

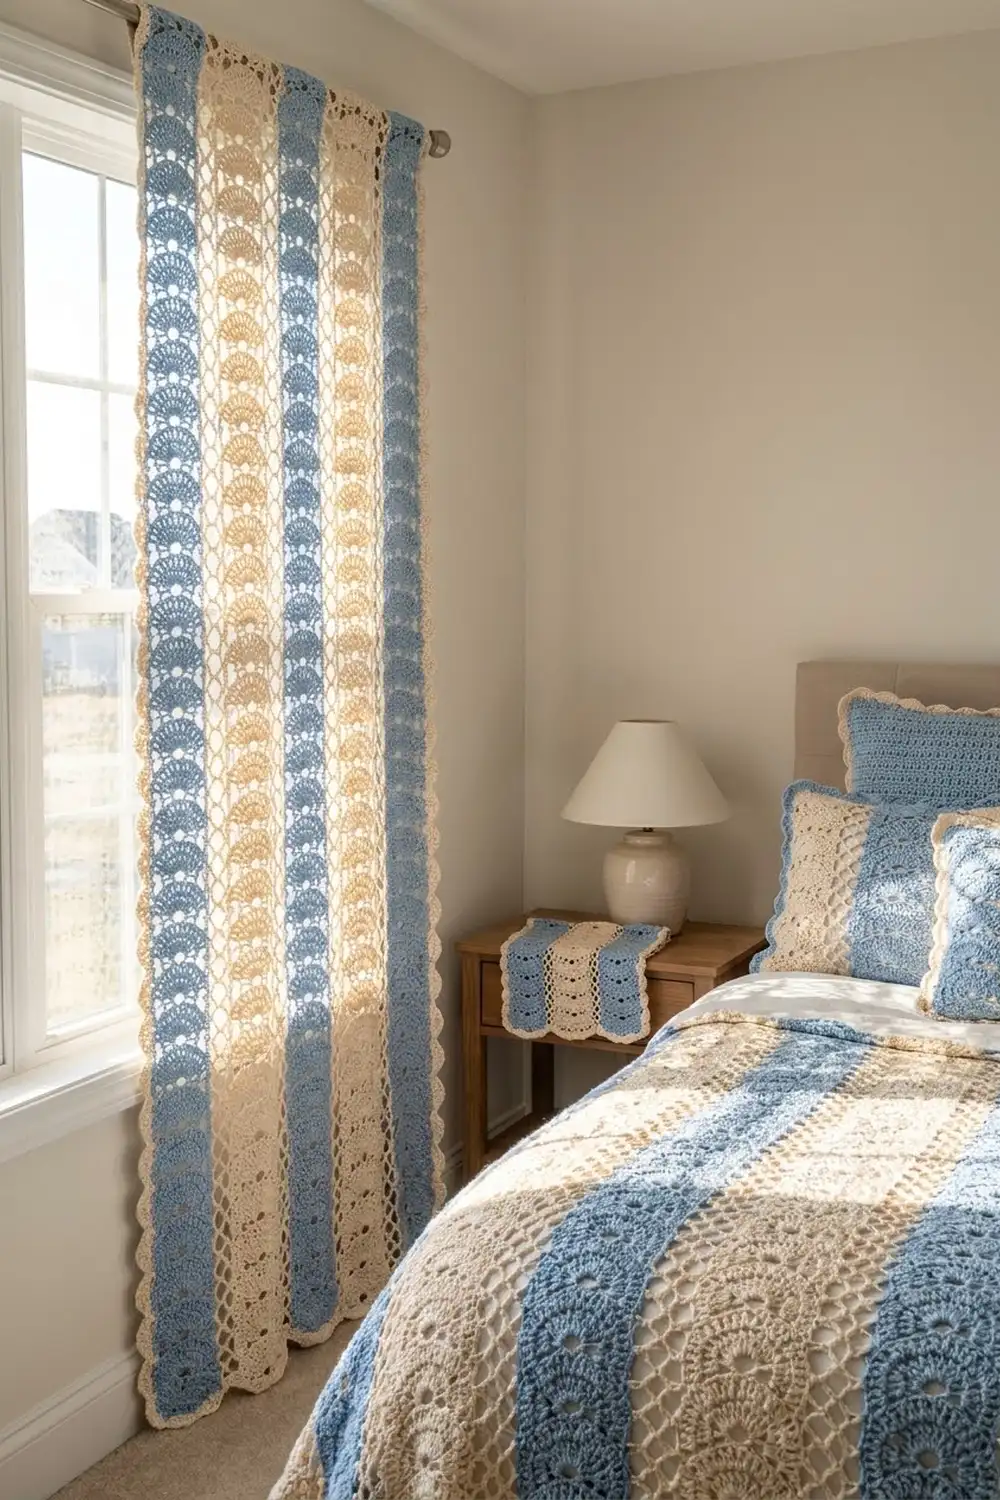
The Bluebell Cascade curtain is a tall, airy panel made from narrow strips of stacked fans. Powder blue strips alternate with cream ones. A light cream lattice runs between every strip, so daylight comes through the open arches between the fans.
The look is soft and cottage-style: one motif repeated over and over, two calm colors, and plenty of open space. This pattern uses US crochet terms throughout.
The finished panel measures 49.25 in x 78 in (125.1 cm x 198.1 cm) including the border. That is long enough to hang from clip rings at a standard window and reach the floor.
The construction is easy to manage. You crochet nine separate strips in rows and give each strip a two-round edging. You join the strips as you go on the second edging round, then finish with a two-round scalloped border.
Finished Size and Construction
- Finished size: 49.25 in x 78 in (125.1 cm x 198.1 cm)
- Skill level: Intermediate
- Terminology: US crochet terms
- Yarn weight: DK (weight 3) cotton or cotton blend
- Hook: 4.0 mm (US G-6)
- Number of pieces: 9 strips
- Layout: 9 strips side by side, 1 strip tall
- Strip size before edging: 4 in x 75 in (10.2 cm x 190.5 cm)
- Strip size after edging: 5.25 in x 76 in (13.3 cm x 193.0 cm)
- Size before border: 47.25 in x 76 in (120.0 cm x 193.0 cm)
- Border depth: 1 in (2.5 cm) on every side
Materials
Choose a smooth, mercerized DK cotton or a cotton-linen blend. Cotton hangs straight and shows the fan texture clearly. It also stands up to sunlight and washing better than acrylic. Avoid fuzzy yarns, because they blur the open arches.
- Color A, powder blue: 400 g / 960 m (1,050 yd)
- Color B, cream: 500 g / 1,200 m (1,312 yd)
These amounts assume a yarn of about 120 m per 50 g. They include a margin of roughly 15 percent for gauge differences and tails.
Tools:
- 4.0 mm (US G-6) crochet hook
- Tapestry needle
- Stitch markers
- Measuring tape
- Rust-proof pins and a large blocking surface (or a clean bed covered with towels)
- Spray bottle
- Curtain clip rings for hanging
Abbreviations (US Terms)
- ch – chain
- sl st – slip stitch
- sc – single crochet
- dc – double crochet
- sp – space
- st(s) – stitch(es)
- tch – turning chain
- RS / WS – right side / wrong side
- rep – repeat
Special stitches:
- Fan: 9 dc in the same st or sp.
- V-st: (dc, ch 3, dc) in the same st.
- Corner fan: 7 dc in the same corner sp (border only).
Gauge and Checkpoints
Gauge matters here because nine strips multiply any small error. Make Rows 1–15 of one strip as a test piece before you commit to all nine.
- Width: One strip measures 4 in (10.2 cm) across the widest fan.
- Height: One fan row plus one V-st row (one “tier”) measures 1.25 in (3.2 cm).
- Test piece: After Row 15 (8 fans), the strip measures about 10 in (25.4 cm) tall.
If your strip is too wide or too tall, go down to a 3.75 mm hook. If it is too narrow or too short, go up to a 4.5 mm hook. For a curtain, height matters more than width, so match the tier height first. Being off by 0.25 in (0.6 cm) per tier adds up to 15 in (38.1 cm) over a full strip.
Later checkpoints:
- After Row 59 (30 fans): about 37.5 in (95.3 cm)
- After Row 120: 4 in x 75 in (10.2 cm x 190.5 cm)
- After Edging Rnd 2: 5.25 in x 76 in (13.3 cm x 193.0 cm)
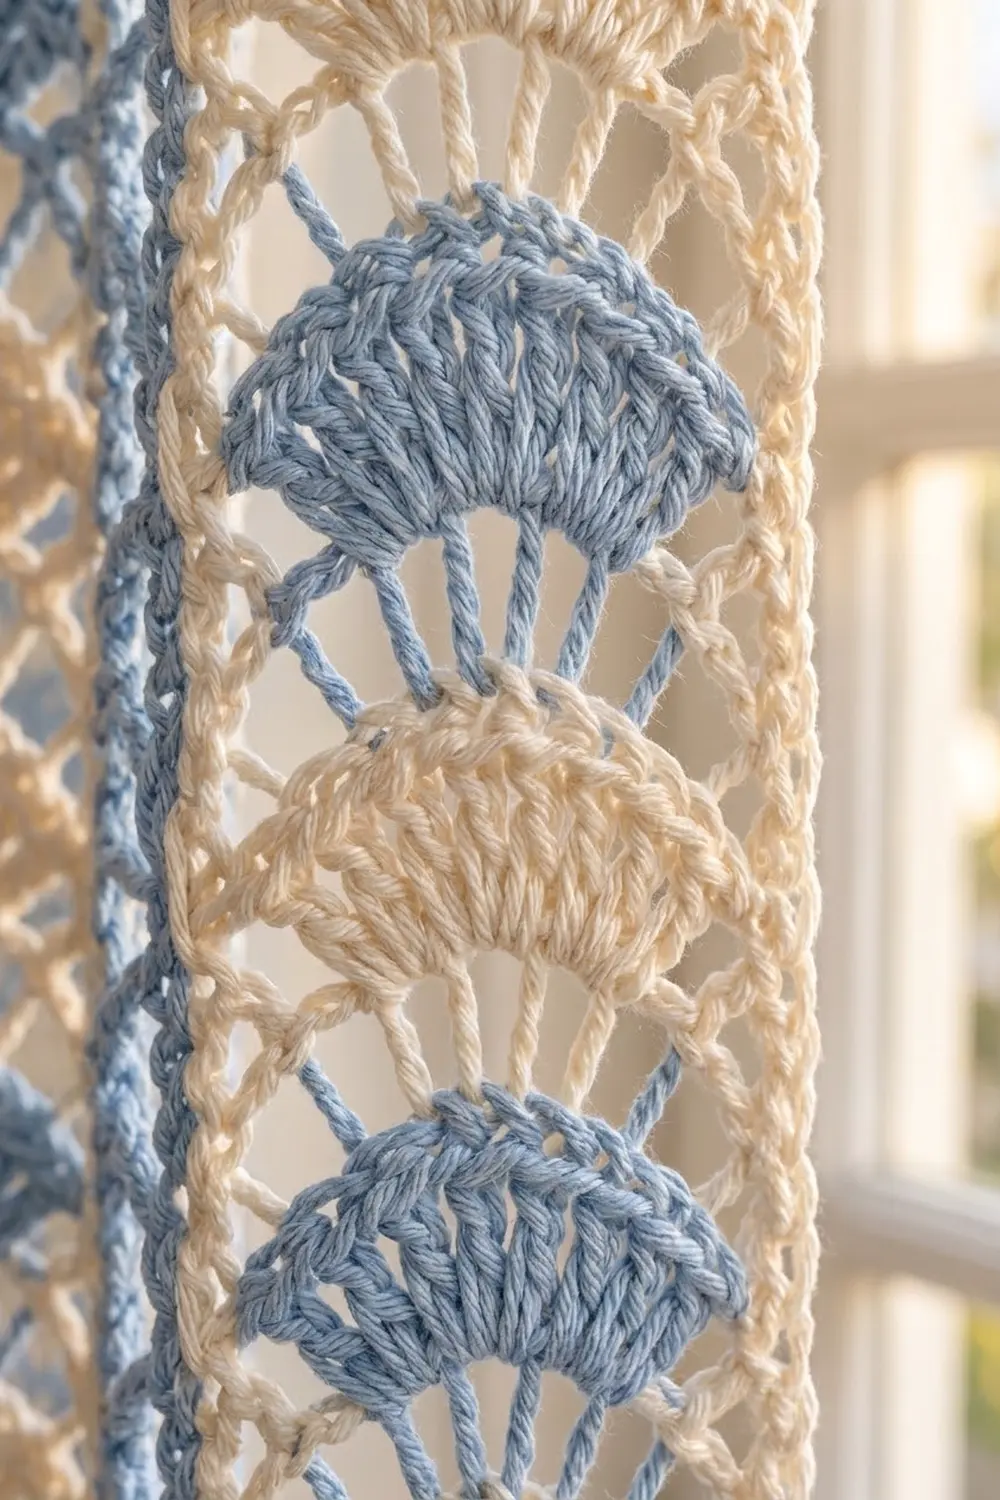
Strip (Make 9)
Work Rows 1–120 and Edging Rnd 1 of each strip in that strip’s main color (A or B). Always work Edging Rnd 2 in B.
Foundation: Ch 17.
Row 1 (RS, fan row): Dc in 4th ch from hook (skipped 3 ch count as first dc), ch 3, skip next 5 ch, fan in next ch, ch 3, skip next 5 ch, dc in last 2 ch, turn. (13 dc: 2 edge dc + 9 fan dc + 2 edge dc; 2 ch-3 sps)
Row 2 (WS, V row): Ch 3 (counts as dc), dc in next dc, ch 3, skip ch-3 sp and next 4 fan dc, V-st in next dc (the 5th, center fan dc), ch 3, skip next 4 fan dc and ch-3 sp, dc in next dc, dc in top of tch, turn. (6 dc; 3 ch-3 sps, including the one inside the V-st)
Row 3 (RS, fan row): Ch 3 (counts as dc), dc in next dc, ch 3, skip ch-3 sp and first dc of V-st, fan in ch-3 sp of V-st, ch 3, skip second dc of V-st and next ch-3 sp, dc in next dc, dc in top of tch, turn. (13 dc; 2 ch-3 sps)
Each new fan sits right on the center of the fan below it. This stacks the fans into one straight column with an open arch on each side.
Rows 4–119: Rep Rows 2–3 fifty-eight more times. Row 119 is a fan row. (60 fans total)
Row 120 (WS): Ch 1, sc in first 2 dc, sc in ch-3 sp, sc in each of 9 fan dc, sc in ch-3 sp, sc in next dc, sc in top of tch. (15 sc)
Do not fasten off.
Edging Rnd 1 (strip’s main color)
Rnd 1: Ch 1, turn so the RS faces you. Sc in each of 15 sc across the top, ch 2 (corner), rotate the strip. Working down the long side, sc around the end of Row 120, then 2 sc around each of the 119 dc row ends. (239 sc) Ch 2 (corner). Working into the foundation chain, sc in each of the 15 ch that sit under Row 1 (ignore the 2 ch of the beginning ch-3). Ch 2 (corner). Work 239 sc up the second long side the same way. Ch 2, sl st to first sc. Fasten off.
(508 sc: 15 + 239 + 15 + 239; plus 4 ch-2 corner sps)
Edging Rnd 2 (B, lattice round)
Work this round in full on Strip 1 only. Strips 2–9 are joined on this round (see Joining).
Rnd 2: With RS facing, join B with a sl st in any corner ch-2 sp. Ch 1, (sc, ch 2, sc) in same sp.
- Short side: Sc in each of 15 sc, (sc, ch 2, sc) in corner sp.
- Long side: Sc in first sc, *ch 3, skip 1 sc, sc in next sc; rep from * 118 more times (last sc lands in the 239th sc), (sc, ch 2, sc) in corner sp.
Continue around until you have worked the last side, then sl st to the first sc. Fasten off.
(Each short side: 17 sc, counting the 2 corner sc. Each long side: 122 sc, counting the 2 corner sc, plus 119 ch-3 loops. Round total: 278 sc, 238 ch-3 loops, 4 ch-2 corner sps.)
The 2 corner sc are included in each side’s count. The ch-2 corner sps are not counted on any side.
Make All Pieces
- Color A (blue): 5 strips
- Color B (cream): 4 strips
- Edging Rnd 2: B on all 9 strips
Layout (left to right):
| A | B | A | B | A | B | A | B | A |
Lay the strips out before joining. Check that every strip has its foundation edge at the bottom so all the fans point upward.
Joining
Join as you go on Edging Rnd 2. Complete Rnd 2 fully on Strip 1. On Strip 2, work Rnd 2 as written until you reach the long side that will sit next to Strip 1.
Joined corner: In the corner sp, sc, ch 1, sl st in the matching corner ch-2 sp of the neighboring strip, ch 1, sc in same sp of the current strip.
Joined long side: Sc in first sc, *ch 1, sl st in the matching ch-3 loop of the neighbor, ch 1, skip 1 sc, sc in next sc; rep from * 118 more times. Work the second joined corner, then finish the round normally.
Join Strip 3 to Strip 2 the same way, and continue through Strip 9.
Stitch-to-stitch logic: Each long side has exactly 119 loops. Every loop on the new strip meets one loop on the old strip, and the two corner sps meet each other. Nothing is added or skipped at the seam. The ch 1 + sl st + ch 1 combination keeps each joined loop the same length as an unjoined ch-3.
Tension: Keep the sl st loose and don’t pull the ch-1s tight. Lay the work flat every 20 loops. Check that the two strips sit level and the lattice forms an even zigzag.
Size checkpoint: The joined panel measures 47.25 in x 76 in (120.0 cm x 193.0 cm), which is 9 strips x 5.25 in (13.3 cm).
Border
Border gauge: Border Rnd 1 settles at about 3.2 sts per inch (13 sts = 4 in / 10.2 cm) on both the short and long edges.
Rnd 1 (B): With RS facing, join B with a sl st in the first sc after the top right outer corner. Ch 1, sc in same sc.
- Short sides: Sc in each sc of each strip’s short side. At each seam, skip the two joined corner sps completely; the sl st has already closed them. (9 strips x 17 sc = 153 sc)
- Outer corners: Ch 2. The sc on each side of this ch-2 are the strips’ own corner sc.
- Long sides: Sc in each sc and 1 sc in each ch-3 loop. (122 sc + 119 sc in loops = 241 sc)
Ch 2 for the last corner, then sl st to first sc. Fasten off. (788 sc: 153 + 241 + 153 + 241; plus 4 ch-2 corner sps)
Rnd 2 (B, fan scallops): Join B with a sl st in any corner ch-2 sp. Ch 3 (counts as dc), 6 dc in same sp (corner fan).
- Each side: Sc in first sc, *skip 1 sc, 5 dc in next sc, skip 1 sc, sc in next sc; rep from * across. The last sc lands in the last st before the corner.
- Each corner: Corner fan in ch-2 sp.
Sl st to top of beginning ch-3. Fasten off.
(Short sides: 38 scallops and 39 sc each. Long sides: 60 scallops and 61 sc each. Plus 4 corner fans.)
Why the math works: Each scallop uses 4 sts, and one more sc closes the side, so every side needs a multiple of 4 plus 1. The short side is 153 = (4 x 38) + 1, and the long side is 241 = (4 x 60) + 1. Every side starts and ends with a sc, so the corner fans sit neatly between them.
The border adds 1 in (2.5 cm) per side. That takes the panel from 47.25 in x 76 in (120.0 cm x 193.0 cm) to 49.25 in x 78 in (125.1 cm x 198.1 cm).
Final Blocking
- Weave in all ends along the strip edges or inside the fan stitches, never across the open arches.
- Soak the panel in cool water with a little wool wash for 15 minutes.
- Gently press out the water. Roll the panel in towels and press again. Do not wring.
- Lay it flat on your blocking surface, RS up.
- Pin the corners to 49.25 in x 78 in (125.1 cm x 198.1 cm).
- Pin along each long edge every 4 in (10.2 cm), keeping the edge straight.
- Smooth each strip so the fans are centered and the lattice zigzag is even.
- Pin out each corner fan and spot-check a few edge scallops.
- Let it dry completely before unpinning, usually 24–48 hours.
Final Quality-Control Checklist
- 9 strips, alternating A and B, starting and ending with A
- Every strip has 60 fans pointing upward
- Every long side has 119 lattice loops
- All seams are joined loop to loop, with no skipped or doubled loops
- Panel before border: 47.25 in x 76 in (120.0 cm x 193.0 cm)
- Border Rnd 1: 153 sc per short side, 241 sc per long side
- Border Rnd 2: 38 scallops per short side, 60 per long side, 4 corner fans
- Finished panel: 49.25 in x 78 in (125.1 cm x 198.1 cm)
- All ends woven in securely
Troubleshooting
Fans drift left or right. You probably missed the center dc in a V row. Count 4 dc on each side of the V-st every time.
A strip is shorter than its neighbors. Your tension tightened as you worked. Count the fans first. If the count is right, block that strip harder lengthwise before joining.
The lattice pulls or puckers. Your joining chains are too tight. Loosen the ch-1s, or go up 0.5 mm for Rnd 2 only.
The border ripples. Your sc are too loose for the edge. Go down 0.5 mm for Border Rnd 1 and keep the same counts.
The border cups or pulls in. Go up 0.5 mm for Border Rnds 1 and 2.
A long side has the wrong count. Recount that strip’s 119 loops. One missed loop throws off the 241.
Care
Machine wash cool on a gentle cycle inside a laundry bag, or hand wash. Reshape and dry flat. Avoid tumble drying, which can stretch the panel lengthwise.
Final Notes
The whole curtain follows one chain of measurements. Each strip starts at 4 in x 75 in (10.2 cm x 190.5 cm) and becomes 5.25 in x 76 in (13.3 cm x 193.0 cm) after the edging. Nine joined strips make 47.25 in x 76 in (120.0 cm x 193.0 cm), and the border brings the panel to 49.25 in x 78 in (125.1 cm x 198.1 cm).
If your first strip hits its checkpoints, the rest of the panel will follow. Count your fans, count your loops, and let blocking do the final smoothing.
Happy crocheting!