

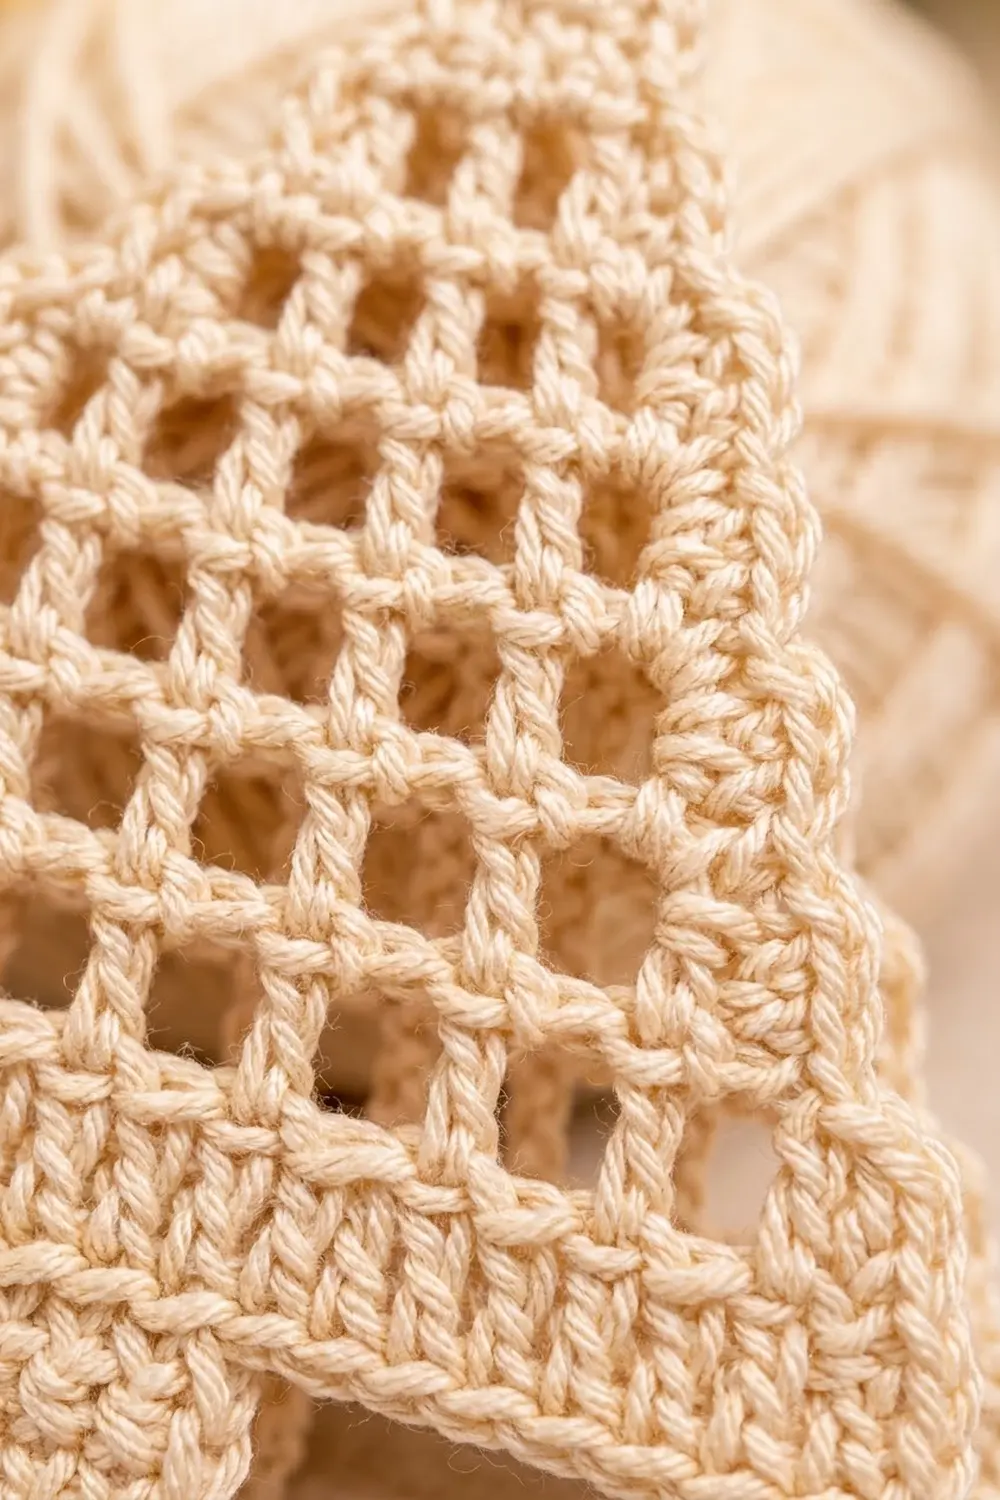
The Hearthside Filet Tree is a flat Christmas tree ornament made of open filet mesh. Its stepped tiers narrow to a single square at the tip. A crisp single-crochet edge traces every step, a small solid trunk anchors the base, and a sturdy loop at the top lets you hang it from a branch, a hook, or a length of twine.
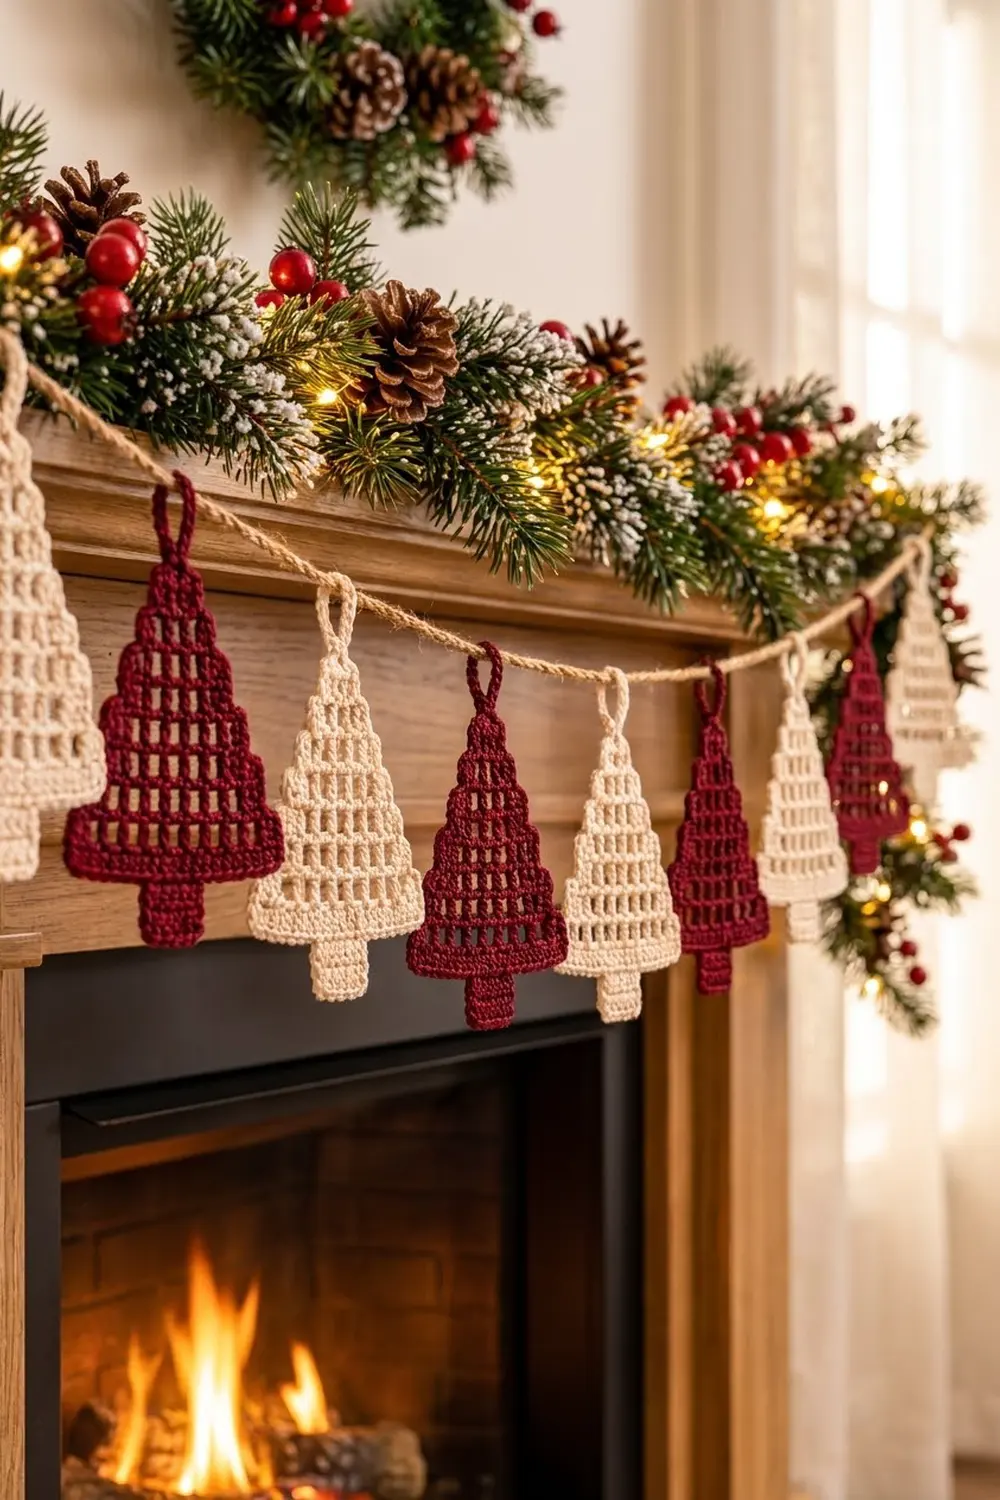
It looks best in classic holiday colors. Deep burgundy gives a rich, traditional look, and cream reads like snow or lace. Make one in each and alternate them for a cozy, Scandinavian-inspired mantel display.
This pattern uses US crochet terms. The finished ornament measures 5¼ in (13.3 cm) wide by 6¼ in (15.9 cm) tall, not counting the hanging loop. The loop adds about 1½ in (3.8 cm), for a total hanging height of about 7¾ in (19.7 cm).
You crochet the tree from the bottom up in filet mesh rows, losing one mesh on each side every two rows. Next, you work one round of single crochet around the whole stepped outline. Then you add the trunk in rows from the center of the bottom edge, and finally the hanging loop.
Finished Size and Construction
- Finished size: 5¼ in (13.3 cm) wide × 6¼ in (15.9 cm) tall, without the loop
- Skill level: Easy / Advanced Beginner
- Terminology: US crochet terms
- Yarn weight: DK / light worsted (#3), cotton or cotton blend
- Hook: 3.5 mm (E-4)
- Number of pieces: 1 (single flat piece)
- Layout: One stepped tree, 9 mesh rows, with trunk and loop
- Size before border: 4¾ in (12.1 cm) wide × 4¾ in (12.1 cm) tall
- Border depth: ¼ in (0.6 cm) on every edge
- Trunk: 1¼ in (3.2 cm) wide × 1 in (2.5 cm) tall
Materials
Yarn: Use a smooth, mercerized DK cotton. Cotton gives the clearest mesh squares and holds a crisp shape after blocking. Avoid fuzzy or very stretchy yarns, because they blur the open squares.
Each ornament uses one color:
- Burgundy version: 15 g (about 35 m) per ornament
- Cream version: 15 g (about 35 m) per ornament
Quantities include a safety margin of about 20% for your gauge swatch, tails, and the hanging loop.
Tools:
- 3.5 mm (E-4) crochet hook
- Tapestry needle
- Scissors
- 2 stitch markers
- Blocking mat and rust-proof pins
- Spray bottle with water
- Optional: fabric stiffener for a firmer ornament
Abbreviations (US Terms)
- ch – chain
- sl st – slip stitch
- sc – single crochet
- dc – double crochet
- sp – space
- st(s) – stitch(es)
- RS – right side
- [ ] – repeat the instructions in brackets the stated number of times
Special stitch – Filet mesh: One mesh is one dc post plus one ch-1 space. A row of n meshes has n + 1 dc posts and n ch-1 spaces, so it is (2 × n) + 1 sts wide. In this pattern, ch 4 at the start of a row counts as 1 dc + ch 1.
Mesh decrease (start of row): Turn, sl st in the first ch-1 sp, sl st in the next dc. This moves you in one full mesh. At the end of the same row, leave the last mesh unworked.
Gauge and Checkpoints
Gauge in filet mesh: 4 meshes (8 sts) = 2 in (5.1 cm) wide, and 4 dc rows = 2 in (5.1 cm) tall. Each mesh is ½ in (1.3 cm) square.
Gauge in sc: 4 sc = 1 in (2.5 cm), and 5 sc rows = 1 in (2.5 cm).
Make one tree first and check it against these measurements:
- After Row 2: 4¾ in (12.1 cm) wide × 1¼ in (3.2 cm) tall
- After Row 4: 2¼ in (5.7 cm) tall; this tier is 3¾ in (9.5 cm) wide
- After Row 6: 3¼ in (8.3 cm) tall; this tier is 2¾ in (7.0 cm) wide
- After Row 8: 4¼ in (10.8 cm) tall; this tier is 1¾ in (4.4 cm) wide
- After Row 9: 4¾ in (12.1 cm) tall; the top mesh is ¾ in (1.9 cm) wide
- After the border: 5¼ in (13.3 cm) wide × 5¼ in (13.3 cm) tall
- After the trunk: 6¼ in (15.9 cm) tall
If your piece is too big: Try a 3.25 mm hook, or tighten your ch-1 spaces. Loose chains are the most common cause of oversized filet.
If your piece is too small: Try a 3.75 mm hook. Make sure each dc is pulled fully up to the height of the ch-4 turning chain.
Rows 1–2 are the best early check. If they don’t measure 4¾ in (12.1 cm) wide, change your hook before going further.
Tree Body (Filet Mesh)
Work in rows from the bottom up. Turn at the end of every row.
Foundation Row: Ch 20. Sc in the 2nd ch from hook and in each ch across. Turn. (19 sc)
Row 1: Ch 4 (counts as dc + ch 1), skip the next sc, dc in the next sc. [Ch 1, skip next sc, dc in next sc] 8 times. Turn.
(9 meshes: 10 dc posts, 9 ch-1 sps, 19 sts)
Row 2: Ch 4 (counts as dc + ch 1), dc in the next dc. [Ch 1, dc in next dc] 8 times; the last dc goes into the 3rd ch of the turning ch-4. Turn.
(9 meshes: 10 dc posts, 19 sts)
Row 3 (decrease): Sl st in the first ch-1 sp, sl st in the next dc. Ch 4 (counts as dc + ch 1), dc in the next dc. [Ch 1, dc in next dc] 6 times. Leave the last ch-1 sp and the turning chain unworked. Turn.
(7 meshes: 8 dc posts, 7 ch-1 sps, 15 sts)
Row 4: Ch 4, dc in the next dc. [Ch 1, dc in next dc] 6 times; the last dc goes into the 3rd ch of the turning ch-4. Turn.
(7 meshes: 8 dc posts, 15 sts)
Row 5 (decrease): Sl st in the first ch-1 sp, sl st in the next dc. Ch 4, dc in the next dc. [Ch 1, dc in next dc] 4 times. Leave the last mesh unworked. Turn.
(5 meshes: 6 dc posts, 11 sts)
Row 6: Ch 4, dc in the next dc. [Ch 1, dc in next dc] 4 times; the last dc goes into the 3rd ch of the turning ch-4. Turn.
(5 meshes: 6 dc posts, 11 sts)
Row 7 (decrease): Sl st in the first ch-1 sp, sl st in the next dc. Ch 4, dc in the next dc. [Ch 1, dc in next dc] 2 times. Leave the last mesh unworked. Turn.
(3 meshes: 4 dc posts, 7 sts)
Row 8: Ch 4, dc in the next dc. [Ch 1, dc in next dc] 2 times; the last dc goes into the 3rd ch of the turning ch-4. Turn.
(3 meshes: 4 dc posts, 7 sts)
Row 9 (decrease): Sl st in the first ch-1 sp, sl st in the next dc. Ch 4, dc in the next dc. Leave the last mesh unworked.
(1 mesh: 2 dc posts, 3 sts)
Do not fasten off. You now have four stepped tiers of two rows each, topped by a single-mesh peak. Each step’s ledge is one mesh (½ in / 1.3 cm) wide on each side, which creates the staircase silhouette.
Border
Border gauge: 4 sc per 1 in (2.5 cm) on every edge. A dc row is ½ in (1.3 cm) tall, so 2 sc per dc row-end matches the horizontal gauge exactly.
Round 1: Ch 1. Work sc around the whole outline as described below. On the slip-stitch side of each ledge, you can work into the slip stitches, or work around them into the dc and ch-1 sp underneath. Either way, the count stays the same.
Top: 3 sc in the top of the first dc of Row 9 (corner), 1 sc in the ch-1 sp, 3 sc in the 3rd ch of the turning ch-4 (corner).
(3 sts worked + 4 extra = 7 sc)
Each side (work the first side going down):
- 2 sc in the end of each of the 9 dc rows: 18 sc
- At each of the 4 ledges: 3 sc in the outer edge dc (corner), then 1 sc in the ch-1 sp. Do not add stitches at the inner corner where the next tier begins.
- Ledge total: 4 ledges × (2 sts worked + 2 extra) = 16 sc
- (26 sts worked + 8 extra = 34 sc per side)
Bottom: Work along the underside of the foundation chain. Work 3 sc in the first ch (corner; this also covers the end of the sc Foundation Row), then 1 sc in each of the next 17 ch, then 3 sc in the last ch (corner).
(19 sts worked + 4 extra = 23 sc)
Work the second side going up in the same way (34 sc). Join with a sl st to the first sc. Fasten off.
Round 1 total: 7 + 34 + 23 + 34 = 98 sc (74 sts worked one per stitch or row-end, plus 24 corner extras).
Why the math works: The border adds one sc, ¼ in (0.6 cm), on every edge. Width goes from 4¾ in to 5¼ in (12.1 cm to 13.3 cm), and height goes from 4¾ in to 5¼ in (12.1 cm to 13.3 cm). Only outer corners get the extra 2 sc. Inner corners get none, because they naturally gather fabric and would ruffle if you added stitches there.
Trunk
Count the 23 bottom-edge sc, including the corner sc. The 12th sc is the center. Place a marker in the 10th sc.
Row 1: With the RS facing, join yarn in the marked (10th) sc. Ch 1, sc in the same st and in each of the next 4 sc. Turn. (5 sc)
This leaves 9 sc free on each side of the trunk: 9 + 5 + 9 = 23.
Rows 2–5: Ch 1, sc in each sc across. Turn. (5 sc in each row)
Fasten off. The trunk measures 1¼ in (3.2 cm) wide × 1 in (2.5 cm) tall.
Hanging Loop
Find the top center sc of the border (the 4th of the 7 top sc, sitting above the ch-1 sp).
- Join yarn there and ch 15. Sl st in the same sc to form a loop.
- Turn. Work 22 sc into the loop, enough to cover the chain completely.
- Sl st into the base sc. Fasten off.
This gives the thick, cord-like loop shown in the photo, standing about 1½ in (3.8 cm) tall.
Final Blocking
- Weave in all ends along the sc border, not through the mesh, so they stay hidden.
- Spray the ornament until it is evenly damp, or soak it briefly and press out the extra water in a towel.
- Lay it flat on the blocking mat, RS up.
- Pin the bottom corners 5¼ in (13.3 cm) apart and the peak 5¼ in (13.3 cm) above the bottom edge.
- Pin each ledge corner so that each tier is level and the steps are mirror images left and right.
- Pin the trunk straight so it extends 1 in (2.5 cm) below the body, for 6¼ in (15.9 cm) total.
- Gently square every mesh opening with your fingertip. You can slip a pin through each open square to keep it straight.
- For a stiffer ornament, brush on diluted fabric stiffener now.
- Let it dry completely before unpinning, usually 12–24 hours.
Final Quality-Control Checklist
- Every row has the correct number of meshes: 9, 9, 7, 7, 5, 5, 3, 3, 1.
- All mesh openings are about ½ in (1.3 cm) square.
- The left and right steps mirror each other.
- The border has 98 sc and lies flat, with no ruffles or cupping.
- The trunk is centered, with 9 border sc free on each side.
- The ornament measures 5¼ in (13.3 cm) wide × 6¼ in (15.9 cm) tall.
- The hanging loop is firmly anchored and fully covered.
- All ends are woven in and trimmed.
Troubleshooting
Mesh squares look like tall rectangles: Your dc stitches are too tall for your chains. Pull each dc a little snugger, or use slightly looser ch-1s.
The tree slants to one side: You probably moved in two meshes at a decrease, or forgot to leave one mesh unworked at the end of the row. Count the dc posts after each decrease row: 8, 6, 4, 2.
The border ruffles at the steps: You added extra stitches at the inner corners. Work only the listed count there.
The border cups or pulls: You used fewer than 2 sc per dc row-end. Recount against the 34 sc per side.
The trunk is off-center: Recount the bottom 23 sc, corners included, and rejoin in the 10th sc.
The loop twists or flops: Pack the full 22 sc into the loop so the chain is fully covered.
Care
Hand wash in cool water with mild soap, press out the water gently, and dry flat. Re-block if needed. If you used fabric stiffener, spot clean only.
Final Notes
The measurement chain is simple. Each mesh is ½ in (1.3 cm), so 9 meshes make a 4¾ in (12.1 cm) base. Nine rows plus the sc foundation make the body 4¾ in (12.1 cm) tall. The ¼ in (0.6 cm) border brings the body to 5¼ in (13.3 cm) square, and the 1 in (2.5 cm) trunk brings the total height to 6¼ in (15.9 cm). If your first two rows measure correctly, the rest of the tree will follow. Make one in burgundy, one in cream, and let them glow by the fire.
Happy crocheting!