

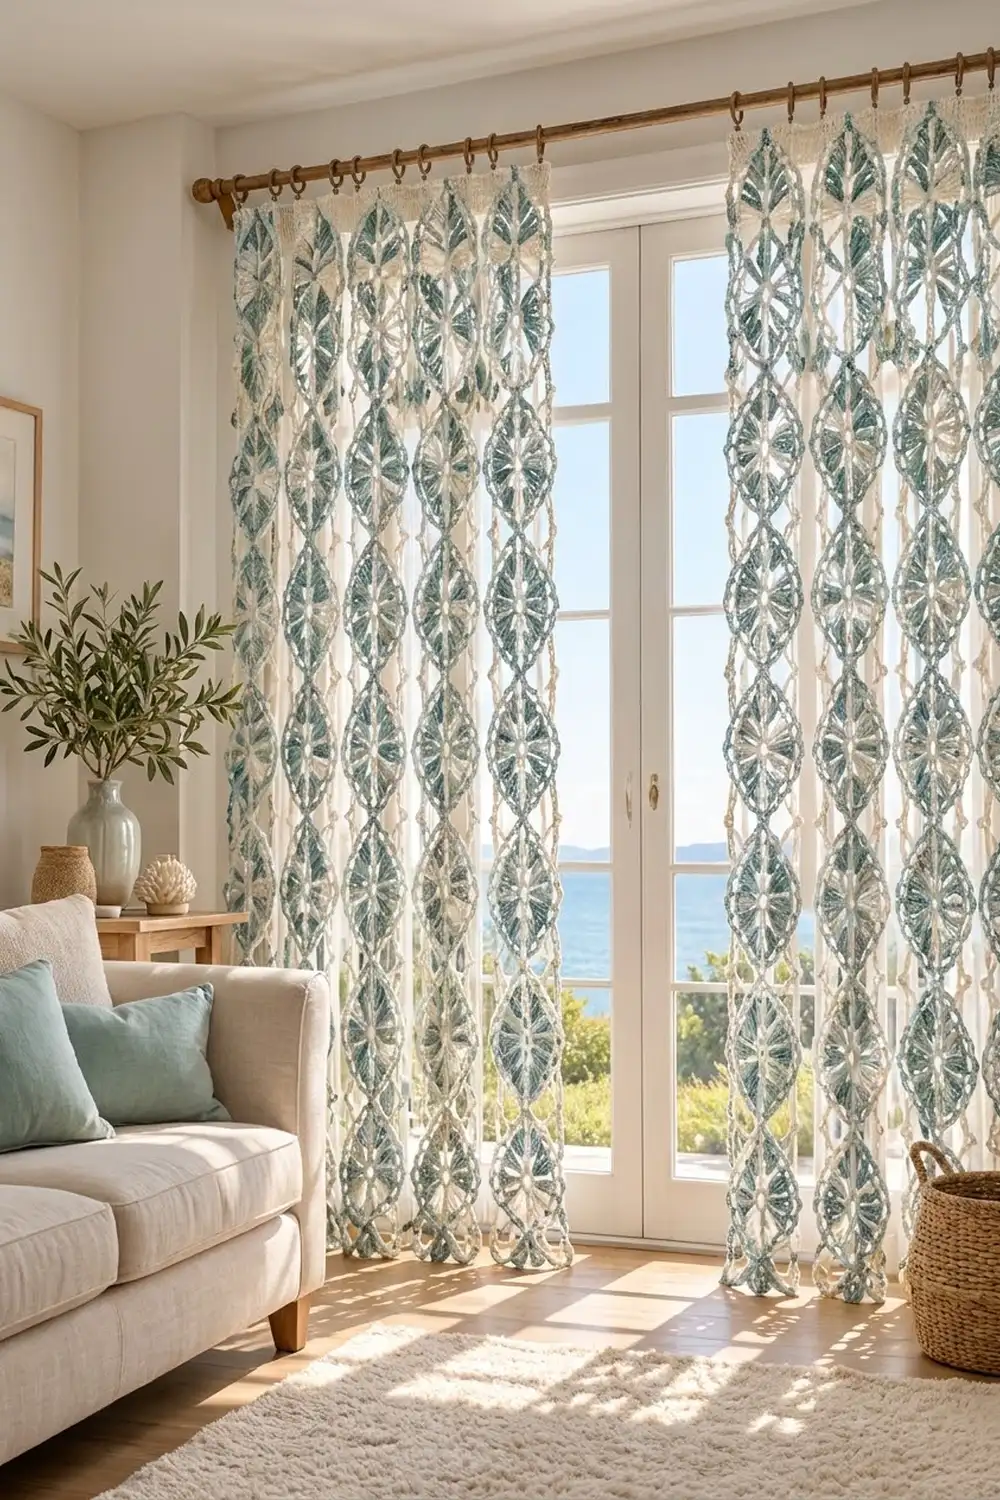
These lace curtain panels are made from pointed oval motifs, each one like a small sea-glass medallion. The motifs line up tip to tip in columns and touch at their widest point, so light comes through the open diamonds between them.
Each motif uses four soft coastal shades: a cream center and edge, dusty teal cluster spokes, sage fans and a pale grey-blue chain outline. Together they look relaxed and airy, which suits a beach house, a sunroom or any bright window.
The pattern uses US crochet terms. Each finished panel measures 24.8 in x 78.8 in (63.0 cm x 200.2 cm) including the border. You make two panels.
To build them, you crochet 156 identical motifs in five rounds, joining them as you go on the last round. Each panel is 6 motifs wide and 13 motifs tall. A two-round border follows the scalloped outline, and the free top tips hold curtain clip rings.
Finished Size and Construction
- Finished panel size: 24.8 in x 78.8 in (63.0 cm x 200.2 cm), make 2
- Skill level: Intermediate
- Terminology: US crochet terms
- Yarn weight: DK (light worsted, #3) cotton or cotton blend
- Hook: 4.0 mm (G-6)
- Number of pieces: 156 motifs (78 per panel)
- Layout per panel: 6 motifs across x 13 motifs down
- Motif size: 4 in x 6 in (10.2 cm x 15.2 cm), measured side point to side point and tip to tip
- Panel size before border: 24 in x 78 in (61.0 cm x 198.1 cm)
- Border depth: 0.4 in (1.0 cm) on each edge
Materials
Use a smooth DK cotton of about 230 m per 100 g. Cotton holds the pointed shape well, hangs without much stretch and washes easily. Avoid fuzzy yarns, because they hide the lace.
- Color A, Cream: 700 g (about 1,610 m), for centers, spines, the last motif round and border Round 1
- Color B, Dusty Teal: 375 g (about 865 m), for the cluster spokes
- Color C, Sage: 375 g (about 865 m), for the fan round
- Color D, Pale Grey-Blue: 525 g (about 1,210 m), for the chain outline and border Round 2
These quantities include a margin of roughly 15-20% for gauge differences and swatching.
Tools: a 4.0 mm (G-6) hook, a tapestry needle, at least 4 stitch markers, scissors, a measuring tape, rust-proof pins, blocking mats, a spray bottle and 12 curtain clip rings (6 per panel).
Abbreviations (US Terms)
- ch – chain
- sl st – slip stitch
- sc – single crochet
- hdc – half double crochet
- dc – double crochet
- tr – treble crochet
- dtr – double treble crochet
- sp(s) – space(s)
- MR – magic ring
- rev sc – reverse single crochet (crab stitch)
Special stitches:
- 3-dc cluster (cl): Yarn over, insert hook in the stitch, pull up a loop, yarn over and pull through 2 loops. Repeat twice more in the same stitch (4 loops on hook). Yarn over and pull through all 4 loops.
- Beginning cluster (beg cl): Ch 2, then work a 2-dc cluster in the same stitch. This counts as a cluster.
- Join point: On Round 5, where the pattern says “ch 3” at a point that touches a finished motif, work ch 1, sl st into the matching ch-3 point of the finished motif, ch 1.
Gauge and Checkpoints
Make one complete test motif before you start the full set, and measure it after each round:
- After Round 1: 1 in (2.5 cm) across.
- After Round 2: 2 in (5.1 cm) across, still round.
- After Round 3: 2.75 in x 4 in (7.0 cm x 10.2 cm), clearly oval.
- After Round 4: 3.5 in x 5.25 in (8.9 cm x 13.3 cm).
- After Round 5: 4 in x 6 in (10.2 cm x 15.2 cm), lightly blocked.
If your motif is too big, go down 0.25-0.5 mm in hook size. If it is too small, go up 0.25-0.5 mm. A motif that is just 0.25 in (0.6 cm) too tall makes a panel 3.25 in (8.3 cm) too long, so fix this before you go on.
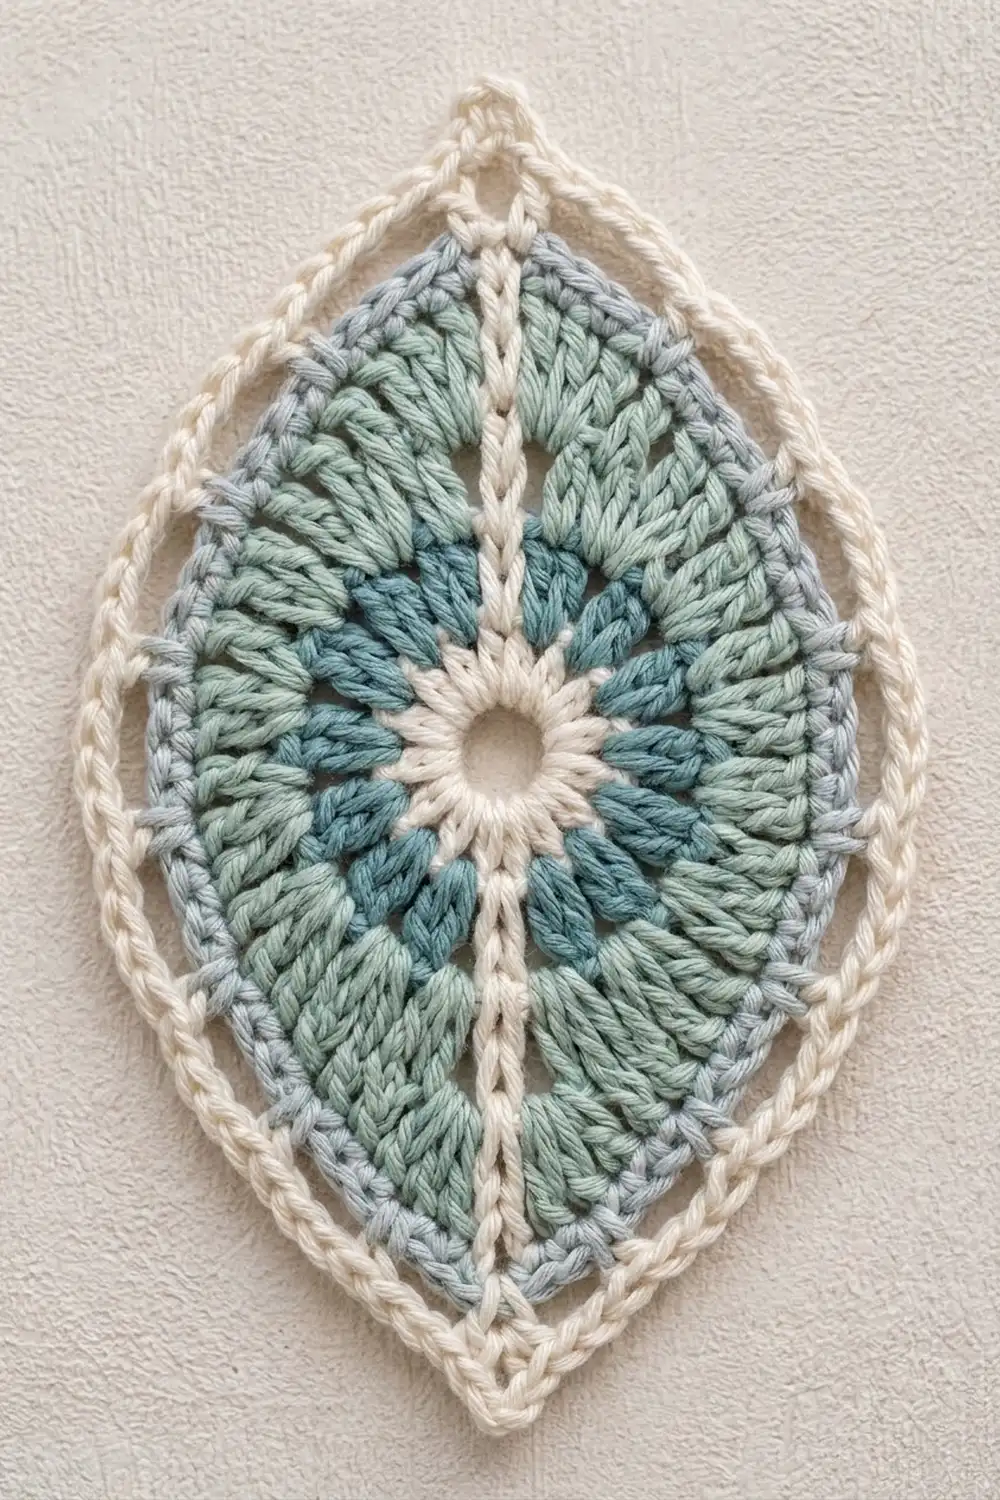
Motif (Make 156)
Work every round with the right side facing. Fasten off at the end of each round.
Round 1 (A): MR, ch 3 (counts as dc), 11 dc in ring, sl st to top of ch-3. Pull the ring snug but leave a small open center. (12 dc)
Round 2 (B): Join B with a sl st in any dc. Beg cl in the same st, ch 3, cl in next dc, ch 3; repeat from * 10 more times, sl st to top of beg cl. (12 clusters, 12 ch-3 sps)*
Mark the beginning cluster as T1 (top tip) and the 7th cluster as T2 (bottom tip). Counting in working order from T1, the ch-3 spaces are sp 1 to sp 12. Sp 1 and sp 12 sit on either side of T1, and sp 6 and sp 7 sit on either side of T2.
Round 3 (C), shaping round: Join C in sp 1.
Ch 4 (counts as tr), 3 tr in sp 1, ch 1, 4 dc in sp 2, ch 1, 4 hdc in sp 3, ch 1, 4 hdc in sp 4, ch 1, 4 dc in sp 5, ch 1, 4 tr in sp 6, ch 2, dtr in top of T2, ch 2.
4 tr in sp 7, ch 1, 4 dc in sp 8, ch 1, 4 hdc in sp 9, ch 1, 4 hdc in sp 10, ch 1, 4 dc in sp 11, ch 1, 4 tr in sp 12, ch 2, dtr in top of T1, ch 2, sl st to top of beg ch-4.
(12 groups of 4 sts + 2 dtr = 50 sts; 10 ch-1 sps; 4 ch-2 sps)
The short hdc groups at the sides and the tall tr groups and dtr tips at the ends are what turn the circle into an almond.
Round 4 (D), chain outline: Join D with a sc between the 2nd and 3rd tr of the sp-1 group (the center of group 1).
*Ch 4, sc in next ch-1 sp, ch 4, sc in center of next group; repeat from * 4 more times (you are now at the center of group 6). Ch 4, skip ch-2 sp, (sc, ch 4, sc) in top of dtr at T2, ch 4, skip ch-2 sp, sc in center of group 7.
**Ch 4, sc in next ch-1 sp, ch 4, sc in center of next group; repeat from ** 4 more times (center of group 12). Ch 4, (sc, ch 4, sc) in top of dtr at T1, ch 4, sl st to first sc.
(26 sc, 26 ch-4 loops)
Number the loops in working order: L1 is the loop just after the joining sc, L12 is the tip loop at T2, and L25 is the tip loop at T1.
Cream spine (A): With the right side facing, surface sl st from the center ring straight up over the T1 cluster and T1 dtr to the base of the T1 tip loop. Fasten off. Repeat from the ring to T2.
Round 5 (A), edge and join round: Join A in L1.
5 sc in each of L1 to L4. 5 sc in L5, ch 3 (side point A). 5 sc in each of L6 to L11. (3 sc, ch 3, 3 sc) in L12 (tip point T2). 5 sc in each of L13 to L18, ch 3 (side point B). 5 sc in each of L19 to L24. (3 sc, ch 3, 3 sc) in L25 (tip point T1). 5 sc in L26, sl st to first sc.
(24 loops x 5 sc + 2 tip loops x 6 sc = 132 sc; 4 ch-3 points)
The 4 points divide the edge into 4 equal quarter-arcs of 33 sc each:
- T1 to side point A: 3 + 5 + 25 = 33 sc
- Side point A to T2: 30 + 3 = 33 sc
- T2 to side point B and side point B to T1: these mirror the first two quarters
Make All Pieces
Work Rounds 1-4 and the spines on all 156 motifs. In each color, that comes to:
- A: 156 centers, 312 spines and 156 Round 5 edges
- B: 156 cluster rounds
- C: 156 fan rounds
- D: 156 outlines
Then work Round 5 one motif at a time as you join.
Layout for one panel (O = one motif, tips pointing up and down):
Row  1:  O O O O O O
Row  2:  O O O O O O
Row  3:  O O O O O O
Row  4:  O O O O O O
Row  5:  O O O O O O
Row  6:  O O O O O O
Row  7:  O O O O O O
Row  8:  O O O O O O
Row  9:  O O O O O O
Row 10:  O O O O O O
Row 11:  O O O O O O
Row 12:  O O O O O O
Row 13:  O O O O O O
Joining
Join as you go on Round 5. At each point that touches a finished motif, work a join point in place of the ch 3.
- Row 1, motif 1: Work Round 5 normally.
- Row 1, motifs 2-6: Join this motif’s side point to the free side point of the motif on its left.
- Rows 2-13, column 1: Join T1 to T2 of the motif directly above.
- Rows 2-13, columns 2-6: Join T1 to T2 of the motif above, and join the side point to the motif on the left.
Each motif has at most two joins, and each join replaces exactly one ch 3. No stitches are added or lost, so every motif keeps its 132 sc. Four motifs never meet at one point, so the open diamonds stay open.
Tension: Keep the ch 1 on each side of each join loose and even. Tight joins pull the columns together and narrow the panel. Loose joins make the tips gap and the panel stretch when it hangs.
Size checkpoint: A 2 x 2 block should measure 8 in x 12 in (20.3 cm x 30.5 cm). A completed row of 6 should measure 24 in (61.0 cm) across. The finished panel should measure 24 in x 78 in (61.0 cm x 198.1 cm) before the border.
Border
Border gauge: 1 sc round + 1 rev sc round = 0.4 in (1.0 cm) deep.
The outer edge is scalloped, and it has three kinds of points:
- Free points: tips or side points that face outward.
- Valleys: joined points where two motifs meet on the edge.
- Corner points: the outer side points of the 4 corner motifs.
Each edge is built from the 33-sc quarters:
- Top edge: 6 motifs x 2 upper quarters x 33 = 396 sc, with 6 free tips and 5 valleys.
- Bottom edge: 396 sc, with 6 free tips and 5 valleys.
- Left edge: 11 middle motifs x 66 sc + 2 corner motifs x 33 sc = 792 sc, with 11 free side points and 12 valleys. Each corner motif gives only one quarter to this edge, because its other outer quarter belongs to the top or bottom edge.
- Right edge: 792 sc, with 11 free side points and 12 valleys.
Border Round 1 (A): With the right side facing, join A in the top-left corner point and work 3 sc in it. Then work around the panel as follows, ending with a sl st to the first sc:
- sc in each sc
- 3 sc in each free ch-3 point and each corner point
- at each valley, skip the joined point and go straight from the last sc before it to the first sc after it (no stitches added)
Round 1 counts:
- Top and bottom edges: 396 + (6 x 3) = 414 sc each
- Left and right edges: 792 + (11 x 3) = 825 sc each
- Corners: 4 x 3 = 12 sc
- Total: 414 + 414 + 825 + 825 + 12 = 2,490 sc
Border Round 2 (D): Join D in any sc. Ch 1, rev sc in each sc around, sl st to first st. Fasten off. (2,490 rev sc)
Why the math works:
- Along the curves, the border sits 1:1 on the motif stitches, so it neither gathers nor ruffles.
- The points that stick out need extra length, so they get 3 sc.
- The valleys curve inward, so skipping the joined point stops them from bunching.
- Every edge is a whole number of 33-sc quarters, so both panels come out the same.
Final Blocking
- Weave in all ends through at least 2 in (5.1 cm) of stitches in the matching color.
- Lay the panel on blocking mats, one half at a time.
- Pin each column straight, with a pin at every tip join and every side point.
- Check that each motif measures 4 in x 6 in (10.2 cm x 15.2 cm) and that the panel is 24.8 in (63.0 cm) wide.
- Mist evenly until damp, without soaking.
- Let it dry completely, then unpin and block the second half the same way.
- Clip 6 curtain rings to the top tips of each panel.
Final Quality-Control Checklist
- Every motif has 132 sc and 4 ch-3 points.
- All tips point straight up and down.
- The cream spines are straight and centered.
- No joins are missed or doubled.
- Border Round 1 has 2,490 sc and lies flat at the valleys.
- Each panel measures 24.8 in x 78.8 in (63.0 cm x 200.2 cm).
- No ends show on the front.
Troubleshooting
- Motif is round, not oval: Check that Round 3 uses hdc at the sides and tr at the ends, with dtr tips.
- Tips are blunt: Check for a ch-2 on both sides of each dtr, and for (sc, ch 4, sc) in each dtr on Round 4.
- Motif cups: Your Round 3 is too tight. Go up 0.25 mm for that round.
- Motif ruffles: Your Round 4 chains are too loose. Work them a little tighter.
- Panel too narrow: Relax the ch 1 on each side of every join.
- Border waves: Recount each edge against the totals above.
Care
Hand wash, or machine wash in a mesh bag on a cool, gentle cycle. Lay flat to dry and reshape the points while damp.
Final Notes
Everything in this pattern follows from one chain of measurements:
- One motif is 4 in x 6 in (10.2 cm x 15.2 cm), with 132 sc in four 33-sc quarters.
- Six motifs across and thirteen down make a 24 in x 78 in (61.0 cm x 198.1 cm) panel.
- A 0.4 in (1.0 cm) border brings each panel to 24.8 in x 78.8 in (63.0 cm x 200.2 cm).
Get your first motif to gauge and everything after it falls into place.
Happy crocheting!