

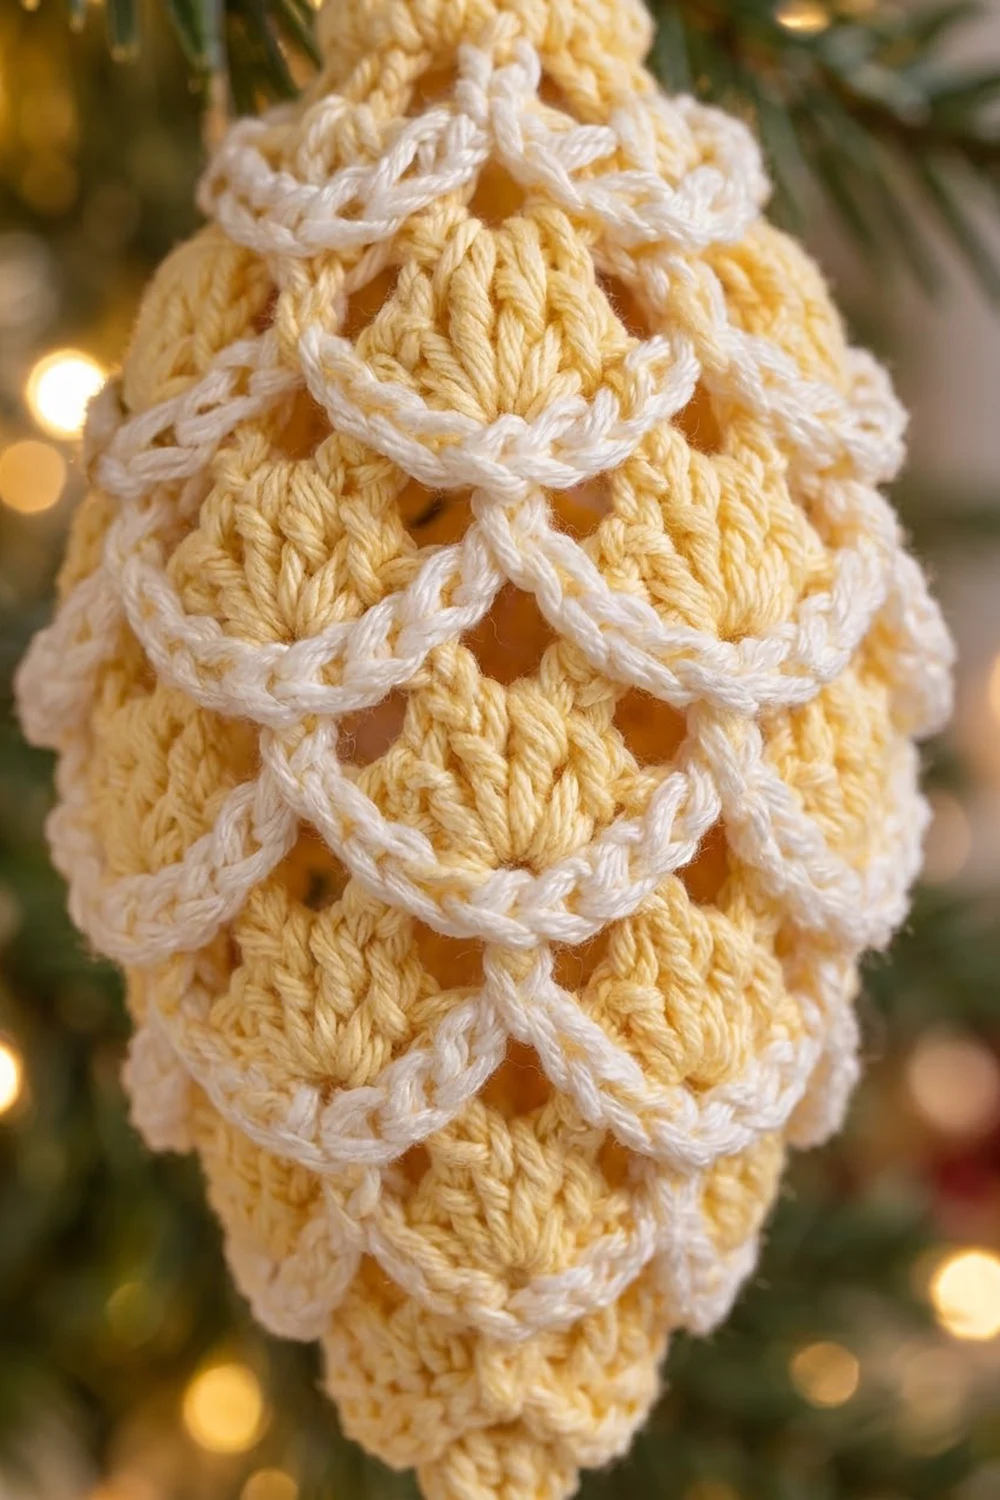
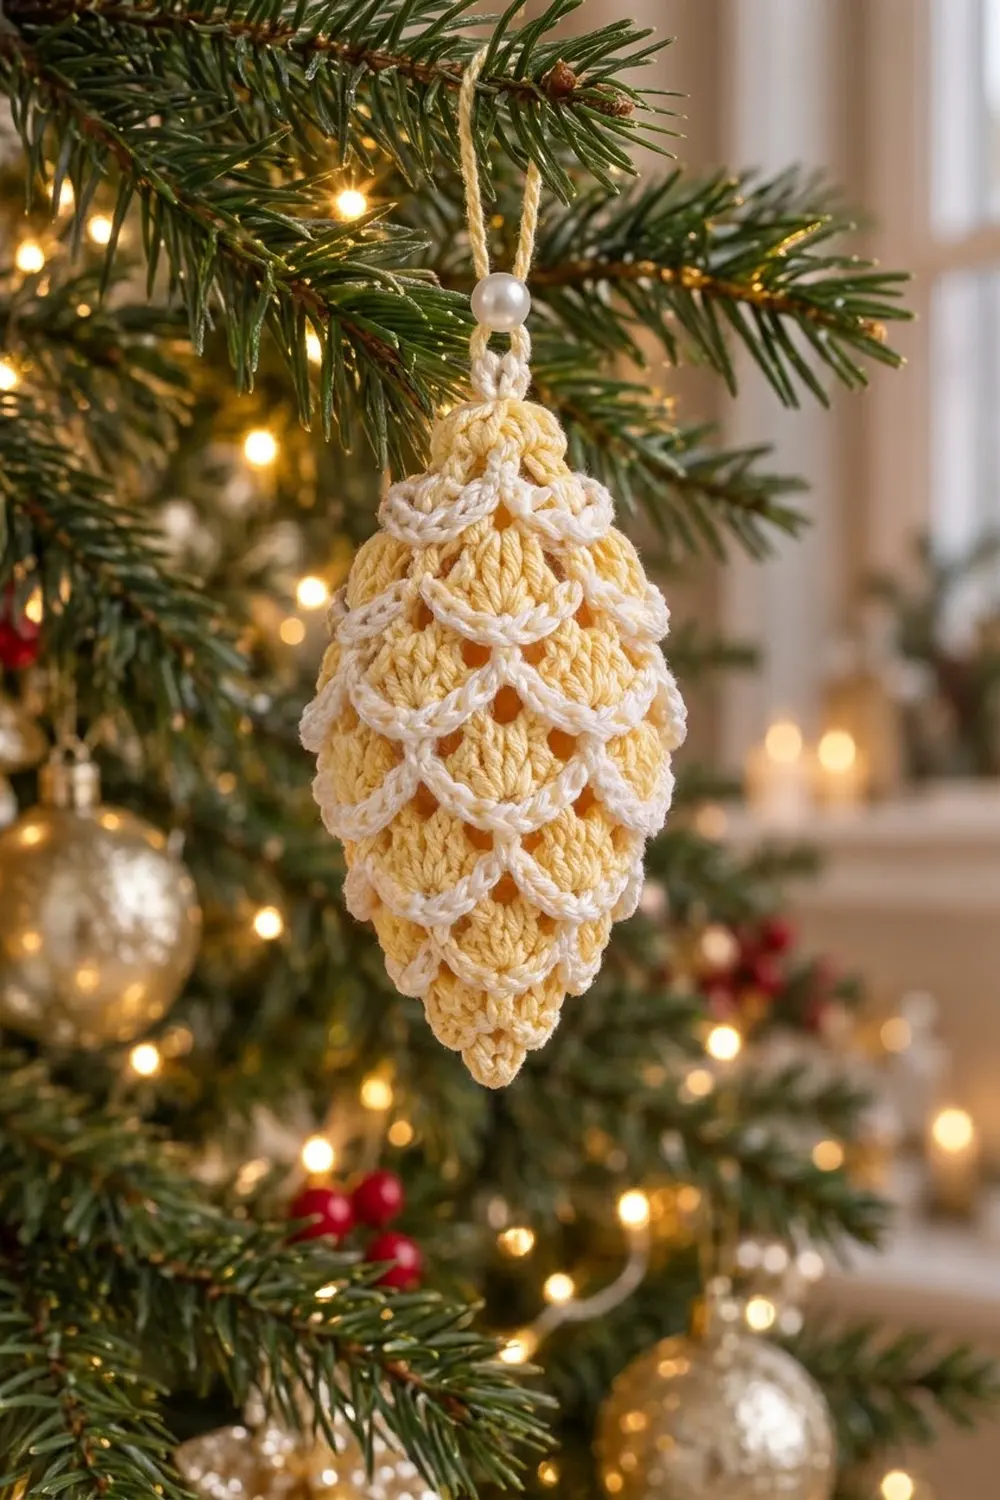
The Buttercream Pinecone is a small, textured Christmas ornament made of soft butter-yellow shell scales, each one outlined with a crisp white rim. The tiers of scales overlap and alternate like a real pinecone, so the ornament looks detailed from every side while it hangs on the tree.
It uses two colors: pale butter yellow for the body and bright white for the scale rims. A single pearl bead sits where the hanging loop meets the top. The look is warm, vintage, and a little elegant. It suits a neutral, gold, or cream tree.
The pattern uses US crochet terms. The finished ornament is 3.5 in (8.9 cm) tall without the loop and 2.25 in (5.7 cm) wide at the widest point. With the loop, it measures about 5 in (12.7 cm) from top to tip.
You work it as one piece, top down, in joined rounds. Each tier has three rounds: a yellow mesh round, a yellow shell round, and a white rim round. The shells stay at six per tier while their size changes, which makes the cone shape. The bottom is lightly stuffed and closed with a few short decrease rounds.
Finished Size and Construction
- Finished size: 3.5 in (8.9 cm) tall × 2.25 in (5.7 cm) wide; about 5 in (12.7 cm) including the loop
- Skill level: Intermediate
- Terminology: US crochet terms
- Yarn weight: Fingering (#1) mercerized cotton
- Hook: 2.5 mm (US B/1 or C/2, depending on brand)
- Number of pieces: 1 (single 3D ornament)
- Layout: Worked top down in the round; 6 tiers of 6 scales each, staggered
- Piece size: 3.5 in (8.9 cm) × 2.25 in (5.7 cm)
- Size before rims: About 3.25 in (8.3 cm) tall × 2 in (5.1 cm) wide
- Rim (border) depth: About 0.125 in (0.3 cm) per scale
Materials
Mercerized cotton gives the cleanest scale edges and the brightest white rims. Soft acrylic will work, but the scales won’t hold their fan shape as well. The quantities below assume a 50 g ball with about 170 m (186 yd) of yarn.
- Color Y (butter yellow): 15 g, about 51 m (56 yd), including a little extra for stuffing scraps
- Color W (white): 5 g, about 17 m (19 yd)
Both quantities include a margin of roughly 20 percent.
Tools:
– 2.5 mm crochet hook
– One 6 mm white pearl bead with a hole large enough for doubled yarn
– Yarn needle
– Stitch marker
– Scissors
– Spray starch (optional)
– About 6 in (15.2 cm) of Y yarn scraps, or a pinch of cream fiberfill, for light stuffing
Abbreviations (US Terms)
- ch – chain
- sl st – slip stitch
- sc – single crochet
- dc – double crochet
- sc2tog – single crochet 2 together
- rsc – reverse single crochet (crab stitch)
- BPsc – back post single crochet
- sp – space
- st(s) – stitch(es)
Special stitches:
- Shell: the stated number of dc all worked into the same ch-loop.
- BPsc: insert your hook from the back to the front to the back around the post of the stitch, yarn over, pull up a loop, then yarn over and pull through 2 loops. Working around the post of a shell’s center dc places the anchor behind that shell. This is what makes the next tier tuck underneath like a real scale.
- Standing BPsc: with a slipknot already on the hook, work a BPsc as normal.
- rsc: work single crochet from left to right. This creates the twisted, cord-like white rim.
Gauge and Checkpoints
Gauge is not critical for an ornament, but it controls the final size. Work Tier 1 (Rounds 1–5) first as your test piece.
- After Round 2: the disk measures 0.75 in (1.9 cm) across.
- After Round 5 (Tier 1 rimmed): the top cap measures about 1 in (2.5 cm) wide.
- One 9-dc shell with its rim (Tier 3): about 1.1 in (2.8 cm) along the curved edge.
If your piece is too big, go down to a 2.25 mm hook. If it’s too small, go up to a 2.75 mm hook. Don’t add or remove dc in the shells, because the shaping depends on the shell sizes.
Pattern
Hanging Loop and Top
Thread the pearl bead onto Y before you start, and slide it about 12 in (30.5 cm) down the yarn.
Round 1 (Y): Make a magic ring. Ch 1, then work 6 sc into the ring. Join with a sl st to the first sc. Leave the ring slightly open for now. (6 sts)
Round 2: Ch 1, then work 2 sc in each st around. Join. (12 sts)
Tier 1
Round 3 (mesh): Ch 1. Sc in the next st, ch 3, skip 1 st. Repeat from * 6 times. Join to the first sc. (6 sc + 6 ch-3 sps)
Round 4 (shells): Sl st into the first ch-3 sp. Ch 3 (this counts as a dc), then work 4 dc in the same sp. Sc in the next sc. Work 5 dc in the next ch-3 sp, then sc in the next sc. Repeat from * 4 more times. Join to the top of the beginning ch-3. Fasten off Y. (30 dc + 6 sc = 36 sts; six 5-dc shells)
Round 5 (rim, W): Join W in the last dc of any shell. Ch 1. Working left to right, rsc in each of the 5 dc of the shell, ch 1, skip the sc between shells. Repeat from * 6 times. Join and fasten off. (30 rsc + 6 ch-1)
Checkpoint: the cap measures 1 in (2.5 cm) wide.
Tiers 2 to 6: The Repeat
Every remaining tier uses the same three rounds. Only the chain length (L) and the shell size (n) change.
- Mesh round (Y): Make a standing BPsc around the center dc of any shell in the previous tier. Ch L, then BPsc around the center dc of the next shell. Repeat from * 4 more times. Ch L, then join to the first BPsc. (6 BPsc + 6 ch-L loops)
- Shell round (Y): Sl st into the first loop. Ch 3 (this counts as a dc), then work n − 1 dc in the same loop. Sc in the next BPsc. Work n dc in the next loop, then sc in the next BPsc. Repeat from * 4 more times. Join, then fasten off Y. (6n dc + 6 sc)
- Rim round (W): Join W in the last dc of any shell. Ch 1. Rsc in each dc of the shell, ch 1, skip the sc. Repeat around, then join and fasten off. (6n rsc + 6 ch-1)
Because each loop runs from one shell’s center to the next shell’s center, the middle of each loop sits under a gap in the tier above. That gives you the staggered, brick-like scales.
The center dc is the 3rd dc of a 5-dc shell, the 4th of a 7-dc shell, and the 5th of a 9-dc shell.
Tier 2 (Rounds 6–8): L = 5, n = 7.
– Round 6: 6 BPsc + 6 ch-5
– Round 7: 42 dc + 6 sc = 48 sts
– Round 8: 42 rsc + 6 ch-1
Tier 3 (Rounds 9–11): L = 6, n = 9.
– Round 9: 6 BPsc + 6 ch-6
– Round 10: 54 dc + 6 sc = 60 sts
– Round 11: 54 rsc + 6 ch-1
Checkpoint: 2 in (5.1 cm) wide and 1.75 in (4.4 cm) from the top.
Tier 4 (Rounds 12–14): L = 6, n = 9.
– Round 12: 6 BPsc + 6 ch-6
– Round 13: 54 dc + 6 sc = 60 sts
– Round 14: 54 rsc + 6 ch-1
Checkpoint: the widest point, 2.25 in (5.7 cm), at about 2.25 in (5.7 cm) from the top.
Tier 5 (Rounds 15–17): L = 5, n = 7.
– Round 15: 6 BPsc + 6 ch-5
– Round 16: 42 dc + 6 sc = 48 sts
– Round 17: 42 rsc + 6 ch-1
Tier 6 (Rounds 18–20): L = 3, n = 5.
– Round 18: 6 BPsc + 6 ch-3
– Round 19: 30 dc + 6 sc = 36 sts
– Round 20: 30 rsc + 6 ch-1
Checkpoint: 3.25 in (8.3 cm) tall.
Stuffing and Closing
Weave all the tails to the inside now. Wad up the Y scraps or the fiberfill and push them gently through the bottom opening. Use only enough to round out the cone. Overstuffing pushes the scales apart, and white filling would show through the gaps.
Round 21 (Y): Make a standing BPsc around the center dc of any Tier 6 shell. Ch 1, then BPsc around the center dc of the next shell. Repeat from * 4 more times. Ch 1, then join. (6 BPsc + 6 ch-1 = 12 sts)
Round 22: Ch 1. Work sc2tog 6 times, each one over a BPsc and the ch-1 that follows it. Join. (6 sts)
Round 23: Ch 1. Work sc2tog 3 times. (3 sts)
Fasten off, leaving a 6 in (15.2 cm) tail. Thread the tail through the 3 sts, pull it tight to form the tip, and weave it inside.
Checkpoint: 3.5 in (8.9 cm) tall.
Hanging Loop
Go back to the starting tail and the bead. Slide the bead up close to the magic ring and ch 1 to lock it in place. Ch 30, then sl st into the ch just above the bead. That makes a loop about 1.5 in (3.8 cm) tall.
Pull the magic ring closed. Pass the tail down through the center and weave it in securely inside the top cap.
Border: White Scale Rims
On this ornament, the “border” is the series of white rim rounds, one on every tier. The rim gauge is 1 rsc per dc. Each scale’s rim count matches that scale’s shell exactly:
| Tier | Shell size | Rim per scale | Rim round total |
|---|---|---|---|
| 1 | 5 dc | 5 rsc | 30 rsc + 6 ch-1 |
| 2 | 7 dc | 7 rsc | 42 rsc + 6 ch-1 |
| 3 | 9 dc | 9 rsc | 54 rsc + 6 ch-1 |
| 4 | 9 dc | 9 rsc | 54 rsc + 6 ch-1 |
| 5 | 7 dc | 7 rsc | 42 rsc + 6 ch-1 |
| 6 | 5 dc | 5 rsc | 30 rsc + 6 ch-1 |
Why the math works:
– Every rim round is simply 6 × (shell size) rsc, plus 6 ch-1 bridges over the sc between shells.
– Nothing is added at the bridges. The ch-1 replaces the skipped sc one for one, so the rim lies flat and doesn’t ruffle.
– Rsc is slightly shorter than sc, which draws the scale edge in a little. That’s what makes the edge cup gently over the tier below.
Final Blocking
- Squeeze the ornament gently into an even oval.
- Use a fingertip to nudge each scale downward so it overlaps the tier below.
- Line up the scales so each tier sits centered under the gaps of the tier above.
- Mist lightly with spray starch, or with water if you don’t want any stiffness.
- Pinch the bottom tip into a soft point.
- Hang it by the loop and let it dry completely, about 4 hours.
- Check that it’s 3.5 in (8.9 cm) tall and 2.25 in (5.7 cm) wide.
Final Quality-Control Checklist
- 6 tiers, each with 6 scales
- Shell sizes run 5, 7, 9, 9, 7, 5 dc from top to bottom
- Every scale has a continuous white rim
- Scales are staggered, not stacked in straight columns
- No white filling shows through the gaps
- All tails are hidden inside
- The bead sits snugly at the top, and the loop measures 1.5 in (3.8 cm)
- Finished size is 3.5 in (8.9 cm) × 2.25 in (5.7 cm)
Troubleshooting
The scales stack in straight columns. You anchored the BPsc in the sc between shells. Anchor it around the center dc of each shell instead.
The rims ruffle. You worked extra rsc. Work exactly 1 rsc per dc and use only a ch-1 at each gap.
The cone is too short or stubby. Your mesh chains are too tight. Chain more loosely, or go up a hook size for the mesh rounds only.
The gaps look too large. Use tighter tension on the BPsc anchors, or shorten L by 1 in Tiers 3 and 4. If you do that, keep the shells at 9 dc.
The tip won’t close neatly. Pull the closing tail firmly, then add one stitch across the tip before you weave it in.
Care
Hand wash in cool water with mild soap. Press out the water in a towel, reshape, and hang to dry. If needed, refresh it with a light starch spray.
Final Notes
The measurement chain runs like this:
– 0.75 in (1.9 cm) disk after Round 2
– 1 in (2.5 cm) cap after Tier 1
– 2 in (5.1 cm) wide after Tier 3
– 2.25 in (5.7 cm) at its widest after Tier 4
– 3.25 in (8.3 cm) long after Tier 6
– 3.5 in (8.9 cm) once the tip is closed
If you hit each checkpoint, the scales will overlap evenly and the white rims will frame every shell. Make one, then make a few more for a matching set on the tree.
Happy crocheting!