

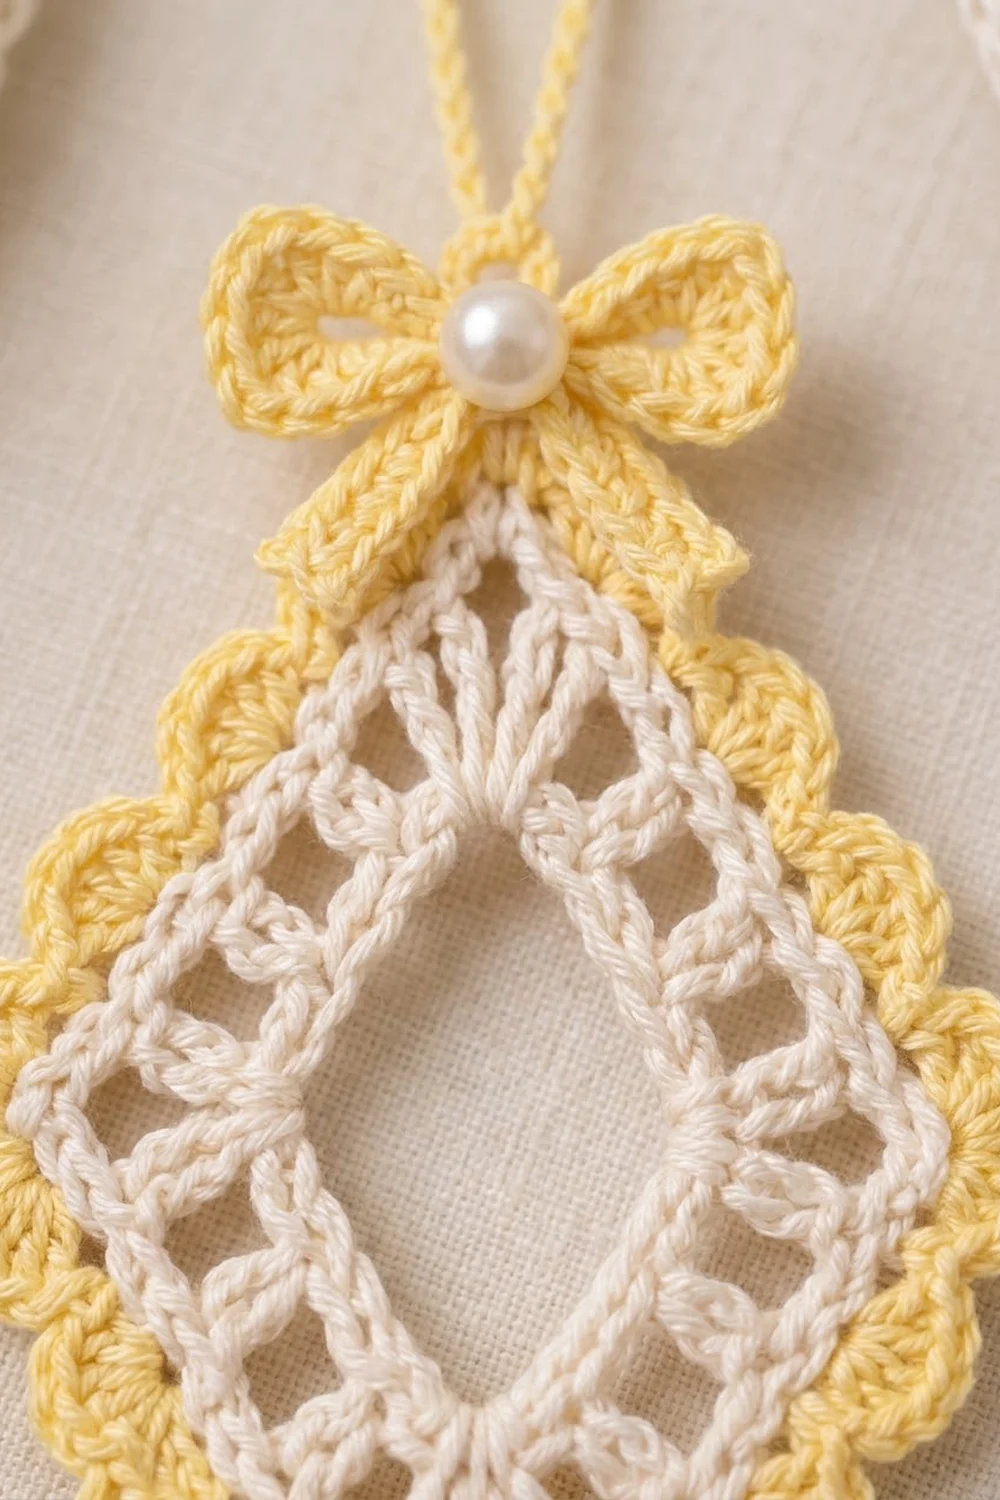
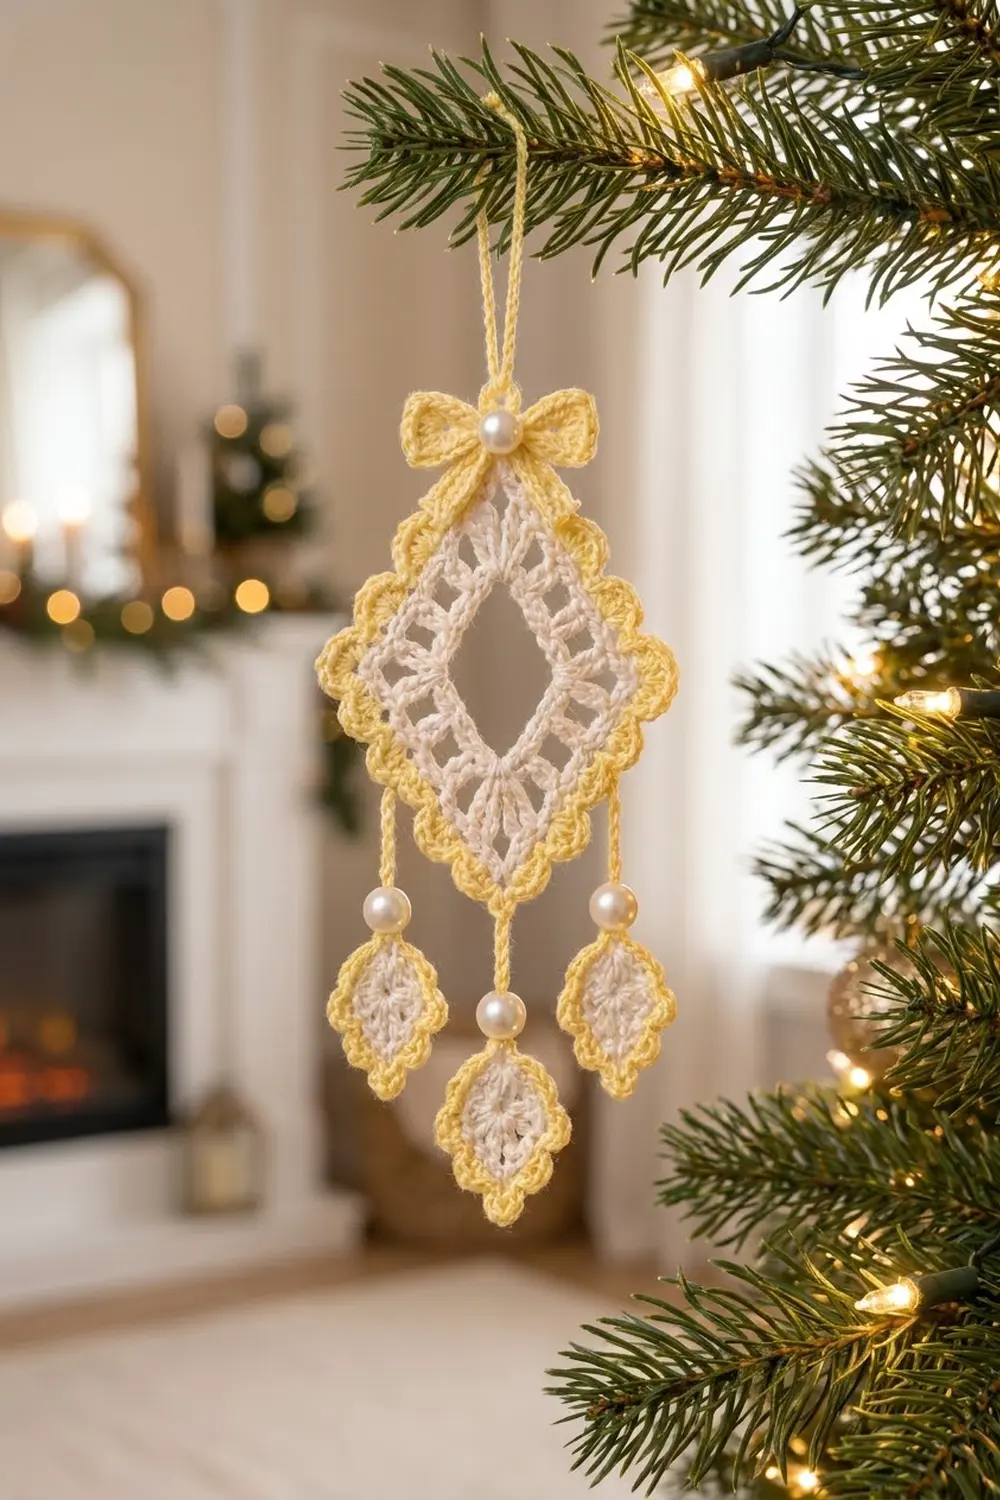
The Butter Lace Diamond is a hanging Christmas ornament built around one openwork diamond. Its center is an open window framed by ladder-like double crochet columns in cream thread. A soft butter-yellow scalloped border finishes the edge, and a small yellow bow with a pearl sits at the top point.
Three small scalloped drops hang from the bottom on yellow chains, each with a pearl bead. The center drop hangs from the bottom point, and the two outer drops hang from the lower edges. The look is light, vintage and a little lacy, and it catches tree lights beautifully.
This pattern uses US crochet terms. The blocked diamond measures 3 in (7.6 cm) wide by 3.5 in (8.9 cm) tall. From the top point to the bottom of the center drop, the ornament is about 6 in (15.2 cm) long, plus a 1.5 in (3.8 cm) hanging loop.
Construction is simple:
1. Crochet the diamond in the round as a square around a chain ring.
2. Add the two-round yellow border.
3. Make three tiny drops and one bow.
The drops are attached with beaded chains worked straight off the border, so there is very little sewing.
Finished Size and Construction
- Finished size: the diamond is 3 in (7.6 cm) wide x 3.5 in (8.9 cm) tall after blocking. The full length is about 6 in (15.2 cm) without the loop.
- Skill level: Intermediate
- Terminology: US terms
- Yarn weight: size 10 crochet cotton (lace weight, category 0)
- Hook: 1.75 mm steel hook, plus a 0.75 mm steel hook for beads
- Number of pieces: 1 ornament made of a main diamond, 3 small drops and 1 bow
- Layout: one square motif turned on point, with three drops hanging below
- Piece size: 3.25 in (8.3 cm) point to point before blocking
- Size before border: 2.25 in (5.7 cm) point to point after Rnd 3
- Border depth: about 0.375 in (1.0 cm), measured straight out from the edge
Materials
Choose a mercerized size 10 cotton thread. It shows stitches crisply, blocks well, and has a gentle sheen that suits pearl beads. Avoid fuzzy or very soft cottons, because the ladder columns will lose their shape.
- Cream (Color A): 5 g / 28 m
- Butter yellow (Color B): 5 g / 28 m
These amounts include a margin of roughly 30 percent for a gauge swatch and weaving in ends.
Tools and notions:
- 1.75 mm steel crochet hook
- 0.75 mm steel hook (for pulling thread through beads)
- 4 pearl beads, 6 mm, with holes at least 1 mm wide
- Fine tapestry needle
- Sewing needle and cream sewing thread
- Rust-proof pins and a blocking mat
- Spray starch or fabric stiffener (optional)
- Scissors
Abbreviations (US Terms)
- ch – chain
- sl st – slip stitch
- sc – single crochet
- hdc – half double crochet
- dc – double crochet
- sk – skip
- sp – space
- st(s) – stitch(es)
- beg – beginning
- rep – repeat
- rnd – round
Special stitches:
- Shell: 5 dc in the same st.
- Corner shell: (3 dc, ch 2, 3 dc) in the same corner sp.
- PB (place bead): Take the 1.75 mm hook out of the loop. Slide a bead onto the 0.75 mm hook, catch the loop, and pull it through the bead. Put the loop back on the 1.75 mm hook and ch 1 to lock the bead in place. This locking ch is included in the chain totals below.
Gauge and Checkpoints
Make one main diamond through Rnd 3 before you buy beads or cut anything long. Gauge matters here because the drops and loop are sized to fit the diamond.
- Main gauge: Rnds 1–3 = 2.25 in (5.7 cm) point to point.
- Border gauge: 10 sc = 1 in (2.5 cm).
- Drop gauge: Drop Rnd 1 = 0.75 in (1.9 cm) point to point.
Checkpoints for the diamond (unblocked, point to point):
- After Rnd 1: 1.25 in (3.2 cm)
- After Rnd 2: 1.75 in (4.4 cm)
- After Rnd 3: 2.25 in (5.7 cm)
- After Rnd 5: 3.25 in (8.3 cm)
If your diamond is more than 0.25 in (0.6 cm) too big after Rnd 3, go down to a 1.5 mm hook. If it is more than 0.25 in (0.6 cm) too small, go up to a 2.0 mm hook. Also check your tension on the foundation ring, because a tight chain will make the center window pucker.
Main Diamond
Work with Color A. Do not turn between rounds. The beg ch-3 counts as a dc throughout.
Foundation: Ch 24, sl st in first ch to form a ring. Make sure the chain is not twisted. This ring becomes the open center window.
Rnd 1: Ch 1, sc in same ch as join, sc in next 4 ch, (sc, ch 2, sc) in next ch, sc in next 5 ch, (sc, ch 2, sc) in next ch; rep from * 2 more times, sl st in first sc.
Count: 28 sc and 4 ch-2 corner sps; 7 sc per side between corner sps.*
The 24-ch ring is split into four sides of 6 ch each, so the window opens into a neat diamond instead of a circle.
Rnd 2: Sl st in next 5 sc, sl st in ch-2 sp. Ch 3, (dc, ch 2, 2 dc) in same sp, ch 1, sk 1 sc, dc in next sc, [ch 1, sk 1 sc, dc in next sc] 2 times, ch 1, sk 1 sc, (2 dc, ch 2, 2 dc) in next ch-2 sp; rep from * 2 more times, ch 1, sk 1 sc, dc in next sc, [ch 1, sk 1 sc, dc in next sc] 2 times, ch 1, sk 1 sc, sl st in top of beg ch-3.
Count: 28 dc (16 in corners, 12 on sides), 16 ch-1 sps, 4 ch-2 corner sps; 7 dc per side including corner dc.*
Rnd 3: Sl st in next dc, sl st in ch-2 sp. Ch 3, (dc, ch 2, 2 dc) in same sp, dc in next 2 dc, [ch 1, sk ch-1 sp, dc in next dc] 3 times, ch 1, sk ch-1 sp, dc in next 2 dc, (2 dc, ch 2, 2 dc) in next ch-2 sp; rep from * 2 more times, dc in next 2 dc, [ch 1, sk ch-1 sp, dc in next dc] 3 times, ch 1, sk ch-1 sp, dc in next 2 dc, sl st in top of beg ch-3. Fasten off.
Count: 44 dc, 16 ch-1 sps, 4 ch-2 corner sps; 11 dc and 4 ch-1 sps per side, including corner dc.*
The ch-1 sps stack directly over the Rnd 2 ch-1 sps, which creates the ladder columns around the window. Check that the diamond measures 2.25 in (5.7 cm) point to point.
Drops (Make 3)
Rnd 1 (Color A): Make a magic ring. Ch 5 (counts as dc and ch 2), [3 dc in ring, ch 2] 3 times, 2 dc in ring, sl st in 3rd ch of beg ch-5. Pull the ring snug but leave a small eyelet about 0.125 in (0.3 cm) wide. Fasten off.
Count: 12 dc, 4 ch-2 corner sps; 3 dc per side.
Rnd 2 (Color B): Join with sl st in any ch-2 sp. Ch 3, 4 dc in same sp, sk 1 dc, sc in next dc, sk 1 dc, shell in next ch-2 sp; rep from * 2 more times, sk 1 dc, sc in next dc, sk 1 dc, sl st in top of beg ch-3. Fasten off, leaving a 4 in (10.2 cm) tail.
Count: 4 shells (20 dc) and 4 sc = 24 sts.*
Each drop measures about 1 in (2.5 cm) wide x 1.25 in (3.2 cm) tall when pinned as a diamond. Choose one shell as the top. Its center (3rd) dc is where the chain attaches.
Bow
Ring: With Color B, ch 24, sl st in first ch to form a ring without twisting.
Rnd 1: Ch 2 (does not count as a st), hdc in each ch around, sl st in first hdc.
Count: 24 hdc.
Fasten off, leaving an 8 in (20.3 cm) tail. Flatten the ring into an oval with the join at the center back. Wrap the tail tightly around the middle 6 times to pinch the bow, then secure it at the back.
Tails: Ch 13, sl st in 2nd ch from hook and in each ch across (12 sl sts). Fasten off. Fold the strip in half into an upside-down V and stitch the fold behind the bow center.
Sew one pearl to the bow center with sewing thread. The bow measures about 1.25 in (3.2 cm) wide.
Border
The border is worked on the main diamond in Color B. Border gauge is 10 sc = 1 in (2.5 cm).
Rnd 4: Join Color B with sl st in any ch-2 corner sp. Ch 1, (sc, ch 2, sc) in same sp, sc in next 4 dc, [sc in ch-1 sp, sc in next dc] 3 times, sc in ch-1 sp, sc in next 4 dc, (sc, ch 2, sc) in next ch-2 sp; rep from * 2 more times, sc in next 4 dc, [sc in ch-1 sp, sc in next dc] 3 times, sc in ch-1 sp, sc in next 4 dc, sl st in first sc.
Count per side: 15 sc worked 1 per existing st or sp + 2 corner sc = 17 sc. Round total: 60 + 8 = 68 sc, plus 4 ch-2 corner sps.*
Each side of Rnd 3 has 15 positions: 11 dc and 4 ch-1 sps. One sc goes into each, and each corner adds its own pair of sc. At 10 sc per inch, 17 sc fit a side of about 1.6 in (4.1 cm) plus the turn at each corner, so the edge stays flat.
Rnd 5: Sl st in ch-2 sp. Ch 3, (2 dc, ch 2, 3 dc) in same sp, sk next 2 sc, sc in next sc, [sk 1 sc, shell in next sc, sk 1 sc, sc in next sc] 3 times, sk next 2 sc, corner shell in next ch-2 sp; rep from * 2 more times, sk next 2 sc, sc in next sc, [sk 1 sc, shell in next sc, sk 1 sc, sc in next sc] 3 times, sk next 2 sc, sl st in top of beg ch-3. Fasten off.
Count per side: 4 sc and 3 shells (15 dc). Corners: 6 dc and a ch-2 sp each. Round total: 84 dc (60 side + 24 corner), 16 sc, 4 ch-2 sps.*
Why the math works: Each side uses exactly 17 sc: 2 skipped, 1 sc, 12 sts for three shell repeats, then 2 skipped. The sc land on the 3rd, 7th, 11th and 15th sts, so the scallops are mirror-symmetric on every side. The ch-2 in each corner shell gives the sharp top and bottom points you need for the loop and the center drop.
The border adds about 0.375 in (1.0 cm) of depth along each edge. Each corner shell also pushes its tip out a little further, so each point grows by about 0.5 in (1.3 cm). That gives 2.25 + 0.5 + 0.5 = 3.25 in (8.3 cm) point to point.
Attach the Loop, Dangles, and Bow
Turn the diamond on point. Any corner can be the top.
Hanging loop: Join Color B with sl st in the top corner ch-2 sp, ch 30, sl st in same sp. Fasten off. The loop hangs about 1.5 in (3.8 cm).
Center dangle: Join Color B with sl st in the bottom corner ch-2 sp. Ch 8, PB, ch 3 (12 ch total including the locking ch), sl st in the center dc of the top shell of a drop. Fasten off.
Outer dangles (make 2): On each lower edge, count the Rnd 5 sc starting from the side point. Join Color B with sl st in the 2nd sc. Ch 3, PB, ch 8 (12 ch total including the locking ch), sl st in the center dc of the top shell of a drop. Fasten off.
The pearl sits low on the center dangle and high on the outer dangles. Each beaded chain measures about 1.25 in (3.2 cm).
Bow: Sew the bow over the base of the hanging loop at the top point.
Final Blocking
- Weave in all ends, but don’t clip the last 0.5 in (1.3 cm) of each tail yet.
- Soak the ornament in cool water for 5 minutes. Press out the water in a towel without wringing.
- Pin the diamond on the mat to 3 in (7.6 cm) wide and 3.5 in (8.9 cm) tall. Pin each point first, then the center of each side.
- Put one pin in the tip of every scallop so the shells fan open.
- Pin the corners of the center window to open it into a crisp diamond.
- Pin each drop to 1 in (2.5 cm) wide x 1.25 in (3.2 cm) tall.
- Mist with spray starch if you want a firmer ornament.
- Let it dry completely, about 12 hours, then unpin it and clip the tails.
If your bow pearl is glued instead of sewn, keep the bow out of the water.
Final Quality-Control Checklist
- Rnd 1 has 28 sc and 4 corner sps.
- Rnd 3 has 11 dc and 4 ch-1 sps on every side.
- Rnd 4 has 17 sc per side, 68 total.
- Rnd 5 has 3 shells and 4 sc on every side.
- The center window is a diamond, not a circle.
- The diamond blocks to 3 x 3.5 in (7.6 x 8.9 cm).
- All three dangles are 12 ch long.
- The outer dangles start at matching sc on both lower edges.
- The ornament hangs straight from its loop.
- Every end is woven in securely.
Troubleshooting
The center window is round: The foundation chain was too loose, or Rnd 1 corners were missed. Check that every 6th ch has a (sc, ch 2, sc) corner.
The edge ruffles in Rnd 4: Your sc are too loose for the dc. Go down 0.25 mm for the border only.
The edge cups in Rnd 5: The shells are too tight. Relax your tension, or work the shells with a slightly larger hook.
The ornament hangs crooked: The loop or center dangle is off-center. Re-join both in the exact corner ch-2 sps.
A bead won’t slide on: The bead hole is too small. Use beads with a hole of 1 mm or larger, or sew the pearl on afterward.
The drops twist: Block them flat with starch, and make sure each dangle is joined in the center dc of the top shell.
Care
Hand wash in cool water with mild soap and dry flat, reshaping and re-pinning the points. Store flat in tissue so the scallops and bow keep their shape.
Final Notes
Here is how the measurements build up:
– The 24-ch ring opens to 1.25 in (3.2 cm) after Rnd 1.
– The diamond grows to 2.25 in (5.7 cm) after Rnd 3.
– It reaches 3.25 in (8.3 cm) after the border.
– Blocking sets it at 3 x 3.5 in (7.6 x 8.9 cm).
– The 12-ch beaded chains and 1.25 in (3.2 cm) drops bring the full ornament to about 6 in (15.2 cm), with a 1.5 in (3.8 cm) loop on top.
Make one, check it against these numbers, and the rest will be easy. A set of these looks lovely on a tree, a wreath, or tied to a gift.
Happy crocheting!