

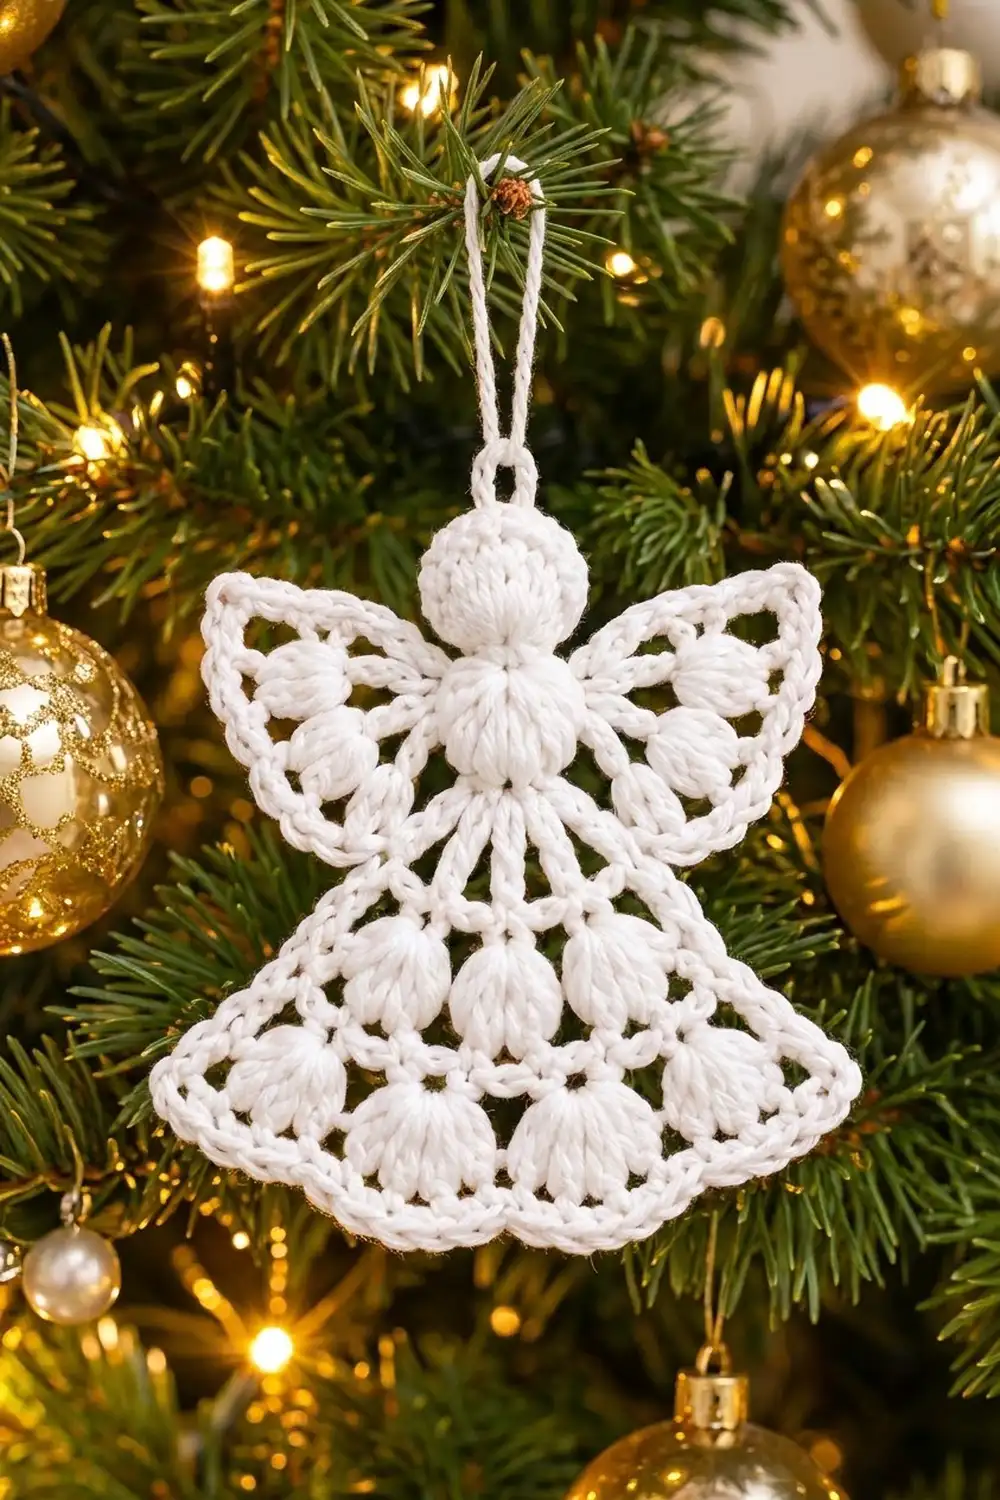
The Snowpuff Lace Angel is a small, flat, all-white ornament made of open lacework and soft, rounded puff stitches. It has a round head, a full puff at the chest, two pointed wings, and a flared, bell-shaped skirt. A neat chain-loop outline runs around the whole shape.
Everything is worked in one color, a bright white cotton, so the texture does the work: puffs against open spokes, and crisp loops along every edge. It looks right on a tree, on a gift tag, or hanging in a window.
This pattern uses US crochet terms. The finished angel measures about 4 in (10.2 cm) tall from the top of the head to the hem, or 5 in (12.7 cm) with the hanging loop. The wingspan is 5 in (12.7 cm) and the hem is 4.75 in (12.1 cm) wide.
You make it as one continuous piece. First you work a dc circle for the head, then a large puff for the chest. The skirt is a fan of rows worked out from the chest. Each wing is a smaller fan worked straight into the side of the head, and one outline round finishes the edges and adds the hanging loop.
Finished Size and Construction
- Finished size: 4 in (10.2 cm) tall without the loop, 5 in (12.7 cm) with the loop; 5 in (12.7 cm) wingspan
- Skill level: Easy-intermediate (puff stitches, working into one stitch, outlining row-ends)
- Terminology: US
- Yarn weight: DK / light worsted cotton (CYC 3)
- Hook: 3.5 mm (E-4)
- Number of pieces: 1 (wings are worked in place, not sewn)
- Layout: Single ornament; no assembly
- Head size: 1 in (2.5 cm) across
- Size before border: 3.75 in (9.5 cm) tall, 4.5 in (11.4 cm) wingspan, 4.5 in (11.4 cm) hem
- Border depth: 0.25 in (0.6 cm)
Materials
Choose a smooth, tightly plied mercerized cotton. It shows the puffs clearly, holds a crisp edge, and blocks well. Avoid fuzzy or loosely spun yarns, because they blur the open spokes.
- White DK cotton: 10 g (about 24 m) per angel
Tools:
- 3.5 mm (E-4) crochet hook
- Tapestry needle
- Scissors
- Stitch markers (2)
- Blocking mat and rustproof pins
- Spray bottle; optional spray starch
The yarn amount includes a margin of about 25 percent for your gauge swatch and weaving in ends.
Abbreviations (US Terms)
- ch – chain
- sl st – slip stitch
- sc – single crochet
- dc – double crochet
- tr – treble crochet
- dtr – double treble crochet
- st(s) – stitch(es)
- sp(s) – space(s)
- sk – skip
- yo – yarn over
- RS / WS – right side / wrong side
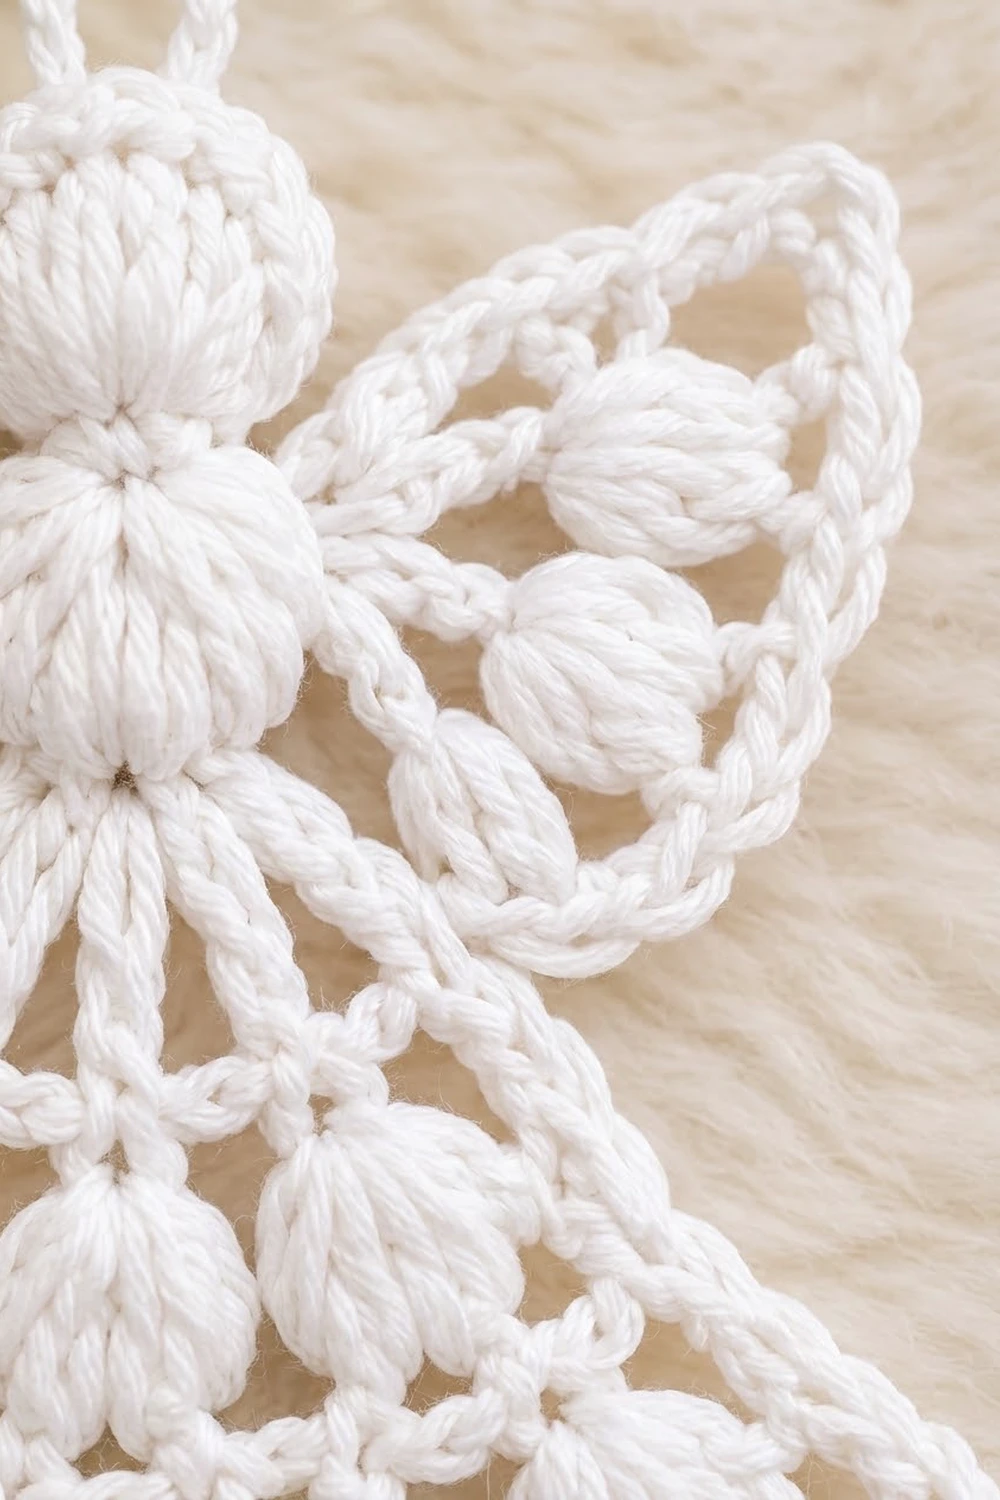
Puff stitch (PS): (Yo, insert hook in the stitch, yo, pull up a loop to the height of a dc) 4 times, giving 9 loops on hook. Yo and pull through all 9 loops, then ch 1 to lock. The locking ch does not count as a stitch. Each PS counts as 1 stitch.
Big puff (BP): Like PS, but pull up the loops 6 times, giving 13 loops on hook. Yo and pull through all 13 loops, then ch 1 to lock.
Puffs worked on WS rows push out toward the RS. That is why every puff row in this pattern is a WS row.
Gauge and Checkpoints
The head works as your gauge swatch. Make it first and measure it before you go on.
- Head (after Round 1): 14 dc, 1 in (2.5 cm) across
- Chest puff: about 0.5 in (1.3 cm) long
- Skirt after Row 3: 1.5 in (3.8 cm) from the bottom of the chest puff to the edge
- Skirt after Row 5: 2.25 in (5.7 cm) deep, with a hem 4.5 in (11.4 cm) wide when pinned flat
- Each wing after Row 3: 1.5 in (3.8 cm) from the base to the outer edge
- After border: 4 in (10.2 cm) tall, 5 in (12.7 cm) wingspan
If your head is bigger than 1 in (2.5 cm), go down to a 3.25 mm hook. If it is smaller than 0.875 in (2.2 cm), go up to a 3.75 mm hook. Keep the same hook for the whole angel. If only the skirt is off, check that your tr and dtr stitches are not being pulled short.
Head
Round 1 (RS): Make a magic ring. Ch 3 (counts as dc), 13 dc in ring, then sl st to the top of the beginning ch-3 to join. Pull the ring closed tightly. (14 dc)
Number the stitches: the beginning ch-3 is st 1, and the rest follow in order, so st 14 is the last dc. Turn the head so that st 1 is at the bottom. St 8 is now at the top center, opposite st 1. Put a marker in st 3 and another in st 13. The wings grow from these two stitches. Do not fasten off.
Checkpoint: the head should lie flat and measure 1 in (2.5 cm).
Chest
Ch 2, then work 1 BP in st 1 (the same st as the join). This makes a round, full puff directly below the head. (1 BP)
Skirt
Every row of the skirt grows out from the locking ch of the BP. Turn at the end of each row.
Row 1 (RS): Ch 4 (counts as tr). Inserting the hook under the locking ch of the BP each time, work [ch 2, tr] 6 times. (7 tr, 6 ch-2 sps)
These 7 tr fan out from the chest like spokes. They make the long lines that run from the chest down into the skirt.
Row 2 (WS, first puff row): Ch 6 (counts as dc + ch 3). PS in next tr, ch 3, dc in next tr, ch 3, PS in next tr, ch 3, dc in next tr, ch 3, PS in next tr, ch 3, dc in top of beginning ch-4. (4 dc + 3 PS = 7 sts, 6 ch-3 sps)
The three puffs land on tr 2, 4, and 6, so they sit evenly across the middle of the skirt.
Row 3 (RS, widening row): Ch 4 (counts as tr), ch 2, tr in next ch-3 sp, ch 2, [tr in next st, ch 2, tr in next ch-3 sp, ch 2] 5 times, tr in 3rd ch of beginning ch-6. (13 tr, 12 ch-2 sps)
This is a conversion row: 7 tr worked one in each existing stitch, plus 6 tr added in the spaces. That gives 7 + 6 = 13 tr.
Checkpoint: 1.5 in (3.8 cm) from the bottom of the chest puff to the edge.
Row 4 (WS, hem puff row): Ch 5 (counts as dc + ch 2), [PS in next tr, ch 2, dc in next tr, ch 2] 5 times, PS in next tr, ch 2, dc in top of beginning ch-4. (7 dc + 6 PS = 13 sts, 12 ch-2 sps)
You skip the ch-2 sps of Row 3 and work only into the tr. The six puffs land on tr 2, 4, 6, 8, 10, and 12, making the row of big puffs along the lower skirt.
Row 5 (RS, edging row): Ch 1, sc in first dc, [3 sc in next ch-2 sp, sc in next st] 12 times. (49 sc)
This is a trim row: 13 sc worked one in each existing stitch, plus 12 × 3 = 36 sc in the spaces. That gives 13 + 36 = 49 sc. Fasten off.
Checkpoint: 2.25 in (5.7 cm) deep, and 4.5 in (11.4 cm) across the hem when the fan is opened to about 140 degrees.
Wings (Make 2, Worked in Place)
With the RS facing, join the yarn with a sl st in the marked st 3 of the head for the first wing. For the second wing, join in st 13. Both wings are worked the same way.
Row 1 (RS): Ch 5 (counts as dtr), [ch 2, dtr] 6 times in the same st. (7 dtr, 6 ch-2 sps)
Open the fan so that it points up and away from the skirt.
Row 2 (WS, wing puff row): Ch 6 (counts as dc + ch 3), PS in next dtr, ch 3, dc in next dtr, ch 3, PS in next dtr, ch 3, dc in next dtr, ch 3, PS in next dtr, ch 3, dc in top of beginning ch-5. (4 dc + 3 PS = 7 sts, 6 ch-3 sps)
This gives the three puffs you see along each wing.
Row 3 (RS, edging row): Ch 1, sc in first dc, [4 sc in next ch-3 sp, sc in next st] 6 times. (31 sc)
This is a trim row: 7 sc worked one in each existing stitch, plus 6 × 4 = 24 sc in the spaces. That gives 7 + 24 = 31 sc. Fasten off.
Checkpoint: 1.5 in (3.8 cm) from the wing base to the outer edge. The angel should now measure 4.5 in (11.4 cm) from wing tip to wing tip.
Border
The border is one round that outlines the whole angel, with ch-3 loops along the hem and the outer wing edges. It also makes the hanging loop.
Border gauge: Each [ch 3, sk 1, sc] repeat should measure about 0.19 in (0.5 cm) along the edge. The border adds 0.25 in (0.6 cm) at the hem and at each wing tip.
Hold the angel with the RS facing you. Rotate it as you go so the edge you are working on is always at the top.
Border Round (RS):
- Hem: Join with sc in the first sc of skirt Row 5. [Ch 3, sk 1 sc, sc in next sc] 24 times. (25 sc, 24 ch-3 loops) Ch 1 to turn the corner.
- First skirt side: Work 15 sc evenly up the row-ends toward the chest: 1 sc in the end of Row 5, 3 sc around the end of Row 4, 4 sc around the end of Row 3, 3 sc around the end of Row 2, and 4 sc around the end of Row 1. (15 sc)
- Chest to wing: Sl st in head st 2. (1 sl st)
- First wing, lower side: Work 9 sc evenly up the row-ends: 5 sc around the dtr of Row 1, 3 sc around Row 2, and 1 sc in Row 3. (9 sc) Ch 1 for the wing-tip corner.
- First wing, outer edge: Sc in the first sc of wing Row 3, [ch 3, sk 1 sc, sc in next sc] 15 times. (16 sc, 15 ch-3 loops) Ch 1 for the corner.
- First wing, upper side: Work 9 sc down the row-ends, mirroring step 4. (9 sc)
- Over the head: Sl st in head sts 4, 5, 6, and 7. In st 8, sl st, ch 16, sl st in the same st to make the hanging loop. Sl st in sts 9, 10, 11, and 12. (9 head sts covered, 10 sl sts, plus 1 ch-16 loop)
- Second wing: Work the upper side (9 sc), ch 1, the outer edge (16 sc, 15 ch-3 loops), ch 1, and the lower side (9 sc).
- Chest to skirt: Sl st in head st 14. (1 sl st)
- Second skirt side: Work 15 sc evenly down the row-ends, mirroring step 2. (15 sc) Ch 1, then sl st in the first sc of the round to join. Fasten off.
Border totals: 25 + 30 + 36 + 32 = 123 sc. There are also 15 + 15 + 24 = 54 ch-3 loops, 6 ch-1 corners, 12 sl sts (not counting the joining sl st), and 1 hanging loop.
Why the math works: A [ch 3, sk 1, sc] repeat needs an odd stitch count: 1 starting sc plus 2 stitches for each repeat. The hem has 49 sc, and 1 + (2 × 24) = 49, so the last repeat ends exactly on the corner sc. Each wing edge has 31 sc, and 1 + (2 × 15) = 31, so it works the same way. The side counts follow the height of each row. A tr or dtr row-end is about as tall as 4–5 sc, a dc row-end as tall as 3 sc, and a sc row-end as tall as 1 sc. That is why the sides lie flat instead of rippling or pulling in. The head is only slip-stitched, so it stays a crisp 1 in (2.5 cm) circle.
Final Blocking
- Weave in all ends along the WS of the sc rows, but not through the open spokes.
- Spray the angel with water until it is evenly damp, or dip it and press out the water in a towel.
- Pin the head first, as a 1 in (2.5 cm) circle.
- Open the skirt into a fan of about 140 degrees. Pin each hem corner so the hem measures 4.75 in (12.1 cm) across.
- Pin each wing so it angles upward, with the tips 5 in (12.7 cm) apart.
- Pin each ch-3 loop on the hem and wings into a small, even arch.
- Shape every puff into a round dome with your fingertip.
- Spray lightly with starch if you want a stiff ornament. Let it dry completely before you unpin it.
Final Quality-Control Checklist
- The head has 14 dc and measures 1 in (2.5 cm).
- The chest puff is round, full, and centered under the head.
- The skirt has 3 puffs in Row 2 and 6 puffs in Row 4, all on the RS.
- The hem has 49 sc before the border and 24 even loops after it.
- Each wing has 3 puffs, 31 sc in Row 3, and 15 loops along the outer edge.
- Each wing starts two stitches away from the chest, one on each side.
- The hanging loop sits at head st 8, centered at the top.
- The angel measures 4 in (10.2 cm) tall and 5 in (12.7 cm) across the wings, with a 4.75 in (12.1 cm) hem.
Troubleshooting
- The puffs pop to the back: You worked a puff row with the RS facing. Puff rows must be WS rows.
- The skirt cups or curls: Your Row 1 tr are too short, or your chains are too tight. Loosen your chains a little and block the skirt firmly into a fan.
- The hem ripples: Your Row 5 sc are too loose, or the border is worked too loosely. Work the 3 sc in each space a little more snugly.
- The wings droop: Starch them. If the wing side edges pull in, work 6 sc instead of 5 around each dtr row-end.
- The angel is lopsided: The wings may be in the wrong stitches. Count again from st 1 at the bottom; the wings belong in st 3 and st 13.
- The border count is off at a corner: Count the sc in Row 5 or in wing Row 3 again. The border repeat only ends neatly on 49 and 31.
Care
Hand wash in cool water with mild soap and press out the water in a towel. Do not wring it. Block it flat again and starch it if you want, then store it flat in tissue between seasons.
Final Notes
The measurements build on each other step by step. The 14 dc head measures 1 in (2.5 cm). The skirt grows from 7 spokes to 13 tr to 49 sc and reaches 2.25 in (5.7 cm) deep, with a 4.5 in (11.4 cm) hem. Each wing grows from 7 dtr to 31 sc and measures 1.5 in (3.8 cm). The border adds 0.25 in (0.6 cm), so the finished angel is 4 in (10.2 cm) tall, 5 in (12.7 cm) wide across the wings, and 4.75 in (12.1 cm) across the hem.
If your head checkpoint matches, everything after it should fall into place.
Happy crocheting!