

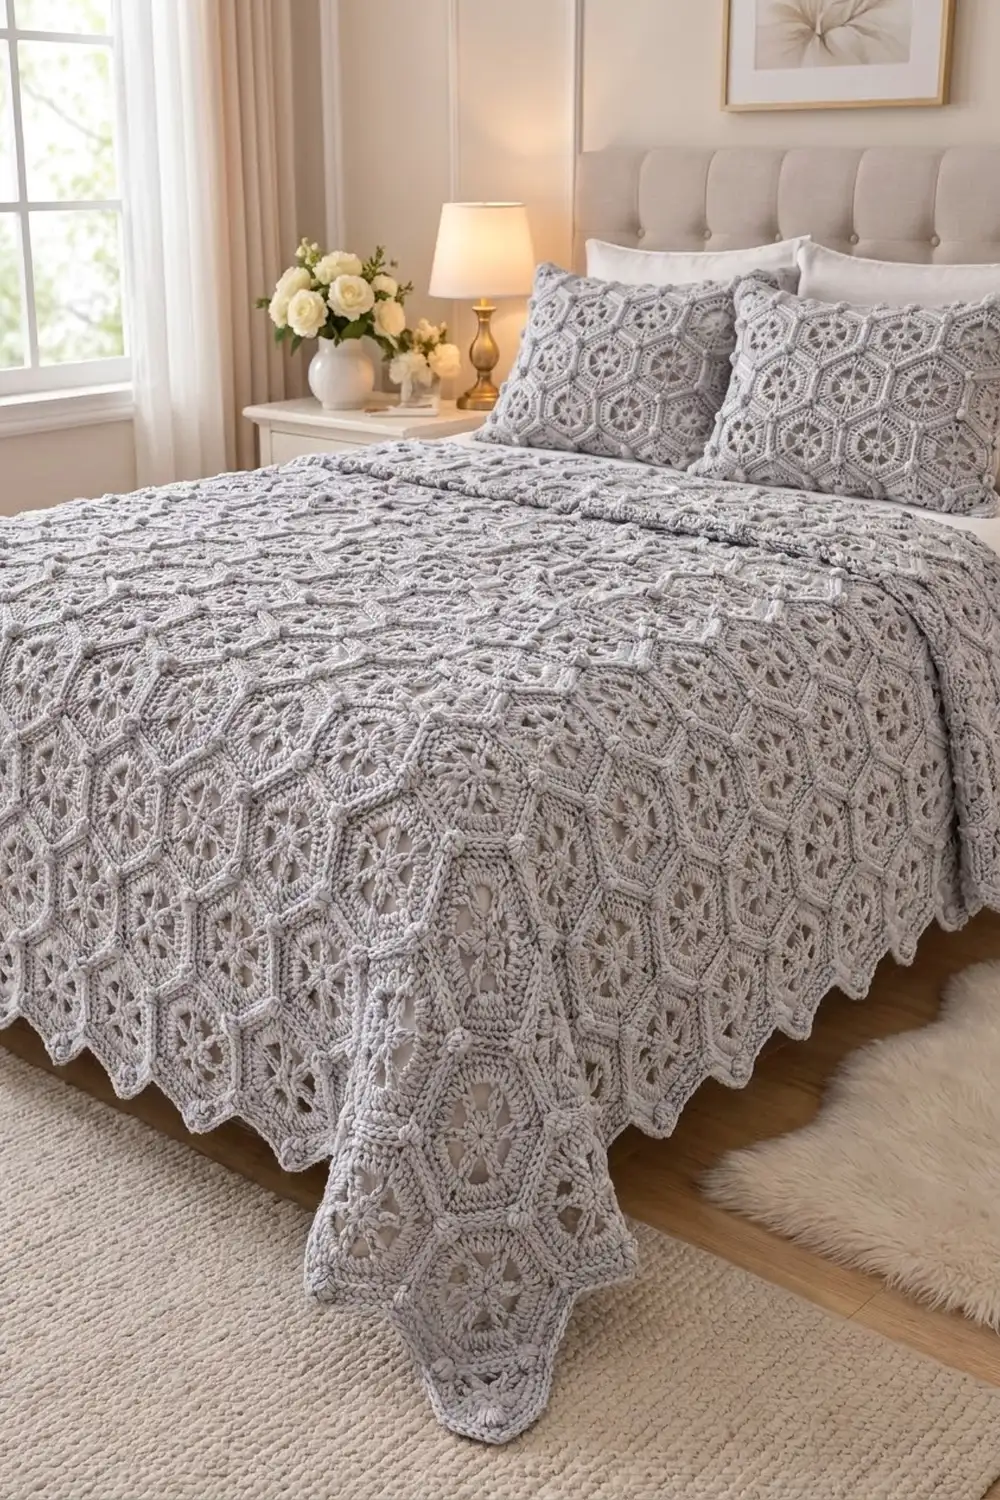
The Silver Frost Hexagon Bedspread is made from one repeated hexagon motif in a soft silver-gray. Each motif has open spokes in the center, triangular windows, and a firm outer frame with a round bobble at every corner. When the motifs are joined, the bobbles meet in neat clusters and the open centers form a light, lacy pattern across the bed.
The bedspread uses only one color, so the texture does all the work. It looks calm and classic, and it suits a neutral bedroom. The edge follows the hexagon points, which gives the bottom and sides a soft scalloped outline.
This pattern uses US crochet terms. The finished bedspread measures about 73 in (185.4 cm) wide and 92 in (233.7 cm) long, including the border. Each motif measures 6 in (15.2 cm) across the flats and 7 in (17.8 cm) from point to point.
Here is how it comes together. You work 196 hexagon motifs in the round, 8 rounds each. Then you whipstitch them into 17 offset rows and finish with a 2-round edging that follows the outline.
Finished Size and Construction
- Finished size: 73 in × 92 in (185.4 cm × 233.7 cm), including border
- Skill level: Intermediate
- Terminology: US crochet terms
- Yarn weight: Worsted (#4)
- Hook: 5 mm (H-8)
- Number of pieces: 196 hexagon motifs
- Layout: 17 rows: 9 rows of 12 motifs alternating with 8 rows of 11 motifs, offset by half a motif
- Motif size: 6 in (15.2 cm) flat to flat; 7 in (17.8 cm) point to point; 3.5 in (8.9 cm) per side
- Size before border: 72 in × 91 in (182.9 cm × 231.1 cm)
- Border depth: about 0.5 in (1.3 cm)
Materials
Use a smooth worsted-weight yarn with good stitch definition. A cotton blend or soft acrylic both work well. Pick a plain, tightly plied yarn so the bobbles and spokes stand out clearly. Avoid fuzzy or very slubby yarns.
Yarn (about 200 m per 100 g):
– Silver gray: 4,000 g (8,000 m), about 20 skeins of 100 g
Each motif uses about 18 g (36 m). The border and joining use about 100 g (200 m) together. The total above includes a margin of roughly 10% for gauge differences and swatching. Buy everything from one dye lot.
Tools:
– 5 mm (H-8) crochet hook
– Tapestry needle
– Stitch markers
– Scissors
– Tape measure
– Blocking mats and rust-proof pins
– Spray bottle
Abbreviations (US Terms)
- ch – chain
- sl st – slip stitch
- sc – single crochet
- hdc – half double crochet
- dc – double crochet
- tr – treble crochet
- sc2tog – single crochet 2 together
- rev sc – reverse single crochet (crab stitch)
- BLO – back loop only
- sp(s) – space(s)
- st(s) – stitch(es)
- sk – skip
- rep – repeat
Special stitch – Bobble: *Yarn over, insert the hook into the stitch or space, yarn over and pull up a loop, yarn over and pull through 2 loops. Repeat from * 4 more times (6 loops on the hook). Yarn over and pull through all 6 loops. Push the bobble to the right side.
Gauge and Checkpoints
Gauge: 18 sc and 20 rows = 4 in (10.2 cm) in sc with a 5 mm hook.
Make one full motif before you start production. Block it lightly and measure it. Check these points as you go:
- After Round 2: 2 in (5.1 cm) across
- After Round 3: 2.75 in (7.0 cm) across
- After Round 4: 3.25 in (8.3 cm) across
- After Round 5: 4.5 in (11.4 cm) flat to flat
- After Round 6: 5 in (12.7 cm) flat to flat
- After Round 7: 5.5 in (14.0 cm) flat to flat
- After Round 8: 6 in (15.2 cm) flat to flat, 7 in (17.8 cm) point to point, 3.5 in (8.9 cm) per side
If the motif is too big: Go down half a hook size. Most of the extra size usually comes from Round 5, so check your treble height.
If the motif is too small: Go up half a hook size.
A difference of 0.25 in (0.6 cm) per motif adds up to 3 in (7.6 cm) across the width of the bedspread, so this check matters.
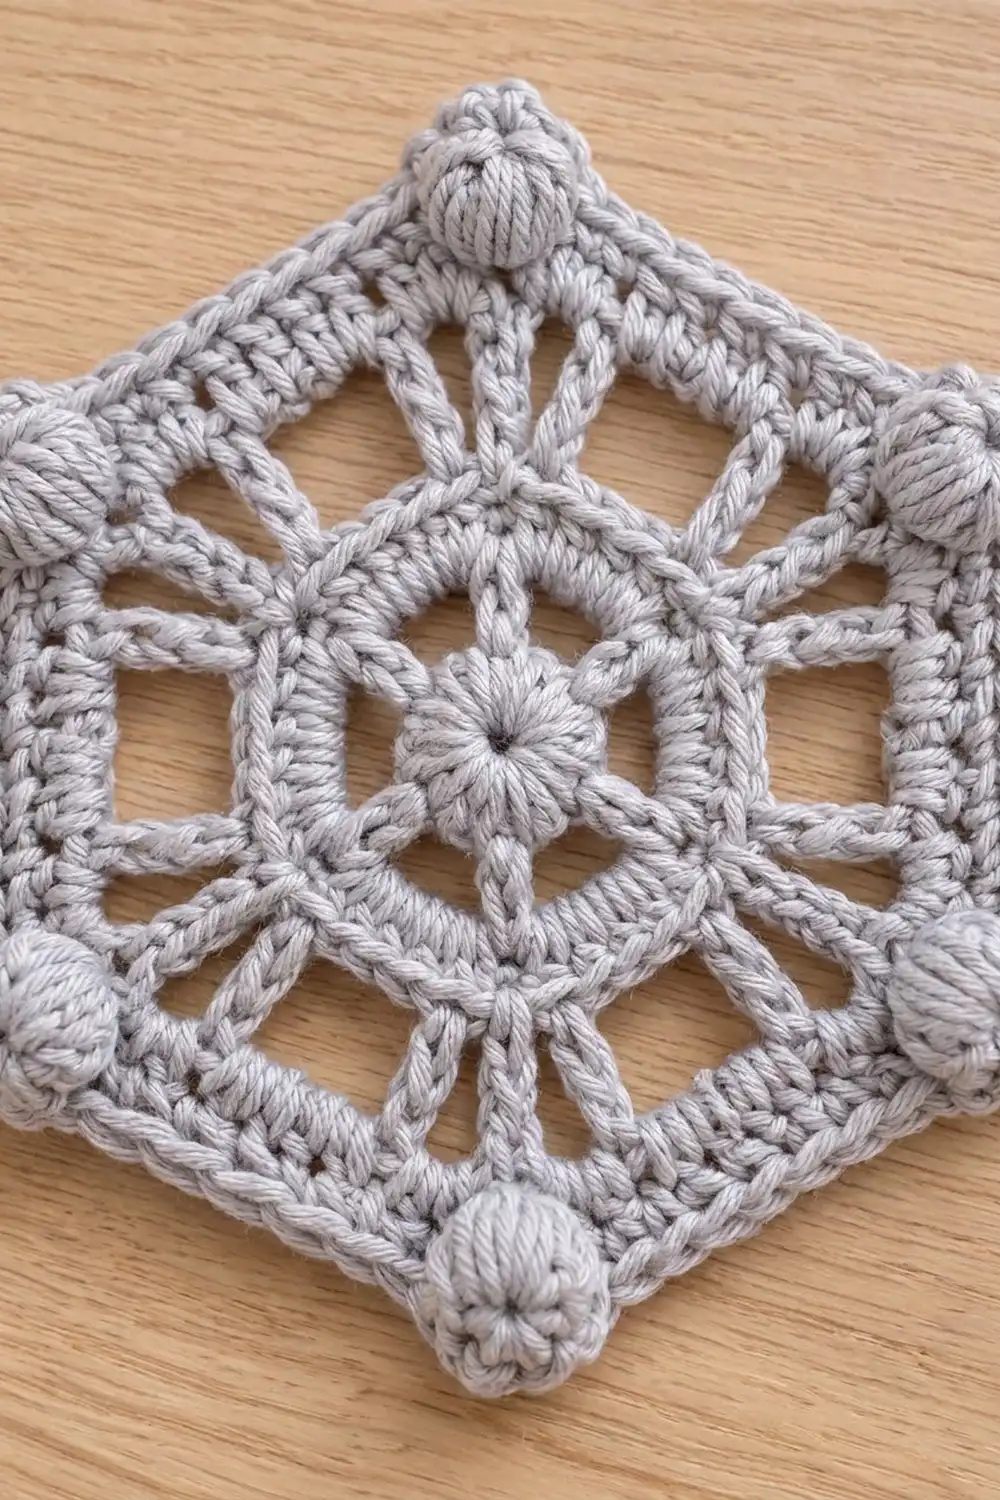
Hexagon Motif
Make 196. Work each round on the right side. Do not turn.
Round 1: Make a magic ring. Ch 3 (counts as dc), then work 11 dc into the ring. Join with a sl st to the top of the ch-3. Pull the ring closed. (12 dc)
Round 2: Ch 5 (counts as dc + ch 2). Dc in the next st, ch 2. Rep from * 10 more times. Join with a sl st to the 3rd ch of the ch-5. (12 dc, 12 ch-2 sps)
These are the short spokes around the center.
Round 3: Ch 2 (does not count). Hdc in the same st. Work 2 hdc in the next ch-2 sp. Hdc in the next dc, 2 hdc in the next ch-2 sp. Rep from * around. Join with a sl st to the first hdc. (36 hdc)
This round makes the solid ring.
Round 4: Ch 1. Sc in the next 2 sts, 2 sc in the next st. Rep from * 11 more times. Join with a sl st to the first sc. (48 sc)
Count 8 stitches per section. Place a marker in the first sc of each of the 6 sections. These marked stitches become the corners.
Round 5 (open spoke round): Ch 4 (counts as tr), ch 3, tr in the same st. Ch 3, sk 3 sts, dc in the next st, ch 3, sk 3 sts. Work (tr, ch 3, tr) in the next marked st. Ch 3, sk 3 sts, dc in the next st, ch 3, sk 3 sts. Rep from * 4 more times. Join with a sl st to the top of the ch-4. (12 tr, 6 dc, 18 ch-3 sps)
Each section uses exactly 8 stitches: 1 corner stitch, 3 skipped, 1 dc, and 3 skipped. The dc sits in the 4th of the 7 non-corner stitches, so it lands in the exact middle of the side. The tr pairs make the V-shaped corner spokes, and the dc is the single middle spoke. The ch-3 spaces between them become the triangular windows.
Round 6: Sl st into the next corner ch-3 sp. Ch 1. Work (sc, ch 2, sc) in the same sp. Sc in the next tr, 3 sc in the next ch-3 sp, sc in the next dc, 3 sc in the next ch-3 sp, sc in the next tr, (sc, ch 2, sc) in the corner ch-3 sp. Rep from * 4 more times. For the last side, sc in the next tr, 3 sc in the next sp, sc in the dc, 3 sc in the next sp, and sc in the last tr. Join with a sl st to the first sc. (66 sc, 6 ch-2 corner sps)
Each side has 11 sc. That is 1 corner sc + 9 sc + 1 corner sc.
Round 7: Ch 2 (does not count). Working in BLO, hdc in each sc. In each corner ch-2 sp, work (hdc, ch 2, hdc) into the whole space. Join with a sl st to the first hdc. (78 hdc, 6 ch-2 corner sps)
Each side now has 13 hdc: 11 + 1 added at each end. The BLO stitches leave a raised ridge that gives the frame its texture.
Round 8: Ch 1. Sc in each hdc. In each corner ch-2 sp, work (sc, bobble, sc). Join with a sl st to the first sc. Fasten off and leave a 24 in (61.0 cm) tail for joining. (90 sc, 6 bobbles)
Side count: Each side has 15 sc between bobbles: 1 + 13 + 1. In this pattern, the bobbles are the corner points and are not counted as part of any side. All joining and border math uses 15 sc per side.
Weave in the starting tail. Block each motif lightly to 6 in (15.2 cm) flat to flat.
Make All Pieces
Make 196 motifs, all in silver gray:
- 108 motifs for the 9 long rows (12 each)
- 88 motifs for the 8 short rows (11 each)
Lay the motifs out with the points facing up and down. Short rows sit in the valleys between motifs in the long rows.
Row 1:  O O O O O O O O O O O O   (12)
Row 2:   O O O O O O O O O O O    (11)
Row 3:  O O O O O O O O O O O O   (12)
Row 4:   O O O O O O O O O O O    (11)
 ...  continue alternating ...
Row 16:  O O O O O O O O O O O    (11)
Row 17: O O O O O O O O O O O O   (12)
Each new row adds 5.25 in (13.3 cm) to the length, because the rows nest into each other.
Joining
Method: Whipstitch with a tapestry needle, working through the outer loops of Round 8.
Stitch-to-stitch logic: Place two motifs right side up with the sides you are joining touching. Start at a bobble. Take one stitch through the tops of both touching bobbles. Then sew sc to sc along the side, matching all 15 stitches one to one. Finish with one stitch through the next pair of bobbles. Because every side has exactly 15 sc, the sides always match and the seam lies flat.
Order:
1. Join the 12 motifs of Row 1 side by side along their vertical sides.
2. Set each Row 2 motif into a valley. Sew its upper-left and upper-right sides to the two motifs above it. Then sew its vertical side to the Row 2 motif next to it.
3. Continue row by row.
Where three motifs meet, pull the three bobbles together with one extra stitch so they form a neat cluster.
Tension: Keep the stitches snug but not tight. The seam should be as flexible as the fabric. If it puckers, loosen up. If you can see gaps, take smaller stitches.
Size checkpoint: Row 1 should measure 72 in (182.9 cm) across. After 4 rows, the piece should measure 22.75 in (57.8 cm) from the top point to the bottom point. After all 17 rows, the piece should measure 72 in × 91 in (182.9 cm × 231.1 cm).
Border
The border follows the scalloped outline. It has two kinds of corner:
- Point: a bobble that belongs to only one motif, at an outer tip
- Valley: two bobbles from neighboring motifs meeting at an inner corner
Border gauge: Work 1 border sc in each Round 8 sc. That keeps the border at the same 18 sc per 4 in (10.2 cm) as the motifs.
Exposed sides per edge:
– Top edge: 24 sides × 15 sc = 360 sc
– Bottom edge: 24 sides × 15 sc = 360 sc
– Left edge: 33 sides × 15 sc = 495 sc
– Right edge: 33 sides × 15 sc = 495 sc
– Total: 114 sides × 15 sc = 1,710 sc
The outline has 60 points and 54 valleys.
Round 1: With the right side facing, join the yarn in any sc on an exposed side. Ch 1. Sc in each sc along every exposed side. At each point, work (sc, ch 2, sc) into the top of the bobble. At each valley, sc2tog through the two touching bobbles. Join with a sl st to the first sc. (1,710 side sc + 120 point sc + 54 sc2tog = 1,884 sts, plus 60 ch-2 sps)
Round 2: Ch 1. Work rev sc in each st. Work 3 rev sc in each ch-2 sp. Join with a sl st and fasten off. (1,884 + 180 = 2,064 rev sc)
Why the math works: The sides get 1 border stitch per motif stitch, so they stay flat. The ch-2 spaces add stitches at each point, so the tips can turn 60° without cupping. Each sc2tog takes away a stitch at a valley, so the inner corners close without bunching. The two rounds add about 0.25 in (0.6 cm) on each side, which gives the finished size of 73 in × 92 in (185.4 cm × 233.7 cm).
Final Blocking
- Weave in all the remaining tails along seams, working in different directions.
- Lay the bedspread flat on blocking mats or a clean carpet covered with towels.
- Spray it evenly until it is damp, not soaking.
- Pin the outer points first, checking the width of 73 in (185.4 cm) and the length of 92 in (233.7 cm).
- Pin the valleys in so the scallops are even.
- Gently open the triangular windows with your fingers and push the bobbles to the front.
- Leave it until it is completely dry, at least 24 hours.
Final Quality-Control Checklist
- [ ] All 196 motifs measure 6 in (15.2 cm) flat to flat
- [ ] Every side has 15 sc between bobbles
- [ ] All bobbles sit on the right side
- [ ] Seams lie flat with no puckers or gaps
- [ ] Bobbles are clustered neatly where motifs meet
- [ ] Rows are offset correctly: 12, 11, 12 and so on
- [ ] The border points are crisp and the valleys are even
- [ ] The finished size is 73 in × 92 in (185.4 cm × 233.7 cm)
- [ ] All ends are woven in securely
Troubleshooting
The motif cups after Round 5: Your trebles are too short or your chains are too tight. Loosen the ch-3 spaces.
The motif ruffles after Round 6: You are pulling the 3-sc groups too loose. Go down half a hook size for Rounds 6–8 only.
The bobbles are flat: Make sure you have all 6 loops before you close the bobble, and push it firmly to the right side.
The sides don’t match when joining: Recount Round 8. Every side must have 15 sc.
The border ruffles at the points: Use (sc, ch 1, sc) instead of (sc, ch 2, sc).
The valleys pucker: Check that every valley has its sc2tog.
Care
Hand wash or machine wash on a gentle cool cycle in a laundry bag, depending on the yarn label. Lay flat to dry and reshape the points while damp.
Final Notes
Every stage builds on the one before. Each motif grows to 6 in (15.2 cm) flat to flat with 15 sc per side. Twelve motifs make a 72 in (182.9 cm) row. Seventeen offset rows make 91 in (231.1 cm). A 2-round border follows the outline, using 1,710 side stitches, and finishes the bedspread at 73 in × 92 in (185.4 cm × 233.7 cm). Check your first motif carefully and the rest will follow.
Happy crocheting!