

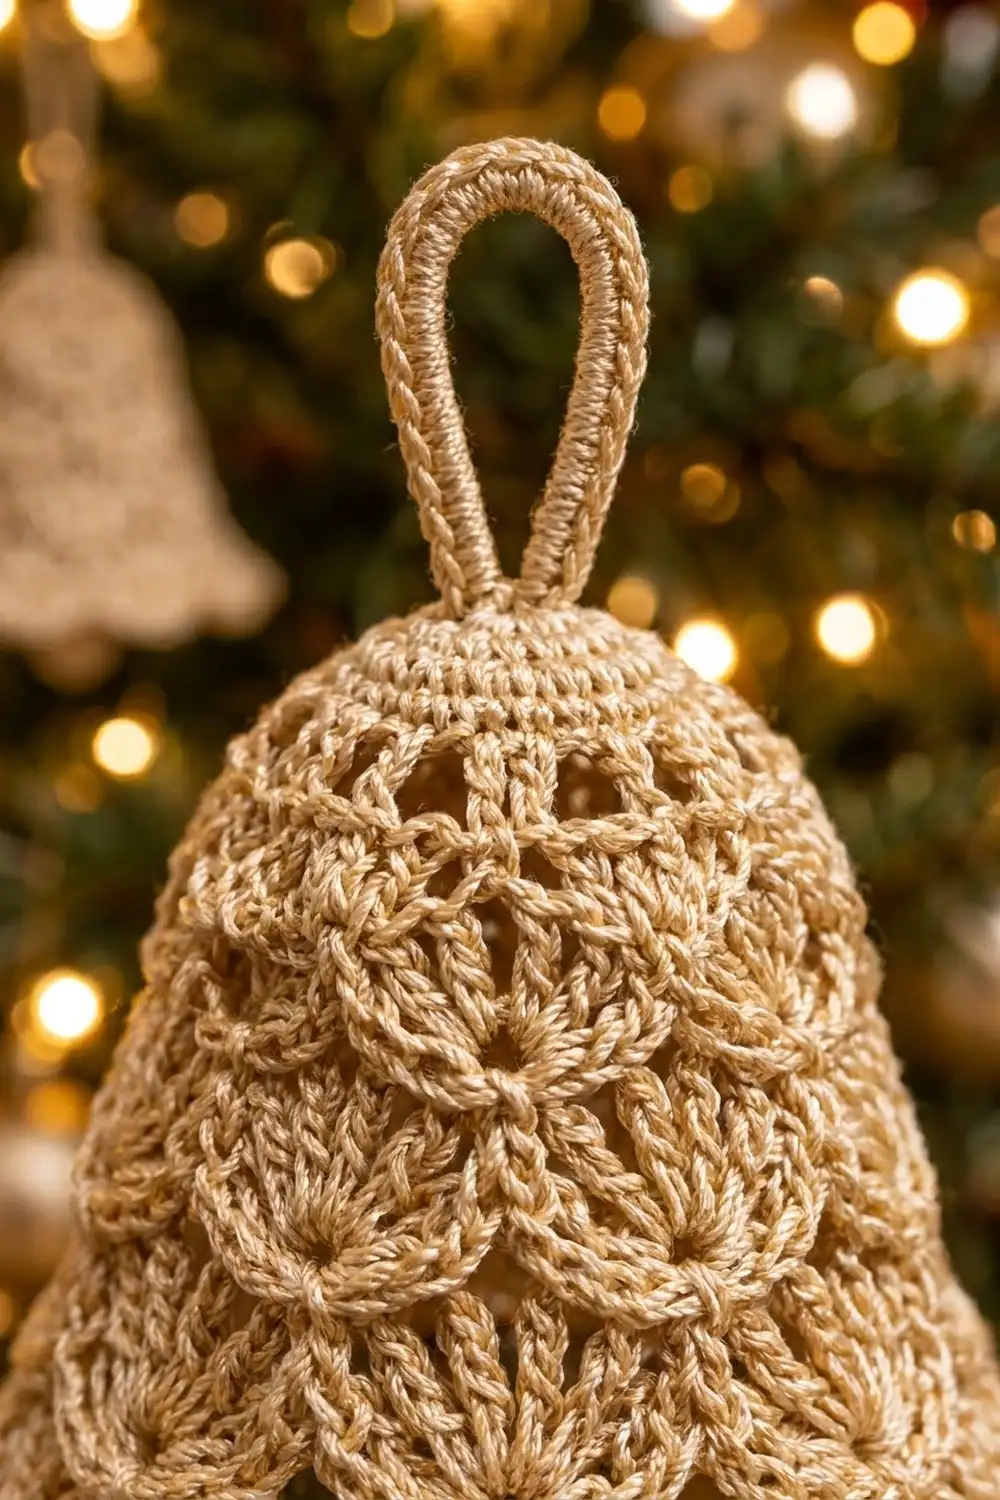
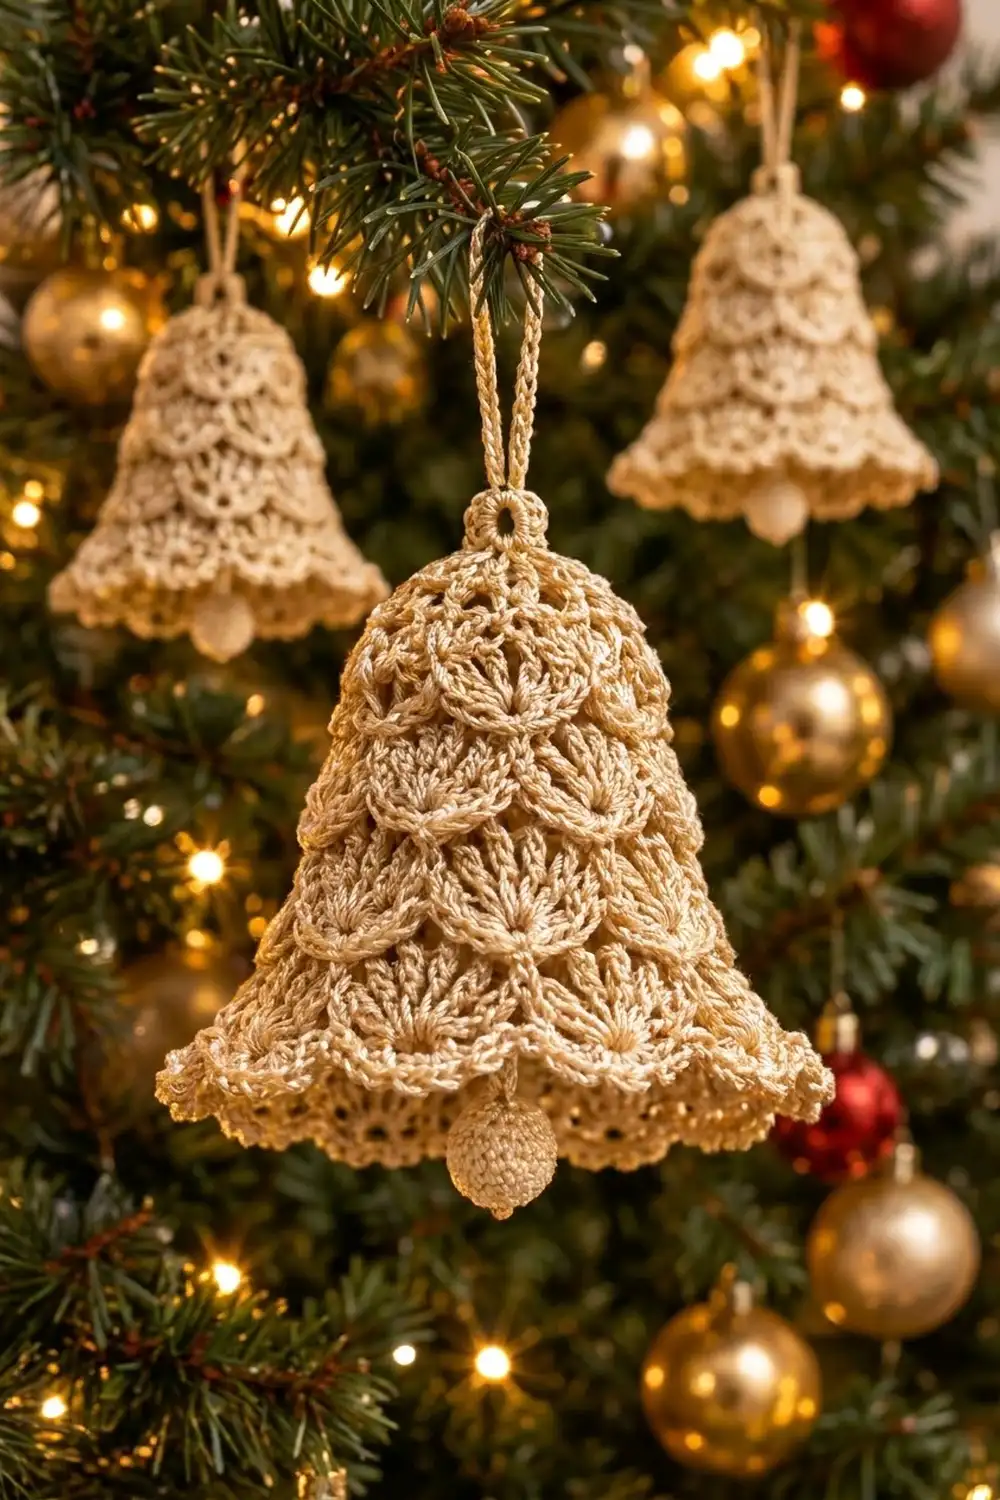
This little bell uses a single champagne-gold thread. Five tiers of fan stitches stack like scales from a small crown down to a flared rim with a picot edge. A small crocheted ball hangs inside as a clapper, and a firm loop at the top lets the bell hang straight on a branch.
The style is classic thread lace: openwork fans and chain arcs that catch the light from tree bulbs. Because it uses only one color, it looks calm and elegant and goes with gold, cream, red, or green decorations.
The pattern uses US crochet terms. The finished bell is 3.75 in (9.5 cm) tall without the loop and 4 in (10.2 cm) across the rim after blocking. The loop adds 1.5 in (3.8 cm).
You work the bell from the top down in joined rounds. Each tier takes two rounds: an arc round that shifts where the fans sit, then a fan round. A two-round lace edging flares the rim. Then you make the clapper, attach the loop, and block the bell over a form so it holds its shape.
Finished Size and Construction
- Finished size: 3.75 in (9.5 cm) tall, 4 in (10.2 cm) rim diameter
- Hanging loop: adds 1.5 in (3.8 cm)
- Skill level: Intermediate (thread work, counting in rounds)
- Terminology: US
- Yarn weight: Size 3 cotton crochet thread (Lace, weight 0)
- Hook: 2.25 mm (US B-1)
- Number of pieces: 1 bell, plus a small clapper ball attached inside
- Layout: One 3D ornament worked in the round, top down
- Bell body before edging: 3.25 in (8.3 cm) tall, 3.25 in (8.3 cm) across
- Edging depth: 0.5 in (1.3 cm)
Materials
Choose a mercerized cotton thread in size 3. Mercerized cotton has a soft sheen that looks gold without the scratchiness of metallic fibers. A thread with a fine metallic strand also works if you want more sparkle. Avoid fuzzy or very soft threads, because the fans need crisp edges.
- Champagne / light gold thread: 25 g, about 100 m (109 yd)
- Polyester fiberfill: a pinch, for the clapper (or a 0.5 in / 1.3 cm wooden bead)
These amounts include a margin. One bell uses about 18 g, or about 75 m (82 yd).
Tools:
- 2.25 mm (US B-1) crochet hook
- Tapestry needle
- Sharp scissors
- 1 stitch marker
- Fabric stiffener or heavy spray starch
- A bell-shaped form: a small plastic funnel, a paper cone, or a plastic cup wrapped in plastic wrap
- Rustproof pins
Abbreviations (US Terms)
- ch – chain
- sl st – slip stitch
- sc – single crochet
- hdc – half double crochet
- dc – double crochet
- sc2tog – single crochet 2 together
- sk – skip
- sp – space
- beg – beginning
- st(s) – stitch(es)
Special stitches:
- Fan: the stated number of dc, all worked into the same ch-sp.
- Picot: ch 3, sl st in 3rd ch from hook.
- Center dc: the middle dc of a fan: the 3rd of 5, 4th of 7, 5th of 9, 6th of 11, or 7th of 13. On the first fan of a round, the beg ch-3 counts as dc 1.
Gauge and Checkpoints
Thread gauge varies a lot from person to person, so work the first tiers and measure before you go further.
Gauge: 8 dc = 1 in (2.5 cm). Rounds 1–2 = 1 in (2.5 cm) across, laid flat.
Flatten the bell gently on a table to measure it, without stretching:
- After Round 2: 1 in (2.5 cm) across
- After Round 4 (Tier 1): 1.5 in (3.8 cm) across, 1 in (2.5 cm) tall
- After Round 8 (Tier 3): 2.5 in (6.4 cm) across, 2 in (5.1 cm) tall
- After Round 12 (Tier 5): 3.25 in (8.3 cm) across, 3.25 in (8.3 cm) tall
- After Round 14 (edging), blocked: 4 in (10.2 cm) across, 3.75 in (9.5 cm) tall
Too big? Go down to a 2 mm hook, or keep your chain arcs tighter. Too small? Go up to a 2.5 mm hook. A 0.25 in (0.6 cm) difference at Tier 1 grows to about 0.75 in (1.9 cm) at the rim, so fix it early.
Bell Body
Join every round with a sl st to the first st. Do not turn. If it helps, mark the first st of each round.
Crown
Round 1: Magic ring, ch 1, 8 sc in ring. Join to first sc. Pull the ring closed, but leave a tiny hole for the clapper cord. (8 sc)
Round 2: Ch 3 (counts as dc), dc in same st, 2 dc in each sc around. Join to top of beg ch-3. (16 dc)
Round 3: Ch 1, sc in first st, ch 3, sk 1 st, sc in next st; repeat from * 6 more times, ch 3, sk last st. Join to first sc. (8 sc, 8 ch-3 sps)
Tier 1
Round 4: Sl st in first ch-3 sp, ch 3 (counts as dc), 4 dc in same sp, sc in next sc, 5 dc in next ch-3 sp, sc in next sc; repeat from * 6 more times. The last sc goes into the first sc of Round 3. Join to top of beg ch-3. (8 fans of 5 dc + 8 sc = 48 sts)
Tier 2
Round 5: Sl st in next 2 dc to reach the center dc of the first fan. Ch 1, sc in same st, ch 5, sc in center dc of next fan; repeat from * 6 more times, ch 5. Join to first sc. (8 sc, 8 ch-5 sps)
Each ch-5 arc now passes over the sc between two Tier 1 fans. This offsets each tier from the one above, which creates the scale pattern.
Round 6: Sl st in first ch-5 sp, ch 3, 6 dc in same sp, sc in next sc, 7 dc in next ch-5 sp, sc in next sc; repeat from * 6 more times. Join. (8 fans of 7 dc + 8 sc = 64 sts)
Tier 3
Round 7: Sl st in next 3 dc (center dc), ch 1, sc in same st, ch 6, sc in center dc of next fan; repeat from * 6 more times, ch 6. Join. (8 sc, 8 ch-6 sps)
Round 8: Sl st in first ch-6 sp, ch 3, 8 dc in same sp, sc in next sc, 9 dc in next ch-6 sp, sc in next sc; repeat from * 6 more times. Join. (8 fans of 9 dc + 8 sc = 80 sts)
Checkpoint: 2.5 in (6.4 cm) across, 2 in (5.1 cm) tall.
Tier 4
Round 9: Sl st in next 4 dc (center dc), ch 1, sc in same st, ch 7, sc in center dc of next fan; repeat from * 6 more times, ch 7. Join. (8 sc, 8 ch-7 sps)
Round 10: Sl st in first ch-7 sp, ch 3, 10 dc in same sp, sc in next sc, 11 dc in next ch-7 sp, sc in next sc; repeat from * 6 more times. Join. (8 fans of 11 dc + 8 sc = 96 sts)
Tier 5
Round 11: Sl st in next 5 dc (center dc), ch 1, sc in same st, ch 8, sc in center dc of next fan; repeat from * 6 more times, ch 8. Join. (8 sc, 8 ch-8 sps)
Round 12: Sl st in first ch-8 sp, ch 3, 12 dc in same sp, sc in next sc, 13 dc in next ch-8 sp, sc in next sc; repeat from * 6 more times. Join. (8 fans of 13 dc + 8 sc = 112 sts)
Checkpoint: 3.25 in (8.3 cm) across, 3.25 in (8.3 cm) tall. Each fan repeat is now 14 sts (13 dc + 1 sc), and 8 × 14 = 112. Do not fasten off. The edging starts right here.
Rim Edging
On this bell, the edging takes the place of a border. It turns the 8 large fans into a finer lace rim that flares out.
Edging gauge: after blocking, each ch-5 loop measures about 0.4 in (1.0 cm) along the rim.
Round 13: Sl st in next 6 dc to reach the center dc (the 7th dc of the first fan). Ch 1, sc in same st, ch 5, sk 3 dc, sc in next dc, ch 5, sk 2 dc, sc in next sc, ch 5, sk 2 dc, sc in next dc, ch 5, sk 3 dc, sc in next dc; repeat from * 7 more times, leaving out the final sc on the last repeat. Join to first sc. (32 sc, 32 ch-5 loops)
In each fan repeat, the sc anchors fall on dc 7, dc 11, the sc between fans, dc 3 of the next fan, and back to dc 7. The gaps are 4 + 3 + 3 + 4 = 14 sts, exactly one repeat. That gives 4 loops per repeat × 8 repeats = 32 loops.
Round 14: Sl st in first ch-5 loop. In each ch-5 loop around, work (sc, hdc, dc, picot, dc, hdc, sc). Join to first sc and fasten off. (32 scallops × 6 sts = 192 sts, plus 32 picots)
Why the math works: Round 12 measures about 10.2 in (25.9 cm) around. The 112 sts bunch together because each fan is worked into a single chain space. Round 13 adds 32 loops of about 0.4 in (1.0 cm) each, for about 12.8 in (32.5 cm) of rim. A circle 4 in (10.2 cm) across measures 12.6 in (32.0 cm) around. That extra length is what flares the rim into a bell lip, so it neither hangs straight nor ruffles.
Weave in all ends along the back of the stitches.
Clapper
Round 1: Magic ring, ch 1, 6 sc in ring. Join. (6 sc)
Round 2: Ch 1, 2 sc in each st around. Join. (12 sc)
Rounds 3–4: Ch 1, sc in each st around. Join. (12 sc)
Stuff firmly with fiberfill, or insert a 0.5 in (1.3 cm) bead.
Round 5: Ch 1, sc2tog 6 times. Join. (6 sts) Fasten off, leaving a 10 in (25.4 cm) tail. Weave the tail through the 6 front loops, pull closed, and bring the tail out at the top. The ball is about 0.75 in (1.9 cm) across.
Hanging Loop and Clapper Cord
Cord: Using the clapper tail, ch 22, which is about 2.75 in (7.0 cm). Pull the tail up through the hole in the center of Round 1, from inside to outside. Adjust so the bottom of the ball sits level with the bottom of Tier 5. Knot the tail firmly on the outside of the crown.
Loop: Join thread with a sl st in any sc of Round 1. Ch 24, sl st in the same sc to form a ring. Work 32 sc into the ring so they cover the chain completely. Sl st in the base sc and fasten off. Weave the end down through the crown, catching the clapper knot so it stays hidden and can’t slip. The finished loop stands 1.5 in (3.8 cm) above the crown.
Final Blocking
- Mix the fabric stiffener as the bottle directs, or prepare heavy spray starch.
- Wrap your form in plastic wrap. It should be about 3.25 in (8.3 cm) across where the rim will sit.
- Soak the bell, then squeeze out the extra liquid without wringing. Blot it in a towel.
- Tuck the clapper inside and slide the bell over the form, crown up.
- Ease each tier down so the fans sit evenly, 8 per round, offset like scales.
- Pull the edging outward and pin each of the 32 picots so the rim measures 4 in (10.2 cm) across.
- Check the height: 3.75 in (9.5 cm) from crown to rim.
- Let it dry completely, usually 12 to 24 hours. Remove the pins and slide the bell off.
- Hang it by the loop and check that the clapper hangs in the center.
Final Quality-Control Checklist
- The crown hole is small and the clapper knot is hidden.
- Every fan round has 8 fans, and every arc round has 8 arcs.
- Fans grow from 5 to 7, 9, 11, then 13 dc, top to bottom.
- Each fan sits centered over the gap between the two fans below it.
- Round 13 has 32 loops, and Round 14 has 32 picots.
- The bell is 3.75 in (9.5 cm) tall and 4 in (10.2 cm) across the rim.
- The loop is 1.5 in (3.8 cm) tall and fully covered with sc.
- The clapper sits level with the bottom of Tier 5 and doesn’t show below the rim.
- All ends are woven in and can’t be seen from outside.
Troubleshooting
The bell lies flat like a disk instead of forming a cone. Your arc chains are too long or too loose. Use the exact chain counts and keep the chains snug.
The bell is too narrow and the fans buckle. Your chains are too tight. Go up one hook size for the arc rounds only.
The tiers line up directly on top of each other. You worked into the sc instead of the center dc. Recount the sl sts at the start of each arc round.
The rim ruffles. Your ch-5 loops are too long. Work Round 13 with ch-4 loops so the rim flares less.
The rim curls inward. Pin it farther out when blocking, and give only the edging a second coat of stiffener.
The clapper hangs off-center. Pull the cord back out, thread it through the exact center of Round 1, and knot it again.
The bell sags over time. Stiffen and block it again. Humid storage softens starch.
Care
Dust gently with a soft brush and store flat in a box with tissue paper. If the bell softens, rinse it, stiffen it again, and reblock it over the form.
Final Notes
Here is how the measurements build: a gauge of 8 dc per 1 in (2.5 cm) gives a 1 in (2.5 cm) crown, 1.5 in (3.8 cm) at Tier 1, 2.5 in (6.4 cm) at Tier 3, and 3.25 in (8.3 cm) at Tier 5. The 112-st round divides into 8 repeats of 14 sts. Those repeats hold 32 edging loops, which flare the rim to 4 in (10.2 cm) across on a bell 3.75 in (9.5 cm) tall. Check your size at each stage, and each bell will match the last.
Happy crocheting!