

This hanging combines small beige bells with cream roses, sage-green leaves and strands of glossy pearls. Each strand ends in a soft cream tassel, and the whole piece hangs from a rope-wrapped rod. It looks delicate, but every part is small and quick to make, and you can check each one as you go.
The colors are quiet and warm. The bells are sand beige; the roses, tabs and tassels are cream; and the leaves are soft sage. The bells have a dense single crochet body and a flared, scalloped rim. The roses have three layers of petals around a tight center.
This pattern uses US crochet terms. The finished hanging measures about 14 in (35.6 cm) wide and 16.5 in (41.9 cm) tall, including the rod. Each bell is about 2.5 in (6.4 cm) tall, and each rose is about 2 in (5.1 cm) across.
The construction is simple. You crochet the bells from the top down in joined rounds and finish each one with a scalloped border. The roses, leaves, tabs and tassels are made separately. Then you string everything on pearl-beaded cords and hang six strands from the rod.
Finished Size and Construction
- Finished size: about 14 in (35.6 cm) wide x 16.5 in (41.9 cm) tall
- Skill level: Easy-intermediate
- Terminology: US crochet terms
- Yarn weight: DK (#3 light) cotton
- Hook: 3.0 mm (US C/2–D/3)
- Number of pieces: 9 bells, 6 roses, 12 leaves, 6 tabs, 6 tassels
- Layout: 6 vertical strands spaced 2 in (5.1 cm) apart on a rope rod
- Piece size: bell 2.5 in (6.4 cm) tall, with a rim about 2.8 in (7.1 cm) across; rose 2 in (5.1 cm); leaf 1.1 in (2.8 cm)
- Bell size before border: about 2.3 in (5.8 cm) tall
- Border depth: about 0.2 in (0.5 cm) of scallops on each bell rim
Materials
Choose a smooth, tightly plied cotton or cotton blend. Mercerized cotton gives crisp stitch definition, and it holds a flared shape well after blocking.
- Sand beige (bells): 60 g / about 145 m
- Cream (roses, tabs, tassels): 40 g / about 100 m
- Sage green (leaves): 10 g / about 25 m
These quantities include a margin of about 20 percent for the test bell, yarn tails and tassel trimming.
Tools and notions:
- 3.0 mm (US C/2–D/3) crochet hook
- Tapestry needle and a fine beading needle
- 120 cream pearl beads, 6 mm
- 25 cream pearl beads, 10 mm
- Strong cream nylon beading cord, 0.8 mm, about 4 yd (3.7 m)
- Rope-wrapped rod or jute-wrapped dowel, 14 in (35.6 cm) long and about 1 in (2.5 cm) thick
- Stitch marker, scissors, ruler, and a stiff card 3 in (7.6 cm) tall
- Fabric stiffener (optional, for the bells)
Abbreviations (US Terms)
- ch – chain
- sl st – slip stitch
- sc – single crochet
- hdc – half double crochet
- dc – double crochet
- sk – skip
- sp – space
- MR – magic ring
- st(s) – stitch(es)
- inc – 2 sc in the same st
Special stitch – Scallop: (sc in next st, sk 1 st, 5 dc in next st, sk 1 st). One scallop uses 4 sts of the previous round and makes 6 new sts.
Gauge and Checkpoints
Gauge: 22 sc and 24 rounds = 4 in (10.2 cm) in sc, worked firmly. That is 5.5 sts and 6 rounds per inch.
Make one complete bell before anything else. It works as your gauge test because it shows both stitch width and round height.
Checkpoints for one bell:
- After Rnd 3: a flat circle about 1 in (2.5 cm) across.
- After Rnd 9: a tube about 1.5 in (3.8 cm) tall and about 2.2 in (5.6 cm) wide when pressed flat.
- After Rnd 14: the bell is about 2.3 in (5.8 cm) tall.
- After the border: the bell is about 2.5 in (6.4 cm) tall, and the rim is about 2.8 in (7.1 cm) across when shaped round.
If your bell is too big, switch to a 2.75 mm hook. If it is too small or stiff, switch to a 3.25 mm hook. Small differences are fine in a hanging, but make all nine bells the same size.
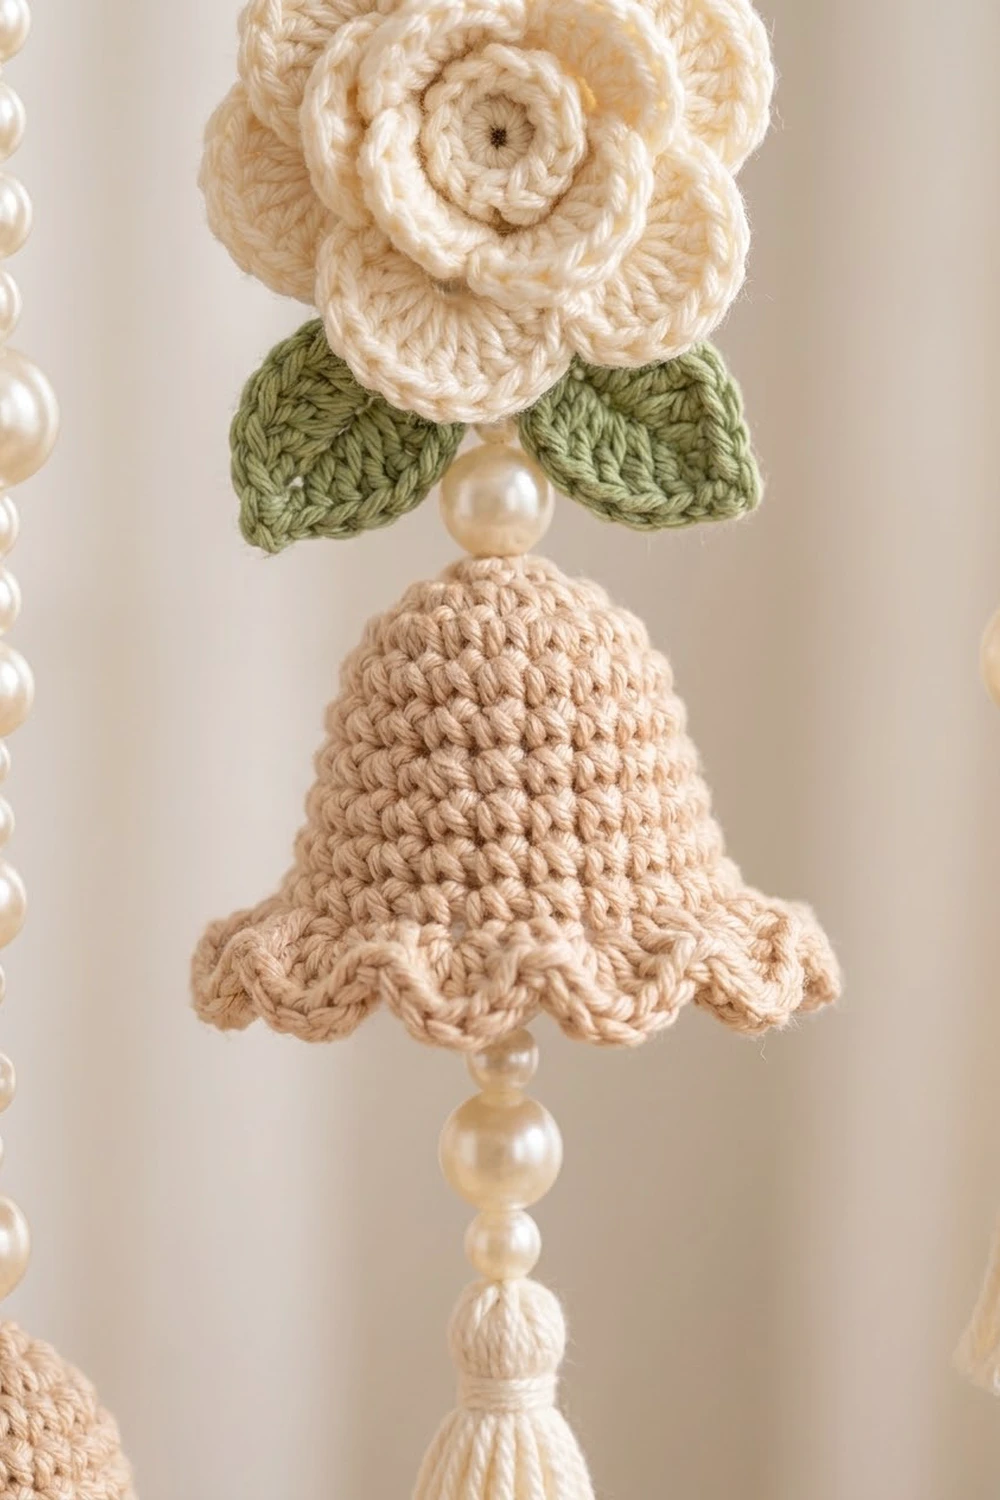
Bell (make 9, sand beige)
Work in joined rounds. Join each round with a sl st to the first sc, then ch 1 to begin the next round. The ch 1 does not count as a stitch.
Rnd 1: MR, 6 sc in ring, join. (6)
Rnd 2: Inc in each st around. (12)
Rnd 3: (sc, inc) 6 times. (18)
Pull the ring closed, but leave a tiny opening that the beading needle can pass through.
Rnds 4–6: Sc in each st around. (18)
These straight rounds turn the flat top into the narrow crown of the bell.
Rnd 7: (2 sc, inc) 6 times. (24)
Rnds 8–9: Sc in each st around. (24)
Rnd 10: (3 sc, inc) 6 times. (30)
Rnds 11–12: Sc in each st around. (30)
Rnd 13: (4 sc, inc) 6 times. (36)
Rnd 14: (2 sc, inc) 12 times. (48)
Rnd 14 adds 12 stitches instead of 6. This sudden jump creates the flare at the lower edge. Do not fasten off; go straight on to the border (see “Border: Scalloped Bell Rim” below).
Rose (make 6, cream)
Rnd 1: MR, ch 1, 10 sc in ring, join. (10)
Rnd 2: Ch 1, sc in first st, (ch 3, sk 1, sc in next st) 4 times, ch 3, sk 1, join to first sc. (5 sc, 5 ch-3 sps)
Rnd 3: In each ch-3 sp work (sc, hdc, 3 dc, hdc, sc), join. (5 petals, 35 sts)
Rnd 4: Working behind the petals, (ch 5, sc around the post of the next Rnd 2 sc) 5 times, ending with the last sc around the first post. (5 ch-5 loops)
Rnd 5: In each ch-5 loop work (sc, hdc, 5 dc, hdc, sc), join. (5 petals, 45 sts)
Rnd 6: Working behind, (ch 6, sc around the post of the next Rnd 4 sc) 5 times. (5 ch-6 loops)
Rnd 7: In each ch-6 loop work (sc, hdc, 7 dc, hdc, sc), join. (5 petals, 55 sts)
Fasten off and leave a 10 in (25.4 cm) tail. Each layer sits behind the one before and is slightly larger, which gives the rose its stacked, cupped look. The rose should measure about 2 in (5.1 cm) across.
Leaf (make 12, sage green)
Ch 7.
Side 1: Starting in the 2nd ch from the hook, work sl st, sc, hdc, dc, hdc, then 3 sc in the last ch. (8 sts)
Side 2: Working along the other side of the chain, work hdc, dc, hdc, sc. (4 sts)
Tip: In the first ch (the one that holds the first sl st), work (sc, ch 2, sl st).
Fasten off and leave an 8 in (20.3 cm) tail. The foundation chain forms a natural center vein. The leaf measures about 1.1 in (2.8 cm) long.
Hanging Tab (make 6, cream)
Ch 6.
Row 1: Sc in the 2nd ch from the hook and in each ch across. (5)
Rows 2–24: Ch 1, turn, sc in each st across. (5)
Fasten off and leave a 10 in (25.4 cm) tail. The tab is about 0.9 in (2.3 cm) wide and 4 in (10.2 cm) long.
Tassel (make 6, cream)
Wrap the yarn 25 times around the 3 in (7.6 cm) card. Slide a 10 in (25.4 cm) strand under the loops at the top and tie it tightly. Cut the loops at the bottom. Wrap a second strand around the tassel 0.4 in (1.0 cm) below the top, tie it, and bury the ends inside. Trim the tassel to 2.5 in (6.4 cm).
Make All Pieces
Totals by color:
- Sand beige: 9 bells
- Cream: 6 roses, 6 tabs, 6 tassels
- Sage green: 12 leaves
There are two strand types. Type A is shorter. Type B is longer and carries two bells.
Type A (strands 1, 3, 5), top to bottom:
tab – 6 small pearls – 1 large pearl – rose with 2 leaves – 1 large pearl – 8 small pearls – bell with large-pearl clapper – tassel
Type B (strands 2, 4, 6), top to bottom:
tab – 4 small pearls – bell with clapper – 8 small pearls – 1 large pearl – rose with 2 leaves – 1 large pearl – 8 small pearls – bell with clapper – tassel
Layout grid (across the rod, left to right):
Strand:   1      2      3      4      5      6
Top:     Rose   Bell   Rose   Bell   Rose   Bell
Middle:  Bell   Rose   Bell   Rose   Bell   Rose
Bottom:  Tassel Bell   Tassel Bell   Tassel Bell
Extra:   –      Tassel –      Tassel –      Tassel
Bead check: Each Type A strand uses 14 small pearls, 2 large pearls and 1 clapper. Each Type B strand uses 20 small pearls, 2 large pearls and 2 clappers. The six strands use 102 small and 21 large pearls in total, so the 120 and 25 in the materials list leave spares.
Joining
Here, joining means assembly. You attach every piece to a beading cord, and each cord hangs from a tab on the rod.
1. Prepare the cords. Cut six cords, each 24 in (61.0 cm) long. Tie the top of each cord securely to the center of a tab’s bottom row.
2. Add the roses. Sew two leaves to the back of each rose at about 5 and 7 o’clock, angled outward. On the back of the rose, run the cord under two of the Rnd 6 chain loops, one at the top and one at the bottom. The cord then runs straight down behind the rose, and the flower faces forward. Add a large pearl directly above and below the rose.
3. Add the bells. Pass the cord down through the opening in the center of the bell’s Rnd 1. Inside the bell, tie a double overhand knot right under the crown so the bell rests on it. Thread a large pearl, slide it about 1.2 in (3.0 cm) down, and knot the cord below it so the pearl hangs like a clapper.
4. Finish each strand. Below the bottom bell, tie the tassel’s top strand to the cord and knot it twice. Trim the cord ends to 0.4 in (1.0 cm) and add a dot of glue.
Tension advice: Keep the knots snug, but don’t pull the pearls tight against each other so the strands can swing freely. Attach the cord firmly at the back of each rose so the rose doesn’t tilt.
5. Hang the strands. Fold each tab around the rod and whipstitch the short ends together just under it, leaving about 0.4 in (1.0 cm) of loop below. Space the tabs 2 in (5.1 cm) apart, center to center, with 2 in (5.1 cm) free at each end of the rod.
Size checkpoint: 2 in margin + 5 gaps of 2 in + 2 in margin = 14 in (35.6 cm). Type A strands hang about 11 in (27.9 cm) below the tab, and Type B strands hang about 15 in (38.1 cm) below it.
Border: Scalloped Bell Rim
Work the border in sand beige on each bell, directly after Rnd 14.
Border gauge: Each scallop uses 4 sts of Rnd 14. It is about 0.7 in (1.8 cm) wide and 0.2 in (0.5 cm) deep.
Rnd 15 (border): Work the Scallop 12 times around, then join with a sl st to the first sc. (12 scallops; 12 sc + 60 dc = 72 sts)
Each scallop is 6 sts: 1 sc and 5 dc. Fasten off and weave in the ends.
Why the math works: Rnd 14 has 48 sts, and one scallop uses 4 sts. Since 48 ÷ 4 = 12, the repeat closes evenly with no partial scallop. The 5 dc packed into one stitch make the rim ripple and flare outward, which forms the wavy edge of the bell.
Final Blocking
- Lightly mist each bell with water. For a firmer shape, dip it in diluted fabric stiffener instead.
- Stuff the bell with a paper towel rolled into a cone.
- Pull each scallop down and outward with your fingers so the rim flares evenly.
- Pin the roses face up on a foam mat and gently cup the petal layers.
- Pin the leaves flat and pinch the tips into points.
- Let everything dry completely before assembly.
Final Quality-Control Checklist
- All nine bells are within 0.2 in (0.5 cm) of the same height.
- Each bell rim has exactly 12 even scallops.
- Each rose has three distinct layers of 5 petals.
- Leaves point outward at matching angles.
- Clappers hang inside the bells, not below the rim.
- Strands of the same type are the same length.
- Tabs are evenly spaced and the rod hangs level.
- All ends are woven in, or knotted and sealed.
Troubleshooting
The bell looks too straight. Rnd 14 must add 12 sts, not 6. Recount to make sure you have 48.
The rim won’t close evenly. You probably have more or fewer than 48 sts in Rnd 14. Recount before starting the border.
Rose petals cover the center. Make each post sc around the sc of the correct round so each layer sits behind the previous one.
Leaves curl. Your tension is tight on Side 1. Pin the leaves flat to block them.
Strands twist. Re-tie the cord at the center of the tab and let the hanging rest for a day.
A bell slides down the cord. Tie a second overhand knot over the first one under the crown to make it bigger.
Care
Dust gently with a soft brush or a hair dryer on the cool setting. If needed, spot clean with a damp cloth and lay flat to dry. Don’t machine wash the beaded strands.

Final Notes
The sizes all build from one gauge. At 5.5 sts and 6 rounds per inch, a bell is 2.3 in (5.8 cm) tall before the border. The 0.2 in (0.5 cm) scallop border brings it to 2.5 in (6.4 cm). Roses at 2 in (5.1 cm), leaves at 1.1 in (2.8 cm) and tassels at 2.5 in (6.4 cm) fill out the strands. Six strands spaced 2 in (5.1 cm) apart make a hanging 14 in (35.6 cm) wide and about 16.5 in (41.9 cm) tall.
Happy crocheting!