

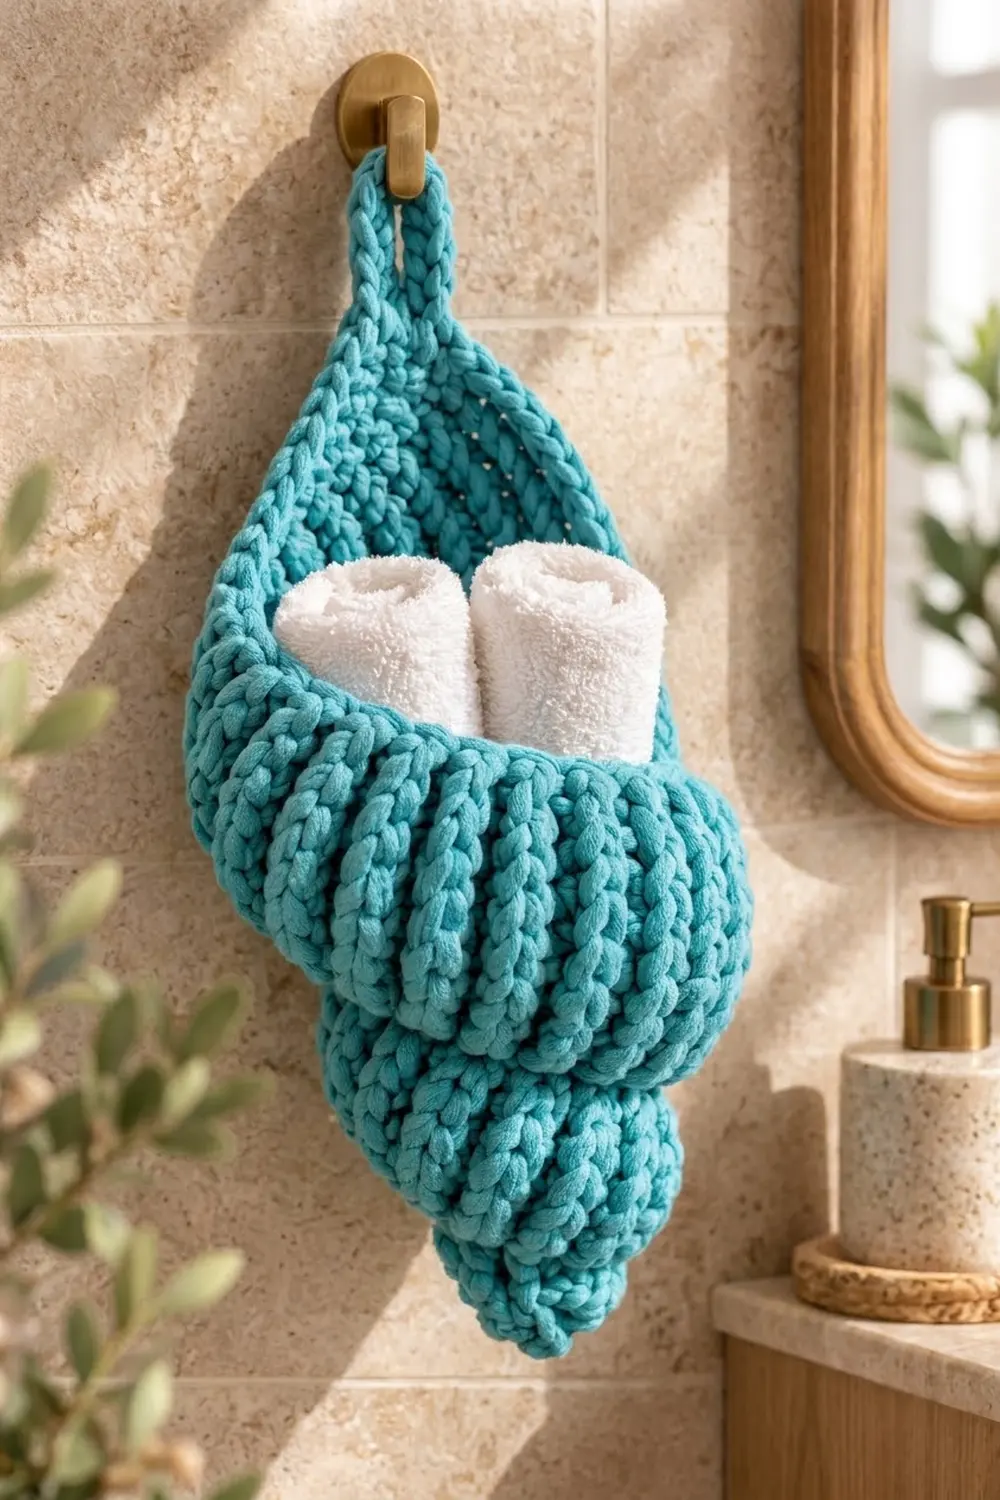
This hanging basket looks like a spiral conch shell. It starts at a pointed spire and grows through three ridged tiers into a deep pocket. A smooth, pointed back flap rises behind the opening and ends in a sturdy hanging loop. It holds rolled hand towels, washcloths, or bath toys, and it looks good on a bathroom wall.
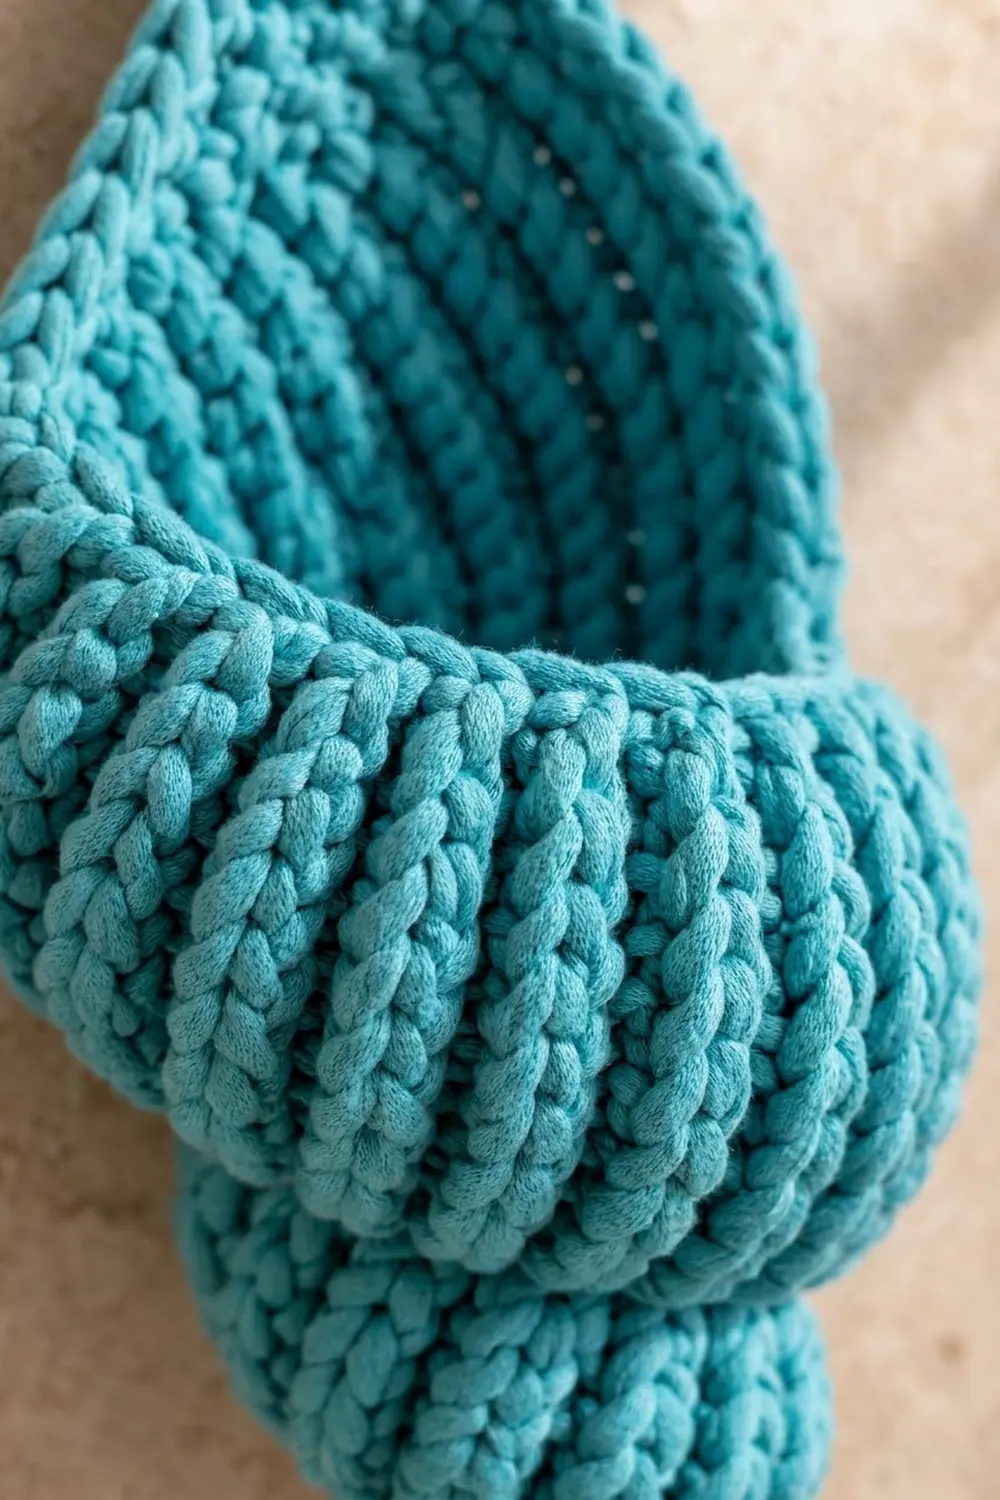
The sample uses one color, a bright turquoise bulky cotton cord. The knit-look ridges come from camel stitch: half double crochet worked into the third loop. That loop is on the inside of the work, so working into it pushes a raised horizontal bar to the outside on every round. Plain single crochet rounds between the tiers pull the fabric in, which gives the shell its stepped, stacked outline.
This pattern uses US crochet terms. The finished basket is about 7 in (17.8 cm) wide when laid flat at its widest point. It is about 13.5 in (34.3 cm) tall from spire tip to flap point, or 15 in (38.1 cm) including the loop.
You crochet the whole thing as one piece. Work joined rounds from the spire tip up to the rim. Then work flat rows over the back half of the rim to shape the tapered flap. Finish with a two-round border around the opening and flap, then add a covered chain loop at the point. There is no sewing and no joining.
Finished Size and Construction
- Finished size: 7 in (17.8 cm) wide flat × 13.5 in (34.3 cm) tall; 15 in (38.1 cm) tall with loop
- Skill level: Intermediate (third-loop hdc, shaping in rounds and rows)
- Terminology: US crochet terms
- Yarn weight: Bulky (#5) cotton or cotton-blend cord
- Hook: 6.0 mm (US J-10)
- Number of pieces: 1
- Layout: Single shell, hung vertically
- Body height (spire to rim): 9 in (22.9 cm)
- Back flap height: 4 in (10.2 cm)
- Size before border: 7 in (17.8 cm) × 13 in (33.0 cm)
- Border depth: about 0.5 in (1.3 cm)
Materials
Yarn advice: Pick a firm bulky cotton or cotton-blend cord of about 110 m per 100 g. Cotton keeps its shape, takes a good wet block, and handles bathroom humidity. Avoid very soft or fuzzy acrylic, because the tiers can collapse under the weight of towels.
- Turquoise: 230 g / 253 m
The sample used about 180 g. The quantity listed includes a margin for your gauge swatch and small tension differences.
Tools:
- 6.0 mm (US J-10) crochet hook
- 4 locking stitch markers
- Tapestry needle with a large eye
- Scissors
- Measuring tape
- Two or three hand towels for blocking
- Wall hook for hanging (optional)
Abbreviations (US Terms)
- ch – chain
- sl st – slip stitch
- sc – single crochet
- hdc – half double crochet
- sc2tog – single crochet 2 together
- sc3tog – single crochet 3 together
- rev sc – reverse single crochet (crab stitch)
- inc – increase (2 stitches in the same stitch)
- MR – magic ring
- st(s) – stitch(es)
- rnd(s) – round(s)
Special stitch – Camel hdc (third-loop hdc): Look at the inside of the work just below the top V of the stitch. You’ll see a horizontal bar, the third loop. Work the hdc into that bar only. The top V gets pushed to the outside and forms a raised knit-look ridge. A camel inc is 2 camel hdc in the same third loop.
Round joins: Start every round with ch 1. This chain does not count as a stitch. Join each round with a sl st into the first stitch, and don’t turn. Keep the join lined up at one side of the shell, because the flap edge will cover it later.
Gauge and Checkpoints
Gauge: 12 sts and 8 rnds of camel hdc = 4 in (10.2 cm). 12 sts and 12 rows of sc = 4 in (10.2 cm).
So 3 sts make 1 in (2.5 cm). A camel hdc round is about 0.5 in (1.3 cm) tall and an sc round is about 0.33 in (0.8 cm) tall.
Make your test with the shell itself. The first 11 rounds act as your swatch. Check these numbers:
- After Rnd 3: cone about 1 in (2.5 cm) tall; flat width 2 in (5.1 cm)
- After Rnd 6: about 2.5 in (6.4 cm) tall; first tier 4 in (10.2 cm) wide flat
- After Rnd 11: about 4.8 in (12.2 cm) tall; second tier 6 in (15.2 cm) wide flat
- After Rnd 20: 9 in (22.9 cm) tall; rim 7 in (17.8 cm) wide flat
Too big? Change to a 5.5 mm (US I-9) hook. Also check that you are working into the third loop and not around the whole stitch.
Too small or stiff? Change to a 6.5 mm (US K-10.5) hook.
The fabric should be dense. If you can see gaps when you hold the tier up to the light, go down a hook size.
Spire (Rounds 1–3)
Rnd 1: MR, ch 1, 6 sc in ring, join. (6 sts) Pull the ring closed tight.
Rnd 2: Ch 1, (sc, inc) 3 times, join. (9 sts)
Rnd 3: Ch 1, (2 sc, inc) 3 times, join. (12 sts)
These are plain sc rounds worked in both loops, so the spire tip stays smooth and pointed.
First Tier (Rounds 4–7)
Rnd 4: Ch 1, (camel hdc, camel inc) 6 times, join. (18 sts)
Rnd 5: Ch 1, (2 camel hdc, camel inc) 6 times, join. (24 sts)
Rnd 6: Ch 1, camel hdc in each st around, join. (24 sts)
Rnd 7 (pinch round): Ch 1, working in both loops, (2 sc, sc2tog) 6 times, join. (18 sts)
Rnd 7 pulls the fabric in and makes the first valley. Rnds 4–6 should now look like three raised ridges.
Second Tier (Rounds 8–12)
Rnd 8: Ch 1, (camel hdc, camel inc) 9 times, join. (27 sts)
Rnd 9: Ch 1, (2 camel hdc, camel inc) 9 times, join. (36 sts)
Rnds 10–11: Ch 1, camel hdc in each st around, join. (36 sts)
Rnd 12 (pinch round): Ch 1, working in both loops, (4 sc, sc2tog) 6 times, join. (30 sts)
Main Body Tier (Rounds 13–20)
Rnd 13: Ch 1, (4 camel hdc, camel inc) 6 times, join. (36 sts)
Rnd 14: Ch 1, (5 camel hdc, camel inc) 6 times, join. (42 sts)
Rnds 15–19: Ch 1, camel hdc in each st around, join. (42 sts)
Rnd 20 (rim round): Ch 1, sc in both loops of each st around, join. (42 sts)
This tier is the pocket. Rnd 20 makes a firm rim that keeps the opening from stretching. Don’t fasten off.
Lay the shell flat with the round joins at one side edge. Stitches 1–21 of Rnd 20 form the front rim and stitches 22–42 form the back.
Back Flap (Rows 1–12)
You now work flat rows over the back 21 stitches only.
Row 1: Ch 1, turn. Sc in each of the last 21 sts of Rnd 20 (sts 42 back to 22). (21 sts)
Row 2: Ch 1, turn, sc in each st across. (21 sts)
Row 3: Ch 1, turn, sc2tog, sc in next 17 sts, sc2tog. (19 sts)
Row 4: Ch 1, turn, sc2tog, sc in next 15 sts, sc2tog. (17 sts)
Row 5: Ch 1, turn, sc2tog, sc in next 13 sts, sc2tog. (15 sts)
Row 6: Ch 1, turn, sc2tog, sc in next 11 sts, sc2tog. (13 sts)
Row 7: Ch 1, turn, sc2tog, sc in next 9 sts, sc2tog. (11 sts)
Row 8: Ch 1, turn, sc2tog, sc in next 7 sts, sc2tog. (9 sts)
Row 9: Ch 1, turn, sc2tog, sc in next 5 sts, sc2tog. (7 sts)
Row 10: Ch 1, turn, sc2tog, sc in next 3 sts, sc2tog. (5 sts)
Row 11: Ch 1, turn, sc2tog, sc in next st, sc2tog. (3 sts)
Row 12: Ch 1, turn, sc3tog. (1 st)
Each decrease row uses up 2 extra stitches, so the counts drop by exactly 2 from 21 down to 3, and sc3tog closes the point.
Checkpoint: The flap should be 4 in (10.2 cm) tall: 12 rows at 3 rows per inch. Its base should match the 7 in (17.8 cm) rim width. The flap is plain sc, so it lies flatter than the ridged body and sits flat against the wall.
Border
Border gauge: 3 sc per 1 in (2.5 cm) along stitches, and 1 sc per sc row end along the flap sides.
Rnd 1: Don’t fasten off. Ch 1, don’t turn, and sc in the Row 12 tip st. Then work:
- First flap side: 1 sc in each row end of Rows 11 down to 1. (11 sts)
- Front rim: 1 sc in each of the 21 unworked sts of Rnd 20 (sts 1–21). (21 sts)
- Second flap side: 1 sc in each row end of Rows 1 up to 11. (11 sts)
- Tip: 2 sc in the same tip st as the first sc. (3 sts at the tip in total)
Join with a sl st to the first sc. Total: 1 + 11 + 21 + 11 + 2 = 46 sts.
Rnd 2: Ch 1, rev sc in each st around, join. (46 sts) This makes the raised, rope-like edge around the opening.
Why the math works: The sc rows are 3 rows per inch and the sc stitches are 3 per inch. One sc per row end therefore matches the flap’s real length, 11 sts over about 3.7 in (9.4 cm), so the sides don’t ruffle or pucker. The front rim keeps exactly the 21 stitches already on Rnd 20, which is half of the 42-stitch round. Nothing is added there, so the opening stays 7 in (17.8 cm) wide. The 3 sts at the tip give just enough ease to turn the point without pulling it blunt.
Hanging Loop
Sl st into the center tip stitch of Rnd 2. Ch 10, then sl st into the same stitch to form a ring. Turn, work 16 sc into the ch-10 space, and sl st into the base of the loop.
The covered loop hangs about 1.5 in (3.8 cm) above the flap point. Fasten off, then weave the tail back and forth through the base of the loop at least three times for strength. Weave in the beginning tail at the spire tip.
Final Blocking
- Soak the shell in cool water for 10 minutes, then press out the water gently without wringing.
- Roll one hand towel tightly and push it down into the spire and the first two tiers.
- Fill the main body tier with a second rolled towel so the 42-stitch section is round and full.
- Press each pinch round inward with your fingers to sharpen the valleys between tiers.
- Lay the back flap flat and pat it into an even triangle that is 4 in (10.2 cm) tall.
- Check that the front rim is 7 in (17.8 cm) across when flattened.
- Leave it to dry upright, propped against a wall, for 24–48 hours. Remove the towels only when the shell is fully dry inside.
Final Quality-Control Checklist
- Spire tip is closed and pointed, with no hole at the magic ring
- Three tiers are clearly separated by two pinched valleys (Rnds 7 and 12)
- Ridges run evenly around every tier, with no rounds worked through both loops by mistake
- Round joins line up along one side and sit under the flap edge
- Rim count is 42 sts; flap counts went 21, 21, 19, then down by 2 each row to 3, then 1
- Border Rnd 1 has 46 sts: 11 per flap side, 21 across the front, and 3 at the tip
- Width is 7 in (17.8 cm); height is 13.5 in (34.3 cm), or 15 in (38.1 cm) with the loop
- Loop is firmly anchored and doesn’t twist the flap when hung
Troubleshooting
The ridges look flat. You are probably working into the back loop instead of the third loop. Find the horizontal bar on the inside, below the V.
The tiers blend together. Pull tighter on the pinch rounds, or use a hook one size smaller for Rnds 7 and 12 only.
The basket flares wider than 7 in (17.8 cm). Your gauge is loose. Go down a hook size and work the main tier again.
The flap edges wave. You worked more than one sc per row end. Undo the stitches and work 11 per side.
The flap curls. Block it flat and pin it until dry. A firmer cord also helps.
The basket sags when full. The fabric is too open. Remake it with a smaller hook, or use lighter contents such as washcloths.
Care
Hand wash cool and reshape while damp. Dry upright with a rolled towel inside, and never tumble dry.
Final Notes
The measurements build on each other. A 2 in (5.1 cm) spire grows into a 4 in (10.2 cm) first tier and a 6 in (15.2 cm) second tier. That leads to a 42-stitch rim that is 7 in (17.8 cm) wide and 9 in (22.9 cm) tall. The 21-stitch flap rises 4 in (10.2 cm), the 46-stitch border adds about 0.5 in (1.3 cm), and the loop adds 1.5 in (3.8 cm), for 15 in (38.1 cm) in all. If your gauge checkpoints match at Rnds 3, 6, 11, and 20, everything after them will fit.
Happy crocheting!