

This curtain is made of open teardrop motifs in a warm apricot-terracotta cotton. Each teardrop has a hollow center, a thick ridged frame that gets wider toward the rounded bottom, and a small chain loop at its pointed tip. The motifs hang tip-up in straight columns, so the panel looks like rows of falling raindrops and lets soft, dappled light into the room.
The style is relaxed boho. One solid color keeps the attention on the shapes and the shadows they cast. The pattern uses US crochet terms.
One finished panel measures 30 in (76.2 cm) wide and 82 in (208.3 cm) long, including a 1 in (2.5 cm) top band. The pair in the photo is two identical panels. Each panel hangs from clip rings on a curtain rod.
Each teardrop is worked in the round on a chain ring: 3 rounds that add height to the bottom curve and keep the tip pointed. You join the motifs as you go. The tip loop of each lower motif is chained through the bottom of the motif above, and its widest point is slip-joined to the neighbor on the left. A solid single crochet band across the top catches the tip loops of the top row.
Finished Size and Construction
- Finished panel size: 30 in x 82 in (76.2 cm x 208.3 cm)
- Skill level: Easy-Intermediate
- Terminology: US
- Yarn weight: Worsted (#4) cotton
- Hook: 4.5 mm (US 7)
- Number of pieces: 180 teardrop motifs per panel, 360 for the pair
- Layout: 10 columns x 18 rows per panel
- Motif size: 3 in (7.6 cm) wide x 4 in (10.2 cm) tall body; 4.5 in (11.4 cm) tall including the tip loop
- Size before border: 30 in x 81 in (76.2 cm x 205.7 cm)
- Border (top band) depth: 1 in (2.5 cm)
Materials
Choose a smooth, firm worsted-weight cotton or cotton blend. Cotton keeps its shape, does not stretch much when it hangs, and shows the stitch texture clearly. Avoid fluffy or very soft acrylics, because a heavy hanging panel will make them grow longer over time. Buy all your yarn from one dye lot, because a color shift is easy to see when light shines through the panel.
- Apricot / terracotta: 600 g (1,140 m) per panel; 1,200 g (2,280 m) for the pair. Each teardrop uses about 5 m.
- 4.5 mm (US 7) crochet hook
- Stitch markers (at least 4)
- Tapestry needle
- Scissors
- Measuring tape
- Rust-proof pins and a blocking surface
- 11 curtain clip rings per panel
These quantities include a margin of about 20% for gauge differences, tails, and a test motif.
Abbreviations (US Terms)
- ch – chain
- sl st – slip stitch
- sc – single crochet
- hdc – half double crochet
- dc – double crochet
- st(s) – stitch(es)
- Rnd – round
- RS – right side
Drop-loop join: Work the stitch as written. Remove the hook from the loop. Insert the hook from front to back through the named stitch on the neighbor motif. Pick up the dropped loop and pull it through. Continue with the next stitch. This join adds no stitches.
Gauge and Checkpoints
Gauge: 16 sc and 16 rows = 4 in (10.2 cm) in sc rows.
Make one test teardrop before you start and check it at each stage:
- After Rnd 1: opening about 1.5 in (3.8 cm) wide x 2.25 in (5.7 cm) tall.
- After Rnd 2: about 2.4 in (6.1 cm) wide x 3.5 in (8.9 cm) tall.
- After Rnd 3: 3 in (7.6 cm) wide x 4 in (10.2 cm) tall, not counting the tip loop.
If your motif is more than 0.25 in (0.6 cm) too big, go down half a hook size. If it is too small, go up half a size. Measure the motif flat without stretching it. Small errors add up fast: an extra 0.25 in (0.6 cm) on each motif makes the panel 2.5 in (6.4 cm) wider and 4.5 in (11.4 cm) longer.
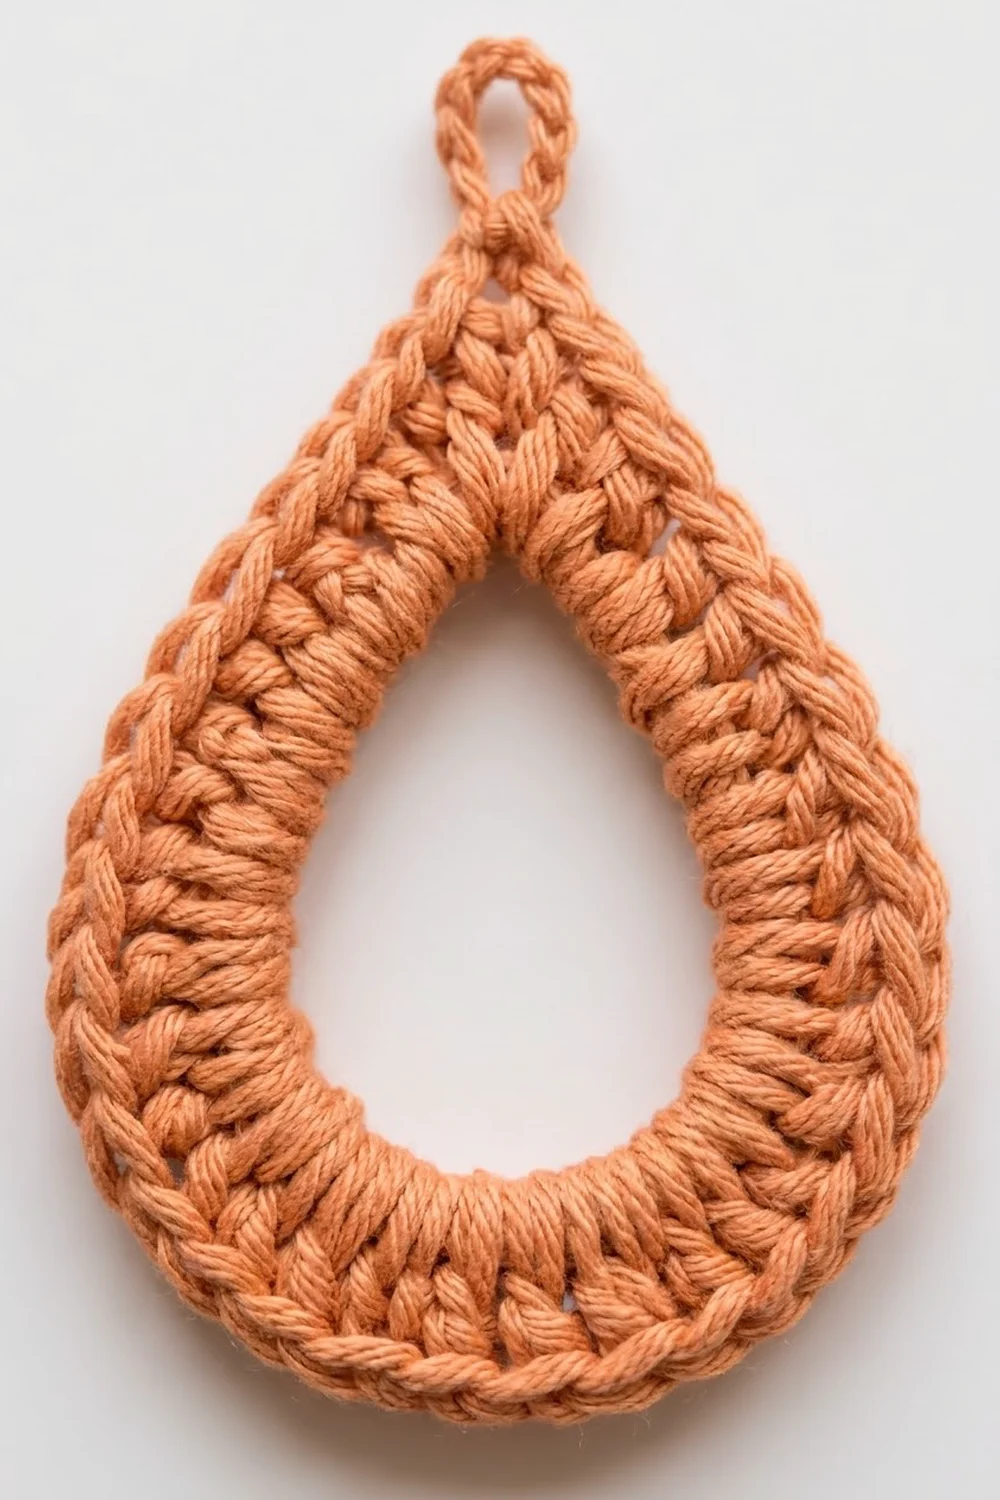
Teardrop Motif
Stitch numbering. Every round begins at the tip. The tip is the point where the chain ring closes, between the last and first stitch. The bottom center is exactly opposite. Keep the RS facing you for every motif. That way, the same stitch numbers are on the same side of every teardrop.
Foundation and Tip Loop
Top-row motifs (Row 1 of the panel): Ch 7, sl st in the first ch to form the tip loop.
All other motifs: Ch 3. Insert your hook from front to back into the gap between sts 19 and 20 of Rnd 3 on the motif directly above. Yo and pull up a loop, then pull it through the loop on your hook (sl st made). Ch 3, then sl st in the first ch to close the tip loop. The new motif now hangs from the one above.
Ring: Ch 24, then sl st in the same first ch at the base of the tip loop. This forms a chain ring of 24 ch, with the tip loop sticking up from the joint.
Round 1
Ch 1 (does not count as a st). Work 1 sc in each of the 24 ch of the ring. Join with sl st to the first sc. (24 sc)
Lay the ring flat. Pinch the joint so it becomes a point. The opening should already look like a teardrop.
Round 2 (growth round)
Ch 1. Sc in sts 1–5 (5 sc). Hdc in sts 6–8 (3 hdc). Work 2 dc in each of sts 9–16 (16 dc). Hdc in sts 17–19 (3 hdc). Sc in sts 20–24 (5 sc). Join with sl st to the first sc. (32 sts: 10 sc, 6 hdc, 16 dc)
The short stitches near the tip keep the top narrow and pointed. The doubled dc around the bottom make the wide, rounded frame.
Round 3 (growth round)
Ch 1. Sc in sts 1–10 (10 sc). Over sts 11–22, work sc in next st, 2 sc in next st; repeat from * 5 more times (18 sc). Sc in sts 23–32 (10 sc). Join with sl st to the first sc. (38 sc)
Joining in Rnd 3. Number the 38 new sts 1–38 from the tip. Stitches 12 and 27 are the mirror-image widest points. With the RS facing you, a right-handed round goes down the left side first. That puts st 12 on the left side and st 27 on the right side. If the motif has a neighbor to its left, work a drop-loop join at its new st 12 into st 27 of that neighbor’s Rnd 3. Motifs in column 1 have no left neighbor, so they skip this join. If you crochet left-handed, swap the numbers: join your new st 27 into the neighbor’s st 12.
Fasten off and weave in the ends along the inside edge of Rnd 1, where they will not show.
Final motif: 38 sc around, 3 in x 4 in (7.6 cm x 10.2 cm) body, plus a 0.5 in (1.3 cm) tip loop.
Make All Pieces
There is one color only. You need 180 motifs per panel, or 360 for the pair. All motifs use the same 3 rounds. Only the foundation changes (a free tip loop for Row 1, a linked tip loop for Rows 2–18) and the side join (none for column 1).
Work row by row, from left to right. That lets you check the width early. Layout for one panel (T = top band, O = motif, tips point up toward the band):
T T T T T T T T T T   (top band, 120 sc)
O O O O O O O O O O   Row 1  (free tip loops, caught by band)
O O O O O O O O O O   Row 2  (tips linked to Row 1)
O O O O O O O O O O   Row 3
...                   Rows 4-17 identical
O O O O O O O O O O   Row 18
C1                C10
Joining
The motifs are joined as you make them, in two ways.
Vertical (tip-to-bottom): The tip loop of each motif in Rows 2–18 is chained through the gap between sts 19 and 20 of the motif above, which is its exact bottom center. This adds no stitches to either motif. Each vertical link adds 0.5 in (1.3 cm), so each row of the panel is 4.5 in (11.4 cm) tall.
Horizontal (side-to-side): In columns 2–10, each motif’s widest point on the left (st 12) is joined to its left neighbor’s widest point on the right (st 27). The teardrops touch at one point only. This keeps the curtain open and light. Each column is 3 in (7.6 cm) wide, so 10 columns make 30 in (76.2 cm).
Tension: Keep the drop-loop pull-through snug, but don’t tighten it so much that the motifs pucker. In the linked tip loop, keep the two ch-3 sides even, so the motif hangs straight down and doesn’t twist.
Size checkpoint: After Row 1, the strip of 10 motifs should measure 30 in (76.2 cm) wide. After Row 4, the panel should measure 18 in (45.7 cm) long from the top of the Row 1 tip loops. The finished motif area is 30 in x 81 in (76.2 cm x 205.7 cm).
Border: Top Hanging Band
Border gauge: 16 sc and 16 rows = 4 in (10.2 cm), or 4 sc and 4 rows per 1 in (2.5 cm).
Starting count: 10 motifs along the top x 12 sts per motif = 120 sc. Each motif is 3 in (7.6 cm) wide, and 3 in x 4 sc per inch = 12 sts. No extra stitches are added at the seams, because the band stitches sit over the motif width, not between motifs.
Row 1: Ch 121. Starting in the 2nd ch from the hook, work 10 sections as follows: sc in each of the next 5 ch; work the next sc through both the next ch and the tip loop of the next Row 1 motif; sc in each of the next 6 ch. (120 sc; 10 tip loops caught)
Rows 2–4: Ch 1, turn. Sc in each st across. (120 sc each row)
Fasten off. The band is 30 in (76.2 cm) wide and 1 in (2.5 cm) deep.
Why the math works: The tip loops are exactly 12 sts apart in the band. The motifs are also exactly 3 in (7.6 cm) apart, center to center, because of the side joins. Both use the same 4-sts-per-inch gauge, so the band does not pull the top row together or stretch it apart.
Clip rings: Attach 11 clip rings at sts 1, 12, 24, 36, 48, 60, 72, 84, 96, 108, and 120. That puts one at each end and the others about every 3 in (7.6 cm), close to each side join below.
Final Blocking
- Weave in any remaining ends and trim them.
- Soak the panel in cool water for 15 minutes, then gently press out the water. Do not wring it.
- Roll the panel in towels to remove more water.
- Lay it flat on a large clean surface, or block it in sections if needed.
- Pin the band straight to 30 in (76.2 cm).
- Shape each teardrop. Pinch the tip into a point, round the bottom, and open the center.
- Check each column runs straight from the band down to Row 18.
- Let it dry completely before hanging. Hanging it while damp will make it grow longer.
Final Quality-Control Checklist
- Every motif has 24, 32, and 38 sts in Rnds 1, 2, and 3.
- All tips point up, and all RS face the same way.
- Every motif in Rows 2–18 is linked at the bottom center of the motif above.
- Every motif in columns 2–10 is joined at its widest point to its left neighbor (st 12 to st 27).
- The band has 120 sc per row, and all 10 tip loops are caught.
- The panel measures 30 in x 82 in (76.2 cm x 208.3 cm).
- Ends are hidden along the inner edges.
Troubleshooting
The tip is rounded, not pointed. You may have added stitches near the joint. Check that Rnds 2 and 3 begin and end with plain sc and have no increases there.
The motif cups or ruffles. Cupping means your Rnd 2 dc are too tight. Ruffling means your tension is too loose. Change your hook size, not the stitch counts.
The motif twists on its loop. The two ch-3 sides of the tip loop are uneven. Remake the foundation and keep both sides the same tension.
The panel leans to one side. Some side joins are at the wrong stitch. Count from the tip again: the join is always new st 12 to neighbor st 27, or the mirror image if you crochet left-handed.
The band ruffles or pulls in. Check your band gauge against 4 sc per 1 in (2.5 cm), and recount to 12 sts per section.
Care
Hand wash in cool water with a mild detergent. Dry flat, and reshape the teardrops while damp. Never tumble dry, and never hang it while wet.

Final Notes
The measurement chain is simple. Each motif is 3 in x 4 in (7.6 cm x 10.2 cm), or 4.5 in (11.4 cm) with its tip loop. Ten columns make 30 in (76.2 cm). Eighteen rows make 81 in (205.7 cm). A 1 in (2.5 cm) band of 120 sc brings the panel to 30 in x 82 in (76.2 cm x 208.3 cm). Get the test motif right, and everything else follows. Make two panels for the full pair.
Happy crocheting!