

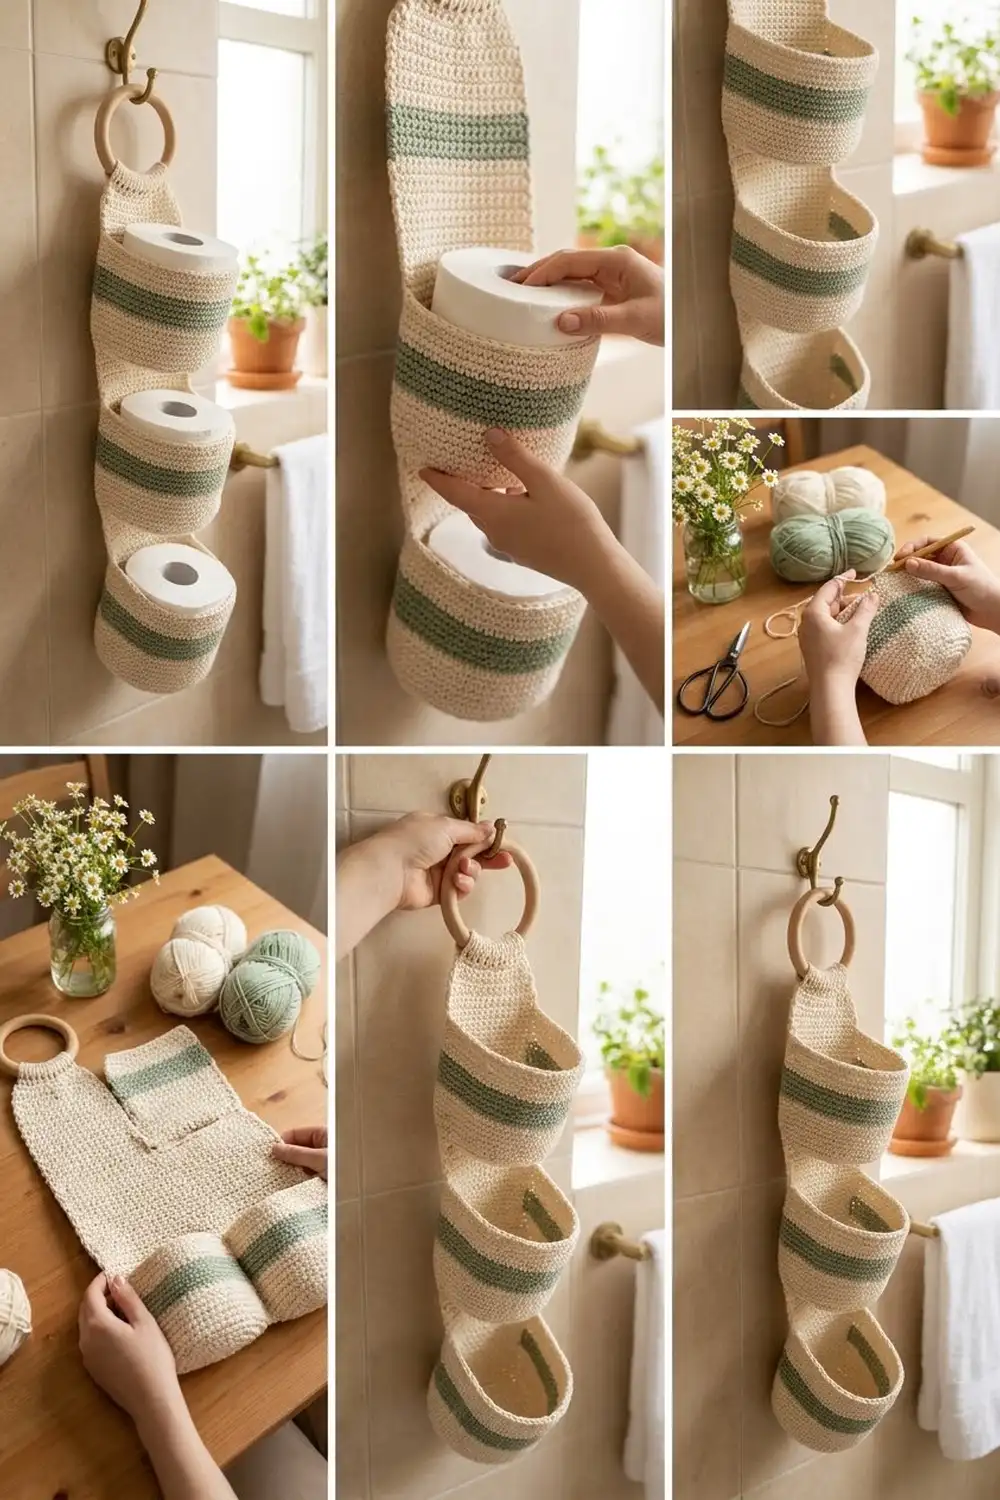
This hanging holder keeps three spare toilet rolls tidy and within reach. It has three round cups stacked on a slim back panel, and the panel narrows into a strap that wraps around a wooden ring. It hangs from any hook or towel bar.
The palette is calm and spa-like. The cups are soft cream cotton, and each one has a single sage-green stripe low on the wall. The dense single crochet fabric holds its shape well, and a rolled rim finishes each cup.
The pattern uses US crochet terms. Each cup measures about 5 in (12.7 cm) across and 4 in (10.2 cm) tall. The assembled holder hangs about 19 in (48.3 cm) from the bottom cup to the top of the strap loop, not counting the ring.
Construction is simple. You crochet three cups in joined rounds, each starting from a flat base. Then you work one back panel in rows, tapering it into a strap. You sew the cups onto the panel stitch by stitch, add a single border round around the panel, and fold the strap over the ring.
Finished Size and Construction
- Finished size: about 5 in (12.7 cm) wide × 19 in (48.3 cm) hanging height
- Skill level: Easy
- Terminology: US crochet terms
- Yarn weight: Bulky (#5) cotton or cotton blend
- Hook: 6.0 mm (US J-10), plus 5.5 mm (US I-9) for the border
- Number of pieces: 4 (3 cups + 1 back panel)
- Layout: 1 column of 3 cups, stacked vertically
- Piece size: cup 5 in (12.7 cm) diameter × 4 in (10.2 cm) tall; panel 4 in (10.2 cm) × 21.25 in (54.0 cm) before folding
- Size before border: panel 4 in (10.2 cm) wide
- Border depth: 1 round, about 0.33 in (0.8 cm); panel width after border about 4.75 in (12.1 cm)
Materials
Choose a smooth, firm cotton or cotton blend in bulky weight. Cotton handles bathroom humidity well and stays crisp. Avoid fuzzy acrylics, because they hide the stitch texture and pick up lint.
- Cream (Main Color, MC): 200 g, about 280 m
- Sage green (Contrast Color, CC): 35 g, about 49 m
These quantities assume about 1.4 m per gram and include a margin of roughly 20%. One cup uses about 40 g of MC and 8 g of CC. The panel uses about 45 g of MC.
Tools:
– 6.0 mm (US J-10) crochet hook
– 5.5 mm (US I-9) crochet hook (border only)
– Wooden ring, 2.75 in (7.0 cm) diameter
– Tapestry needle
– 6–8 locking stitch markers
– Measuring tape
– Scissors
– Three toilet rolls (for shaping and blocking)
Abbreviations (US Terms)
- ch – chain
- sl st – slip stitch
- sc – single crochet
- inc – 2 sc in the same stitch
- sc2tog – single crochet 2 together (decrease)
- BLO – back loop only
- st(s) – stitch(es)
- rnd – round
- MC / CC – main color / contrast color
Special stitch – Reverse single crochet (rev sc): Working from left to right (right-handers), insert the hook into the next stitch to the right. Yarn over, pull up a loop, then yarn over and pull through both loops. This makes the rolled, corded rim.
Gauge and Checkpoints
Gauge: 12 sc and 13 rows = 4 in (10.2 cm) with a 6.0 mm hook, worked firmly.
Make one complete cup before anything else. It serves as your gauge test, and it shows you right away whether a toilet roll fits.
Checkpoints:
– After Rnd 8 the base should measure about 5 in (12.7 cm) across.
– The cup’s circumference should be 16 in (40.6 cm), which is 48 sts at 3 sts per inch.
– After Rnd 20 the wall should measure about 3.75 in (9.5 cm) from the base ridge.
– The finished cup should be about 4 in (10.2 cm) tall.
– After Row 13 of the panel it should be 4 in (10.2 cm) wide and 4 in (10.2 cm) long.
If your piece is too big: go down half a hook size. A base wider than 5.25 in (13.3 cm) makes the cups sag.
If your piece is too small: go up half a hook size. A standard roll is about 4.5 in (11.4 cm) wide and needs to slide in easily.
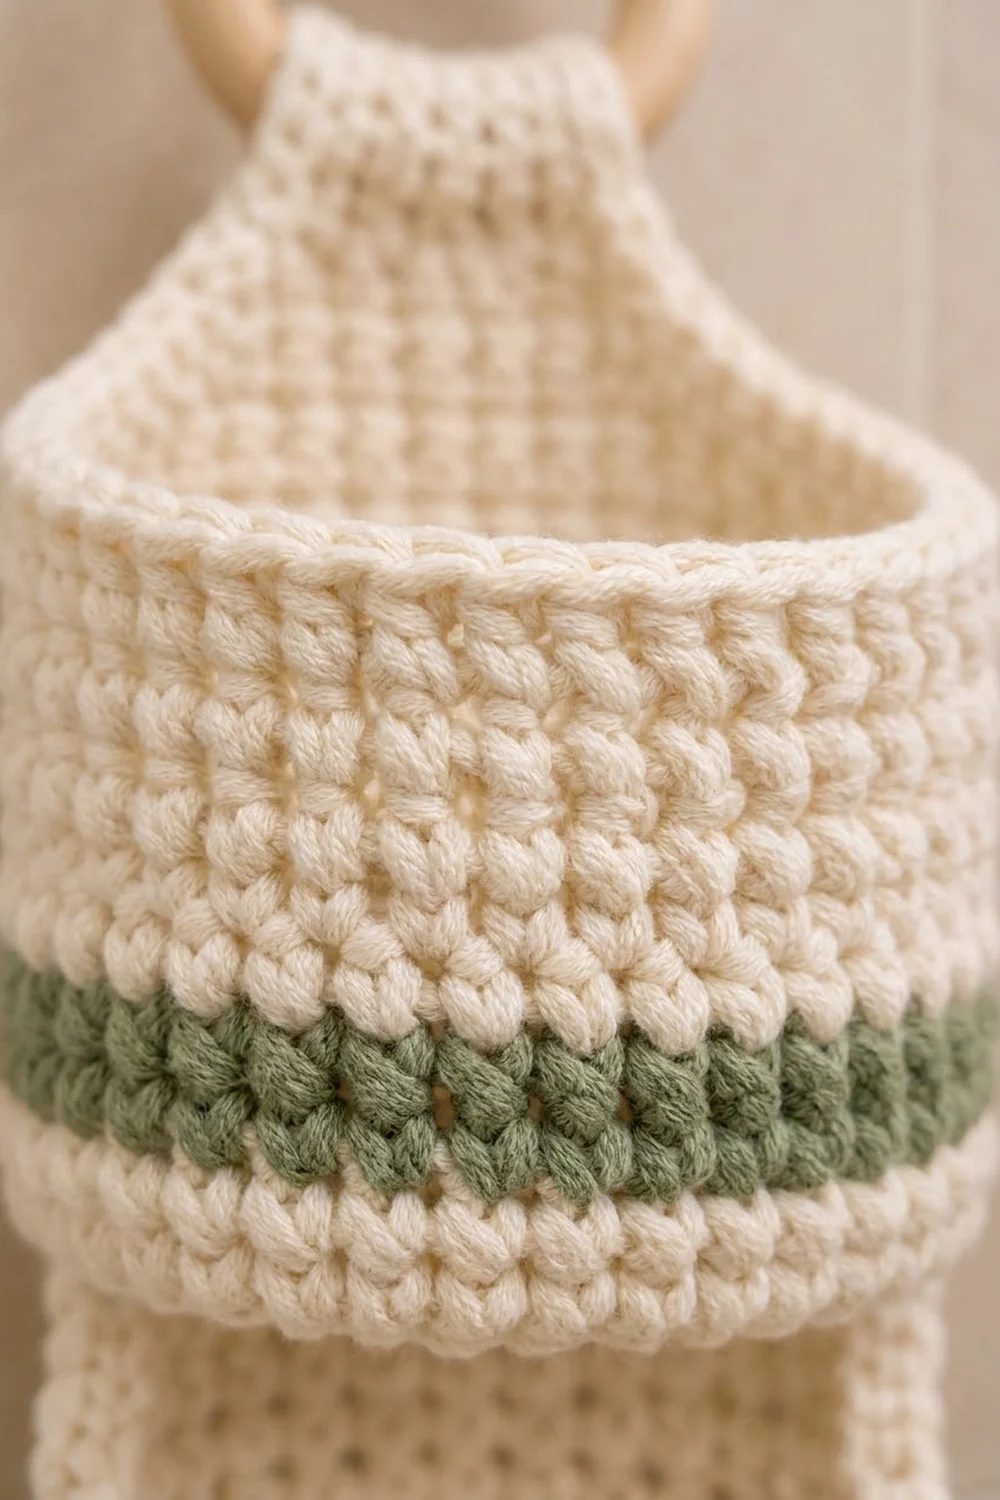
Cup (Make 3)
Work in joined rounds. End every round with a sl st to the first sc, then ch 1. The ch 1 does not count as a stitch. Keep the joins lined up so they form one seam, which will sit against the back panel.
With MC and the 6.0 mm hook, make a magic ring.
Rnd 1: 6 sc in the ring, join. (6)
Rnd 2: inc in each st, join. (12)
Rnd 3: sc 1, inc 6 times, join. (18)
Rnd 4: sc 2, inc 6 times, join. (24)
Rnd 5: sc 3, inc 6 times, join. (30)
Rnd 6: sc 4, inc 6 times, join. (36)
Rnd 7: sc 5, inc 6 times, join. (42)
Rnd 8: sc 6, inc 6 times, join. (48)
Checkpoint: the flat base is about 5 in (12.7 cm) across.
Rnd 9 (turning round): sc BLO in each st, join. (48)
The free front loops of Rnd 8 form a ridge, and the wall turns upward from it.
Rnds 10–11: sc in each st, join. (48)
On the last sl st of Rnd 11, change to CC.
Rnds 12–14 (stripe): with CC, sc in each st, join. (48)
On the last sl st of Rnd 14, change to MC. Cut CC and weave in the end later.
Rnds 15–20: with MC, sc in each st, join. (48)
Checkpoint: the wall is about 3.75 in (9.5 cm) tall. That’s 12 wall rounds (Rnds 9–20).
Rnd 21 (rim): ch 1, rev sc in each st, join. (48)
Fasten off. Leave a 24 in (61.0 cm) tail for sewing.
The cup now has 13 wall rounds (Rnds 9–21), about 4 in (10.2 cm) tall. Each round is 48 sts.
Back Panel
With MC and the 6.0 mm hook, ch 13.
Row 1: sc in the 2nd ch from the hook and in each ch across, turn. (12)
Rows 2–45: ch 1, sc in each st across, turn. (12)
Checkpoint: the panel measures 4 in (10.2 cm) × about 13.75 in (34.9 cm).
Taper:
Row 46: ch 1, sc across, turn. (12)
Row 47: ch 1, sc2tog, sc 8, sc2tog, turn. (10)
Row 48: ch 1, sc across, turn. (10)
Row 49: ch 1, sc2tog, sc 6, sc2tog, turn. (8)
Row 50: ch 1, sc across, turn. (8)
Row 51: ch 1, sc2tog, sc 4, sc2tog, turn. (6)
Row 52: ch 1, sc across, turn. (6)
Row 53: ch 1, sc2tog, sc 2, sc2tog, turn. (4)
Checkpoint: the taper adds about 2.5 in (6.4 cm).
Strap:
Rows 54–69: ch 1, sc in each st, turn. (4)
Fasten off. The strap is about 5 in (12.7 cm) long. The whole panel is 69 rows, about 21.25 in (54.0 cm).
Make All Pieces
- Cups: make 3. Each uses about 40 g of MC and 8 g of CC.
- Back panel: make 1, about 45 g of MC.
- Total: about 165 g of MC and 24 g of CC before the margin.
Layout grid (panel rows, bottom to top):
[ Strap, Rows 54–69 – folds over ring ]
[ Taper, Rows 46–53                   ]
[ Cup 3 (top),    Rows 33–45          ]
[ Gap,            Rows 30–32          ]
[ Cup 2 (middle), Rows 17–29          ]
[ Gap,            Rows 14–16          ]
[ Cup 1 (bottom), Rows 1–13           ]
Each cup zone is 13 rows, which matches the cup’s 13 wall rounds. Each gap is 3 rows, about 0.9 in (2.3 cm).
Joining
Method: whipstitch with MC, using the long tail from each cup.
Mark the cup: Find the cup’s column of round joins. Count 5 sts to the right and 5 sts to the left of it, and place markers. These 10 sts are the cup’s back.
Mark the panel: Panel sts 2–11 form the sewing zone. Leave sts 1 and 12 (the outer edge columns) free for the border.
Stitch-to-stitch logic:
1. Bottom seam: Sew the 10 marked front loops of Rnd 8 (the base ridge) to the tops of sts 2–11 on the first row of the cup’s zone. That’s Row 1, Row 17 or Row 33. Sew one loop to one stitch, 10 to 10.
2. Top seam: Sew the back loops of the 10 marked rim sts (Rnd 21) to the tops of sts 2–11 on the last row of the zone. That’s Row 13, Row 29 or Row 45.
3. Side seams: Whipstitch the outermost marked wall column on each side to panel column 2 (or column 11). Match one round to one row, 13 to 13.
Tension: Pull each stitch snug but not tight. The seam should lie flat without puckering the panel. Put a toilet roll inside the cup while you sew so the wall keeps its round shape.
Size checkpoint: With all three cups attached, the cup section measures about 13.75 in (34.9 cm) from the bottom of Cup 1 to the rim of Cup 3. You should see about 0.9 in (2.3 cm) of panel between cups.
Border
The border is one round of sc around the whole back panel, worked after joining. It frames the panel edges and the strap.
Border gauge: Use the 5.5 mm hook. Along the sides you place 1 sc per row end, which is 13 sts for every 4 in (10.2 cm). Your main gauge is 12 sts per 4 in (10.2 cm). The smaller hook tightens those extra stitches so the edge lies flat instead of rippling.
Join MC with a sl st at the bottom right corner (the first foundation chain).
Border Rnd 1:
– Bottom edge: 3 sc in the first ch, sc in each of the next 10 ch, 3 sc in the last ch. (16 sts. This count includes both 3-st corner groups.)
– Left side: 1 sc in each row end of Rows 1–69, up the straight section, the taper and the strap. (69 sts, row ends only, no corner sts.)
– Strap tip: 3 sc in the first st of Row 69, sc in the next 2 sts, 3 sc in the last st. (8 sts, including both corner groups.)
– Right side: 1 sc in each row end of Rows 69 down to 1. (69 sts, row ends only.)
– Join with a sl st to the first sc.
Total: 16 + 69 + 8 + 69 = 162 sts.
Fasten off.
Why the math works: The corner groups exist only in the bottom and top counts, so no stitch is counted twice. Each side has exactly one stitch per panel row, so both sides match at 69. Across the width, the border adds 1 st on each side: 12 + 2 = 14 sts, about 4.75 in (12.1 cm). The strap goes from 4 sts to 6 sts, which makes it 2 in (5.1 cm) wide.
Hanging the holder: Slide the strap through the wooden ring. Fold it to the back so its tip lies over the back of Rows 50–53, and whipstitch it down. The loop should rise about 2.5 in (6.4 cm) above the taper.
Final Blocking
- Lightly mist the holder with water, or steam it from 1 in (2.5 cm) away without touching the fabric.
- Put a toilet roll inside each cup to set the round shape.
- Lay the piece flat, cup side up, with the panel straight.
- Pin the panel to 4.75 in (12.1 cm) wide along its length.
- Roll each rim gently with your fingers so the reverse sc sits evenly.
- Let it dry completely, at least 12 hours.
- Take out the pins, hang the holder and check that the cups sit level.
Final Quality-Control Checklist
- Every cup has 48 sts in Rnds 8–21.
- The green stripe sits at Rnds 12–14 on all three cups.
- Each cup is about 5 in (12.7 cm) across and 4 in (10.2 cm) tall.
- The panel has 69 rows: 45 straight, 8 tapered and 16 for the strap.
- The cups are sewn to panel rows 1–13, 17–29 and 33–45.
- Each gap is 3 rows, about 0.9 in (2.3 cm).
- The border totals 162 sts and both sides match at 69.
- The strap is sewn securely around the ring.
- All ends are woven in on the back of the panel.
- The holder hangs about 19 in (48.3 cm) tall.
Troubleshooting
The roll won’t fit. Your gauge is too tight. Remake the cup with a 6.5 mm hook, or add an Rnd 9 with sc 7, inc 6 times (54 sts) and keep 54 sts for the wall.
The cup walls slant outward. Check that Rnd 9 was worked in BLO and that Rnds 10–21 have no extra stitches. Count each round.
There’s a jog at the stripe. The color-change jog sits on the join column, so the panel hides it. Keep all joins lined up.
The border ripples. Remake it with a tighter hand, or use a 5.0 mm hook.
The cups droop forward. Reinforce the top seam with a second pass of whipstitch through all 10 rim sts.
The strap twists. Make sure it lies flat before you sew it down, and sew across its full 2 in (5.1 cm) width.
Care
Hand wash in cool water with mild soap, then reshape over a toilet roll and dry flat. Don’t tumble dry, because cotton can shrink and the cups may lose their shape.
Final Notes
The measurement chain is simple. At a gauge of 12 sc = 4 in (10.2 cm), 48 sts make a 16 in (40.6 cm) circumference, so the cup is 5 in (12.7 cm) across. Thirteen wall rounds give a 4 in (10.2 cm) cup, and each cup lines up with a 13-row zone on the panel. The three zones plus two 3-row gaps make 45 rows, about 13.75 in (34.9 cm). Adding the taper, the strap loop and one 162-st border round brings the holder to about 4.75 in (12.1 cm) of panel width and 19 in (48.3 cm) of hanging height.
Happy crocheting!