
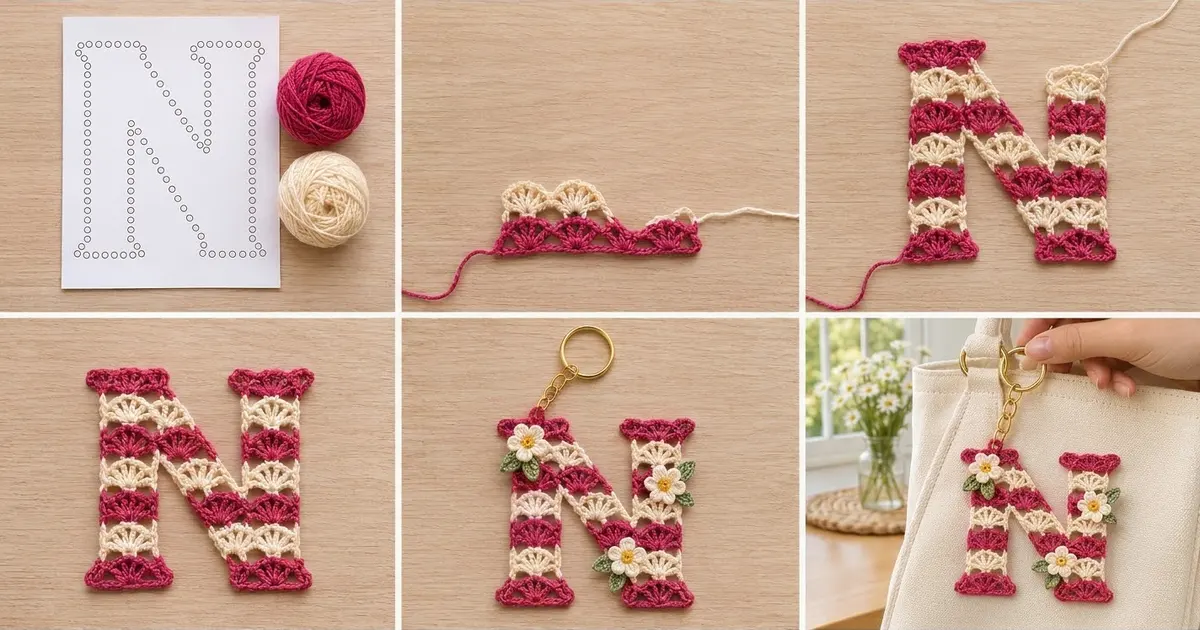
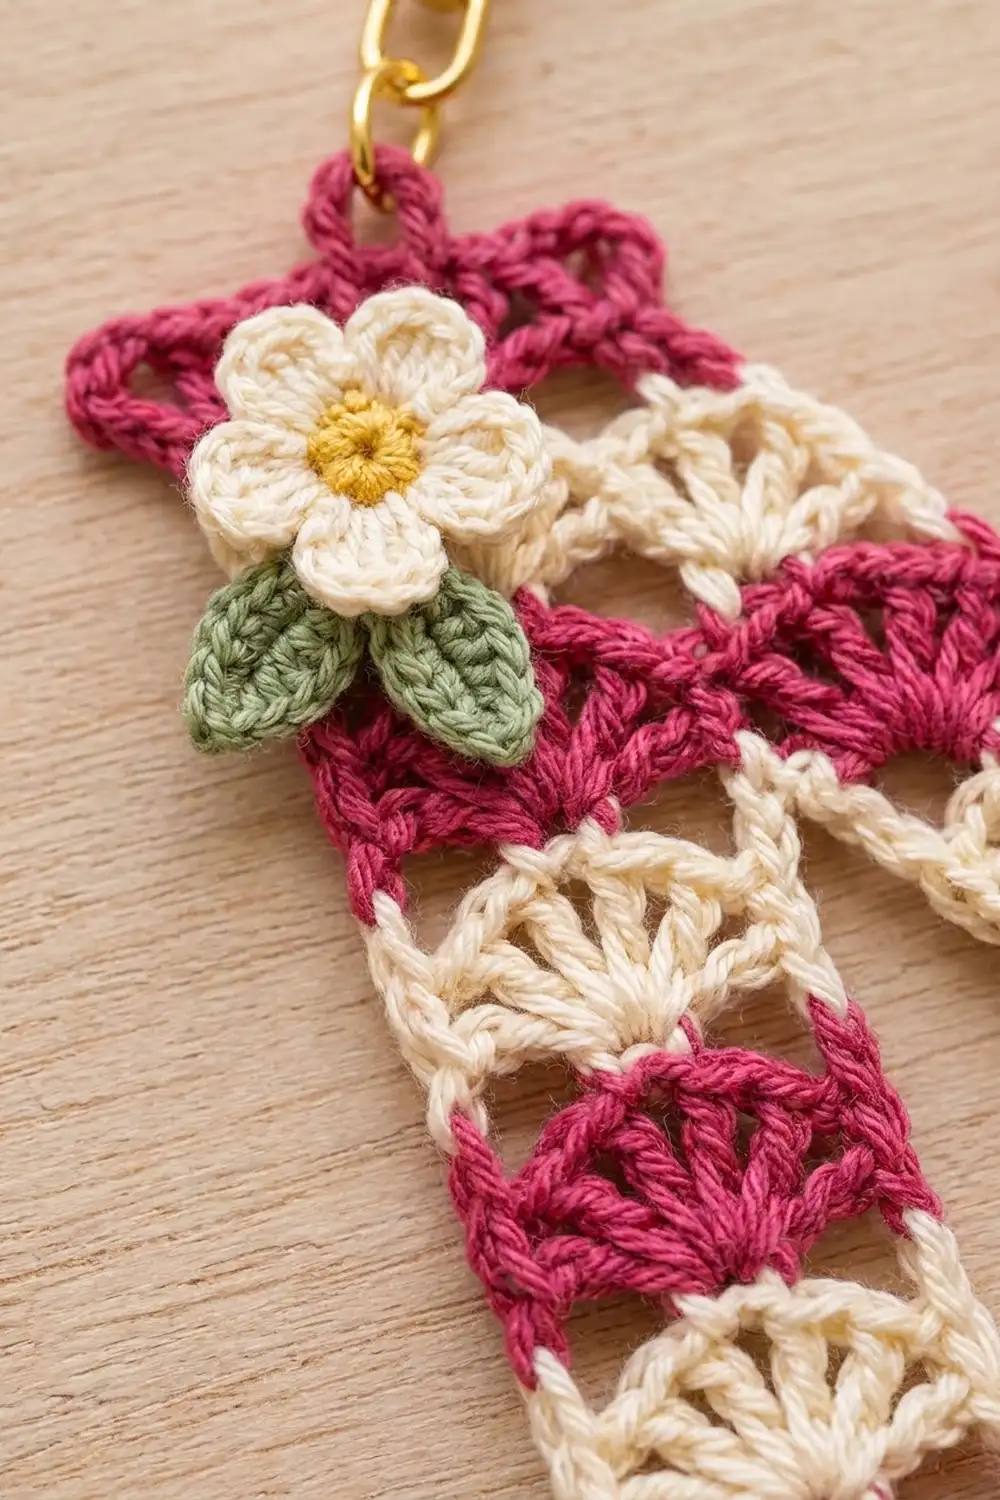
This little letter N is made of stacked fan stitches in raspberry and cream. The stripes run across each bar like tiny seashells, and a solid raspberry edging with flared serif corners makes it read clearly as a letter. Three cream flowers with yellow centers and sage-green leaves add a cottage-garden touch.
The style is soft and vintage-inspired. It suits a tote bag, backpack zipper or set of keys, or makes a quick personalized gift. The pattern uses US crochet terms throughout.
The finished letter measures 4.625 in wide x 4.25 in tall (11.7 cm x 10.8 cm) before you count the small serif flares. Each serif sticks out about 0.25 in (0.6 cm) more at the corners.
Construction is simple and repetitive. You make three identical shell strips: a left bar, a right bar and a diagonal. You tilt the diagonal between the two bars and tack it in place. Then a two-round border joins everything into one solid letter and adds the serifs. Finally, you make the flowers and leaves, sew them on and attach the keyring.
Finished Size and Construction
- Finished size: 4.625 in x 4.25 in (11.7 cm x 10.8 cm), excluding serif flares
- Skill level: Advanced beginner
- Terminology: US crochet terms
- Yarn weight: Sport (2) cotton
- Hook: 2.75 mm (US C-2)
- Number of pieces: 1 letter motif (built from 3 identical strips), plus 3 flowers and 6 leaves
- Layout: Letter N: left bar, tilted diagonal, right bar
- Strip size: 1.125 in x 3.75 in (2.9 cm x 9.5 cm)
- Size before border: 4.125 in x 3.75 in (10.5 cm x 9.5 cm)
- Border depth: 0.25 in (0.6 cm) per side, in 2 rounds
Materials
Use a smooth mercerized cotton in sport weight. Cotton keeps the fans crisp and stands up to life as a keychain. The amounts below assume about 3.4 m per gram (roughly 170 m per 50 g).
- Raspberry: 8 g (about 27 m)
- Cream: 5 g (about 17 m)
- Buttery yellow: 1 g (about 3 m)
- Sage green: 2 g (about 7 m)
These quantities include a safety margin.
Tools
- 2.75 mm (US C-2) crochet hook
- Tapestry needle
- Sharp scissors
- Rust-proof pins and a blocking mat
- Gold keyring set: a 25 mm split ring with about 2 in (5.1 cm) of chain and an open jump ring
- Flat-nose pliers
Abbreviations (US Terms)
- ch – chain
- sl st – slip stitch
- sc – single crochet
- hdc – half double crochet
- dc – double crochet
- sc2tog – single crochet 2 together
- sp – space
- st(s) – stitch(es)
- RS – right side
Special stitches
- Shell: 5 dc worked into the same stitch.
- Serif: (hdc, dc, ch 2, dc, hdc) worked into one stitch. This makes a small pointed flare.
Gauge and Checkpoints
Gauge: 8 sts = 1 in (2.5 cm) across one strip row. One shell row = 0.5 in (1.3 cm) tall. One sc row = 0.25 in (0.6 cm) tall.
Make one complete strip before anything else. That strip is your gauge swatch, and you will use it in the letter.
Checkpoints:
- After Row 2: the strip is 1.125 in wide x 0.75 in tall (2.9 cm x 1.9 cm).
- After Row 5: the strip is 2.25 in (5.7 cm) tall.
- After Row 8: the strip is 1.125 in x 3.75 in (2.9 cm x 9.5 cm).
- After assembly: the letter is 4.125 in x 3.75 in (10.5 cm x 9.5 cm).
- After Border Round 1: 4.375 in x 4 in (11.1 cm x 10.2 cm).
- After Border Round 2: 4.625 in x 4.25 in (11.7 cm x 10.8 cm).
If your strip is too big, go down 0.25 mm in hook size. If it is too small, go up 0.25 mm. Make a new strip either way. Width matters most, because three strip widths plus the diagonal’s footprint set the letter’s width.
Strips (Make 3 Alike)
All three strips are identical. Change color on the last yarn-over of the row before the new color starts. Cut each color as you finish with it and leave 4 in (10.2 cm) tails at the side edges. Border Round 1 will cover these tails.
Color sequence:
- Rows 1–2: raspberry
- Row 3: cream
- Row 4: raspberry
- Row 5: cream
- Row 6: raspberry
- Row 7: cream
- Row 8: raspberry
This gives 7 visible stripes, with raspberry at the top and bottom.
Foundation (raspberry): Ch 10.
Row 1 (RS): Sc in the 2nd ch from the hook and in each ch across. Turn. (9 sc)
Row 2 (shell row): Ch 3 (counts as a dc). Ch 1, skip the next 3 sc, work a Shell in the next sc (the 5th st). Ch 1, skip the next 3 sc, dc in the last sc. Turn. (7 dc and 2 ch-1 sps = 9 sts)
The ch-1 spaces stretch over the skipped stitches. This creates the open gaps beside each fan.
Row 3 (cream): Ch 3 (counts as a dc). Ch 1, skip the ch-1 sp and the next 2 dc. Work a Shell in the next dc, which is the center dc of the shell below. Ch 1, skip the next 2 dc and the ch-1 sp, dc in the top of the turning ch. Turn. (9 sts)
Rows 4–8: Repeat Row 3, following the color sequence. (9 sts in each row)
Fasten off. Each new fan sits directly on the center of the fan below, so the strip stays straight and each stripe stays one fan wide.
Check your strip: it should be 1.125 in x 3.75 in (2.9 cm x 9.5 cm). Label the three strips A (left bar), B (diagonal) and C (right bar).
Assembling the Letter
Lay A and C RS up, with Row 1 at the bottom. Leave a 1.875 in (4.8 cm) gap between them. The outside width should now measure 4.125 in (10.5 cm).
Place B in the gap and tilt it so it runs from upper left to lower right, at about 12 degrees from vertical.
- B’s top-left corner touches A’s top-right corner, sitting 0.125 in (0.3 cm) below the top of A.
- B’s bottom-right corner touches C’s bottom-left corner, sitting 0.125 in (0.3 cm) above the bottom of C.
This works because the tilted strip covers 1.875 in (4.8 cm) of width, which exactly fills the gap. Pin it in place.
With raspberry yarn and the tapestry needle, whipstitch the joins:
- Join B’s left edge along Row 8 (4 edge positions) to A’s right edge along Row 8.
- Join B’s right edge along Rows 1–2 (6 edge positions) to C’s left edge along Rows 1–2.
Ease the tiny difference in angle as you sew, and keep the stitches loose enough that the fabric lies flat.
Size check: 4.125 in x 3.75 in (10.5 cm x 9.5 cm). The open triangle below the diagonal and the one above it should look about the same size.
Border
Border gauge: 8 sc = 1 in (2.5 cm) along any edge.
- Along the top and bottom of a strip, work 1 sc in each st or ch-1 sp, for 9 sc.
- Along the sides, work 2 sc into the end of the sc row and 4 sc into the end of each shell row: 2 + (7 x 4) = 30 sc for a full side.
Each top or bottom count of 9 includes its corner stitch. At a corner, work 3 sc into that stitch: 1 counts in the 9 and 2 are extra.
Round 1 (raspberry)
RS facing, join raspberry at A’s top-left corner and work down the outside edge. Work over the yarn tails as you go.
- A outer side: 30 sc.
- A bottom: 9 sc, with 3 sc in the first and last st (2 corners).
- A inner side, going up Rows 1–7: 26 sc (2 + 6 x 4).
- Notch: no extra stitches. Go straight onto B.
- B left side, going down Rows 7–1: 26 sc.
- B bottom: 9 sc, with 3 sc in the first st (1 corner).
- C bottom: 9 sc, with 3 sc in the last st (1 corner).
- C outer side: 30 sc.
- C top: 9 sc, with 3 sc in the first and last st (2 corners).
- C inner side, going down Rows 8–3: 24 sc (6 x 4).
- Notch: no extra stitches.
- B right side, going up Rows 3–8: 24 sc.
- B top: 9 sc, with 3 sc in the first st (1 corner).
- A top: 9 sc, with 3 sc in the last st (1 corner, back where you started).
Sl st to the first sc.
Count: 214 sc on the edges + (8 corners x 2 extra) = 230 sc.
The 8 corners are the six free upright corners (A top-left, A bottom-left, A bottom-right, C bottom-right, C top-right, C top-left) plus B’s bottom-left and top-right corners.
Size check: 4.375 in x 4 in (11.1 cm x 10.2 cm).
Round 2 (raspberry, serifs)
Ch 1 and sc in each sc around, with these changes:
- At each of the 6 upright corners, work a Serif into the center sc of the 3-sc corner group, instead of 1 sc. Each Serif turns 1 stitch into 4 stitches plus a ch-2 sp, so it adds 3.
- At B’s 2 corners, work 3 sc into the center sc. This adds 2 at each corner.
- At each of the 2 notches, sc2tog over the last st of one side and the first st of the next. This takes away 1 at each notch.
Sl st to the first sc and fasten off.
Count: 230 + 18 + 4 − 2 = 250 sts plus 6 ch-2 sps.
Why the math works: at 8 sc per inch, 9 sc covers each 1.125 in (2.9 cm) strip end and 30 sc covers each 3.75 in (9.5 cm) side. The fabric neither ruffles nor pulls in. The 2 extra stitches at each corner let the border turn flat. The sc2tog at the notches stops the inside corners from bunching. Two rounds add 0.25 in (0.6 cm) per side, which brings the letter to 4.625 in x 4.25 in (11.7 cm x 10.8 cm).
Flowers (Make 3)
Center (yellow): Make a magic ring. Ch 1 and work 5 sc into the ring. Pull the ring closed and sl st to the first sc. (5 sc) Fasten off.
Petals (cream): Join cream in any sc. In each sc around, work (sl st, ch 2, 2 dc, ch 2, sl st). (5 petals, 10 dc) Fasten off and leave a 6 in (15.2 cm) tail for sewing.
Each flower measures about 0.75 in (1.9 cm) across, with a 0.25 in (0.6 cm) yellow center.
Leaves (Make 6)
Green: Ch 6. Working into the chain:
- Sl st in the 2nd ch from the hook.
- Sc in the next ch.
- Hdc in the next ch.
- Sc in the next ch.
- Sl st in the last ch.
(5 sts) Fasten off and leave a tail. Each leaf is about 0.625 in (1.6 cm) long.
Attaching Appliqués and Hardware
Sew 2 leaves behind each flower so the tips peek out at an angle. Then sew the flowers on with small stitches through the yellow center and the base of each petal:
- Flower 1: where B meets the top of A, at the upper left.
- Flower 2: on C at Rows 4–5, overlapping its outer edge.
- Flower 3: low on B near its join with C, around Rows 2–3.
Open the jump ring with pliers. Slip it through Rounds 1 and 2 at A’s top edge, 2 sts in from the corner serif. Hook the end of the chain on, then close the ring firmly.
Final Blocking
- Weave in all ends along the border or the back of the flowers.
- Pin the letter RS up to 4.625 in x 4.25 in (11.7 cm x 10.8 cm).
- Check that the diagonal is straight and that the two open triangles match.
- Pin each serif out to a point and each fan to a neat scallop.
- Mist with water until damp, but not soaked.
- Let it dry completely, at least 4 hours.
- Unpin and recheck the measurements.
Final Quality-Control Checklist
- [ ] Each strip has 7 stripes with raspberry at the top and bottom.
- [ ] Every shell row has 9 sts.
- [ ] B is tilted, with matching triangles above and below it.
- [ ] Round 1 = 230 sc; Round 2 = 250 sts + 6 ch-2 sps.
- [ ] All 6 serifs flare evenly.
- [ ] The letter measures 4.625 in x 4.25 in (11.7 cm x 10.8 cm).
- [ ] The flowers and leaves are stitched on securely.
- [ ] The jump ring is fully closed.
Troubleshooting
- Fans lean to one side: you placed a Shell off center. Count to the 3rd dc of the shell below.
- Strip is wider at the top: your shells are too loose. Shorten the ch 3 and tighten the dc.
- Border ruffles: you are working too many sc along the sides. Recount to 4 per shell row.
- Border cups: you skipped row ends, or the 3-sc corner groups are missing.
- Notches bunch up: check the sc2tog in Round 2.
- Diagonal won’t sit flat: loosen the whipstitch joins, then re-pin and block.
Care
Hand wash in cool water with mild soap, press out the water in a towel, and dry flat. Avoid the dryer, which can loosen the appliqués.

Final Notes
The measurement chain is simple:
- Each strip is 1.125 in x 3.75 in (2.9 cm x 9.5 cm).
- Two strips plus the tilted diagonal make 4.125 in x 3.75 in (10.5 cm x 9.5 cm).
- Border Round 1 brings it to 4.375 in x 4 in (11.1 cm x 10.2 cm).
- Border Round 2 finishes it at 4.625 in x 4.25 in (11.7 cm x 10.8 cm).
If your first strip matches, the rest of the letter will follow. Happy crocheting!