

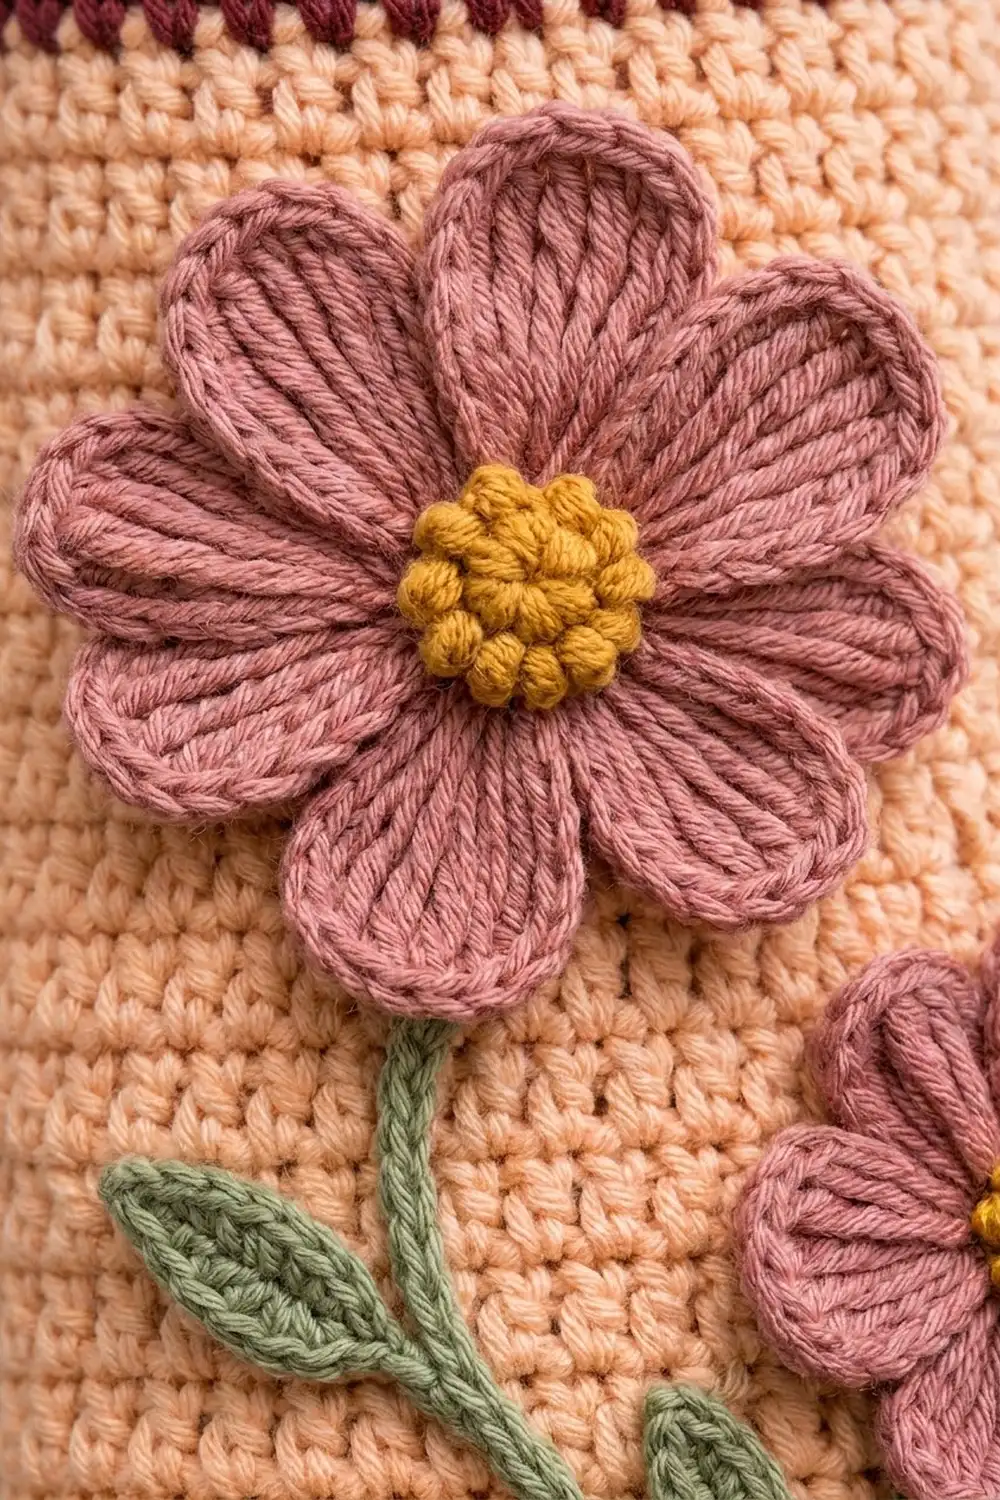
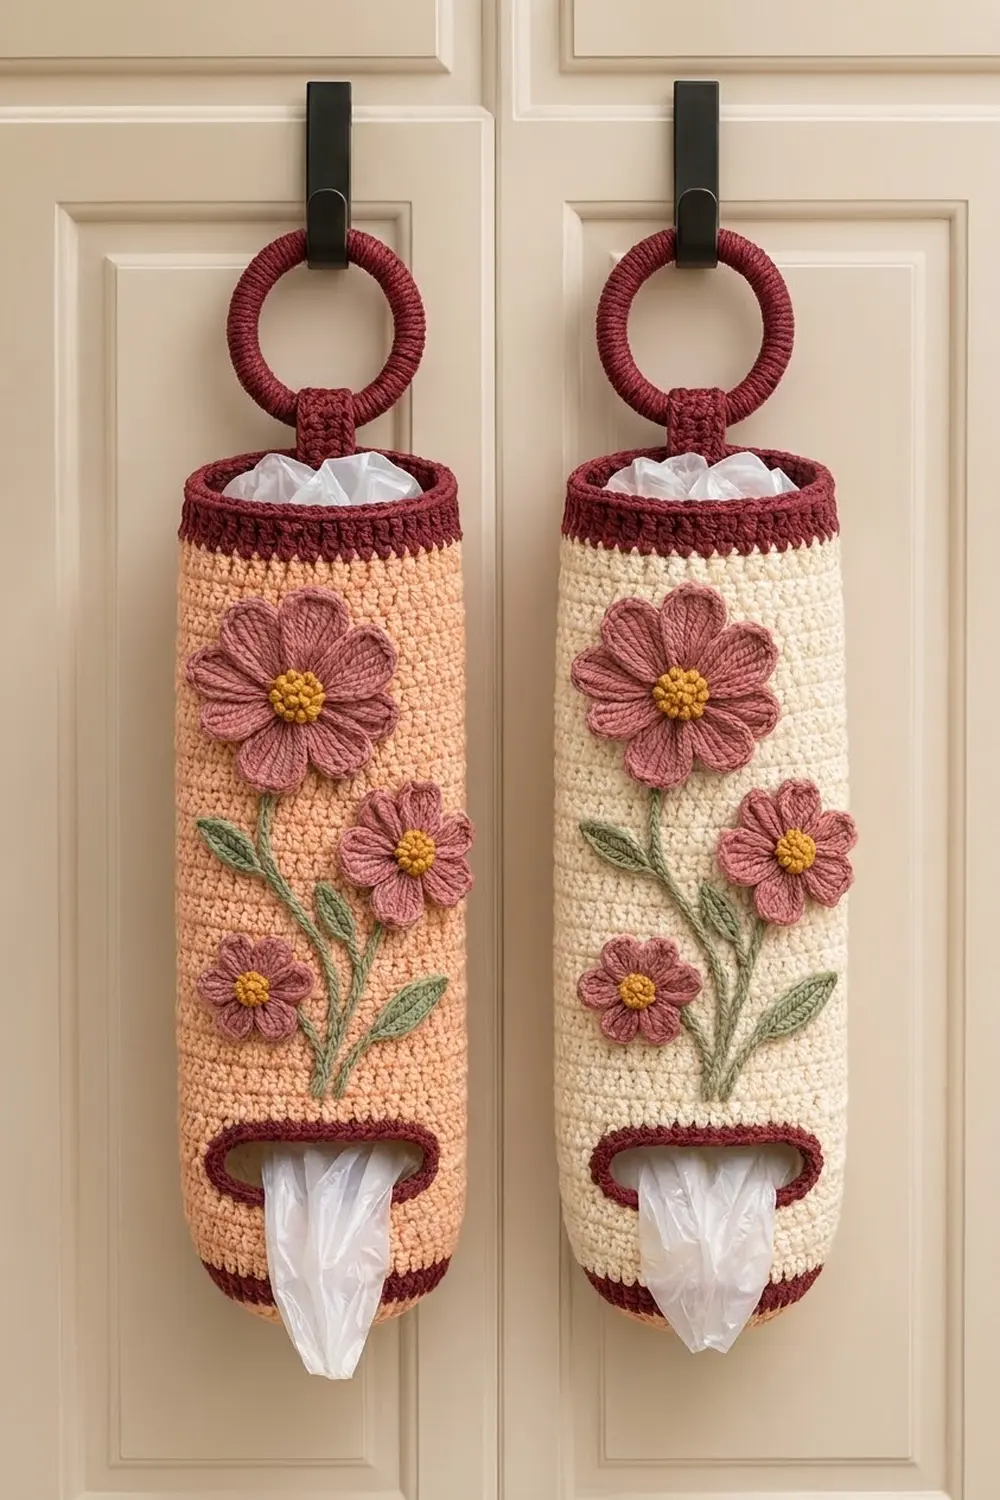
This plastic bag holder is a tall, sturdy tube with a soft peach body and deep burgundy trim. A cluster of dusty-rose cosmos flowers with mustard centers and sage-green stems runs up the front. Push bags in at the top and pull them out one at a time through the oval slot near the bottom.
The palette is warm and calm: peach, burgundy, dusty rose, mustard and sage. The look is cottage-kitchen, with dense single crochet that holds its shape on a cabinet door.
This pattern uses US crochet terms. The finished body is 6 in (15.2 cm) wide when flattened and 15.5 in (39.4 cm) tall. With the hanging ring, the total length is about 19 in (48.3 cm).
Construction is simple. You work an oval base, then a seamless tube in continuous rounds. The slot is formed with a few turned rows and a chain bridge. The top rim and slot edging come next. Finally, you make the flowers, stems, leaves, covered ring and tab, and sew them on.
Finished Size and Construction
- Finished size: 6 in (15.2 cm) wide flat × 15.5 in (39.4 cm) tall; about 19 in (48.3 cm) including the ring
- Skill level: Intermediate
- Terminology: US
- Yarn weight: Worsted (#4)
- Hook: 4.5 mm (US 7)
- Number of pieces: 1 body, plus appliqués (3 flowers, 3 stems, 5 leaves), 1 covered ring and 1 tab
- Layout: Single tube; appliqués are grouped on the front face
- Body circumference: 48 sts = 12 in (30.5 cm)
- Size before border: 6 in × 14.6 in (15.2 × 37.1 cm)
- Border depth: Top rim 0.9 in (2.3 cm)
Materials
Use a smooth worsted yarn at about 180 m per 100 g. Cotton or a cotton blend gives the crispest shape. Acrylic works too, but it is a little softer.
- Color A, peach (body): 120 g / 216 m
- Color B, burgundy (stripe, rim, slot edging, ring, tab): 30 g / 54 m
- Color C, dusty rose (petals): 15 g / 27 m
- Color D, mustard (centers): 5 g / 9 m
- Color E, sage green (stems and leaves): 10 g / 18 m
All quantities include a margin of about 10%.
Tools:
– 4.5 mm (US 7) hook
– 3 in (7.6 cm) plastic or wooden macramé ring
– Stitch markers
– Tapestry needle
– Scissors
– Straight pins
– Tape measure
– Spray bottle for blocking
Abbreviations (US Terms)
- ch: chain
- sl st: slip stitch
- sc: single crochet
- hdc: half double crochet
- dc: double crochet
- tr: treble crochet
- blo: back loop only
- st(s): stitch(es)
- Rnd: round
- RS / WS: right side / wrong side
French knot: Bring the needle up from the back, wrap the yarn twice around the needle, then insert it back down next to the exit point and pull it through.
Invisible join: Cut the yarn and pull the tail through the last stitch. Thread it on a needle, pass it under both loops of the first stitch, then back down into the last stitch.
Gauge and Checkpoints
Gauge: 16 sc and 18 rnds = 4 in (10.2 cm) in continuous rounds.
Test the base first. It is the quickest piece and tells you everything about your gauge.
- After Rnd 5: The oval measures about 4.5 × 2.25 in (11.4 × 5.7 cm) and has 48 sts.
- After Rnd 14: The tube is 3 in (7.6 cm) tall from the bottom fold.
- After Rnd 22: The tube is 4.8 in (12.2 cm) tall, and the slot gap is 3 in (7.6 cm) wide.
- After Rnd 66: The tube is 14.6 in (37.1 cm) tall and 6 in (15.2 cm) wide flat.
If your piece is too big, go down one hook size. If it is too small, go up one. Don’t change the stitch counts: the 48-stitch circumference is what keeps the design proportional.
Body
Work in continuous rounds without joining unless told otherwise. Move a marker up to the last stitch of each round.
Oval Base (Color A)
Ch 12.
Rnd 1: Sc in 2nd ch from hook, sc in next 9 ch, 3 sc in last ch. Working along the opposite side of the chain, sc in next 9 ch, 2 sc in last ch (the same ch as the first sc). (24 sts)
Rnd 2: 2 sc in first st, sc in next 9 sts, 2 sc in each of next 3 sts, sc in next 9 sts, 2 sc in each of last 2 sts. (30 sts)
Rnd 3: [Sc in next st, 2 sc in next st] once, sc in next 9 sts, [sc in next st, 2 sc in next st] 3 times, sc in next 9 sts, [sc in next st, 2 sc in next st] 2 times. (36 sts)
Rnd 4: [Sc in next 2 sts, 2 sc in next st] once, sc in next 9 sts, [sc in next 2 sts, 2 sc in next st] 3 times, sc in next 9 sts, [sc in next 2 sts, 2 sc in next st] 2 times. (42 sts)
Rnd 5: [Sc in next 3 sts, 2 sc in next st] once, sc in next 9 sts, [sc in next 3 sts, 2 sc in next st] 3 times, sc in next 9 sts, [sc in next 3 sts, 2 sc in next st] 2 times. (48 sts)
The round now ends at one narrow end of the oval. This is a side fold of the flattened tube. Stitches 1–24 form the front and stitches 25–48 form the back.
Lower Wall and Stripe
Rnd 6: Sc blo in each st around. (48 sts) This creates the turning ridge that defines the base.
Rnds 7–8: Sc in each st around. (48 sts)
Rnds 9–11: Change to Color B. Sc in each st around. (48 sts) This forms the 0.7 in (1.8 cm) burgundy stripe.
Rnds 12–14: Change to Color A. Sc in each st around. (48 sts)
Dispensing Slot
The slot uses front stitches 7–18. That’s 12 stitches, centered on the 24-stitch front.
Row 15 (RS): Sc in next 6 sts, ch 1, turn. (6 sts)
Row 16 (WS): Sc in the same 6 sts. Continue around the back of the tube and sc in sts 48 down to 19. (36 sts) Ch 1, turn.
Rows 17–21: Sc in each of the 36 sts, ch 1, and turn at the end of each row. Row 21 is a RS row and ends at st 6. (36 sts each)
Rnd 22: Do not turn. Ch 12 loosely, skip the 12-st gap, then sc in each of the next 36 sts. (12 ch + 36 sc = 48 sts)
The opening is 12 sts wide, 3 in (7.6 cm), and about 1.6 in (4.1 cm) tall before edging.
Upper Wall
Rnd 23: Sc in each of the 12 ch and each of the 36 sc. (48 sts) The round now begins at the first chain. The center front is between the 6th and 7th stitches.
Rnds 24–66: Sc in each st around. (48 sts)
Checkpoint: The body is 6 × 14.6 in (15.2 × 37.1 cm). Don’t fasten off.
Flowers
Large Flower (Make 1)
Rnd 1: With Color D, make a magic ring and work 8 sc into it. Join with sl st to the first sc and fasten off. (8 sts)
Rnd 2: Join Color C in any st. 2 sc in each st around. (16 sts)
Rnd 3: [Sc in next st, 2 sc in next st] 8 times. (24 sts)
Rnd 4 (petals): [Sl st in next st, (hdc, dc, 3 tr, dc, hdc) in next st, sl st in next st] 8 times. (8 petals)
Fasten off. The flower measures about 3 in (7.6 cm) across.
Small Flowers (Make 2)
Rnd 1: Work as for the large flower. (8 sts)
Rnd 2: Work as for the large flower. (16 sts)
Rnd 3 (petals): [Sl st in next st, (hdc, 3 dc, hdc) in next st] 8 times. (8 petals)
Fasten off. Each flower measures about 2 in (5.1 cm) across.
Nubby Centers
Using Color D, work 5 French knots in a tight cluster over Rnd 1 of each flower. This gives the raised, seedy look of a cosmos center.
Stems and Leaves (Color E)
Main stem: Ch 26. Sl st in 2nd ch from hook and in each ch across. (25 sl sts, about 5 in / 12.7 cm)
Right branch: Ch 13. Sl st in 2nd ch from hook and in each ch across. (12 sl sts, about 2.5 in / 6.4 cm)
Left branch: Ch 11. Sl st in 2nd ch from hook and in each ch across. (10 sl sts, about 2 in / 5.1 cm)
Leaves (make 5): Ch 6. Starting in the 2nd ch from hook, work sc, hdc, dc, hdc, sl st. (5 sts) Each leaf is about 1.25 in (3.2 cm) long. Leave a sewing tail on each piece.
Hanger
Covered Ring
Join Color B to the ring with a sl st. Work sc over the ring until it is fully covered, about 66 sc. Pack the stitches tightly so no ring shows. Join with sl st and fasten off.
Tab
With Color B, ch 7.
Row 1: Sc in 2nd ch from hook and in each ch across. (6 sts)
Rows 2–14: Ch 1, turn, sc in each st. (6 sts)
Fasten off, leaving a long tail. The tab measures 1.5 × 3.1 in (3.8 × 7.9 cm).
Border: Top Rim and Slot Edging
Border gauge: The border uses the same gauge as the body: 16 sc and 18 rnds = 4 in (10.2 cm).
Top Rim
Rnds 67–70: Change to Color B. Sc in each st around. (48 sts: 24 on the front face, 24 on the back face)
Fasten off with an invisible join.
Why the math works: The rim adds no stitches. It keeps the 48-stitch circumference, so the flattened width stays 24 sts = 6 in (15.2 cm) and the rim doesn’t flare. Four rounds at 4.5 rnds per inch add 0.9 in (2.3 cm). Added to 14.6 in, that gives a finished height of 15.5 in (39.4 cm).
Slot Edging
Rnd 1: Join Color B at a lower corner of the slot. Work these sts around the opening:
– 12 sc along the lower edge, into the free tops of Rnd 14 sts 7–18
– 6 sc evenly along the first short side
– 12 sc into the underside of the Rnd 22 chain
– 6 sc evenly along the second short side
Join to the first sc. (36 sts)
Rnd 2: Sl st loosely in each st around. (36 sts)
Fasten off with an invisible join.
Why the math works: The long edges match the 12-stitch gap exactly, so the slot neither puckers nor gapes. Each side of the edging takes about 0.3 in (0.8 cm) of the opening’s height, leaving a finished opening of about 3 × 1 in (7.6 × 2.5 cm). That’s wide enough for one bag at a time.
Assembly
- Flatten the tube so the slot is centered on the front.
- Pin the large flower with its center about 11.5 in (29.2 cm) above the bottom fold, 1.75 in (4.4 cm) left of center.
- Pin one small flower with its center about 9 in (22.9 cm) up, 1.5 in (3.8 cm) right of center.
- Pin the second small flower with its center about 7.25 in (18.4 cm) up, 1.75 in (4.4 cm) left of center.
- Run the main stem from the bottom of the large flower down to about 5.5 in (14 cm) above the bottom fold. Curve the two branches out from the base of the main stem to the small flowers.
- Pin the leaves along the stems, angled upward.
- Whipstitch every piece through the front layer only. Keep a hand inside the tube so you don’t catch the back.
- Fold the tab around the covered ring. Sew one end to the outside of the rim and the other end to the inside, centered on the front and covering Rnds 67–70.
Final Blocking
- Weave in all ends inside the tube.
- Stuff the tube with a rolled towel to a flat width of 6 in (15.2 cm).
- Spray it lightly with water until damp, not soaked.
- Pat the petals open and point each leaf tip.
- Ease the slot into a smooth oval, 3 in (7.6 cm) wide.
- Let it dry fully before removing the towel.
Final Quality-Control Checklist
- The body measures 6 × 15.5 in (15.2 × 39.4 cm) flat.
- The burgundy stripe is 3 rnds deep and the top rim is 4 rnds deep.
- The slot is centered on the front and about 3 × 1 in (7.6 × 2.5 cm).
- The base ridge from Rnd 6 is crisp and even.
- All 8 petals on each flower are evenly spaced.
- No stitching from the appliqués shows on the back face.
- The ring is fully covered and the tab is sewn securely through all rim rounds.
Troubleshooting
- The base cups or ruffles: Your tension changed between rounds. Re-check the Rnd 5 count of 48 and the oval size.
- The slot is crooked: You turned on the wrong row. Row 21 must be a RS row ending at st 6.
- The slot gapes or puckers: The Rnd 22 chain was too tight or too loose. Work it with the same tension as your sc, or go up one hook size just for the chain.
- The rim flares: You added stitches. Recount to 48.
- Petals cup inward: Block them flat, or go up one hook size for the petal round.
- The holder twists when hung: Re-center the tab between front stitches 6 and 7, measured from the slot.
Care
Hand wash in cool water and lay flat to dry, reshaping over a rolled towel. Don’t tumble dry, because the appliqués can distort.
Final Notes
Here is the measurement chain:
– Gauge: 16 sc = 4 in (10.2 cm)
– Circumference: 48 sts = 12 in (30.5 cm), which is 6 in (15.2 cm) flat
– Height before rim: 14.6 in (37.1 cm)
– Top rim: 0.9 in (2.3 cm)
– Finished body: 15.5 in (39.4 cm)
– With the 3 in (7.6 cm) ring: about 19 in (48.3 cm) total
Hold the gauge and every later piece falls into place. For a softer look, swap Color A for cream, as in the second colorway.
Happy crocheting!