

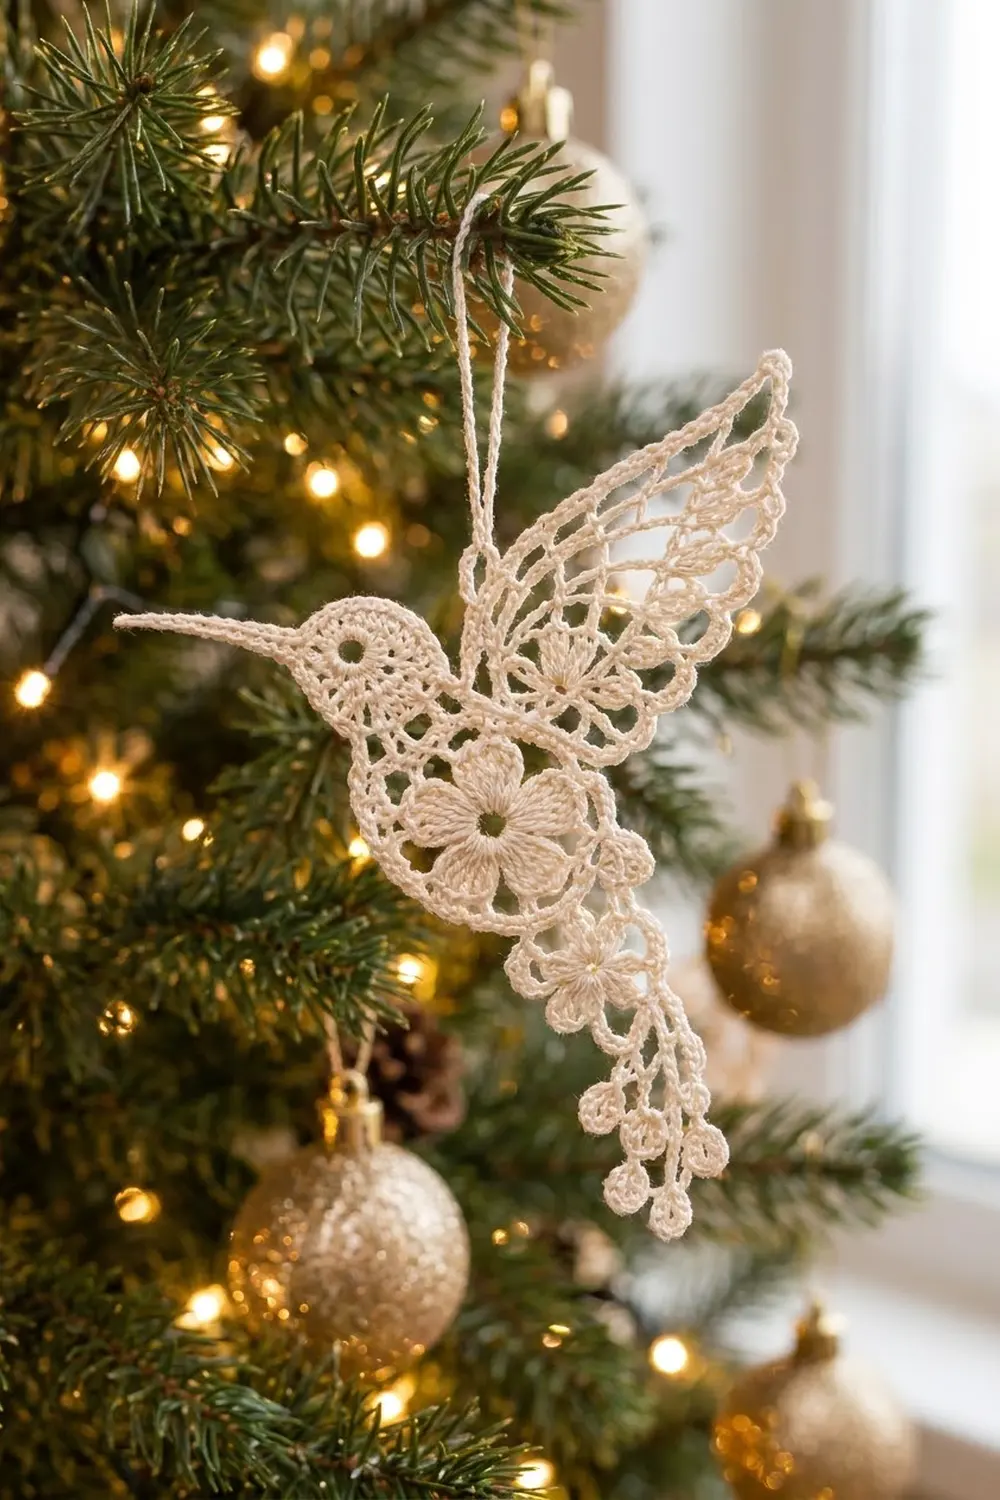
This lace hummingbird is a delicate thread ornament. It has a five-petal blossom at its breast, an upswept fan wing and a slender pointed beak. The tail turns into two small flowers and a cascade of tiny bead-like drops. The bird hangs from a fine chain loop and catches the light beautifully on a tree.
The whole bird is worked in one color, cream (ivory) cotton crochet thread. The look is classic vintage-style lace: open chain mesh, solid single crochet outlines and small raised petals.
The pattern uses US crochet terms. The finished ornament is about 5 in (12.7 cm) wide from beak tip to back edge and 8 in (20.3 cm) tall from wing tip to the lowest tail drop. The hanging loop adds 1.5 in (3.8 cm).
Construction is continuous, and there is no sewing. You start with the breast flower and build the round body mesh around it. Then you work the head and beak, the wing and the tail directly off marked stitches on the body. The wing edging is the border, and the hanging loop goes on last.
Finished Size and Construction
- Finished size: 5 in (12.7 cm) x 8 in (20.3 cm), plus a 1.5 in (3.8 cm) loop
- Skill level: Intermediate (thread lace)
- Terminology: US
- Yarn weight: Size 10 cotton crochet thread (lace)
- Hook: 1.5 mm (US steel #8)
- Number of pieces: 1
- Layout: Single ornament, no assembly
- Body size: 3 in (7.6 cm) across after Round 7
- Wing before border: 3.5 in (8.9 cm) tall from the wing base
- Border depth: 0.125 in (0.3 cm) on the leading edge; 0.25 in (0.6 cm) shells on the trailing edge
Materials
Choose a mercerized cotton thread in size 10. It gives crisp stitch definition, blocks well and takes starch evenly. Avoid fuzzy or acrylic threads, because the lace will lose its shape.
- Cream / ivory, size 10 cotton thread: 10 g, about 56 m (61 yd)
One ornament uses about 8 g. The quantity above includes a margin for your gauge test and for differences in tension. One standard ball makes several birds.
Tools:
– 1.5 mm (US steel #8) crochet hook
– Fine tapestry needle
– 4 locking stitch markers
– Small sharp scissors
– Foam blocking board and rustproof pins
– Spray bottle, plus fabric stiffener or starch (optional)
Abbreviations (US Terms)
- ch – chain
- sl st – slip stitch
- sc – single crochet
- sc2tog – single crochet 2 together
- hdc – half double crochet
- dc – double crochet
- sk – skip
- sp – space
- st(s) – stitch(es)
Special stitches:
– Picot: Ch 3, sl st in 3rd ch from hook.
– Shell: (sc, hdc, 3 dc, hdc, sc) in the same space = 7 sts.
– Drop: Ch 4, sl st in 4th ch from hook to form a tiny ring. Work 6 sc in the ring, then sl st in the first sc.
– Small flower: Ch 5, sl st in 5th ch from hook to form a ring. (Ch 3, 2 dc, ch 3, sl st) in ring; repeat 4 more times = 5 petals. Petal 3 sits directly opposite the stem.
Gauge and Checkpoints
Make the breast flower (Rounds 1–3) first as your test piece. For lace, you check gauge by measuring at each stage:
- Flower after Round 3: 1.5 in (3.8 cm) across, petal tip to petal tip
- Body after Round 7: 3 in (7.6 cm) across
- Head after Round H2: 1 in (2.5 cm) across
- Wing before border: 3.5 in (8.9 cm) tall
- Wing after border: 3.75 in (9.5 cm) tall
- Tail: 4 in (10.2 cm) long
If your flower is larger than 1.5 in (3.8 cm), switch to a 1.25 mm hook. If it is smaller, switch to a 1.75 mm hook. A 0.125 in (0.3 cm) error in the flower grows to nearly 0.5 in (1.3 cm) across the finished bird.
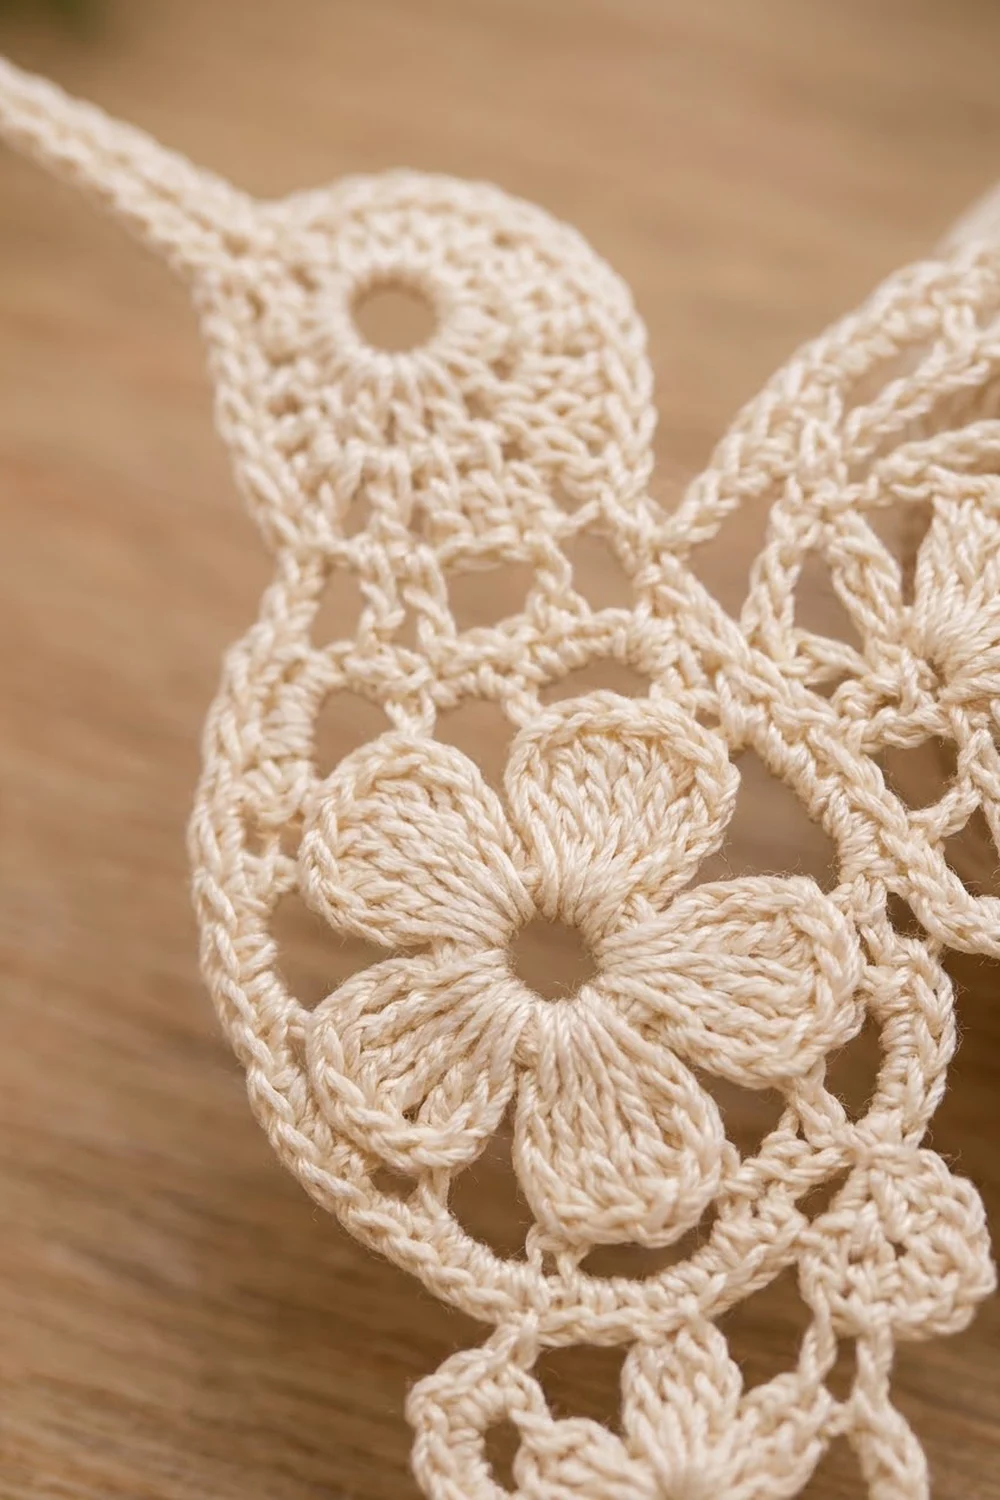
Breast Flower
Round 1: Ch 6, sl st in first ch to form a ring. Ch 1, 15 sc in ring, sl st in first sc. (15 sc) The ring stays open and forms the center hole.
Round 2: Ch 1, sc in first st. Ch 4, sk 2, sc in next st; repeat from * 3 more times. Ch 4, sk 2, sl st in first sc. (5 sc, 5 ch-4 sps)
Round 3: Sl st in first ch-4 sp. Work (sc, hdc, 5 dc, hdc, sc) in each ch-4 sp around, then sl st in first sc. (5 petals of 9 sts = 45 sts)
Round 4: Working behind the petals, sl st in the back of the next Round 2 sc. Ch 7, sc in the next Round 2 sc behind the petals; repeat around, ending with ch 7, sl st in first sc. (5 ch-7 loops)
Body
Round 5: Sl st in first ch-7 loop, ch 1. (Sc, ch 5, sc) in ch-7 loop, ch 5; repeat in each loop around, then sl st in first sc. (10 sc, 10 ch-5 sps)
Round 6: Sl st to the center of the first ch-5 sp, ch 1, sc in same sp. Ch 6, sc in next ch-5 sp; repeat around, ending with ch 6, sl st in first sc. (10 ch-6 sps)
Round 7: Sl st in first ch-6 sp, ch 1. Work 7 sc in each ch-6 sp around, then sl st in first sc. (70 sc) Fasten off.
Checkpoint: the body is 3 in (7.6 cm) across. Place markers to divide Round 7 into four sections:
- Neck: sts 1–14 (14 sts)
- Wing base: sts 15–35 (21 sts)
- Tail base: sts 36–49 (14 sts)
- Belly: sts 50–70 (21 sts)
14 + 21 + 14 + 21 = 70, so every stitch belongs to exactly one section.
Head and Beak
Round H1: Ch 4, sl st in first ch to form a ring. Ch 1, 10 sc in ring, sl st in first sc. (10 sc) The open ring is the eye.
Round H2: Ch 3 (counts as dc), dc in same st, 2 dc in each st around, sl st in top of ch-3. (20 dc) Checkpoint: the head is 1 in (2.5 cm) across.
Round H3 (beak and joining round):
- Ch 1, sc in first 4 sts.
- Beak: Ch 18. Sl st in 2nd ch from hook and in next 5 ch, sc in next 6 ch, hdc in next 5 ch. (17 beak sts) The stitches get taller toward the head, so the beak tapers to a fine point.
- Sc in next 6 head sts (sts 5–10).
- Join to the body: Work the next 6 head sts (sts 11–16) as follows: sc in the head st, then sl st in a body neck st. Use neck sts 10, 9, 8, 7, 6 and 5, in that order.
- Sc in last 4 head sts, sl st in first sc.
(20 sc around the head, plus 17 beak sts.) Fasten off. The beak sits almost directly opposite the join, so it points forward and away from the body.
Wing
With the right side facing, work in rows off the wing base (body sts 15–35).
Row W1: Join thread with a sc in st 15. Ch 5, sk 3, sc in next st; repeat from * 4 more times, ending in st 35. Turn. (6 sc, 5 ch-5 sps)
Row W2: Ch 1, sc in first sc. Ch 7, sc in next sc; repeat across. Turn. (5 ch-7 sps) These long loops are the fan spokes.
Row W3: Ch 1, 9 sc in each ch-7 sp across. Turn. (45 sc)
Row W4: Ch 1, sc in first st. Ch 5, sk 3, sc in next st; repeat from * 10 more times. Turn. (12 sc, 11 ch-5 sps)
Row W5: Sl st in first 3 ch, ch 1, sc in same sp. Ch 5, sc in next ch-5 sp; repeat across. Turn. (10 ch-5 sps)
Rows W6–W14: Repeat Row W5. Each row has 1 fewer space than the row before: W6 has 9 spaces, W7 has 8, and so on, down to W14 with 1 ch-5 sp. Fasten off.
Checkpoint: the wing measures 3.5 in (8.9 cm) from the body edge to the top of Row W14.
Border (Wing Edging)
This one-round edging goes around the free edges of the wing. It firms the leading edge, which faces the head, and adds feather scallops to the trailing edge.
Border gauge: 8 sc = 1 in (2.5 cm).
Leading edge: Join thread in body st 14, next to the wing base. Work 8 sc evenly up the sides of Rows W1–W3. Then work 4 sc in the outer ch-5 sp at the end of each row from W4 up to W13 (10 sps = 40 sc). (48 sc)
Tip: Work (3 sc, picot, 3 sc) in the single ch-5 sp of Row W14. (6 sc + 1 picot)
Trailing edge: Work 1 shell in the outer ch-5 sp of each row from W13 down to W4 (10 shells = 70 sts). Then work 8 sc evenly down the sides of Rows W3–W1. (78 sts) Sl st in body st 35 and fasten off.
Why the math works: Each ch-5 space spans about 0.5 in (1.3 cm). At 8 sc = 1 in (2.5 cm), 4 sc fill that span exactly, so the leading edge lies straight, with no ripples or pulling. A shell puts 7 stitches into the same span, almost twice what lies flat. The extra stitches rise into a rounded scallop on each row, which looks like layered feathers. The edging adds 0.25 in (0.6 cm) to the wing’s height, bringing it to 3.75 in (9.5 cm).
Tail
With the right side facing, work off the tail base (body sts 36–49).
Row T1: Join thread in st 36, ch 1. Sc2tog 7 times across. Turn. (7 sc)
Row T2: Ch 1, sc in each st across. Turn. (7 sc)
Row T3 (first part) and Flower A: Ch 1, sc in first 4 sts. Ch 3 for the stem, then work a small flower (Flower A).
Flower B: Sl st along the petal edges to the tip of petal 3 of Flower A. Ch 3, then work a small flower (Flower B).
Drop strands: Work all 5 strands from the lower petals of Flower B. After each strand, sl st back up each chain, skipping the drops, to return to the petal tip. To move to the next petal tip, sl st along the petal edges.
- Strand 1 (from petal 2 tip): Ch 6, drop. (1 drop)
- Strand 2 (from petal 3 tip): Ch 4, drop, ch 3, drop. (2 drops)
- Strand 3 (from petal 3 tip): Ch 4, drop, ch 3, drop, ch 3, drop. (3 drops)
- Strand 4 (from petal 3 tip): Ch 4, drop, ch 3, drop. (2 drops)
- Strand 5 (from petal 4 tip): Ch 6, drop. (1 drop)
That makes 9 drops in total. Fasten off.
Row T3 (second part): Join thread in st 5 of Row T2, ch 1, sc in sts 5–7. Fasten off. Row T3 now has 7 sc, and the stem sits at its center.
Checkpoint: the tail measures 4 in (10.2 cm) from the body edge to the lowest drop.
Hanging Loop
Join thread in the wing tip picot. Ch 30, sl st in the same picot. Work 1 sl st in each ch around the loop to firm it, then fasten off. The loop hangs about 1.5 in (3.8 cm).
Final Blocking
- Weave in all ends through solid sc areas, never through the open mesh.
- Soak the bird in cool water for 10 minutes. Roll it in a towel to press out the water; do not wring it.
- Pin the breast flower flat with 1 pin in each petal tip.
- Ease the body into a soft teardrop that narrows toward the tail. Pin every second sc of Round 7.
- Pin the beak straight.
- Pin the wing so it sweeps upward and slightly back. Put a pin in every shell and in the tip picot.
- Fan the 5 tail strands out evenly and pin each drop.
- Check the size: 5 in (12.7 cm) x 8 in (20.3 cm).
- For a firm ornament, spray with fabric stiffener or starch. Leave it to dry for at least 12 hours before you remove the pins.
Final Quality-Control Checklist
- The flower has 5 even petals and an open center.
- Round 7 has 70 sc.
- The eye ring is open, and the beak is straight and pointed.
- The leading edge has 48 sc, the tip has a centered picot and the trailing edge has 10 shells.
- The tail has 2 small flowers and 9 drops on 5 strands.
- The hanging loop is firm and secure.
- All ends are hidden and trimmed.
- The finished size is 5 in (12.7 cm) x 8 in (20.3 cm).
Troubleshooting
- The flower cups instead of lying flat: Your tension is tight. Loosen the Round 3 dc, or go up half a hook size.
- The body ruffles: Go down a hook size for Rounds 5–7, keep the count at 70 sc and block firmly.
- The wing points toward the head: Re-pin it during blocking so it sweeps back.
- The beak curls: The chain twisted. Rework it with the chain lying flat, or starch the beak and pin it straight.
- The drops look lumpy: Pull each ring closed snugly before working its 6 sc.
- The loop stretches: Add the round of sl sts if you skipped it, or starch the loop.
Care
Hand wash in cool water with mild soap, then reshape the bird and pin it flat to dry. Store it flat between sheets of tissue paper so the wing and tail keep their shape.
Final Notes
Each measurement depends on the one before it:
- A 1.5 in (3.8 cm) flower gives a 3 in (7.6 cm) body of 70 stitches.
- The body carries a 1 in (2.5 cm) head and a 3.5 in (8.9 cm) wing, which grows to 3.75 in (9.5 cm) with its edging.
- It also carries a 4 in (10.2 cm) tail.
Together they make a 5 in (12.7 cm) x 8 in (20.3 cm) hummingbird. Check the flower first, and the rest of the bird will follow.
Happy crocheting!