

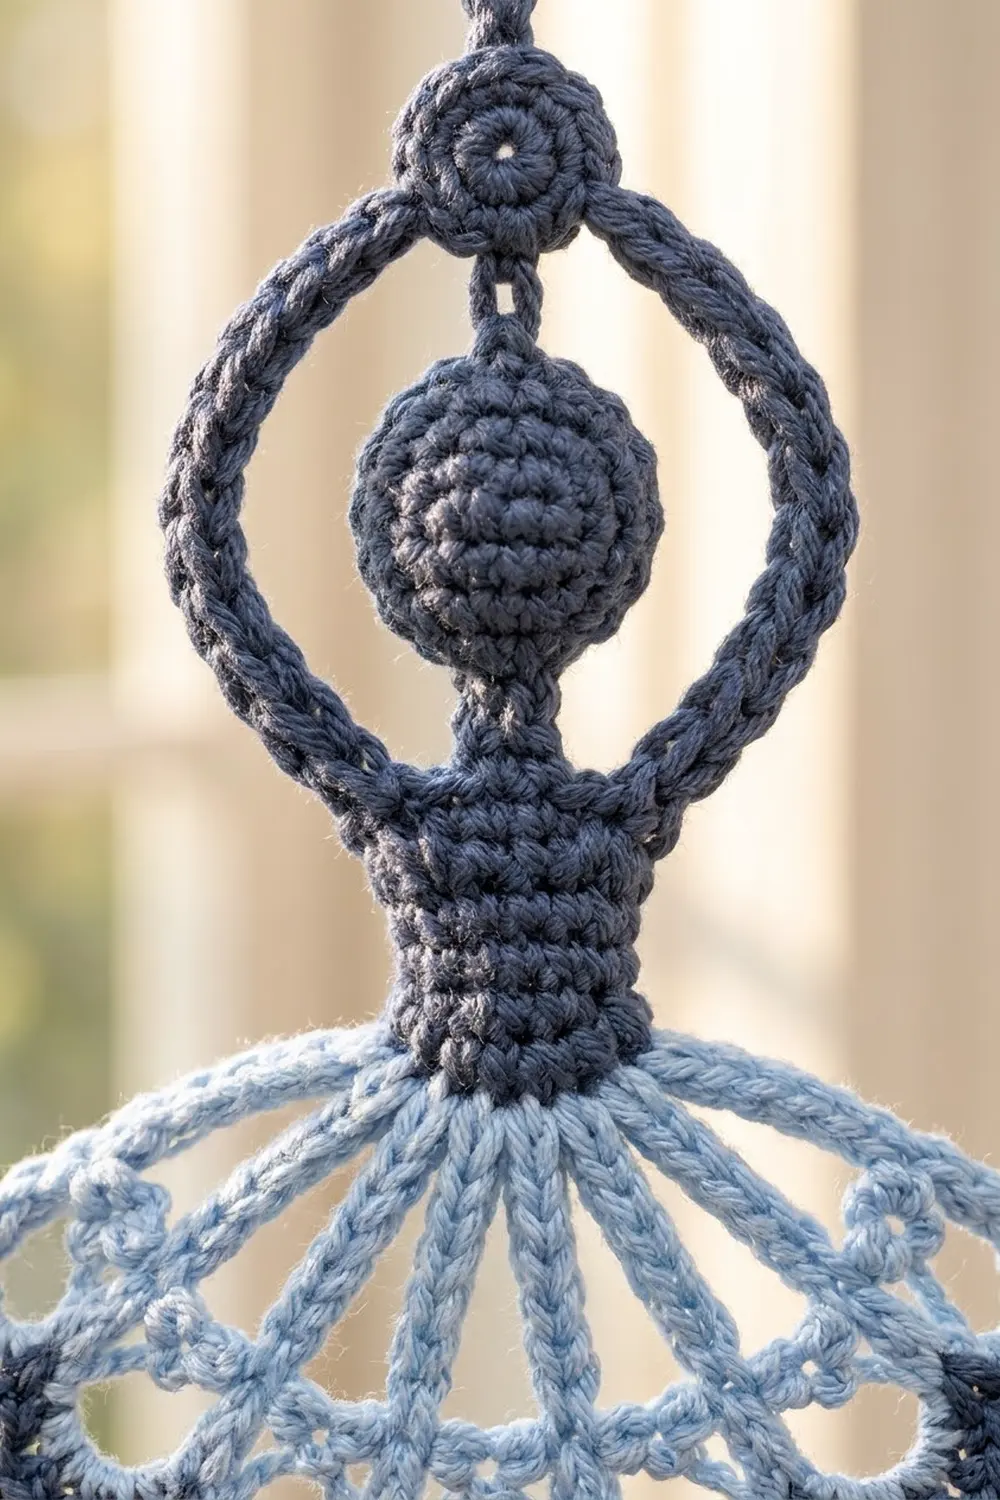
This curtain has a row of ballerinas hanging in front of the glass. A dark denim-blue lace valance runs along the rod, and a light powder-blue scalloped edge softens its lower edge. Below it hang 11 cords: six carry two ballerinas each, and the five between them carry small dark circles and light-blue bows.
The look is airy and a little vintage, so it suits a nursery or a dance-lover’s bedroom. Only two colors are used, and their contrast keeps every tutu spoke and arm loop easy to see against the light.
The pattern uses US crochet terms. The finished curtain measures 40¼ in (102.2 cm) wide and 34 in (86.4 cm) long. That includes a 4 in (10.2 cm) valance and 30 in (76.2 cm) strands.
First you work the valance flat in rows and add a scalloped border along its lower edge. Next you make the slip-stitch cords and the small motifs. Then you sew the motifs onto the cords and tie each cord to an anchor stitch in the border.
Finished Size and Construction
- Finished size: 40¼ × 34 in (102.2 × 86.4 cm)
- Skill level: Intermediate
- Terminology: US
- Yarn weight: Worsted (#4) cotton
- Hook: 4.5 mm (US 7)
- Number of pieces: 1 valance, 11 cords, 12 ballerinas, 25 circles, 26 bows
- Layout: 11 strands spaced 4 in (10.2 cm) apart, alternating ballerina strands and bead strands
- Piece sizes: ballerina 7¼ × 4 in (18.4 × 10.2 cm); circle 1½ in (3.8 cm); bow 2 × 1 in (5.1 × 2.5 cm)
- Valance before border: 40¼ × 2¾ in (102.2 × 7.0 cm)
- Border depth: 1¼ in (3.2 cm)
Materials
Use a smooth mercerized cotton or a cotton blend. It shows lace clearly, holds a crisp shape, and resists stretching. The amounts below assume about 85 m per 50 g.
- Color D (dark denim blue): 220 g, about 374 m
- Color L (light powder blue): 125 g, about 213 m
These quantities include a margin of about 15% for swatches and tails.
Tools:
– 4.5 mm (US 7) crochet hook
– Tapestry needle
– 11 metal curtain rings, 1½ in (3.8 cm) inner diameter
– Stitch markers
– Rust-proof pins and a blocking mat
– Measuring tape and a spray bottle
Abbreviations (US Terms)
- ch – chain
- sl st – slip stitch
- sc – single crochet
- hdc – half double crochet
- dc – double crochet
- tr – treble crochet
- sc2tog – single crochet 2 together
- sp – space
- st(s) – stitch(es)
- rev sc – reverse single crochet (crab stitch)
- D / L – dark / light color
Special stitch – Trefoil (Tf): (Ch 3, sl st in 3rd ch from hook) 3 times, then sl st in the st at the base of the first picot. This makes 3 tiny petals around one center point.
Gauge and Checkpoints
Gauge: 16 sc and 18 rows = 4 in (10.2 cm).
Cord gauge: 16 sl st = 4 in (10.2 cm).
Before you start the valance, make one test ballerina and one test circle. Check them against these sizes:
- Ballerina head after Rnd 3: 1¼ in (3.2 cm) across
- Body after Row 7: 1½ in (3.8 cm) tall
- Tutu hem: 4 in (10.2 cm) wide
- Finished ballerina: 7¼ in (18.4 cm) from the top of the hand ring to the toe
- Circle: 1½ in (3.8 cm) across
If your pieces are more than ¼ in (0.6 cm) too big, go down 0.5 mm in hook size. If they’re too small, go up 0.5 mm. The valance has its own checkpoint after Row 1: 161 sc should measure 40¼ in (102.2 cm).
Valance
Use D. The valance is worked flat, with Row 1 as the top edge. It has 10 repeats of 16 sts, plus 1 st.
Foundation: Ch 162.
Row 1: Sc in 2nd ch from hook and in each ch across. Turn. (161 sc)
Row 2 (mesh): Ch 4 (counts as dc + ch 1), skip next st, dc in next st. Ch 1, skip next st, dc in next st; repeat from * across. Turn. (81 dc + 80 ch = 161 sts)*
Now number the dc in each repeat 0 to 8. Dc 8 of one repeat is also dc 0 of the next.
Row 3 (fans): Ch 1, sc in first dc. *Ch 3, skip next dc, sc in dc 2. Ch 2, skip next dc, work [dc, (ch 1, dc) 4 times] in dc 4. Ch 2, skip next dc, sc in dc 6. Ch 3, skip next dc, sc in dc 8. Repeat from * 9 more times. Turn.
That makes 22 sts per repeat: 31 sc + 50 dc + 140 ch = 221 sts. The 11 sc that sit on dc 0/8 are the boundary sc.
Row 4: Ch 4 (counts as tr). Ch 5, sc in 2nd ch-1 sp of fan, ch 3, sc in 3rd ch-1 sp of fan, ch 5, tr in next boundary sc. Repeat from * across. Turn. (11 tr + 20 sc + 130 ch = 161 sts)*
Row 5 (conversion row): Ch 1, sc in first tr. *5 sc in ch-5 sp, sc in sc, 3 sc in ch-3 sp, sc in sc, 5 sc in ch-5 sp, sc in tr. Repeat from * across.
Count: 31 sts worked 1 per existing stitch (11 tr + 20 sc) + 130 sc worked into ch sps = 161 sc. Fasten off.
Checkpoint: The valance should measure 40¼ × 2¾ in (102.2 × 7.0 cm).
Ballerina (make 12)
Head (D): Make a magic ring.
- Rnd 1: 6 sc in ring. (6)
- Rnd 2: 2 sc in each st. (12)
- Rnd 3: Sc in next st, 2 sc in next st; repeat from * 6 times. Sl st to first sc. (18)*
Don’t fasten off. The head should measure 1¼ in (3.2 cm) across.
Body (D): Work in rows from the bottom of the head.
- Row 1: Ch 1, sc in next 3 sts of Rnd 3. Turn. (3)
- Row 2: Ch 1, 2 sc in first st, sc in next st, 2 sc in last st. Turn. (5)
- Row 3: Ch 1, 2 sc in first st, sc in next 3 sts, 2 sc in last st. Turn. (7)
- Rows 4–6: Ch 1, sc in each st. Turn. (7)
- Row 7 (waist): Ch 1, sc2tog, sc in next 3 sts, sc2tog. (5)
Fasten off. The body should be 1½ in (3.8 cm) tall.
Arms (D):
- Join D at the right end of Row 3.
- Ch 12, then ch 6 and sl st in the 6th ch from hook. This makes the hand ring.
- Ch 12 and sl st to the left end of Row 3.
- Sc in each of the 12 ch going up, 10 sc in the hand ring, and sc in each of the 12 ch coming down. Sl st to the shoulder. (34 sc)
Fasten off. Use the tail to tack the top of the head to the bottom of the hand ring with 2 small stitches.
Tutu (L): Join L in the first st of Row 7.
- Row 1: Ch 1, 2 sc in first st, sc in next 3 sts, 2 sc in last st. Turn. (7 sc)
- Row 2 (spokes): Ch 4 (counts as tr). Ch 3, tr in next sc; repeat from * 5 more times. Turn. (7 tr, 6 ch-3 sps)*
- Row 3: Ch 4 (counts as tr). Ch 3, Tf, ch 3, tr in next tr; repeat from * 5 more times. (7 tr, 6 trefoils, 12 ch-3 sps)*
Fasten off L.
- Row 4 (D hem): Join D in the first tr. Ch 1, sc in same tr. 4 dc in next ch-3 sp, dc in the sl st at the trefoil base, 4 dc in next ch-3 sp, sc in next tr. Repeat from * 5 more times. (6 scallops of 9 dc + 7 sc = 61 sts)*
Fasten off. The hem should measure 4 in (10.2 cm) wide.
Leg (D): Ch 15.
- First side: Sl st in 2nd ch from hook (this is the toe). Sc in next 4 ch, hdc in next 4 ch, dc in next 4 ch, and 3 dc in the last ch. (16 sts)
- Second side: Rotate and work along the other side of the foundation chain. Dc in next 4 ch, hdc in next 4 ch, sc in next 4 ch, and sl st at the toe. (13 sts)
That makes 29 sts in total, and the leg is 3½ in (8.9 cm) long. Sew its wide end behind the tutu at the waist so that 1 in (2.5 cm) of the leg shows below the hem.
Circle (make 25)
Use D. Work Rnds 1–3 the same as the ballerina head. (18 sc)
Rnd 4: Ch 1, rev sc in each st. Sl st to join. (18)
Fasten off. Each circle should measure 1½ in (3.8 cm) across.
Bow (make 26)
Use L. Ch 17.
- Row 1: Sc in 2nd ch from hook and in each ch across. Turn. (16)
- Rows 2–3: Ch 1, sc in each st. Turn. (16)
Fasten off, leaving a 12 in (30.5 cm) tail.
- Fold both short ends to the center.
- Wrap the tail tightly around the center 6 times.
- For the bow tails, ch 8 from the center and sl st back along the chain. Repeat once more.
The bow should measure 2 × 1 in (5.1 × 2.5 cm).
Cords (make 11)
Use D. Ch 121, leaving an 8 in (20.3 cm) starting tail. Sl st in the back bump of the 2nd ch from hook and in each ch across. (120 sl st)
Fasten off. Each cord should measure 30 in (76.2 cm).
Make All Pieces
In D: 1 valance, 11 cords, 12 ballerina bodies (head, body, arms, and leg), 12 tutu hems, and 25 circles.
In L: 12 tutus, 26 bows, and the valance border.
Mark the placements on each cord, measuring from the top. Sew each motif to the front of its cord, catching the cord at the motif’s top, center, and bottom.
Ballerina strand (B), make 6:
– Hand rings at 4 in (10.2 cm) and 15 in (38.1 cm)
– Bow at 28 in (71.1 cm)
Bead strand (C), make 5:
– Circles centered at 3, 9, 15, 21, and 27 in (7.6, 22.9, 38.1, 53.3, and 68.6 cm)
– Bows at 6, 12, 18, and 24 in (15.2, 30.5, 45.7, and 61.0 cm)
Hang the strands in this order:
Anchor:  1  2  3  4  5  6  7  8  9  10  11
Strand:  B  C  B  C  B  C  B  C  B  C   B
Border
Use L. Turn the valance so that Row 5 faces up. The border runs along this lower edge only. The top edge stays plain for the rings.
Border gauge: Border Row 1 matches the body gauge of 16 sc = 4 in (10.2 cm), so the edge won’t ruffle or pull in.
Row 1: Join L in the first st. Ch 1, sc in each st across. Turn. (161 worked 1 per st + 0 added = 161 sc)
Row 2 (scallops): Ch 1, sc in first st. Ch 3, skip next 7 sts, work [dc, (ch 1, dc) 6 times] in next st, ch 3, skip next 7 sts, sc in next st. Repeat from * 9 more times. Turn. (11 sc + 70 dc + 60 ch-1 + 60 ch in ch-3 sps = 201 sts)*
Row 3: Ch 1, sc in first sc. *3 sc in ch-3 sp, sc in next dc, (2 sc in ch-1 sp, sc in next dc) 6 times, 3 sc in ch-3 sp, sc in sc. Repeat from * across.
Count: 81 sts worked 1 per existing stitch (11 sc + 70 dc) + 60 sc in ch-3 sps + 120 sc in ch-1 sps = 261 sc. Fasten off.
Why the math works: Row 1 has 161 sc, which is 10 × 16 + 1. Each scallop uses exactly 16 sts. So the 11 sc between scallops land on sts 1, 17, 33, and so on up to 161. In Row 3, those same sc become sts 1, 27, 53, and so on up to 261 (26 sts per repeat). These 11 stitches are the strand anchors. They line up vertically with the valance’s tr columns and with the ring points at the top.
Joining
Method: Tie the strands on, then sew the rings on.
Strands: Thread the 8 in (20.3 cm) top tail of each cord through its anchor sc from front to back. Bring it back up through the cord’s first sl st, knot twice, and weave the end down inside the cord. Each cord attaches to exactly one anchor stitch, with no stitches or chains added.
Rings: Sew one ring to Row 1 at each of sts 1, 17, 33, and so on up to 161. That’s 11 rings, spaced 4 in (10.2 cm) apart.
Tension: Make each tie snug but not puckered. The anchor sc should keep its shape, and each cord should hang straight.
Size checkpoint: Every cord should drop 30 in (76.2 cm) below the border, which makes the full curtain 34 in (86.4 cm) long.
Final Blocking
- Spray the valance until it’s damp but not soaked.
- Pin it to 40¼ × 4 in (102.2 × 10.2 cm). Put one pin in each fan and one at the tip of each scallop.
- Pin each ballerina flat. Open the tutu hem to 4 in (10.2 cm) and round out the arm loop.
- Press the circles flat to 1½ in (3.8 cm) and shape the bow loops with your fingers.
- Let everything dry completely, then hang the curtain.
Final Quality-Control Checklist
- The valance has 161 sts in Rows 1, 2, 4, and 5, and 10 fans.
- The border has 10 scallops and 11 anchors.
- Each of the 12 ballerinas measures 7¼ in (18.4 cm) and has a 61-st hem.
- Each bead strand has 5 circles and 4 bows.
- Each ballerina strand has 2 ballerinas and 1 bow.
- The strands hang in the B-C-B order.
- All tails are woven in, and all knots are hidden.
Troubleshooting
- The valance ruffles: Recount Row 5 and Border Row 1. Each should have 161 sts.
- The valance cups: The chain loops are too tight. Loosen the ch-5 sps.
- The tutu curls: Steam it and pin the hem out wide.
- The circles ripple: Work Rnd 4 one hook size smaller.
- The strands twist: Block the cords flat before you sew the motifs on.
Care
Hand wash in cool water and lay flat to dry, pinning the scallops back into shape. Keep the curtain out of harsh all-day sun so the denim blue doesn’t fade.

Final Notes
Here’s the full measurement chain. A gauge of 16 sc = 4 in (10.2 cm) gives 161 sc = 40¼ in (102.2 cm). The valance is 2¾ in (7.0 cm) deep before the border, and the border adds 1¼ in (3.2 cm), for a total depth of 4 in (10.2 cm). The 11 anchors are spaced 4 in (10.2 cm) apart and hold 30 in (76.2 cm) cords. That gives a finished curtain of 40¼ × 34 in (102.2 × 86.4 cm).
Happy crocheting!