
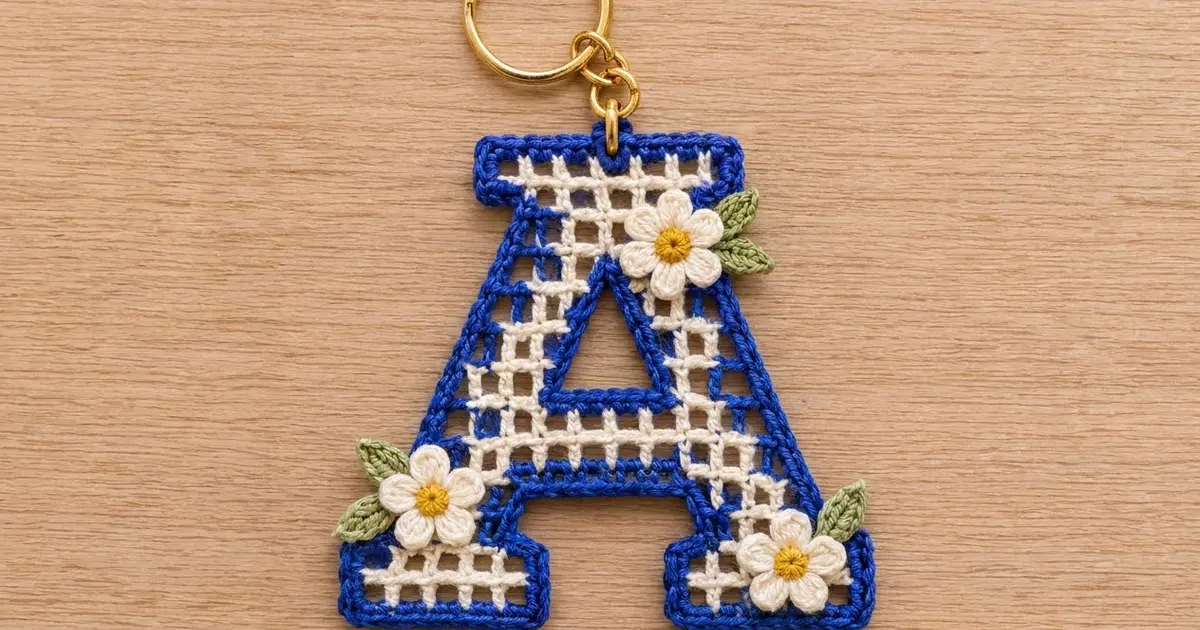
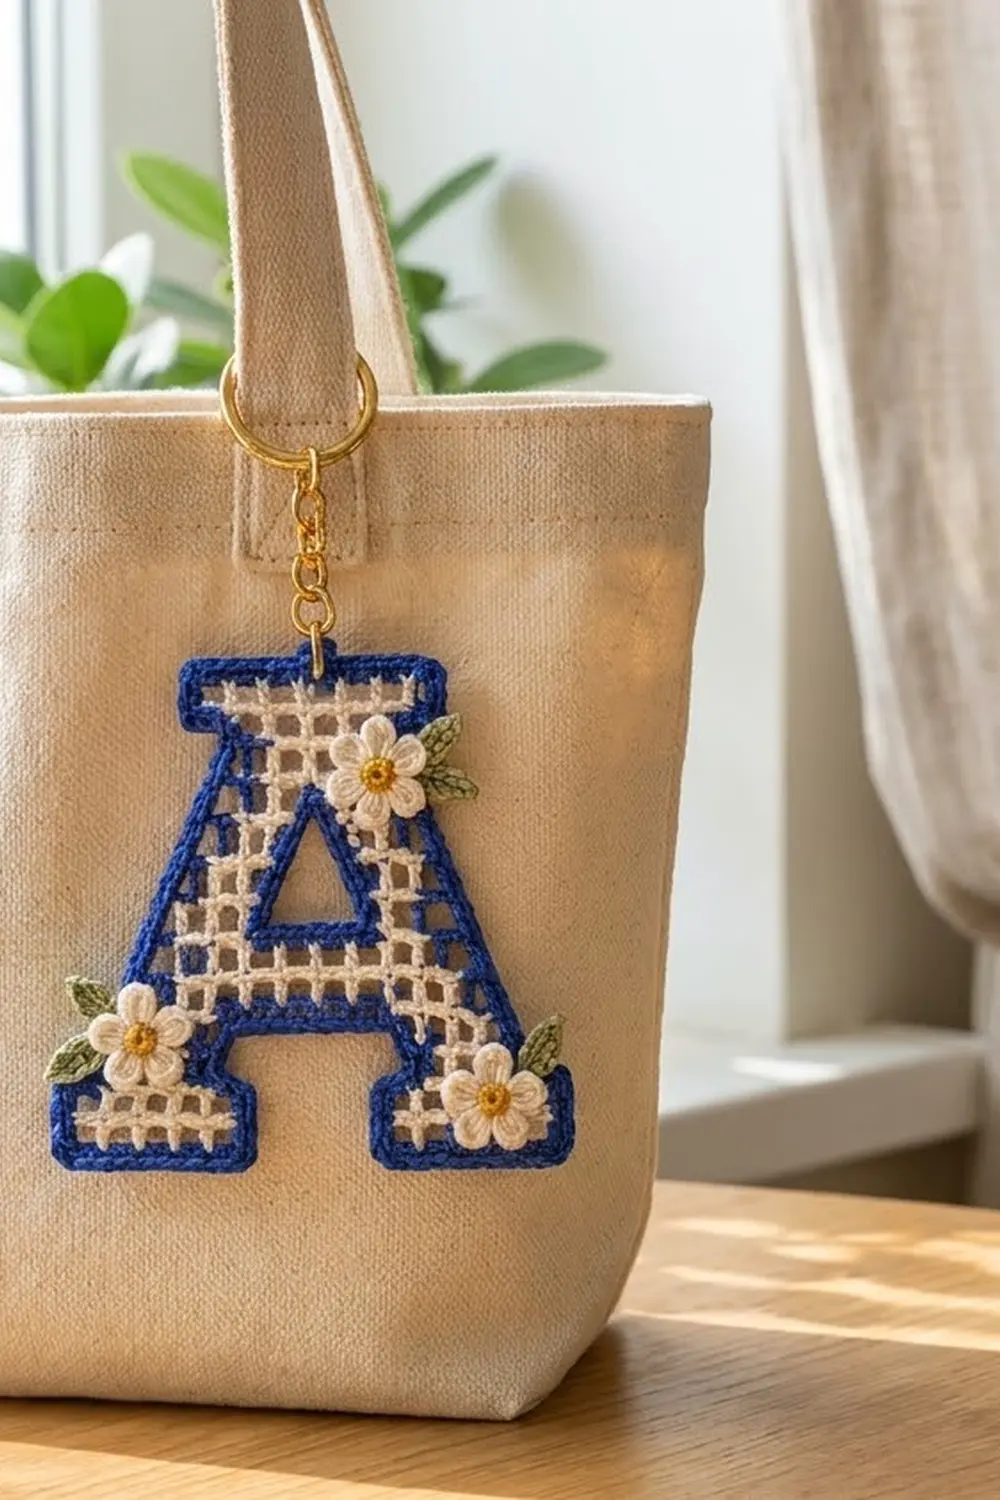
This letter A bag charm is a small, crisp filet-mesh initial in cream and royal blue. Blue bands run through the cream grid for a gingham-style look, and a thick corded blue edge outlines the whole letter and its counter opening. Three tiny cream flowers with yellow centers and green leaves finish it off, and a gold split ring lets it hang from a tote handle or a set of keys.
The letter is a blocky serif capital. It has wide stepped feet, legs that step inward as they rise, a solid mesh crossbar, a small enclosed counter above the crossbar, and a flat top. All instructions use US crochet terms.
The finished charm measures 4.9 in (12.4 cm) wide by 4.3 in (10.9 cm) tall, including the border. Each flower is about 0.8 in (2.0 cm) across.
You work the letter from the bottom up in rows of open mesh (dc, ch 1). The two legs start as separate sections, and a chain bridge joins them into the crossbar. Above the crossbar, the letter splits into two short legs around the counter, and a second chain bridge closes the top. Two blue border rounds go around the outside and two more go around the counter. The flowers, leaves and hardware go on last.
Finished Size and Construction
- Finished size: 4.9 in (12.4 cm) wide x 4.3 in (10.9 cm) tall
- Skill level: Intermediate
- Terminology: US
- Yarn weight: Super Fine (#1) mercerized cotton or size 3 crochet thread
- Hook: 2.0 mm
- Number of pieces: 1 letter, plus 3 flowers and 5 leaves as small appliqués
- Layout: Single piece, no joining
- Piece size: 15 meshes wide x 13 rows tall
- Size before border: 4.5 in (11.4 cm) x 3.9 in (9.9 cm)
- Border depth: 0.2 in (0.5 cm) on every edge
Materials
Use a smooth, tightly plied mercerized cotton. It gives the mesh crisp corners and a corded edge that holds its shape when the charm swings from a bag. Avoid fuzzy or very stretchy yarns, because the stepped outline depends on clean, sharp lines. Pick a cream and a strong royal blue with good contrast so the gingham bands stand out.
- Color A, Cream: 5 g (about 17 m) for the mesh and flower petals
- Color B, Royal Blue: 8 g (about 27 m) for the stripe rows and borders
- Color C, Golden Yellow: 1 g (about 3 m) for the flower centers
- Color D, Sage Green: 1 g (about 3 m) for the leaves
All quantities include a safety margin.
Tools:
- 2.0 mm crochet hook
- Tapestry needle
- Rust-proof pins and a blocking board
- Gold split ring, 1 in (2.5 cm) across
- Short gold chain, about 1 in (2.5 cm) long
- 2 small gold jump rings and flat-nose pliers
- Optional: spray starch for a firmer charm
Abbreviations (US Terms)
- ch: chain
- sl st: slip stitch
- sc: single crochet
- hdc: half double crochet
- dc: double crochet
- sc2tog: single crochet 2 together
- rev sc: reverse single crochet (crab stitch)
- sp: space
- sk: skip
- yo: yarn over
- RS / WS: right side / wrong side
Mesh: One mesh is 1 dc post plus 1 ch-1 sp. A section of n meshes has n + 1 dc posts and n ch-1 sps, so it has 2n + 1 stitches in total.
Mesh row: Ch 4 (counts as dc and ch 1), sk the ch-1 sp, dc in the next dc. Ch 1, sk the ch-1 sp, dc in the next dc. Repeat from * across, working the last dc into the 3rd ch of the turning ch.
Step in at the start of a row: Sl st in the ch-1 sp, then sl st in the next dc. This moves you 1 mesh inward. Then begin the row with ch 4.
Step in at the end of a row: Stop 1 mesh early and turn.
Rev sc: Work sc from left to right (right to left if you crochet left-handed). This makes the corded rope edge.
Gauge and Checkpoints
Gauge: 10 meshes x 10 rows = 3 in (7.6 cm), so each mesh is a 0.3 in (0.8 cm) square.
Make the left leg (Rows 1-6) first as your test piece. It should measure 1.5 in (3.8 cm) wide at Row 1 and 1.8 in (4.6 cm) tall after Row 6.
- Too big: Switch to a 1.75 mm hook.
- Too small: Switch to a 2.25 mm hook.
Fix the gauge before you go on, because every later measurement depends on this square mesh. Keep your ch-1 sps the same size as your dc posts are tall, so the squares stay square rather than turning into rectangles.
Checkpoints:
- After Row 8: The crossbar is 3.3 in (8.4 cm) wide and the piece is 2.4 in (6.1 cm) tall.
- After Row 11: The counter opening is 0.9 in (2.3 cm) wide and 0.9 in (2.3 cm) tall.
- After Row 13: The top is 2.1 in (5.3 cm) wide and the whole letter is 4.5 in (11.4 cm) x 3.9 in (9.9 cm).
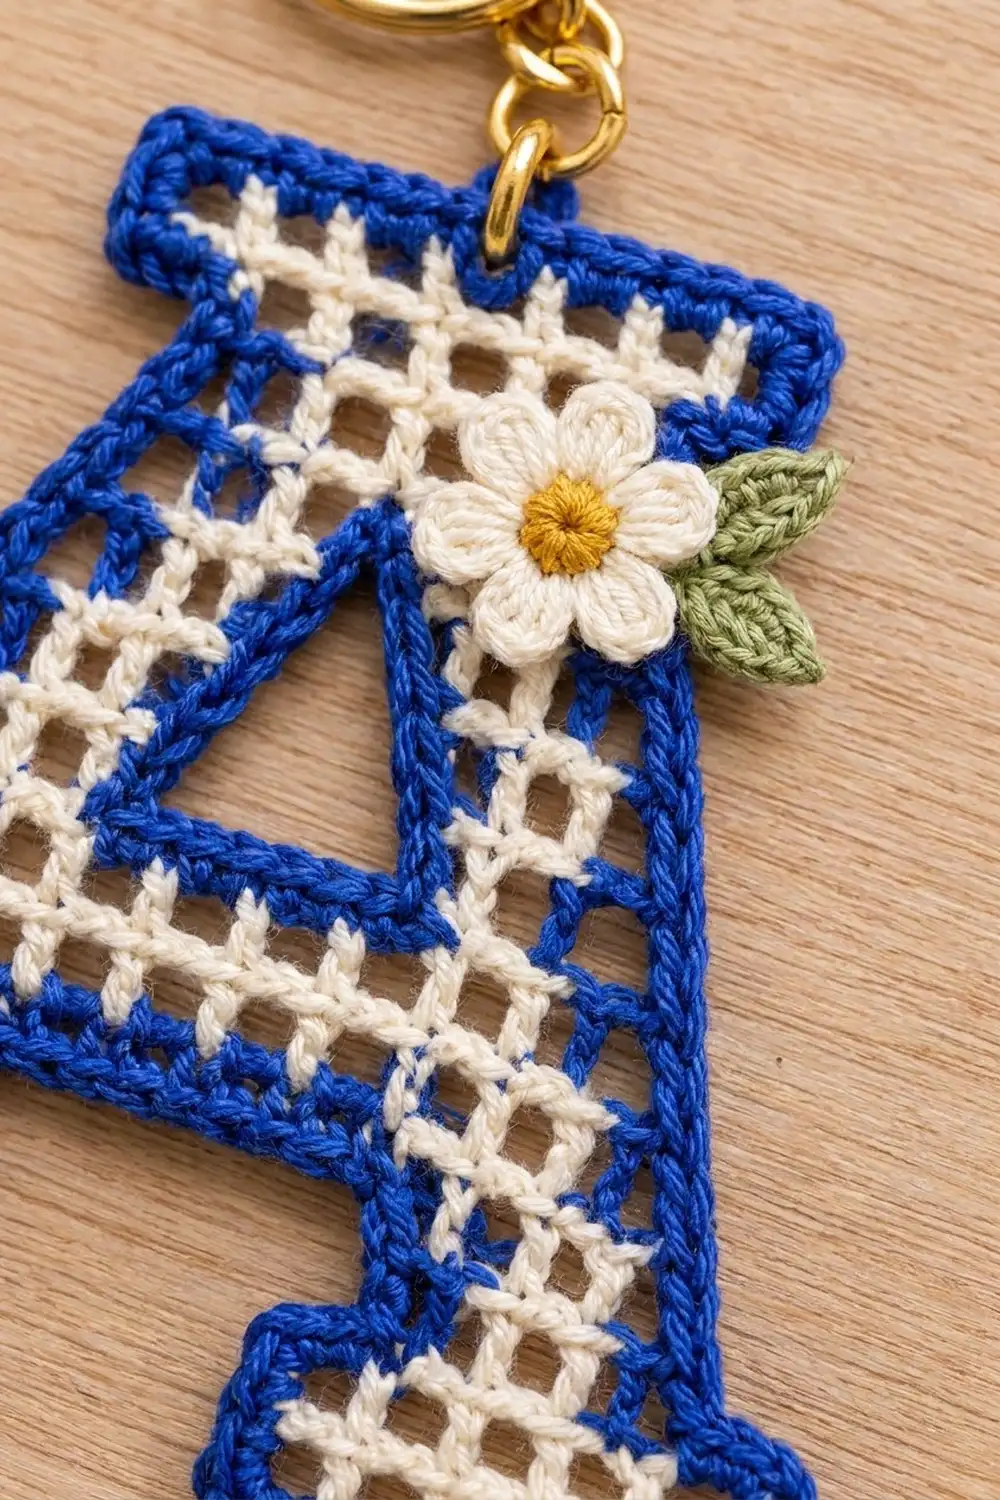
Letter Grid Reference
Meshes are numbered 1-15 from left to right, as seen from the RS. Odd rows are RS rows, worked from right to left. Even rows are WS rows.
| Rows | Left section | Right section | Color |
|---|---|---|---|
| 1-2 | meshes 1-5 | meshes 11-15 | A |
| 3-4 | meshes 2-5 | meshes 11-14 | Row 3 B, Row 4 A |
| 5-6 | meshes 3-5 | meshes 11-13 | Row 5 A, Row 6 B |
| 7-8 | meshes 3-13 (one piece) | — | A |
| 9-10 | meshes 4-6 | meshes 10-12 | Row 9 B, Row 10 A |
| 11 | meshes 5-6 | meshes 10-11 | A |
| 12-13 | meshes 5-11 (one piece) | — | Row 12 B, Row 13 A |
Rows 3, 6, 9 and 12 are blue. To change color, work the final yo of the last dc in the previous row with the new color. Cut the old color, leaving a 6 in (15.2 cm) tail. You’ll work the border over these tails, so they disappear.
Left Leg (Rows 1-6)
Row 1 (RS): With A, ch 14. Dc in the 6th ch from hook (the skipped ch count as dc and ch-1 sp). Ch 1, sk 1 ch, dc in the next ch. Repeat from * 3 more times. Turn. (5 meshes: 6 dc + 5 ch = 11 sts)
Row 2 (WS): Work a mesh row. Change to B in the last dc. (5 meshes, 11 sts)
Row 3: Work a mesh row across 4 meshes, then step in at the end of the row. Turn. Change to A. (4 meshes, 9 sts)
Row 4: Work a mesh row. (4 meshes, 9 sts)
Row 5: Work a mesh row across 3 meshes, then step in at the end of the row. Turn. Change to B. (3 meshes, 7 sts)
Row 6: Work a mesh row. Fasten off. (3 meshes, 7 sts)
Right Leg (Rows 1-6)
Rows 1-2: Work as for the left leg, changing to B at the end of Row 2. (5 meshes, 11 sts)
Row 3: Step in at the start of the row, then work a mesh row over the remaining 4 meshes. Change to A. (4 meshes, 9 sts)
Row 4: Work a mesh row. (4 meshes, 9 sts)
Row 5: Step in at the start of the row, then work 3 meshes. Change to B. (3 meshes, 7 sts)
Row 6: Work a mesh row. Change to A and don’t fasten off. (3 meshes, 7 sts)
Lay the legs side by side, RS up, with a 5-mesh gap between them. The gap is 1.5 in (3.8 cm).
Crossbar (Rows 7-8)
Row 7 (RS): Ch 4 and work 3 meshes across the right leg. Ch 9 for the bridge. Dc in the last dc of left-leg Row 6, then work 3 meshes across the left leg. Turn. (11 meshes: 3 + 5 bridged + 3; 8 dc + 15 ch = 23 sts)
Row 8: Work a mesh row across all 11 meshes. Over the bridge, dc into the 2nd, 4th, 6th and 8th ch. Don’t fasten off. (11 meshes: 12 dc + 11 ch = 23 sts)
Keep the 9-ch bridge the same width as the gap. If it’s pulled tight, the feet will tilt inward.
Upper Legs and Counter (Rows 9-11)
Right upper leg
Row 9: Change to B in the last dc of Row 8. Step in at the start of the row, then work 3 meshes over meshes 12-10. Turn. Change to A. (3 meshes, 7 sts)
Row 10: Work a mesh row. (3 meshes, 7 sts)
Row 11: Step in at the start of the row, then work 2 meshes. Fasten off. (2 meshes, 5 sts)
Left upper leg
Row 9: With RS facing, join B in the dc between meshes 6 and 7, leaving meshes 7-9 unworked. Ch 4 and work 3 meshes over meshes 6-4. Step in at the end of the row and turn. Change to A. (3 meshes, 7 sts)
Row 10: Work a mesh row. (3 meshes, 7 sts)
Row 11: Work 2 meshes, then step in at the end of the row. Turn. Change to B. (2 meshes, 5 sts)
Top (Rows 12-13)
Row 12 (WS): Work 2 meshes across the left upper leg. Ch 5 for the bridge. Dc in the last dc of right-leg Row 11, then work 2 meshes. Turn. Change to A. (7 meshes: 6 dc + 9 ch = 15 sts)
Row 13: Work a mesh row across 7 meshes. Over the bridge, dc into the 2nd and 4th ch. Fasten off. (7 meshes: 8 dc + 7 ch = 15 sts)
The counter is now enclosed. It is 3 meshes wide by 3 rows tall, which is 0.9 in (2.3 cm) square.
Border
Border gauge: 2 sc per mesh on horizontal edges and 2 sc per row-end on vertical edges. That’s 20 sc = 3 in (7.6 cm), which matches the mesh gauge exactly.
Border rules:
- Horizontal edges: Work 2 sc in each ch-1 sp. On the bottoms of the feet, work into the skipped foundation ch. Across the 9-ch bridge, work 10 sc evenly (1 in each ch, plus 1 extra in the center ch).
- Vertical edges: Work 2 sc around each dc row-end post.
- Outer (convex) corners: Work 1 extra sc into the corner point.
- Inner (concave) corners: Sc2tog the last sc of one edge together with the first sc of the next edge.
Outer Rnd 1: Join B at the bottom-left corner. Ch 1 and work 1 corner sc, then work counterclockwise:
| Edge | Length | Sc |
|---|---|---|
| Left foot bottom | 5 meshes | 10 |
| Left leg inner side (Rows 1-6) | 6 rows | 12 |
| Crossbar underside (bridge) | 5 meshes | 10 |
| Right leg inner side (Rows 6-1) | 6 rows | 12 |
| Right foot bottom | 5 meshes | 10 |
| Right outer: Rows 1-2 / step / Rows 3-4 / step | 2 + 1 + 2 + 1 | 4 + 2 + 4 + 2 |
| Right outer: Rows 5-8 / step / Rows 9-10 / step | 4 + 1 + 2 + 1 | 8 + 2 + 4 + 2 |
| Right side, Rows 11-13 | 3 rows | 6 |
| Top | 7 meshes | 14 |
| Left side, Rows 13-11 | 3 rows | 6 |
| Left outer: step / Rows 10-9 / step / Rows 8-5 | 1 + 2 + 1 + 4 | 2 + 4 + 2 + 8 |
| Left outer: step / Rows 4-3 / step / Rows 2-1 | 1 + 2 + 1 + 2 | 2 + 4 + 2 + 4 |
The edges total 68 units x 2 = 136 sc. Add 14 sc for the convex corners and subtract 10 for the concave sc2tog: 136 + 14 − 10 = 140 sc. Sl st to the first sc.
Outer Rnd 2: Ch 1, then rev sc in each sc around. Fasten off. (140 rev sc)
Counter Rnd 1: Join B at the inside bottom-left corner of the counter. Work:
- 6 sc across the top of Row 8
- 6 sc up the right side (Rows 9-11)
- 6 sc across the underside of the 5-ch bridge
- 6 sc down the left side
Sc2tog at all 4 inner corners, then sl st to join. (24 − 4 = 20 sc)
Counter Rnd 2: Rev sc in each sc around. Fasten off. (20 rev sc)
Keep your border tension relaxed but even. Rev sc pulls tighter than regular sc, so don’t tug each loop.
Why the math works: The border uses the same 2-sc-per-0.3-in rate as the mesh, so straight edges lie flat. Convex corners need the extra sc to turn without cupping. Concave corners need the sc2tog to turn without ruffling. The two rounds add 0.2 in (0.5 cm) to each side:
- Width: 4.5 + 0.4 = 4.9 in (12.4 cm)
- Height: 3.9 + 0.4 = 4.3 in (10.9 cm)
Flowers (Make 3)
Rnd 1: With C, make a magic ring and work 5 sc into it. Sl st to join and fasten off. (5 sc)
Rnd 2: Join A in any sc. In the same sc, work (ch 2, 2 dc, ch 2, sl st). Sl st in the next sc. Repeat from * 4 more times. Fasten off, leaving a sewing tail. (5 petals)
Each flower measures about 0.8 in (2.0 cm) across.
Leaves (Make 5)
With D, ch 6. Starting in the 2nd ch from hook, work sc, hdc, dc, hdc, sc across. Ch 1. Working along the opposite side of the chain, work sc, hdc, dc, hdc, sc. Sl st in the tip and fasten off, leaving a sewing tail. (10 sts)
Each leaf is about 0.6 in (1.5 cm) long.
Final Blocking
- Weave in all ends except the sewing tails on the flowers and leaves.
- Soak the letter in cool water for 10 minutes, then roll it in a towel and press gently.
- Pin it RS up to 4.9 in (12.4 cm) x 4.3 in (10.9 cm), pinning every outer corner first.
- Straighten the mesh so the posts run vertically. Pin the counter open to a 0.5 in (1.3 cm) square.
- Mist with starch if you like, then let it dry completely.
- Sew on the flowers:
- One flower on the upper right leg, with 2 leaves tucked behind its right side
- One flower on the left foot, with 2 leaves at its left
- One flower on the lower right foot, with 1 leaf above it
- Pass a jump ring through both border rounds at the top center, above mesh 8. Attach the chain, then the split ring.
Final Quality-Control Checklist
- The letter measures 4.9 in (12.4 cm) x 4.3 in (10.9 cm).
- Each foot is 1.5 in (3.8 cm) wide, and the gap between the feet is 1.5 in (3.8 cm).
- The steps on the left and right sides mirror each other.
- Outer Rnd 2 has 140 rev sc and Counter Rnd 2 has 20.
- There are no holes or gaps at either bridge join.
- The flowers lie flat, and no sewing shows on the WS.
- Both jump rings are fully closed.
Troubleshooting
- Legs lean or steps look uneven: Recount your meshes against the grid table. Each step should be exactly 1 mesh.
- Bridge sags or puckers: Chain at the same tension as your ch-1 sps.
- Border ruffles: You have too many sc. Recheck the 2-per-unit rule.
- Border cups: Some convex corners are missing their extra sc.
- Counter closes up: Make sure you worked only 4 sc2tog, then block it open.
- Ring tears through: Pass the jump ring through both border rounds, not just one.
Care
Hand wash in cool water and lay flat to dry, reshaping the corners while the charm is damp. Re-starch if it softens.
Final Notes
The whole charm comes from one measurement chain:
- A 0.3 in (0.8 cm) mesh builds a 15 x 13 grid that measures 4.5 in (11.4 cm) x 3.9 in (9.9 cm).
- A 140-st outer border adds 0.2 in (0.5 cm) to each side.
- The finished letter measures 4.9 in (12.4 cm) x 4.3 in (10.9 cm).
Get the test leg right, and every step after it falls into place.
Happy crocheting!