

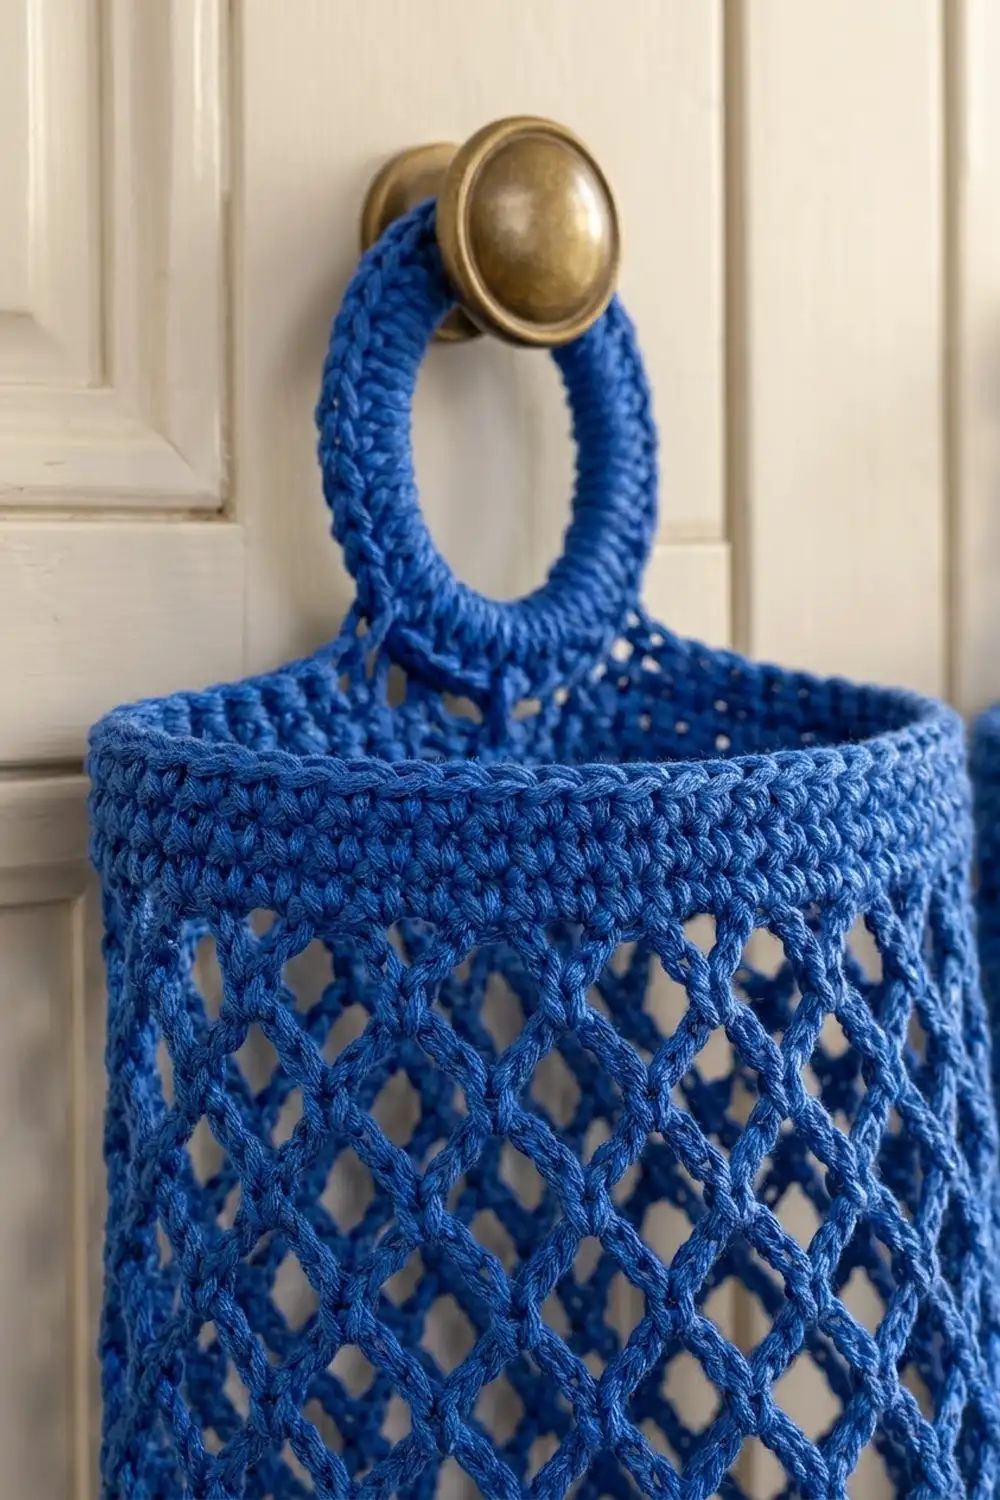
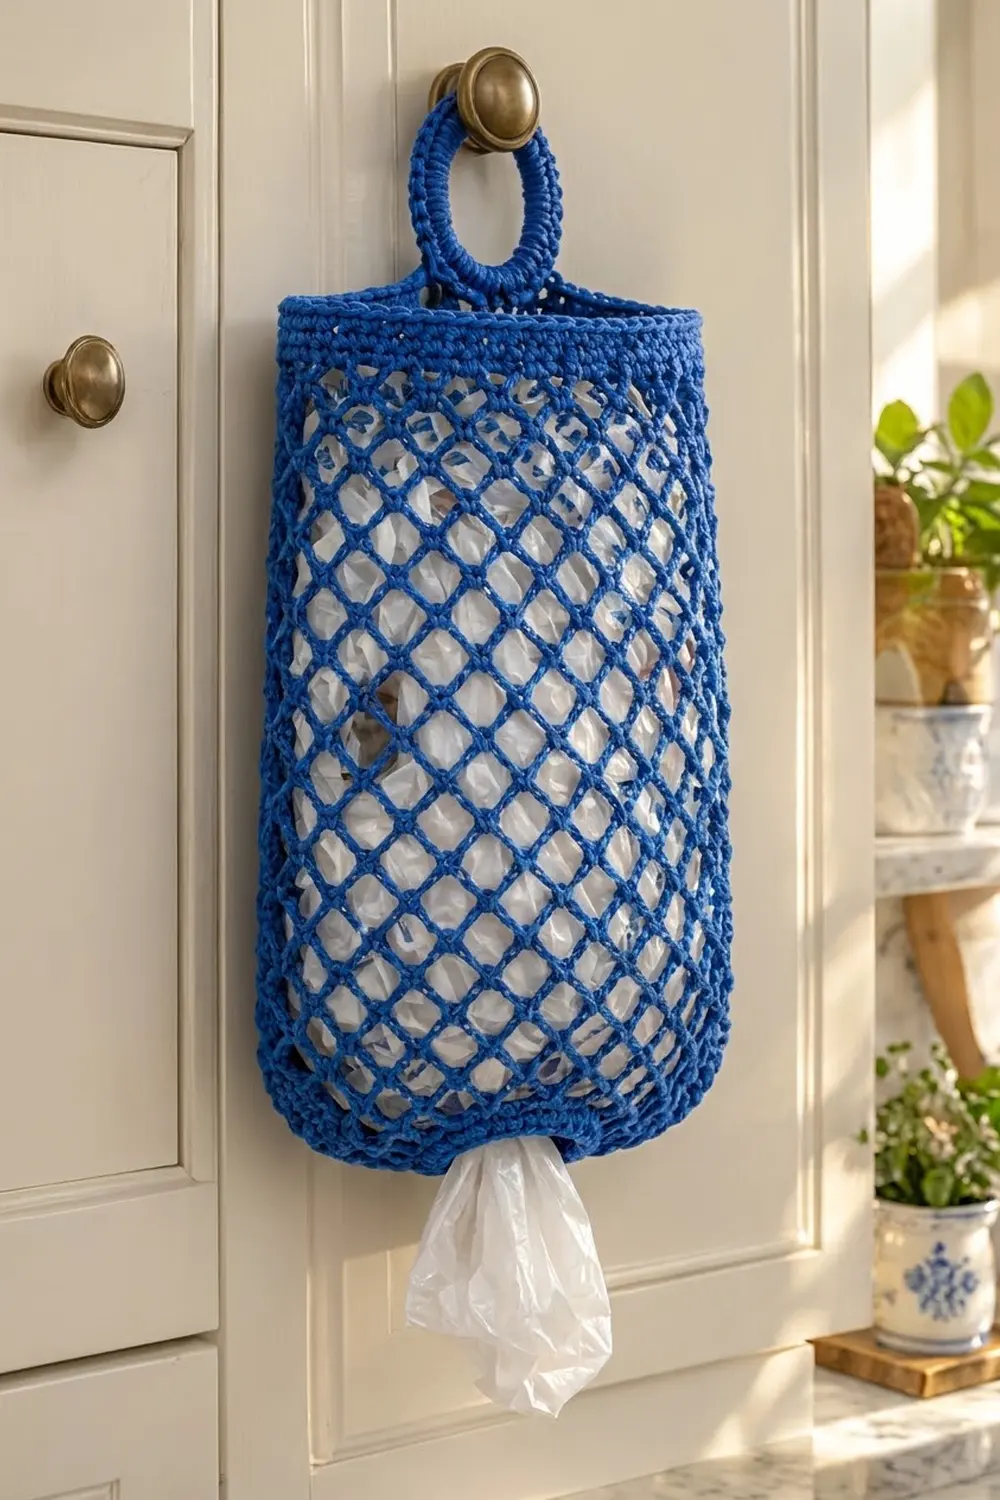
This holder keeps loose plastic bags in one tidy, washable tube. The body is an open diamond net, so you can see how many bags are left. Solid bands at the top and bottom keep the openings firm, and a thick ring lets it hang from a knob, hook or door handle.
The sample is worked in a single bright royal blue cotton, which looks crisp against white cabinetry and white bags. The style is simple and practical, with a nod to vintage market nets.
The pattern uses US crochet terms. The finished body measures 6 in (15.2 cm) wide flat and 12.5 in (31.8 cm) tall. With the ring attached, the hanging length is 15 in (38.1 cm).
Construction is in the round from the bottom up. You chain a ring for the bottom opening and work a short solid band. Next, three mesh rounds widen the base, followed by straight mesh rounds. A solid top band finishes the body. The hanging ring is made separately and sewn to the inside back of the top band.
Finished Size and Construction
- Finished size: 6 in (15.2 cm) wide flat × 12.5 in (31.8 cm) tall; 15 in (38.1 cm) hanging length including ring
- Skill level: Easy (advanced beginner)
- Terminology: US crochet terms
- Yarn weight: Worsted (#4), cotton or cotton blend
- Hook: 5.0 mm (US H-8)
- Number of pieces: 2 (1 body, 1 hanging ring)
- Layout: Single tube; the ring is centered on the back of the top band
- Body circumference: 12 in (30.5 cm), which is 12 mesh loops
- Size before top band: 6 in (15.2 cm) wide × 11 in (27.9 cm) tall
- Top band depth: 1.5 in (3.8 cm)
- Bottom band depth: 1 in (2.5 cm); opening 4 in (10.2 cm) wide flat
- Ring: 3 in (7.6 cm) outer diameter, 1.5 in (3.8 cm) center opening
Materials
Yarn. Use a smooth worsted-weight cotton or a cotton/acrylic blend. Cotton holds the mesh shape well, does not stretch much under the weight of bags, and can be washed. Pure acrylic works too, but the net will stretch longer over time.
- Royal blue: 100 g, approximately 175 m (191 yd)
- Body: about 85 g / 150 m
- Ring: about 10 g / 18 m
- Seaming tail: included above
These quantities include a margin of about 10 percent for a gauge swatch and weaving in ends.
Tools:
- 5.0 mm (US H-8) crochet hook
- 5.5 mm (US I-9) hook for the foundation chain (optional)
- Tapestry needle
- Scissors
- 1 stitch marker
- Measuring tape
- Blocking pins and a blocking mat or towel
- Optional: a spray bottle
Abbreviations (US Terms)
- ch – chain
- sl st – slip stitch
- sc – single crochet
- dc – double crochet
- sk – skip
- sp – space
- st(s) – stitch(es)
- rep – repeat
- inc – increase
Special stitch: Mesh loop finish (“ch 2, dc”). At the end of a mesh round, ch 2 and dc in the first sc of the round. Together, the ch 2 and dc stand in for a ch-5 loop. They also leave your hook in the middle of that loop, ready to start the next round without slip-stitching across.
Gauge and Checkpoints
Single crochet gauge: 16 sc × 16 rounds = 4 in (10.2 cm). That works out to 4 sts and 4 rounds per inch (2.5 cm).
Mesh gauge: 4 loops × 6 rounds = 4 in (10.2 cm), measured gently stretched to an open diamond. Each loop spans about 1 in (2.5 cm) of circumference.
Work the bottom band first and treat it as your test piece. It is small, and it tells you right away whether your tension is right.
Checkpoints:
- After the bottom band: The tube measures 4 in (10.2 cm) across when flat and 1 in (2.5 cm) tall.
- After Mesh Round 3: The tube measures 6 in (15.2 cm) across when flat.
- After Mesh Round 15: The total height from the bottom edge is 11 in (27.9 cm) with the mesh lightly stretched lengthwise.
- After the top band: The body measures 6 in (15.2 cm) × 12.5 in (31.8 cm).
- Ring: 3 in (7.6 cm) across.
If your piece is too big, go down to a 4.5 mm hook. If it is too small, go up to a 5.5 mm hook. The solid bands are more sensitive to hook size than the mesh. If only the mesh is off, you can block it to size. If the bands are off, change hooks.
Pattern: Bottom Band (Bag Opening)
The bottom band forms the dispenser hole that bags are pulled through.
Using the larger hook, or a loose tension, ch 32. Sl st to the first ch to form a ring, making sure the chain isn’t twisted. Switch to the 5.0 mm hook.
Round 1: Ch 1, sc in each ch around, sl st to first sc. (32 sc)
Place a marker in the first st of the round and move it up each round.
Rounds 2–4: Ch 1, sc in each st around, sl st to first sc. (32 sc)
Checkpoint: 8 in (20.3 cm) around, 4 in (10.2 cm) flat, 1 in (2.5 cm) tall.
Pattern: Mesh Base (Shaping Rounds)
The next three rounds turn the solid band into the net and widen the base from 8 to 12 loops. This produces the rounded, slightly narrowed bottom shown on the finished holder.
Mesh Round 1 (conversion round): Ch 1, sc in same st as join, [ch 5, sk 3 sts, sc in next st] 7 times, ch 2, dc in first sc. (8 sc, 8 loops)
The sc sit in sts 1, 5, 9, 13, 17, 21, 25 and 29. The ch 2 and dc bridge the last 3 sts.
Mesh Round 2 (growth round): Ch 1, (sc, ch 5, sc) in the loop formed by the dc, [ch 5, sc in next loop] 3 times, ch 5, (sc, ch 5, sc) in next loop, [ch 5, sc in next loop] 3 times, ch 2, dc in first sc. (10 sc, 10 loops)
The two increases sit opposite each other at the sides of the tube.
Mesh Round 3 (growth round): Ch 1, (sc, ch 5, sc) in first loop, [ch 5, sc in next loop] 4 times, ch 5, (sc, ch 5, sc) in next loop, [ch 5, sc in next loop] 4 times, ch 2, dc in first sc. (12 sc, 12 loops)
Checkpoint: Flatten the tube with the increases at the folds. It should measure 6 in (15.2 cm) across.
Pattern: Mesh Body (Straight Rounds)
Mesh Rounds 4–14: Ch 1, sc in first loop, [ch 5, sc in next loop] 11 times, ch 2, dc in first sc. (12 sc, 12 loops each round)
Mesh Round 15 (last mesh round): Ch 1, sc in first loop, [ch 5, sc in next loop] 11 times, ch 5, sl st in first sc. (12 sc, 12 loops)
This round ends with a full ch-5 and a sl st, so the top band starts from a stitch instead of the middle of a loop.
You now have 15 mesh rounds. At 6 rounds per 4 in (10.2 cm), that’s 10 in (25.4 cm) of mesh. Together with the bottom band, the body is 11 in (27.9 cm) tall.
The mesh naturally twists slightly in a spiral as you work in the round. That’s normal and will straighten when you block.
Pattern: Hanging Ring
Ch 20, sl st to the first ch to form a ring.
Round 1: Ch 1, work 30 sc into the center of the ring, working over the chain. Push the stitches together as you go so they cover the chain fully. Sl st to first sc. (30 sc)
Round 2 (growth round): Ch 1, [sc in next 4 sts, 2 sc in next st] 6 times, sl st to first sc. (36 sc)
Round 3: Sl st in each st around. (36 sl st)
Fasten off, leaving a 16 in (40.6 cm) tail for sewing.
Checkpoint: The outer diameter is 3 in (7.6 cm) and the center opening is about 1.5 in (3.8 cm). The thick, rolled look in the photo comes from packing Round 1 tightly onto the chain.
Border: Top Band
The top band is the holder’s border. It firms the top opening and gives the ring a solid place to attach.
Border gauge: 16 sc × 16 rounds = 4 in (10.2 cm), the same as the bottom band.
Top Band Round 1 (conversion round): Ch 1, sc in same st as join, 3 sc in next ch-5 sp, [sc in next sc, 3 sc in next ch-5 sp] 11 times, sl st to first sc.
- Stitch count: 12 sc (1 in each existing sc) + 36 sc (3 in each of the 12 loops) = 48 sc
- Per flattened side: 24 sc on the front and 24 sc on the back. A tube has no corners, so no corner stitches are added.
Top Band Rounds 2–5: Ch 1, sc in each st around, sl st to first sc. (48 sc; 24 per side)
Top Band Round 6: Ch 1, sc in each st around, sl st to first sc. (48 sc) Fasten off and weave in the end.
Why the math works: The mesh has 12 loops, each spanning 1 in (2.5 cm), so it is 12 in (30.5 cm) around. One sc plus 3 sc per loop gives 4 sc per inch. That matches the sc gauge exactly, so the band lies flat without ruffling or pulling in. Six rounds at 4 rounds per inch give a band 1.5 in (3.8 cm) deep. The bottom band follows the same logic: 32 sc ÷ 4 sts per inch = 8 in (20.3 cm) around. That is deliberately smaller than the body, so bags are held in place and come out one at a time.
Attaching the Ring
- Lay the body flat with the ring’s round-1 increases at the side folds. Mark the center 6 sts of the back top band. These are back-side sts 10–15 of the 24.
- Place the ring behind the band so that 0.5 in (1.3 cm) of the ring overlaps the inside of the band. That leaves 2.5 in (6.4 cm) of ring above the top edge.
- Use the ring’s tail to whipstitch through the ring and only the inside layer of the band across those 6 sts.
- Work a second pass back across the same 6 sts. Two passes carry the weight of a full load of bags.
- Weave in the tail so it doesn’t show on the front.
Size checkpoint: The total hanging length is 12.5 in (31.8 cm) + 2.5 in (6.4 cm) = 15 in (38.1 cm).
Final Blocking
- Weave in all remaining ends along the solid bands, where they hide best.
- Wet the holder thoroughly in cool water and gently squeeze it out. Don’t wring it.
- Roll it in a towel to remove excess moisture.
- Lay it flat with the side increases at the folds. Straighten the mesh so the diamonds run evenly up the tube.
- Pin the body to 6 in (15.2 cm) wide and 12.5 in (31.8 cm) tall. Ease the mesh lengthwise rather than stretching the bands.
- Pin the ring into a round 3 in (7.6 cm) circle.
- Let it dry completely, then unpin.
Final Quality-Control Checklist
- Bottom band: 32 sc, 4 in (10.2 cm) flat, 1 in (2.5 cm) tall
- Mesh: 15 rounds, 12 loops from Round 3 onward, no missed loops
- Increases sit at the two side folds, so the base is evenly rounded
- Top band: 48 sc in every round, 24 per side, 1.5 in (3.8 cm) deep
- Body: 6 in (15.2 cm) × 12.5 in (31.8 cm)
- Ring: 3 in (7.6 cm) across, chain fully covered
- Ring sewn with two passes and centered on the back
- All ends woven in securely
Troubleshooting
Foundation ring twisted. If you notice it after Round 1, rip back and rechain. A twist can’t be fixed later.
Bottom opening too tight. Chain with a larger hook, or add 4 sts to the foundation (36 sc). In Mesh Round 1, sk 3 then work into the 4th st for 9 sc and 9 loops. Increase once in Round 2 and twice in Round 3 to reach 12 loops.
Top band ruffles. Work 2 sc instead of 3 into a few loops, or go down a hook size for the band.
Top band pulls in. Your mesh loops are longer than 1 in (2.5 cm). Change to ch 4 loops in the body, or use a larger hook for the band.
Mesh loops look uneven. Keep each ch-5 the same length. Count the chains rather than judging by eye.
Holder stretches too long when full. Cotton relaxes with use. Rewash and block it, or remove one or two straight mesh rounds next time.
Ring sags forward. Sew it to the inside layer only, across at least 6 sts.
Care
Hand wash or machine wash on a gentle cycle in cool water, then reshape and lay flat to dry. Avoid hot dryers, which can shrink cotton unevenly.
Final Notes
The measurement chain is short and easy to check:
- The 32-sc bottom band is 8 in (20.3 cm) around.
- Three shaping rounds widen it to 12 loops, or 12 in (30.5 cm) around, which is 6 in (15.2 cm) flat.
- Fifteen mesh rounds bring the height to 11 in (27.9 cm).
- The 48-sc top band matches the mesh at 4 sts per inch and adds 1.5 in (3.8 cm), for a 12.5 in (31.8 cm) body.
- The 3 in (7.6 cm) ring adds 2.5 in (6.4 cm) above the top, for a total hanging length of 15 in (38.1 cm).
Check each step as you go and the finished holder will come out square, sturdy and ready to fill. Make one for the kitchen, another for the car or the laundry room, and you’ll never dig through a cupboard for a bag again.
Happy crocheting!