
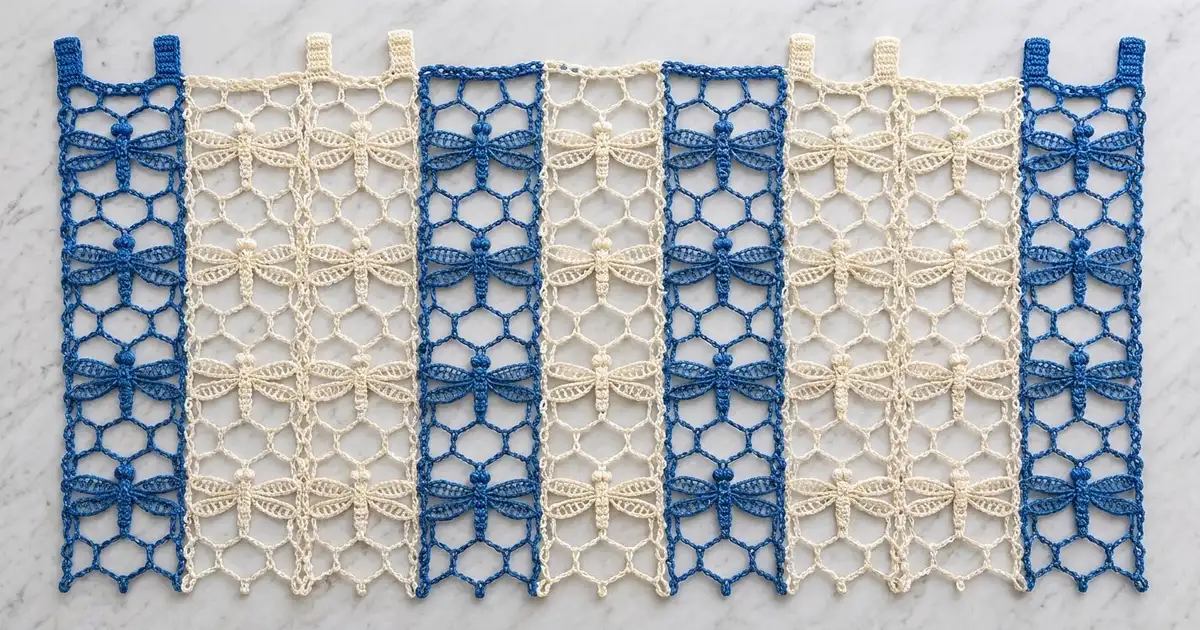
The Blue Meadow Dragonfly Lace Curtain is a light, airy panel made from seven long lace strips in royal blue and cream. Each strip is an open honeycomb mesh with a column of dragonflies floating down the center, so daylight shines through every cell.
The strips alternate blue, cream, blue, cream, blue, cream, blue. Each dragonfly matches its own strip, which keeps the look calm and tone-on-tone while the strip colors create bold vertical stripes. Tiny ring picots finish the bottom edge, and loop tabs at the top slide straight onto a curtain rod.
This pattern uses US crochet terms. The finished curtain measures 43.8 in (111.3 cm) wide by 72.9 in (185.2 cm) long, not counting the tabs or the bottom picots.
You will crochet seven mesh strips in rows, add a picot edge and side edging to each, make 63 dragonfly appliqués and sew them on, slip-stitch the strips together, then work a three-row border with tabs along the sides and top.
Finished Size and Construction
- Finished size: 43.8 in x 72.9 in (111.3 cm x 185.2 cm)
- Skill level: Intermediate
- Terminology: US crochet terms
- Yarn weight: DK / light worsted (#3) cotton
- Hook: 4.5 mm (US 7)
- Number of pieces: 7 strips plus 63 dragonfly appliqués (each made of 1 body and 4 wings)
- Layout: 7 strips side by side, 1 strip tall
- Strip size: 6.0 in x 72 in (15.2 cm x 182.9 cm), including side edging
- Size before border: 42 in x 72 in (106.7 cm x 182.9 cm)
- Border depth: 0.9 in (2.3 cm) on the sides and top; the bottom keeps its picot edge
Materials
Choose a smooth mercerized or soft combed cotton in DK weight. Cotton holds the mesh open, drapes well, and handles sunlight and washing. These amounts assume about 105 m per 50 g ball.
- Royal blue: 500 g (1,050 m) for 4 strips, 36 dragonflies, and the border
- Cream: 350 g (735 m) for 3 strips and 27 dragonflies
Quantities include a margin of about 20 percent, so slightly loose tension will not leave you short.
Tools:
– 4.5 mm (US 7) crochet hook
– Tapestry needle
– Stitch markers
– Rust-proof pins and blocking mats
– Measuring tape
– Spray bottle
Abbreviations (US Terms)
- ch – chain
- sl st – slip stitch
- sc – single crochet
- hdc – half double crochet
- dc – double crochet
- tr – treble crochet
- sc2tog – single crochet 2 together
- sp – space
- st(s) – stitch(es)
- rep – repeat
- RS / WS – right side / wrong side
Special stitches:
– Drop picot: ch 5, sl st in 5th ch from hook. This makes a small ring.
– Bobble: (yarn over, insert hook in st, yarn over, pull up a loop, yarn over, pull through 2 loops) 5 times in the same st, yarn over, pull through all 6 loops on hook.
Gauge and Checkpoints
- Sc: 25 sc = 5.4 in (13.7 cm); 10 sc rows = 3 in (7.6 cm), so each sc row is 0.3 in (0.8 cm)
- Mesh: 10 mesh rows = 6 in (15.2 cm), so each mesh row is 0.6 in (1.5 cm) after a light block
Test one piece first. Work Rows 1–11 of the strip and one complete dragonfly. Pin the swatch flat and mist it.
- Rows 1–11 should measure 5.4 in (13.7 cm) wide by 6.3 in (16.0 cm) tall.
- The dragonfly should measure 6.0 in (15.2 cm) across the wings and 3.75 in (9.5 cm) long.
If the swatch is too big, go down a half size in hook. If it is too small, go up a half size. Width matters most, because seven strips multiply any error by seven: 0.1 in (0.3 cm) per strip becomes 0.7 in (1.8 cm) across the curtain.

Strip (Make 7: 4 Blue, 3 Cream)
Ch 26.
Row 1 (RS): Sc in 2nd ch from hook and in each ch across. Turn. (25 sc)
Row 2 (loop row): Ch 1, sc in first sc, *ch 5, skip 3 sc, sc in next sc; rep from * 5 more times. Turn. (7 sc, 6 ch-5 loops)
Row 3 (offset row): Ch 5 (counts as dc + ch 2), sc in first ch-5 loop, *ch 5, sc in next ch-5 loop; rep from * 4 more times, ch 2, dc in last sc. Turn. (2 dc, 6 sc, 5 ch-5 loops, 2 ch-2 sps)
Row 4 (loop row): Ch 1, sc in first dc, *ch 5, sc in next ch-5 loop; rep from * 4 more times, ch 5, sc in 3rd ch of turning ch. Turn. (7 sc, 6 ch-5 loops)
Each sc sits in the center of a loop below, so the loops stack in offset pairs. Blocking pulls them open into a honeycomb of hexagon-shaped cells. The dc at each end of the offset rows forms the straight, chain-like side edges.
Rows 5–120: Rep Rows 3–4 fifty-eight more times. Row 120 is a loop row. (7 sc, 6 ch-5 loops)
Row 121 (top row): Ch 1, sc in first sc, *3 sc in next ch-5 loop, sc in next sc; rep from * 5 more times. (25 sc) Fasten off.
Length checkpoints (flat, not stretched):
– After Row 20: 11.7 in (29.7 cm)
– After Row 60: 35.7 in (90.7 cm)
– After Row 120: 71.7 in (182.1 cm)
– After Row 121: 72 in (182.9 cm)
Bottom Picot Edge
With RS facing, join yarn in the first remaining loop of the foundation ch. Sl st in same ch, drop picot, *sl st in each of next 4 ch, drop picot; rep from * 5 more times. Fasten off. (25 sl st, 7 drop picots)
The picots line up under the 7 sc of Row 2 and hang 0.5 in (1.3 cm) below the strip. Sl sts add no length, so the body stays 72 in (182.9 cm).
Side Edging
Work each long side separately. With RS facing, join yarn at the bottom corner. Work 1 sc in the end of Row 1, 3 sc around the end of each of Rows 2–120, and 1 sc in the end of Row 121. Fasten off. Repeat on the other side.
Count per long side: 1 + (119 x 3) + 1 = 359 sc.
Each edging adds 0.3 in (0.8 cm) of width, so the strip grows from 5.4 in (13.7 cm) to 6.0 in (15.2 cm).
Top count per strip: last side-edging sc on each side + 25 sc of Row 121 = 27 sts. These 2 corner sts belong to both the side count and the top count, so do not count them twice.
Dragonfly (Make 63: 36 Blue, 27 Cream)
Body (1 per dragonfly)
Work in continuous rounds without joining. Mark the first st of each round.
Rnd 1: 4 sc in a magic ring. (4 sc)
Rnds 2–12: Sc in each st around. (4 sc)
Rnd 13 (thorax): 2 sc in each st around. (8 sc)
Rnds 14–15: Sc in each st around. (8 sc)
Rnd 16: Sc2tog 4 times. (4 sts)
Rnd 17 (eyes): *Bobble in next st, sc in next st; rep from * once more. (2 bobbles, 2 sc)
Fasten off, leaving a 12 in (30.5 cm) tail. Do not stuff. Flatten the tube so the spiral sc show as a column of stacked Vs. The body is 0.5 in (1.3 cm) wide and 3.75 in (9.5 cm) long, with the two bobble eyes side by side at the top.
Wing (4 per dragonfly)
Ch 14.
Rnd 1: Sc in 2nd ch from hook, hdc in next ch, dc in next ch, ch 1, tr in next ch; rep from * 6 more times, ch 1, dc in next ch, hdc in next ch, 3 sc in last ch. Working in the opposite side of the foundation ch: hdc in next ch, dc in next ch, ch 1, tr in next ch; rep from * 6 more times, ch 1, dc in next ch, hdc in next ch, 2 sc in last ch (the same ch as the first sc). Sl st in first sc. (28 sts, 16 ch-1 sps)
Rnd 2 (outline): Ch 1, sc in each st and each ch-1 sp around, working 3 sc in the center sc at each tip. Sl st in first sc. Fasten off, leaving a 6 in (15.2 cm) tail. (44 sc worked 1 per st and sp + 4 extra tip sc = 48 sc)
The tr posts with ch-1 gaps form the ladder rungs, and Rnd 2 makes the solid oval outline. Each wing measures 2.75 in (7.0 cm) long and 1.25 in (3.2 cm) wide.
Assemble the Dragonfly
Sew one narrow tip of each wing to the thorax (Rnds 13–15), two wings per side. Angle the upper pair slightly toward the head and the lower pair slightly toward the tail. Wingspan: 2.75 in + 0.5 in + 2.75 in = 6.0 in (15.2 cm), so the tips reach the strip edges.
Make All Pieces
- Blue: 4 strips, 36 bodies, 144 wings
- Cream: 3 strips, 27 bodies, 108 wings
Dragonfly placement: Pin 9 dragonflies down the center of each strip, heads up. Place the first thorax 4 in (10.2 cm) above the bottom edge, then one every 8 in (20.3 cm), so the last sits at 68 in (172.7 cm). Sew around each body and along the wing outlines with matching yarn.
Layout grid (RS facing, left to right):
| B | C | B | C | B | C | B |
  1   2   3   4   5   6   7
B = blue strip, C = cream strip.
Joining
Use a slip-stitch seam worked on the WS.
- Hold strips 1 and 2 with RS together, side edgings matching, bottom corners aligned.
- Join blue yarn at the bottom corner. Sl st through both loops of each matching pair of edging sc.
- Work all 359 pairs. Fasten off.
- Repeat for the remaining seams, six in total, always in blue so the seams blend in.
Stitch-to-stitch logic: Every strip has exactly 359 sts per side, so each seam matches one-for-one with no easing. The seam adds no stitches to the top count.
Tension: Keep the sl sts as loose as the edging sc. Tight seams pucker and shorten the curtain. Go up one hook size for seaming if needed.
Checkpoint: The joined curtain measures 42 in (106.7 cm) wide by 72 in (182.9 cm) long.
Border
The border runs up the right side, across the top, and down the left side.
Border gauge: Same as the strip sc gauge, 10 sc rows = 3 in (7.6 cm), so 3 rows = 0.9 in (2.3 cm).
Starting counts:
– Each long side: 359 sts (one strip’s side edging, including the top corner st)
– Top: 7 strips x 27 sts = 189 sts (including both corner sts)
Row 1 (RS): Join blue at the bottom right corner. Ch 1, sc in each of next 358 sts, 3 sc in corner st, sc in each of next 187 sts, 3 sc in corner st, sc in each of next 358 sts. Turn.
(Right 358 + corner 3 + top 187 + corner 3 + left 358 = 909 sc)
Row 2 (tab row, WS): Ch 1, sc in each of next 359 sts, 3 sc in center sc of corner, *sc in next 9 sts, ch 30, skip next 9 sts, sc in next 9 sts; rep from * 6 more times, 3 sc in center sc of corner, sc in each of next 359 sts. Turn.
(Left 359 + corner 3 + top 126 sc and 7 ch-30 tabs + corner 3 + right 359 = 850 sc + 210 ch = 1,060 sts)
Row 3 (RS): Ch 1, sc in each of next 360 sts, 3 sc in center sc of corner, sc in next sc, *sc in next 9 sc, sc in each of 30 ch of tab, sc in next 9 sc; rep from * 6 more times, sc in next sc, 3 sc in center sc of corner, sc in each of next 360 sts. Fasten off.
(Right 360 + corner 3 + top 338 + corner 3 + left 360 = 1,064 sc)
Why the math works: Each row adds 2 sts at each corner. Without tabs, Row 2 would hold 913 sts. The tabs remove 63 skipped sts and add 210 ch, giving 1,060, and Row 3 adds 4 corner sts for 1,064.
On Row 2 the top run between corners is exactly 189 sts, the same as 7 x 27. Each strip gets its own 27-st block: 9 sc, a 9-st tab gap, 9 sc. That keeps every tab centered on its strip. Each tab is 30 sc, about 6.5 in (16.5 cm) of loop over a 2 in (5.1 cm) gap, which fits rods up to 1.5 in (3.8 cm) across.
Final size: width 42 + 0.9 + 0.9 = 43.8 in (111.3 cm); length 72 + 0.9 = 72.9 in (185.2 cm).
Final Blocking
- Weave in all ends, running each tail through a few sts in two directions.
- Soak the curtain in cool water for 15 minutes.
- Roll it in towels to press out the water. Do not wring.
- Lay it flat, RS up, on mats or a towel-covered carpet.
- Pin the sides straight to 72.9 in (185.2 cm) and the top to 43.8 in (111.3 cm).
- Ease the mesh columns sideways to open the honeycomb cells.
- Shape each wing into a smooth oval and pin the tips.
- Lay each bottom picot flat as a round ring.
- Let it dry completely before unpinning.
Final Quality-Control Checklist
- 7 strips in the order B, C, B, C, B, C, B
- Every strip has 359 side sts and 27 top sts
- 9 dragonflies per strip, centered, heads up
- Seams flat, with no puckers or gaps
- Border counts: 909, 1,060, 1,064
- 7 tabs, each centered on a strip
- 49 bottom picots (7 per strip)
- Finished size 43.8 in x 72.9 in (111.3 cm x 185.2 cm)
- All ends woven in securely
Troubleshooting
- Strip too narrow: Your sc is tight. Go up a hook size and restart.
- Cells look like diamonds: Block more firmly, easing the columns sideways.
- Side edge waves: Too many sc per row end. Recount to 359.
- Side edge pulls in: Too few sc per row end, or the edging is tight.
- Seams pucker: Loosen the sl sts or seam with a larger hook.
- Wings curl: Steam lightly and pin flat to dry.
- Tabs uneven: Count 9-9-9 in each strip block before chaining.
Care
Hand wash in cool water, or machine wash on a gentle cycle in a mesh laundry bag. Lay flat to dry and re-pin the mesh if needed. Avoid hot dryers, which shrink cotton and distort the cells.

Final Notes
The measurement chain is short and easy to check. 25 sc make a 5.4 in (13.7 cm) strip, and side edging brings it to 6.0 in (15.2 cm). 121 rows make 72 in (182.9 cm). Seven strips make 42 in (106.7 cm). Three border rows add 0.9 in (2.3 cm) per edge, for a finished 43.8 in x 72.9 in (111.3 cm x 185.2 cm) curtain. Check your gauge at each step and the dragonflies will line up neatly from end to end.
Happy crocheting!