
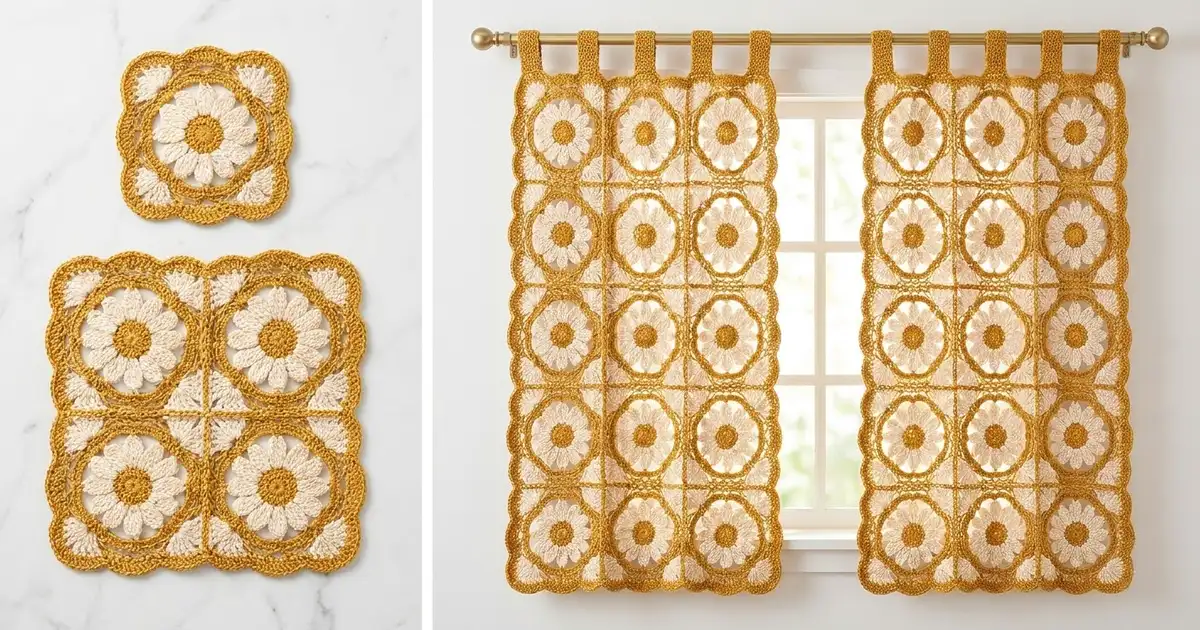
These curtain panels are made from cream daisies set inside a golden lace frame. Each square motif has a round mustard center, eight cream petals and an open gold chain frame with soft arches. Small cream fans sit at the corners, so a cream burst appears wherever four squares meet. Light passes through the open mesh, and the daisies stay clear and graphic.
The style is cottage-meets-vintage. It suits a sunny kitchen, a breakfast nook or a bedroom window. Only two colors are used, so the panels look calm even with dozens of flowers.
This pattern uses US crochet terms. Each finished panel measures 26½” × 74½” (67.3 × 189.2 cm) before the tabs. The tabs add about 2½” (6.4 cm) of loop above the top edge.
You make 6″ (15.2 cm) square motifs in the round, block them, and join them flat with slip stitch in a grid 4 motifs wide by 12 motifs tall. A three-round gold border with a shell edge finishes each panel, and 5 cream tabs are sewn to the top. Make two panels for a pair.
Finished Size and Construction
- Finished panel size: 26½” × 74½” (67.3 × 189.2 cm), plus tabs
- Skill level: Intermediate
- Terminology: US crochet terms
- Yarn weight: DK (light worsted, #3), cotton
- Hook: 4.0 mm (G-6)
- Number of pieces: 48 motifs per panel, 96 for the pair, plus 5 tabs per panel
- Layout per panel: 4 motifs wide × 12 motifs tall
- Motif size: 6″ × 6″ (15.2 × 15.2 cm), blocked
- Panel size before border: 24″ × 72″ (61.0 × 182.9 cm)
- Border depth: 1¼” (3.2 cm) on each side
Materials
Use a smooth mercerized or matte cotton DK yarn. Cotton blocks crisply, holds the petal shape and handles sunlight and washing well. Avoid fuzzy yarns, because they blur the lace.
- Color A, Mustard Gold: 550 g (approx. 1,320 m), for centers, frames, joins and borders
- Color B, Cream: 400 g (approx. 960 m), for petals, corner fans and tabs
These amounts are for two panels and include a margin of roughly 15% for gauge differences and swatching.
Tools
- 4.0 mm (G-6) crochet hook
- Tapestry needle
- Stitch markers
- Blocking mats, rust-proof pins and a spray bottle
- Measuring tape
- Curtain rod, about 1″ (2.5 cm) in diameter
Abbreviations (US Terms)
- ch – chain
- sl st – slip stitch
- sc – single crochet
- hdc – half double crochet
- dc – double crochet
- sp – space
- st(s) – stitch(es)
- RS / WS – right side / wrong side
Special stitch – Petal: Ch 8, sc in 2nd ch from hook, hdc in next ch, dc in each of next 3 ch, hdc in next ch, sc in last ch. That gives 7 sts. The skipped chain forms the petal tip.
Counting rule: In Rounds 3, 4 and 6, every chain counts as a stitch.
Gauge and Checkpoints
Make one complete motif and block it before you start the rest. Gauge: 1 blocked motif = 6″ × 6″ (15.2 × 15.2 cm), and the 23 stitches on one side of Round 6 measure 6″ (15.2 cm).
Checkpoints:
- After Round 1, the center measures 1¼” (3.2 cm) across.
- After Round 2, the daisy measures about 4½” (11.4 cm) from petal tip to opposite petal tip. Each petal is about 1½” (3.8 cm) long.
- After Round 4, the frame measures about 5½” (14.0 cm) square, unblocked.
- After Round 6 and blocking, the motif measures 6″ (15.2 cm) square.
If the motif is too big by more than ¼” (0.6 cm), go down to a 3.75 mm hook. If it is too small, go up to a 4.5 mm hook. A ¼” (0.6 cm) error per motif adds up to 3″ (7.6 cm) over the 12-motif length, so it is worth fixing now.
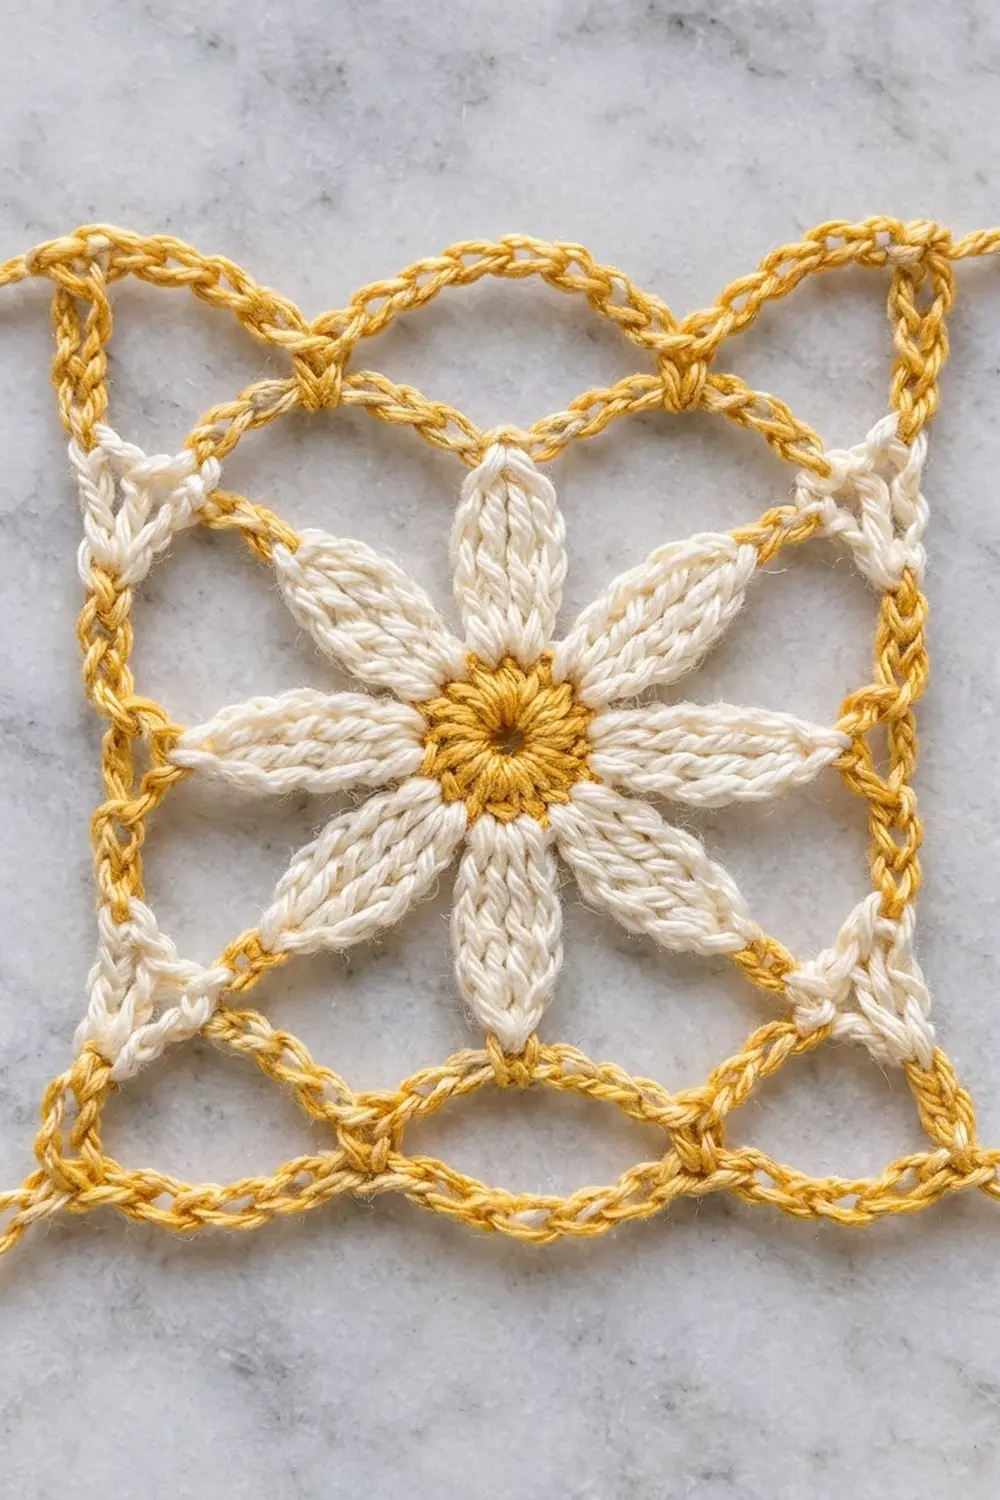
Daisy Motif
Round 1 (Color A, center)
Make a magic ring. Ch 3 (counts as dc), work 15 dc in the ring, then sl st to the top of the beginning ch-3. Pull the ring tight. (16 dc)
Fasten off Color A.
Round 2 (Color B, petals)
With RS facing, join Color B with a sl st in any dc.
Work 8 petals: Make a Petal. Sl st in the same dc at the base of the petal, then sl st in the next dc. Repeat 7 more times. The last sl st lands in the joining stitch.
(8 petals; each petal = 7 sts on a ch-8; 2 dc of Round 1 used per petal)
Fasten off Color B. Lay the petals out like a clock face. Mark 4 alternating petals as corner petals. The 4 petals between them are side petals.
Round 3 (Color A, petal-tip ring)
With RS facing, join Color A with a sc in the tip of a corner petal. Work into the skipped chain at the tip.
Ch 7, sc in the tip of the next petal. Repeat 6 more times. Ch 7, then sl st to the first sc.
(8 sc + 8 ch-7 sps = 64 sts)
Round 4 (Color A, squaring the frame)
- Ch 1. Work (sc, ch 5, sc) in the same sc. This is the first corner loop.
- Ch 5, sc in the next ch-7 sp, ch 5. Skip the side-petal sc. Sc in the next ch-7 sp, ch 5.
- Work (sc, ch 5, sc) in the next corner sc.
Repeat steps 2–3 around, ending after step 2 on the last side. Sl st to the first sc.
(16 sc + 16 ch-5 sps = 96 sts. Each corner has 1 corner loop; each side has 3 arch loops and 2 sc.)
Fasten off Color A.
Round 5 (Color B, corner fans)
Join Color B in any corner ch-5 loop. Work (2 dc, ch 3, 2 dc) in the loop and fasten off. Repeat in each of the other 3 corner loops.
(4 fans, each 4 dc + ch-3 sp)
Round 6 (Color A, edge round)
Join Color A with a sc in the ch-3 sp of any fan, then work ch 2 and sc in the same sp. This is the first corner.
Each side:
- Sc in each of the next 2 dc.
- Skip the Round 4 corner sc hidden behind the fan.
- Ch 2, sc in the next ch-5 sp, ch 2, sc in the next sc, worked twice.
- Ch 2, sc in the last ch-5 sp, ch 2.
- Skip the Round 4 corner sc.
- Sc in each of the next 2 dc of the next fan.
- Work (sc, ch 2, sc) in the fan’s ch-3 sp.
Work the 4th side without the final corner group, then sl st to the first sc.
Stitches per side: 1 corner sc + 2 sc + 17 (6 ch-2 = 12 ch, plus 5 sc) + 2 sc + 1 corner sc = 23 sts. This count includes the side’s own 2 corner sc. The ch-2 corner spaces are not counted.
Round total: 4 × 23 = 92 sts + 4 corner ch-2 sps
Fasten off and weave in all ends securely.
Make All Pieces
Each panel needs 48 motifs. The pair needs 96 motifs. Each motif uses about 4 g of Color A and 3 g of Color B.
Wet block each motif to 6″ (15.2 cm) square before joining. Pin the four corners first, then the arch points.
Layout per panel (4 wide × 12 tall, M = motif):
Row 1:  M M M M   <- top edge (tabs)
Row 2:  M M M M
Row 3:  M M M M
Row 4:  M M M M
Row 5:  M M M M
Row 6:  M M M M
Row 7:  M M M M
Row 8:  M M M M
Row 9:  M M M M
Row 10: M M M M
Row 11: M M M M
Row 12: M M M M   <- bottom edge
All motifs are the same, so they can face any direction.
Joining
Method: Flat slip stitch join in Color A, worked from the RS.
- Place two motifs side by side, RS up, with their edges touching.
- Join Color A in the matching corner ch-2 sps of both motifs.
- Sl st through the back loop of one stitch on Motif 1, then the matching back loop on Motif 2. Continue stitch to stitch.
- Each side has 23 sts, so you make 23 matched joins. End with a sl st through both corner ch-2 sps at the far end.
The join adds no stitches and no width, because it sits on top of the existing edge stitches.
Order: Join each horizontal row of 4 motifs into a strip first. Then join the 12 strips with long vertical seams. Where four corners meet, sl st through all four ch-2 sps together. The cream fans then form a four-petal burst at that point.
Tension: Keep your sl sts as loose as the motif stitches. Pull on a finished seam. If it puckers, re-work it with a hook one size larger.
Size checkpoint: A joined panel lies flat at 24″ × 72″ (61.0 × 182.9 cm). Each strip of 4 should measure 24″ (61.0 cm).
Border
Work the border in Color A. Border gauge: 3.83 sts per inch (about 1.5 sts per cm), which matches the motif gauge of 23 sts per 6″ (15.2 cm).
Starting counts:
- Short sides (top and bottom): 4 motifs × 23 sts = 92 sts
- Long sides: 12 motifs × 23 sts = 276 sts
At each seam, the joined corner ch-2 sps are skipped. No stitches are added at seams.
Border Round 1 (sc)
Join with a sc in any stitch. Sc in each stitch around. Work (sc, ch 2, sc) in each of the 4 outer corner ch-2 sps. Sl st to the first sc.
Count per side between corner ch-2 sps:
- Short sides: 92 + 2 = 94 sc
- Long sides: 276 + 2 = 278 sc
Border Round 2 (dc)
Ch 3 (counts as dc). Dc in each sc around. Work (dc, ch 2, dc) in each corner ch-2 sp. Sl st to the top of the ch-3.
Count per side:
- Short sides: 94 + 2 = 96 dc
- Long sides: 278 + 2 = 280 dc
Border Round 3 (shell edge)
Starting at the first dc after any corner, work sc in the next dc, skip 1 dc, 5 dc in the next dc, skip 1 dc. Repeat across the side. At the corner sp, work (dc, ch 3, dc). Continue around and sl st to the first sc.
Shells per side:
- Short sides: 96 ÷ 4 = 24 shells
- Long sides: 280 ÷ 4 = 70 shells
Why the math works: Each motif side has 23 sts. Every border side starts from a whole number of motifs, and Rounds 1 and 2 each add exactly 2 sts per side. That makes 96 and 280, which are both multiples of 4, so the 4-stitch shell repeat fits with no leftovers.
The border adds 1¼” (3.2 cm) per side. The finished panel is 26½” × 74½” (67.3 × 189.2 cm).
Tabs (make 5 per panel, Color B)
- Ch 8. Sc in the 2nd ch from hook and in each ch across. (7 sc)
- Rows 2–35: Ch 1, turn, sc in each sc across. (7 sc)
Each tab is 1½” × 7″ (3.8 × 17.8 cm).
Attaching the tabs: Fold each tab in half and place it over the top edge. Sew both ends to the WS of the border so they overlap the panel by 1″ (2.5 cm). This leaves a 2½” (6.4 cm) loop.
Tab placement: Center the tabs at both ends and over the three vertical seams. Measured from the left edge of the motif grid, they sit at 0″, 6″, 12″, 18″ and 24″ (0, 15.2, 30.5, 45.7 and 61.0 cm). The end tabs sit just inside the border corners.
Final Blocking
- Soak the panel in lukewarm water for 15 minutes. Gently press out the water. Do not wring it.
- Roll it in towels to remove more moisture.
- Lay it flat on mats or a clean sheet. Pin the four outer corners to 26½” × 74½” (67.3 × 189.2 cm).
- Pin along each seam line, checking every 6″ (15.2 cm) mark with the tape.
- Open each shell and pin the petal tips into place where needed.
- Let it dry completely, which takes 24–48 hours.
- Unpin, then steam the tabs lightly if they curl.
Final Quality-Control Checklist
- Every motif has 8 petals, a round gold center and 4 cream corner fans.
- Each motif edge has 23 sts, and all seams are matched stitch to stitch.
- Four-corner junctions are joined through all four ch-2 sps.
- Border counts are 96 and 280 sts per side before the shells.
- There are 24 shells on each short side and 70 on each long side.
- The panel lies flat with no rippling or cupping.
- The 5 tabs are evenly placed and securely sewn.
- All ends are woven in at least 1″ (2.5 cm) and trimmed.
Troubleshooting
- The petals curl: Your chain is too tight. Chain more loosely, or block the petals flat with pins.
- The motif cups: The Round 3 chains are too short for your tension. Work ch 8 instead of ch 7, but keep Round 4 the same.
- The motif ruffles: Use ch 6 in Round 3.
- The seams pucker: Re-join with a larger hook and looser sl sts.
- The border count is off: Check whether stitches were worked into seam corner sps. Skip those sps.
- The panel is too long: Remove one row of motifs. Each row is 6″ (15.2 cm), and the border math stays valid.
Care
Hand wash or machine wash on a gentle cold cycle in a mesh bag, then dry flat and reshape. Avoid tumble drying, which can shrink cotton and distort the lace.

Final Notes
The measurement chain is:
- A 1¼” (3.2 cm) center grows into a 4½” (11.4 cm) daisy and a 6″ (15.2 cm) blocked motif with 23 sts per side.
- Joining 4 × 12 motifs makes a 24″ × 72″ (61.0 × 182.9 cm) grid.
- A 1¼” (3.2 cm) border brings the panel to 26½” × 74½” (67.3 × 189.2 cm).
Check your size at each step, and the full pair of panels will hang straight and even.
Happy crocheting!