

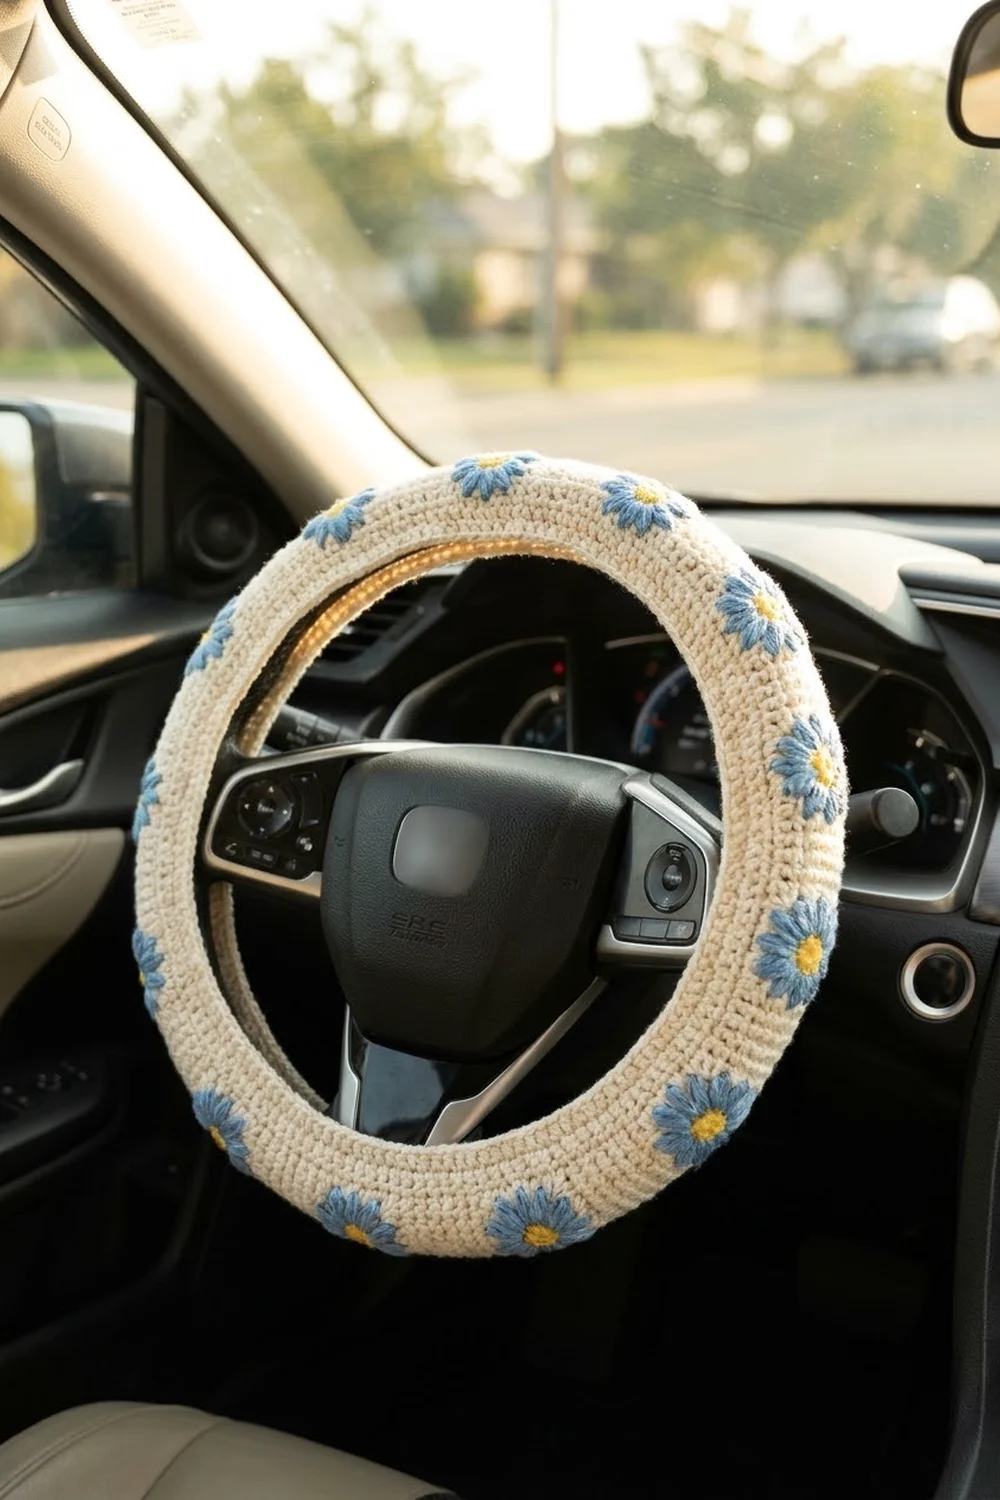
This steering wheel cover is soft, simple and cheerful. It is one cream strip of single crochet with a neat edging. You wrap it around the wheel rim and sew it closed on the inner side. Ten small blue daisies with yellow centers are embroidered along the front face, evenly spaced around the wheel.
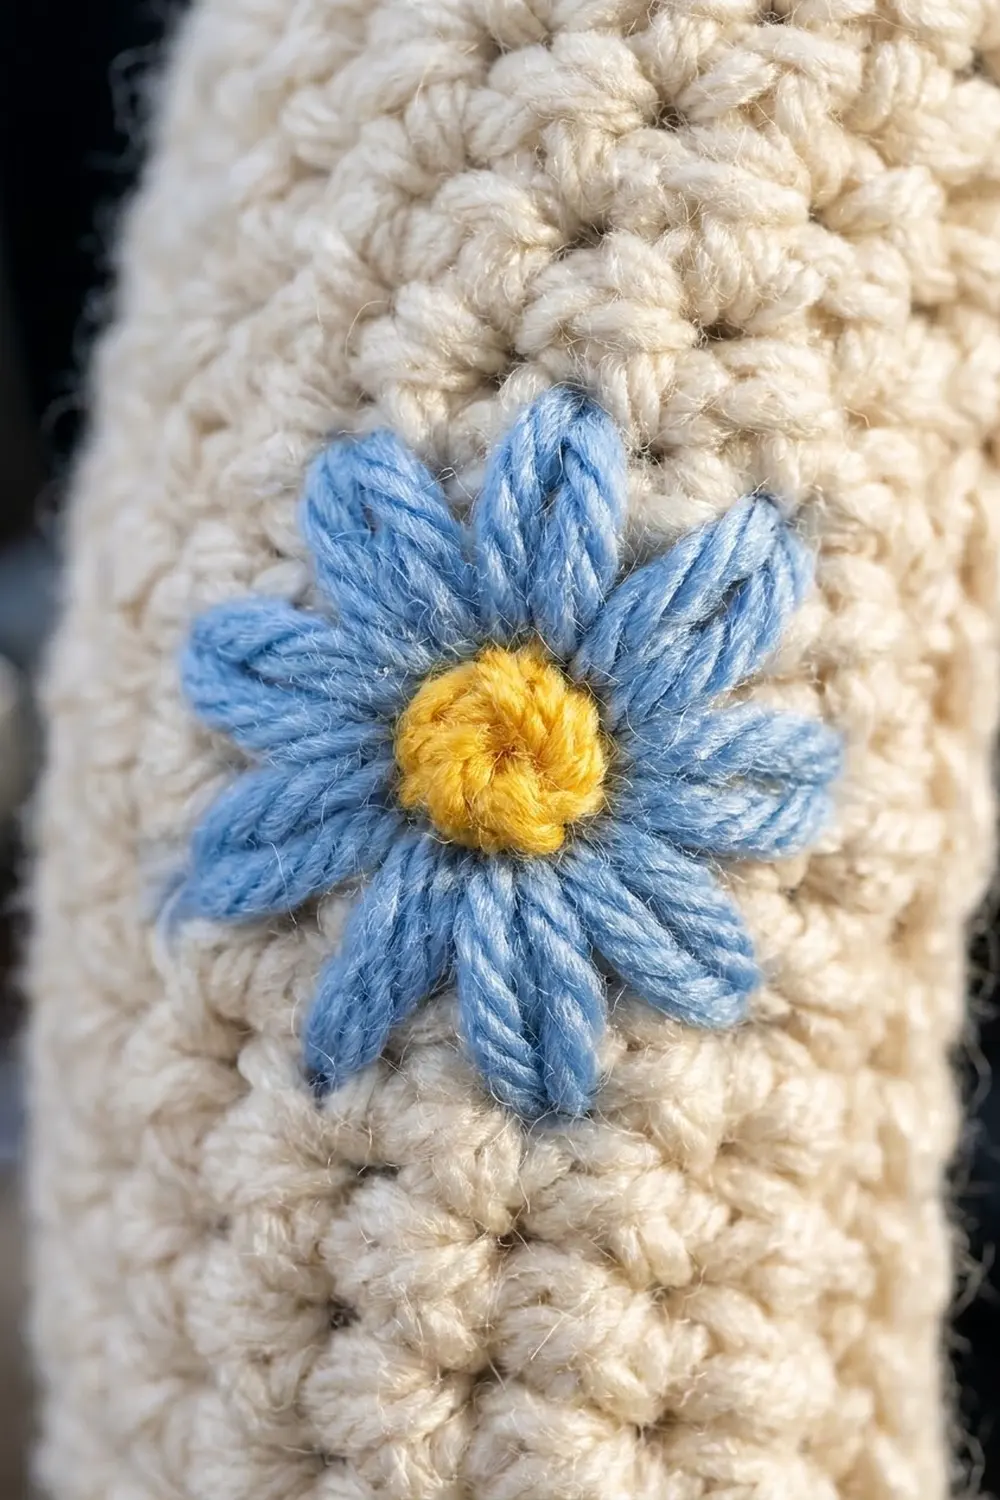
The colors are cream, soft cornflower blue and buttery yellow. The cream body has the tidy, grainy texture of plain single crochet. The flowers are worked in lazy daisy stitch with French knot centers. They sit slightly raised and look hand-stitched rather than sewn on.
All instructions use US crochet terms. The finished strip measures 4.5 in (11.4 cm) wide by 40.5 in (102.9 cm) long. It fits most standard car wheels 14.5–15 in (36.8–38.1 cm) in diameter with a rim grip of 4.25–4.75 in (10.8–12.1 cm) around.
Construction is straightforward:
- Crochet a flat strip in rows.
- Add one round of single crochet border.
- Embroider the daisies while the piece is flat.
- Wrap the strip around the wheel, whipstitch the long edges together on the back of the rim, and sew the short ends to close the ring.
Finished Size and Construction
- Finished size: 4.5 in x 40.5 in (11.4 cm x 102.9 cm), flat
- Skill level: Easy
- Terminology: US crochet terms
- Yarn weight: Worsted (#4, medium)
- Hook: US H-8 (5.0 mm)
- Number of pieces: 1 strip
- Layout: One strip wrapped around the rim and seamed into a closed ring
- Piece size before border: 4 in x 40 in (10.2 cm x 101.6 cm)
- Border depth: 0.25 in (0.6 cm) on every side
- Embellishment: 10 embroidered daisies, each about 1.25 in (3.2 cm) across
Materials
Choose a smooth worsted yarn with good stitch definition. Cotton or a cotton-acrylic blend gives a firm, grippy surface that won’t pill quickly under your hands. Avoid fuzzy or very slippery yarns, which make the wheel feel loose in your grip.
- Cream (main color): 90 g, about 165 m
- Cornflower blue (petals): 10 g, about 18 m
- Yellow (centers): 5 g, about 9 m
These amounts include a margin of roughly 15–20% for your gauge swatch, embroidery practice and seaming.
Tools:
- US H-8 (5.0 mm) crochet hook
- Blunt tapestry needle with a large eye
- Sharp embroidery needle (optional, for fine petals)
- Stitch markers (at least 10)
- Measuring tape
- Scissors
- Pins or clips
- Spray bottle for blocking
Abbreviations (US Terms)
- ch – chain
- sc – single crochet
- st(s) – stitch(es)
- sl st – slip stitch
- RS – right side
- WS – wrong side
Special stitches (embroidery):
- Lazy daisy stitch: Bring the needle up at the flower center and insert it back down in the same hole. Bring the tip up at the petal tip and loop the yarn under the needle tip. Pull through to form a teardrop loop, then go down just outside the loop to tack it in place.
- French knot: Bring the needle up and wrap the yarn around the needle 3 times. Insert the needle close to where it came up. Pull through slowly while holding the wraps against the fabric.
Gauge and Checkpoints
Gauge: 16 sc and 16 rows = 4 in (10.2 cm) in single crochet rows.
This square gauge matters for two reasons. It lets the edging place 1 sc per row-end without ruffling or pulling. It also makes length easy to track: 4 rows equal 1 in (2.5 cm).
Before you start, work a test section. Ch 17, work 16 sc across, and continue for 16 rows. Measure it flat without stretching.
Checkpoints:
- Row 1: 16 sc measure 4 in (10.2 cm) across.
- Row 16: The piece measures 4 in x 4 in (10.2 cm x 10.2 cm).
- Row 80: The piece measures 20 in (50.8 cm) long.
- Row 160: The piece measures 40 in (101.6 cm) long.
- After the border: 4.5 in x 40.5 in (11.4 cm x 102.9 cm).
If your swatch is too big (fewer than 16 sts per 4 in), go down to a US G-6 (4.0 mm) hook. If it is too small (more than 16 sts per 4 in), go up to a US I-9 (5.5 mm) hook.
If your stitch gauge is right but your row gauge is off, keep 16 sts per row. Track the length with your tape measure and adjust the number of rows to reach 40 in (101.6 cm).
Main Strip
Use cream and work in rows. The first row is the RS.
Foundation: Ch 17.
Row 1 (RS): Sc in 2nd ch from hook and in each ch across. (16 sc)
Row 2: Ch 1, turn. Sc in each st across. (16 sc)
Rows 3–160: Repeat Row 2. (16 sc in every row)
Count your stitches about every 10 rows. A strip this long can quietly gain or lose a stitch at the edges, and one extra stitch makes that section wider than the rest.
Length checkpoint: At Row 160, the strip is 40 in (101.6 cm) long and 4 in (10.2 cm) wide. Don’t fasten off. Go straight into the border.
Adjusting for your wheel: Measure around your wheel at the middle of the grip. The finished cover should be about 3.5 in (8.9 cm) shorter than that measurement so it fits snugly. Add or remove rows in groups of 4, which is 1 in (2.5 cm) per group. If you change the length, adjust the flower spacing below to match.
Border
The border is one round of sc around the whole strip. It neatens the edges for seaming and adds 0.25 in (0.6 cm) on every side.
Border gauge: The same as the body: 16 sc = 4 in (10.2 cm). Along the long sides you work 1 sc per row-end, which gives 4 sc per 1 in (2.5 cm).
Round 1: Don’t turn. Ch 1, then work around the strip as follows:
- Long side 1: Sc in the end of each row down the side. (160 sc)
- Corner: Ch 1.
- Short end 1 (foundation edge): Sc in each foundation ch across. (16 sc)
- Corner: Ch 1.
- Long side 2: Sc in the end of each row up the side. (160 sc)
- Corner: Ch 1.
- Short end 2 (top of Row 160): Sc in each st across. (16 sc)
- Corner: Ch 1. Sl st to the first sc to join.
Round total: 160 + 16 + 160 + 16 = 352 sc, plus 4 corner ch-1 spaces.
Fasten off and leave a tail of about 3 m for seaming the long edges later. You’ll use a separate length of cream for the end seam.
Why the math works:
- The long sides have 160 rows and the gauge is square, so 160 sc along each side fill exactly 40 in (101.6 cm).
- The short ends keep their original 16 sc, which matches 4 in (10.2 cm).
- The ch-1 corners aren’t counted as stitches, so nothing is counted twice.
- The border adds 0.25 in (0.6 cm) on each side. That makes the strip 4 + 0.25 + 0.25 = 4.5 in (11.4 cm) wide and 40 + 0.25 + 0.25 = 40.5 in (102.9 cm) long.
Daisy Embroidery
Embroider while the strip is flat. It’s much easier than working on the wheel.
Placement: Lay the strip RS up. The flowers sit along the center of the strip’s width, which becomes the front face of the rim. Count the 16 body sts and place a stitch marker between sts 8 and 9 on each of these rows:
8, 24, 40, 56, 72, 88, 104, 120, 136, 152
That gives 10 flower centers, 16 rows (4 in / 10.2 cm) apart. The first flower sits 8 rows from the foundation end and the last sits 8 rows from the Row 160 end. When you join the ends, the spacing stays even except at the seam, where the 2 border rows add just 0.5 in (1.3 cm).
Petals (blue): Thread a blunt needle with about 1.5 m of blue. Work 10 lazy daisy petals out from the marked center, like the positions on a clock face. Each petal is about 2 sts, or 0.5 in (1.3 cm), long. Space the petals evenly and keep the loops plump, not tight. Each finished flower measures about 1.25 in (3.2 cm) across. Weave in the tail on the WS.
Center (yellow): Thread about 0.75 m of yellow. Work 3 French knots of 3 wraps each, clustered tightly in the center. Together they form one round, raised dot about 0.25 in (0.6 cm) across. Weave in the tail on the WS.
Repeat for all 10 flowers. Check from the RS that every flower is centered across the width and lined up along the strip.
Final Blocking
Block the strip before fitting so the stitches relax evenly.
- Lay the strip RS up on a towel or blocking mat.
- Pat it into shape: 4.5 in (11.4 cm) wide and 40.5 in (102.9 cm) long.
- Pin the long edges straight every 4 in (10.2 cm). Don’t stretch the length, because the cover needs to stay slightly smaller than the wheel for a snug fit.
- Mist evenly with water until damp but not soaked.
- Gently fluff the petals with a fingertip so they lie flat and open.
- Let it dry completely before removing the pins.
Fitting and Seaming
- Position: Start at the bottom center of the wheel. Lay the strip over the front of the rim with the flowers centered on the front face.
- Wrap: Fold both long edges around the rim so they meet on the inner back side, closest to the driver.
- Seam the long edges: Thread the long cream tail on a tapestry needle. Whipstitch through the back loops of the border sc on each side, matching sc to sc (border st 1 to border st 1, and so on). Work around the rim in sections of about 6 in (15.2 cm), easing the cover forward as you go.
- Spokes: When you reach a spoke, stitch right up to it, pass the yarn behind the spoke, and continue on the other side. The spoke sits in the seam gap without bunching the fabric.
- Close the ring: When you get back to the bottom, whipstitch the two short ends together with a separate length of cream. Match 16 border sc to 16 border sc, plus the corner chains.
- Finish: Weave in all tails along the seam on the inside.
Tension: Pull each whipstitch snug enough to close the gap, but not so tight that the seam puckers. Put one stitch into every border sc, which works out to about 4 stitches per 1 in (2.5 cm).
Size checkpoint: The cover should stretch gently to fit. The outer edge stretches more than the inner edge, which helps it hug the curve. If you have to pull hard to fit the last 6 in (15.2 cm), the strip is too short. Add 4–8 rows.
Final Quality-Control Checklist
- Every row has 16 sc.
- The strip measures 4 in x 40 in (10.2 cm x 101.6 cm) before the border.
- The border round has 160 sc on each long side and 16 sc on each short end.
- The bordered strip measures 4.5 in x 40.5 in (11.4 cm x 102.9 cm).
- There are 10 flowers, 16 rows apart, centered across the width.
- Each flower has 10 even petals and a round yellow center.
- No yarn tails show on the front face.
- The seam sits on the inner back side of the rim.
- The cover doesn’t twist or slide when you turn the wheel.
Troubleshooting
The strip edges wave. Your stitch count has drifted. Count back to the last correct row and rip back to it.
The border ruffles on the long sides. Your rows are shorter than your stitches are wide. Skip 1 row-end every 8 rows, the same way on both long sides.
The border pulls in. Your rows are taller than your stitches are wide. Work 2 sc into 1 row-end every 8 rows.
The cover is loose and rotates. It’s too long. Undo the end seam, remove rows in groups of 4, and redo the border on that end.
The cover won’t close around the grip. Your wheel’s grip is thick. Start with 1 more ch so each row has 18 sc, and work 18 sc on each short end of the border.
The petals look flat or thin. Use a doubled strand of blue, or leave each loop a little looser before tacking it down.
The flowers drift off-center. Remove the markers, recount from the edge, and re-mark between sts 8 and 9 before stitching.
Care
Hand wash in cool water with mild soap, press the water out in a towel, and lay flat to dry. While the cover is on the wheel, spot clean it with a damp cloth.
Final Notes
The measurement chain is simple:
- A gauge of 16 sc and 16 rows per 4 in (10.2 cm) gives a 16-stitch strip that’s 4 in (10.2 cm) wide.
- 160 rows make the strip 40 in (101.6 cm) long.
- The border adds 0.25 in (0.6 cm) on each side, for a final size of 4.5 in x 40.5 in (11.4 cm x 102.9 cm).
- That strip wraps a standard grip snugly and stretches gently around a 14.5–15 in (36.8–38.1 cm) wheel.
Check your gauge first, count your stitches, and block before fitting. Your little blue daisies will brighten every drive.
Happy crocheting!