
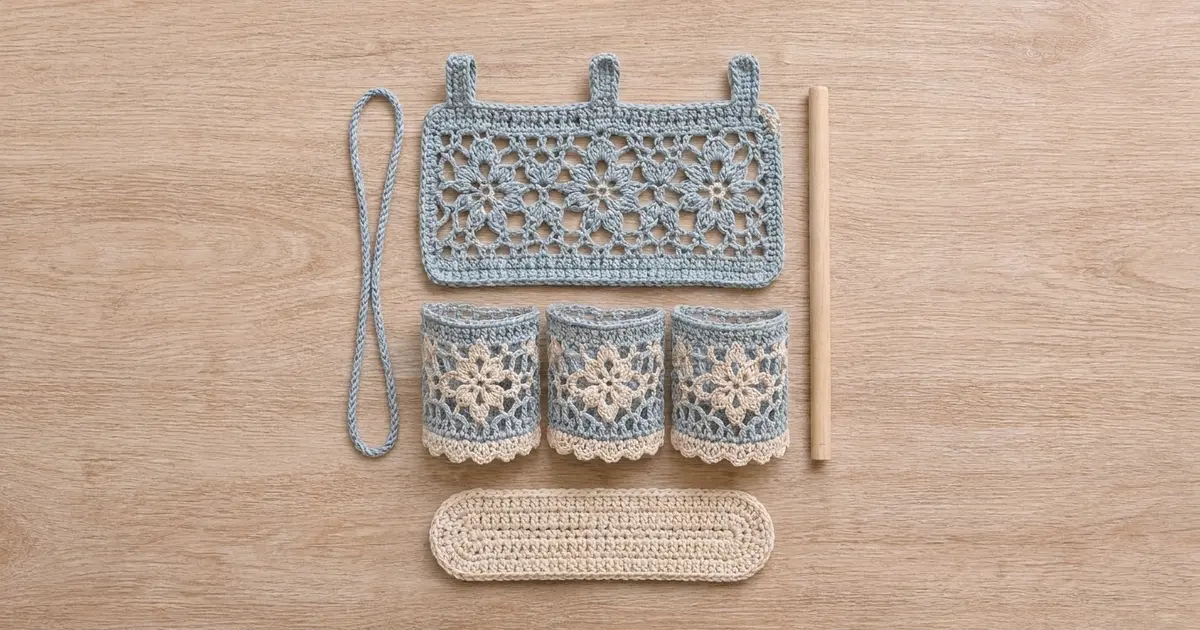
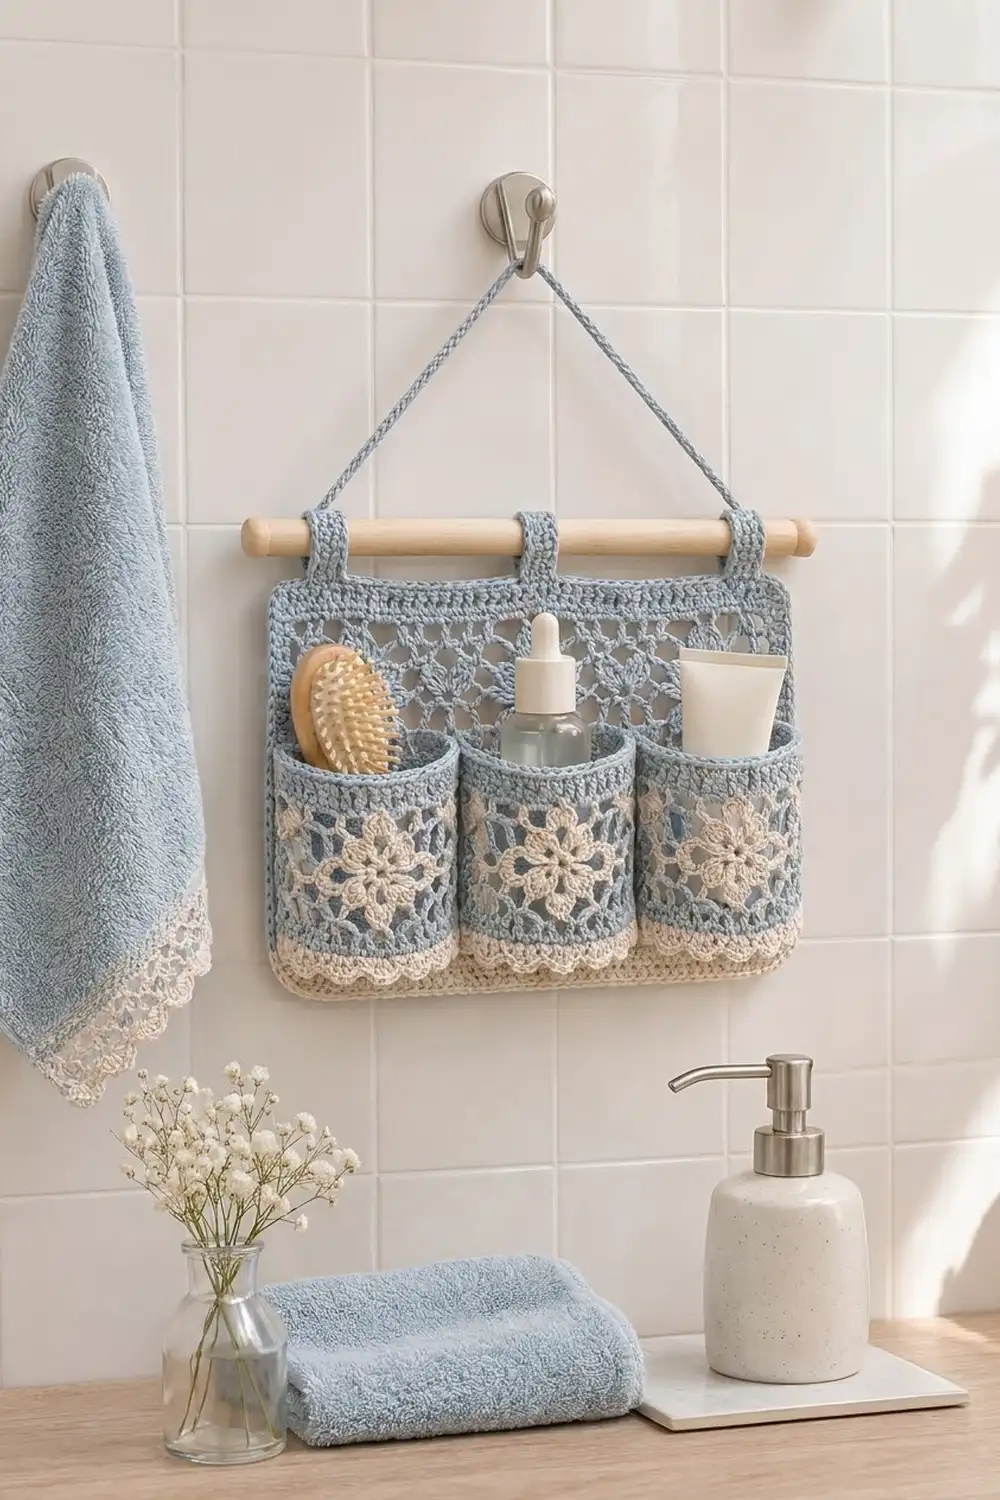
This wall organizer has a dusty-blue lace back panel and three pockets that stand side by side on a cream oval base. Each pocket front has a cream flower inside a blue lace frame and ends in a cream scalloped edge. Hang it from a wooden dowel in a bathroom, nursery or craft corner.
The colors are soft blue and natural cream, and the look is a little vintage, like a granny square. The pattern uses US crochet terms throughout.
The finished organizer is 16.25 in wide x 8.75 in tall (41.3 x 22.2 cm), not counting the tabs. The base is 2 in (5.1 cm) deep. Each pocket stands 6 in (15.2 cm) tall, and its scallop hangs another 0.5 in (1.3 cm) below that.
Here is how it goes together. You make six identical lace squares. Three are joined in a row and get a bottom band and a border to become the back panel. The other three get side gussets, a top rim and a scallop to become pockets. You then make a separate oval base and sew everything together.
Finished Size and Construction
- Finished size: 16.25 x 8.75 in (41.3 x 22.2 cm), excluding tabs
- Skill level: Intermediate
- Terminology: US
- Yarn weight: Worsted (#4) cotton
- Hook: 5.0 mm (H-8)
- Number of pieces: 6 lace squares (3 for the panel, 3 for the pockets), 1 oval base, 1 cord. The 3 tabs are worked directly onto the panel.
- Layout: Panel = 3 squares in 1 row; 3 pockets side by side in front of it
- Square size: 4.75 in (12.1 cm), 19 sts per side
- Panel size before border: 14.25 x 6.75 in (36.2 x 17.1 cm)
- Border depth: 1 in (2.5 cm) on every side
Materials
Use a smooth, mercerized or combed cotton. It holds its shape well in a damp bathroom and shows the lace clearly. Avoid acrylic, which stretches when the pockets are loaded.
- Blue (A): 150 g, about 255 m
- Cream (B): 50 g, about 85 m
Tools:
– 5.0 mm (H-8) hook
– Tapestry needle
– Scissors
– 6 stitch markers
– Wooden dowel, 18 in (45.7 cm) long and 0.5 in (1.3 cm) across
– Blocking mat, rustproof pins and a spray bottle
The quantities include a margin of about 20% for gauge swatches and tails.
Abbreviations (US Terms)
- ch – chain
- sl st – slip stitch
- sc – single crochet
- hdc – half double crochet
- dc – double crochet
- sk – skip
- st(s) – stitch(es)
- sp – space
- FLO – front loop only
- RS / WS – right side / wrong side
Special stitches:
– Petal: (sc, hdc, 3 dc, hdc, sc) all in the same space.
– Shell: 5 dc in the same stitch.
– Standing sc: Start with a slip knot on the hook, insert the hook into the stitch and work a sc as usual.
Gauge and Checkpoints
- 16 sc and 16 rows = 4 in (10.2 cm)
- 16 dc and 8 rows = 4 in (10.2 cm)
Make one square first and check it before making the rest:
- After Round 3: about 2.75 in (7.0 cm) across the petals
- After Round 6: about 4.25 in (10.8 cm) square
- After Round 7: 4.75 in (12.1 cm) square, 19 sts per side
If your square is more than 0.25 in (0.6 cm) too big, go down half a hook size. If it is too small, go up half a size. Every later measurement depends on this square, so don’t move on until it’s right.
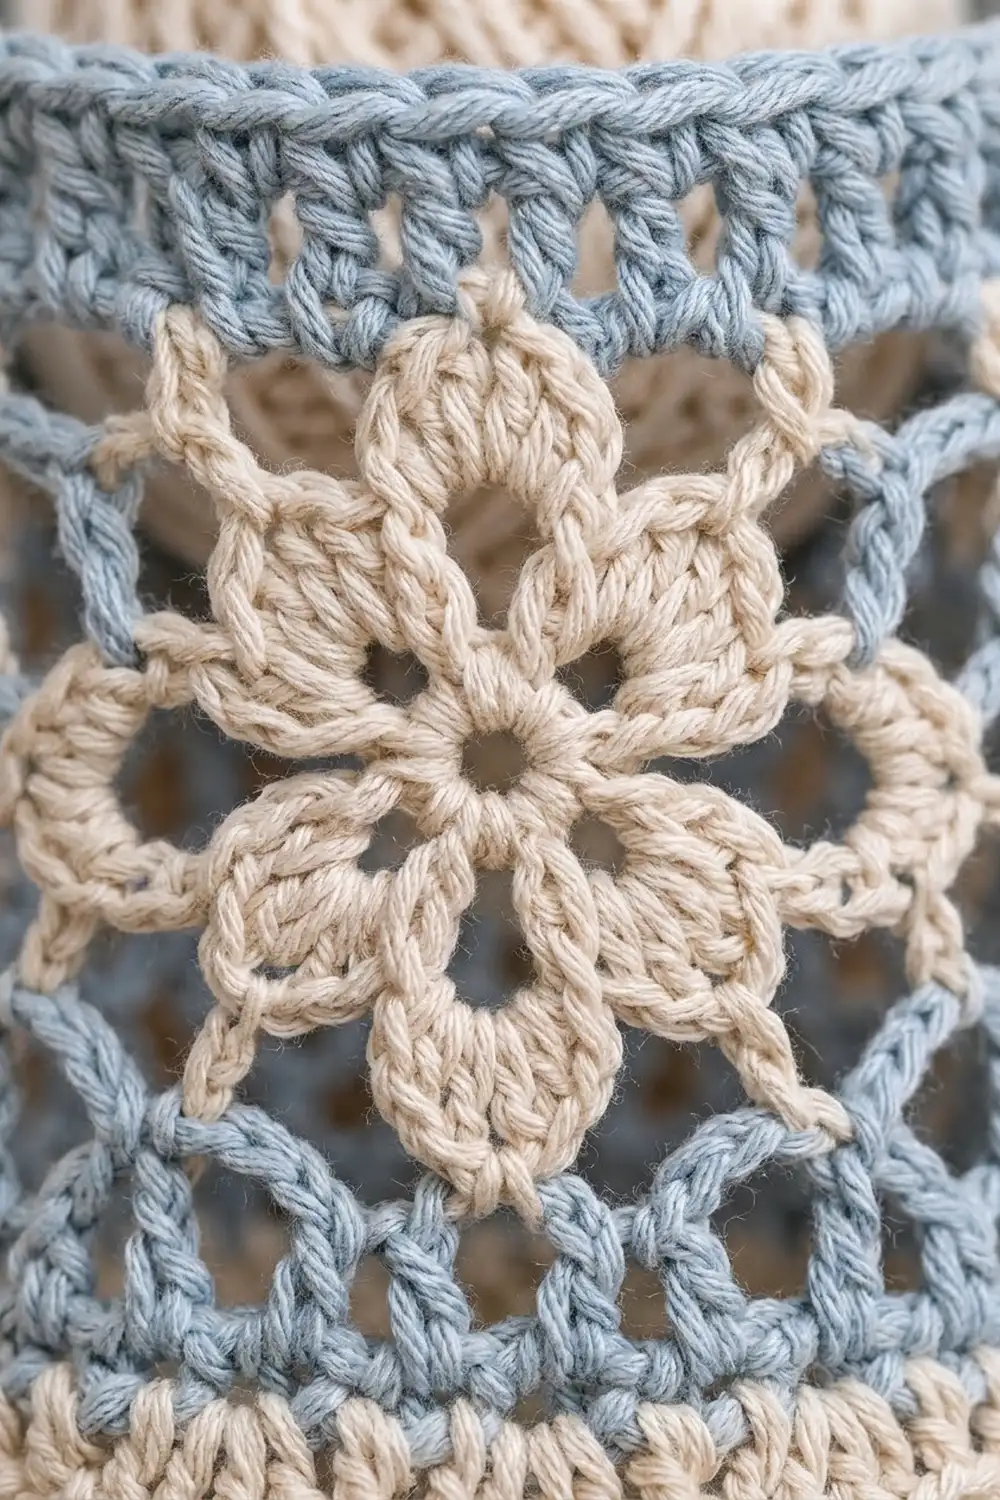
Lace Square (Make 6)
Colors:
– Panel squares: all rounds in A.
– Pocket squares: Rounds 1–3 in B, Rounds 4–7 in A.
Round 1: Make a magic ring. Ch 3 (counts as dc), work 15 dc in the ring, then sl st to the top of the ch-3. (16 dc)
Round 2: Ch 1, sc in the same st, ch 3, sk 1. Sc in the next st, ch 3, sk 1; repeat from * 6 more times. Sl st to the first sc. (8 sc, 8 ch-3 sps)
Round 3: Sl st into the first ch-3 sp, ch 1, then work 1 Petal in each ch-3 sp around. Sl st to the first sc. (8 petals, 56 sts) For pocket squares, fasten off B.
Round 4: Work behind the petals. Join A with a standing sc around the post of any Round 2 sc, then ch 4. Sc around the post of the next Round 2 sc, ch 4; repeat from * 6 more times. Sl st to the first sc. (8 sc, 8 ch-4 loops)
Round 5: Sl st into the first loop. Ch 3 (counts as dc), then work (2 dc, ch 3, 3 dc) in the same loop for a corner. Ch 2, sc in the next loop, ch 2.
– Work (3 dc, ch 3, 3 dc) in the next loop, ch 2, sc in the next loop, ch 2; repeat from * 2 more times.
– Sl st to the top of the ch-3.
– (24 dc, 4 sc, 4 corner ch-3 sps, 8 ch-2 sps)
Round 6: Sl st in the next 2 dc and into the corner sp. Ch 3, then work (dc, ch 2, 2 dc) in the same sp.
– Dc in the next 3 dc, 2 dc in the ch-2 sp, dc in the sc, 2 dc in the ch-2 sp, dc in the next 3 dc, then work (2 dc, ch 2, 2 dc) in the corner sp; repeat from * 2 more times.
– Finish the last side with dc in the next 3 dc, 2 dc in the ch-2 sp, dc in the sc, 2 dc in the ch-2 sp and dc in the next 3 dc. Sl st to the top of the ch-3.
– (15 dc per side between the corner sps, 60 dc total)
Round 7: Ch 1. Work sc in each dc and 3 sc in each corner ch-2 sp. Sl st to the first sc and fasten off. (72 sc) The middle sc of each 3-sc group is the corner st, so each side has 19 sts counting both corner sts.
Pocket Gussets and Edges (Work on Each Pocket Square)
Gussets
Row 1 (RS): Join A with a standing sc in a top corner st. Sc down one side, ending in the bottom corner st. (19 sc)
Row 2: Ch 3 (counts as dc), turn, dc in each st across. (19 dc)
Row 3: Repeat Row 2. (19 dc)
Row 4: Ch 1, turn, sc in each st across. (19 sc) Fasten off, leaving a 16 in (40.6 cm) tail.
Repeat on the opposite side of the square. Each gusset is 1.5 in (3.8 cm) deep, and its row ends give 6 sts: 1 for each sc row and 2 for each dc row.
Checkpoint: Laid flat, the pocket measures 7.75 in (19.7 cm) wide.
Top Rim (A)
Row A: Work 6 sc across the gusset row ends, 19 sc across the top of the square, then 6 sc across the other gusset. (31 sc)
Row B: Ch 4 (counts as dc + ch 1), turn, sk 1, dc in the next st. Ch 1, sk 1, dc in the next st; repeat from * across. (16 dc, 15 ch-1 sps = 31 sts)
Row C: Ch 1, turn, sc in each dc and each ch-1 sp. (31 sc) Fasten off.
The rim is 1 in (2.5 cm) tall.
Bottom Edge (B)
Row 1: Along the bottom, work 6 sc in the gusset row ends, 19 sc in the square, and 6 sc in the other gusset row ends. (31 sc)
Row 2 (scallop): Ch 1, turn. Working in the FLO, sc in the first st. Sk 2, Shell in the next st, sk 2, sc in the next st; repeat from * 4 more times. (5 shells, 6 sc; 1 + 6 x 5 = 31 sts used) Fasten off.
The unused loops of Row 1 are left free for joining the pocket to the base.
Pocket checkpoint: 6 in (15.2 cm) from the bottom of Row 1 to the top of the rim. The scallop hangs 0.5 in (1.3 cm) below that.
Oval Base (B)
Foundation: Ch 60.
Round 1: Work 3 sc in the 2nd ch from the hook, then sc in the next 57 ch. Work 3 sc in the last ch. Working along the other side of the chain, sc in the next 57 ch. Sl st to the first sc. (3 + 57 + 3 + 57 = 120)
Round 2: Ch 1. Work 2 sc in each of the 3 end sts, sc in the next 57 sts, 2 sc in each of the next 3 sts, then sc in the next 57 sts. Join. (6 + 57 + 6 + 57 = 126)
Round 3: Ch 1. On each end, work (sc in the next st, 2 sc in the next st) 3 times. Sc in each straight st. Join. (9 + 57 + 9 + 57 = 132)
Round 4: Ch 1. On each end, work (sc in the next 2 sts, 2 sc in the next st) 3 times. Sc in each straight st. Join. (12 + 57 + 12 + 57 = 138) Fasten off.
Checkpoint: 16.25 x 2 in (41.3 x 5.1 cm).
Place a marker between the 6th and 7th sts of each 12-st end. This divides the base into a front half and a back half of 69 sts each (6 + 57 + 6).
Hanging Cord (A)
Chain until the cord measures 26 in (66.0 cm). Sl st in the 2nd ch from the hook and in each ch across, then fasten off.
Make All Pieces
- A only: 3 squares (panel)
- B center with A frame: 3 squares, finished as pockets
- B: 1 oval base
- A: 1 cord
Back panel:   [ A ][ A ][ A ]
Pockets:      [P1 ][P2 ][P3 ]
Base:        (===============)
Joining
Joining the Panel Squares
- Hold two blue squares RS together with their edges matched corner to corner.
- With A, sl st through both layers in the back loops: 19 sl sts, one stitch to one stitch, corner st to corner st.
- Join square 2 to square 3 the same way.
Keep the sl sts as loose as the sc beneath them. If the seam is shorter than the square edge, it will pucker.
No stitches are added at the seams. The top and bottom edges are each 3 x 19 = 57 sts.
Bottom Band (A)
Row 1 (RS): Join A in the bottom-right corner st. Ch 3 (counts as dc), then dc in each st across. (57 dc)
Rows 2–4: Ch 3, turn, dc in each st across. (57 dc)
Checkpoint: The panel measures 14.25 x 6.75 in (36.2 x 17.1 cm).
Border
The border uses the same gauge, 4 sts per inch.
Starting edge counts:
– Top: 57 sts (3 squares x 19)
– Bottom: 57 sts (Row 4 of the band)
– Each short side: 27 sts, made up of:
– the top corner st
– 17 square-side sts
– the square’s bottom corner st
– 2 sts in each of band Rows 1–3
– 1 st in the side of Row 4
– the last dc of Row 4, which is the bottom corner
The 4 corner sts are shared between two sides, so the starting total is 2 x 57 + 2 x 27 − 4 = 164.
Round 1 (A): Ch 1. Work sc in each st and 3 sc in each of the 4 corner sts. Join.
– Count: 164 worked 1 per st + 8 extra corner sts = 172
– Long sides: 59 sts each; short sides: 29 sts each
Round 2 (A): Ch 3 (counts as dc). Work dc in each st and 5 dc in each corner st. Join.
– Count: 172 + 16 extra = 188
– Long sides: 63 sts each; short sides: 33 sts each
Round 3 (A): Ch 1. Work sc in each st and 3 sc in each corner st. Join and fasten off.
– Count: 188 + 8 extra = 196
– Long sides: 65 sts each; short sides: 35 sts each
Why the math works:
– An sc round is 0.25 in (0.6 cm) tall and adds 1 st at each end of every side.
– A dc round is 0.5 in (1.3 cm) tall and adds 2 sts at each end of every side.
– So each side grows by exactly the depth of the border: 1 in (2.5 cm) all around.
– 65 sts ÷ 4 = 16.25 in (41.3 cm), and 35 sts ÷ 4 = 8.75 in (22.2 cm).
Tabs (A)
Count the top-edge sts from the top-left corner (corner = st 1). With RS facing:
1. Join A in st 3 and sc in sts 3–7. (5 sc)
2. Rows 2–12: Ch 1, turn, 5 sc.
3. Fasten off, leaving a long tail.
Repeat on sts 31–35 (centered on st 33) and on sts 59–63. Each tab is 1.25 x 3 in (3.2 x 7.6 cm).
Fold each tab to the WS and sew its last row 0.75 in (1.9 cm) below the top edge to make a loop.
Assembly
- Base to panel. Sew the base’s back half (69 sts) to the panel’s bottom edge (65 sts):
- base sts 1–3 into the bottom-left corner st;
- base sts 4–66 into panel sts 2–64 (63 sts);
- base sts 67–69 into the bottom-right corner st.
- Pockets to base. Whipstitch the free loops of each pocket’s Bottom Row 1 to the base’s front half:
- base sts 1–6: Pocket 1, outer gusset;
- base sts 7–25: Pocket 1, front;
- base sts 26–44: Pocket 2, front;
- base sts 45–63: Pocket 3, front;
- base sts 64–69: Pocket 3, outer gusset.
- Total: 6 + 19 + 19 + 19 + 6 = 69.
- Inner gussets. Pair Pocket 1’s right gusset with Pocket 2’s left gusset, and Pocket 2’s right gusset with Pocket 3’s left gusset.
- Sew the 6 bottom sts of each inner gusset onto the surface of the base.
- Whipstitch the Row 4 edges of each pair (19 sts each) to the panel, going straight up from bottom-border sts 23 and 43.
- Outer gussets. Whipstitch each outer gusset’s Row 4 (19 sts) to short-side sts 2–20 of the border, then tack the rim row ends.
- Hang it. Slide the dowel through the tabs and tie one cord end around each end of the dowel.
Final Blocking
- Mist the whole organizer until it is damp, not soaked.
- Lay the panel flat and pin it to 16.25 x 8.75 in (41.3 x 22.2 cm).
- Pin each scallop shell into a round arch.
- Fill each pocket with a rolled towel so it dries in a rounded D shape.
- Let it dry completely, at least 24 hours.
- Remove the pins and hang.
Final Quality-Control Checklist
- Every square measures 4.75 in (12.1 cm) with 19 sts per side
- Panel before border: 14.25 x 6.75 in (36.2 x 17.1 cm)
- Border Round 3 total: 196 sts
- Tabs are centered on sts 5, 33 and 61
- Base: 138 sts, 16.25 x 2 in (41.3 x 5.1 cm)
- Each pocket has 5 shells and 31 sts in its rim
- All tails are woven in through solid stitches, not lace loops
Troubleshooting
- Square cups: Your chains are too tight. Loosen the Round 4 ch-4 loops.
- Square ruffles: Go down half a hook size, or check that Round 6 has exactly 15 dc per side.
- Border corners curl: Use exactly 3 sc and 5 dc at each corner as written. Don’t add extra.
- Base too short for the panel: Recount Round 1. Each straight side must have 57 sts.
- Pockets sag forward: Re-tack the gusset Row 4 edges more firmly to the panel.
- Scallop flips up: Re-block it, pinning each shell downward.
Care
Hand wash in cool water with mild soap, press out the water in a towel and dry flat. Re-block if the pockets lose their shape.
Final Notes
Every measurement follows from the square:
– 4.75 in (12.1 cm) square
– 14.25 x 6.75 in (36.2 x 17.1 cm) panel with its band
– 16.25 x 8.75 in (41.3 x 22.2 cm) bordered panel
– base matched to the panel width at 16.25 in (41.3 cm)
– three 6 in (15.2 cm) pockets
Get the first square right and everything else will fit.
Happy crocheting!