

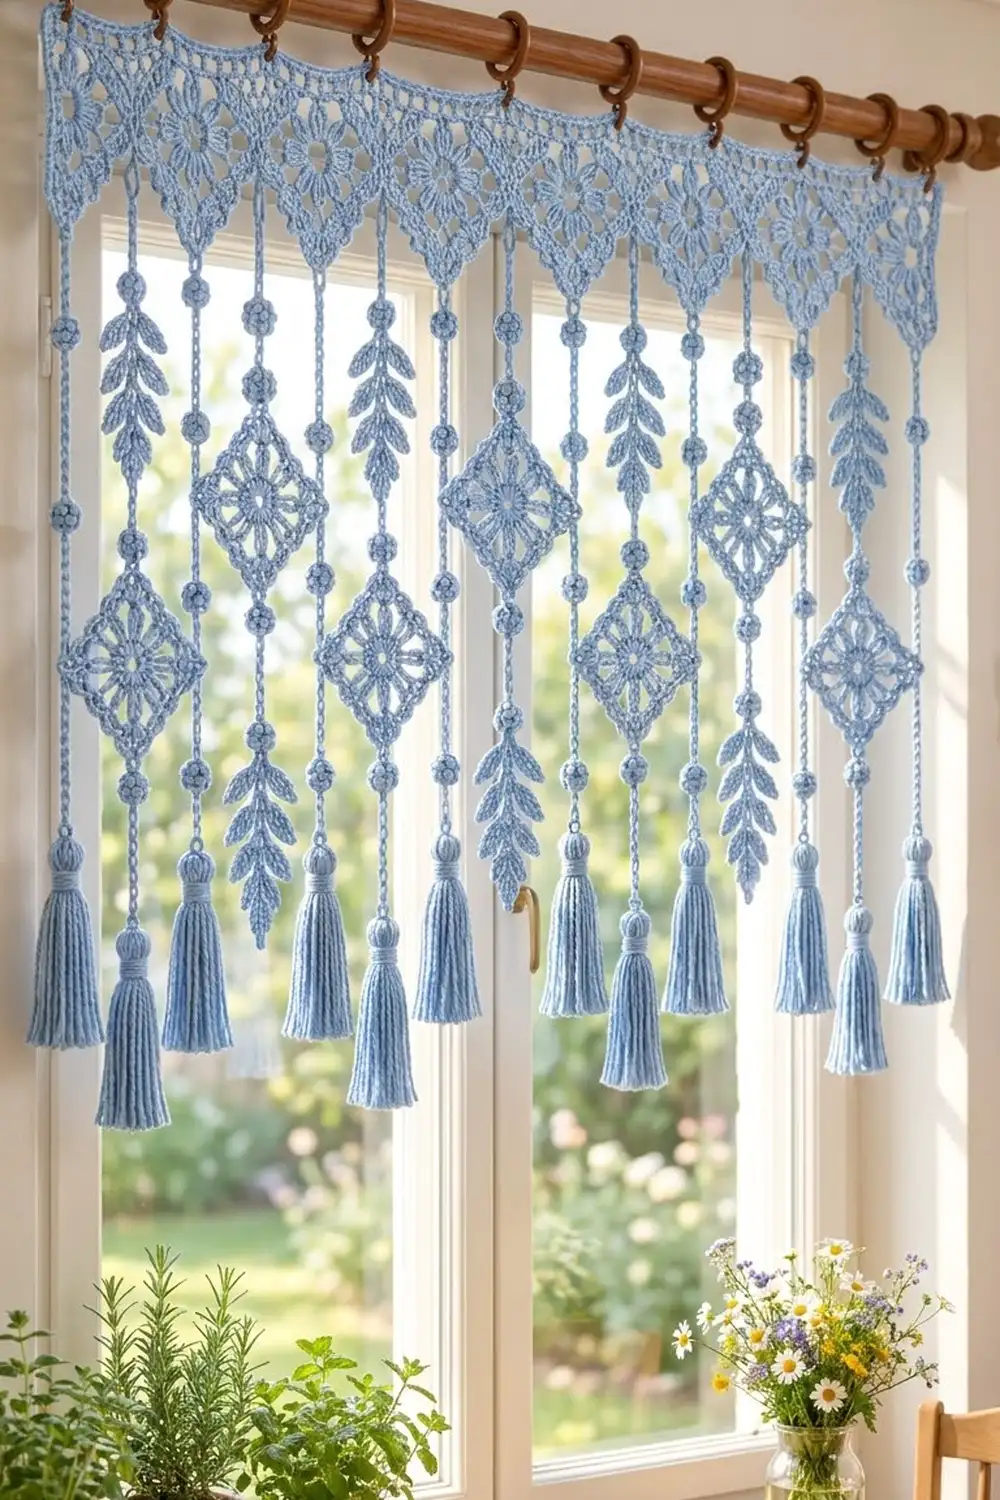
This window valance is soft blue lace with a cottage feel. A straight band of on-point flower motifs runs across the top. Beaded chain strands hang below it, carrying more flower diamonds, leafy sprigs and plump tassels.
Everything is worked in one color: a light, powdery blue cotton that glows when the sun comes through it. The style is part filet lace and part boho macramé. It suits kitchens, sunrooms and any small window that needs color without blocking the light.
The pattern uses US crochet terms. The finished valance measures about 45.3 in (115.1 cm) wide and 28.3 in (71.9 cm) long, including the tassels.
You’ll crochet 16 flower diamonds and join 8 of them corner to corner into a band. Then you’ll fill the top gaps with join-as-you-go triangles, add a three-row top border and work 15 hanging strands directly from the band. Tassels are made last.
Finished Size and Construction
- Finished size: 45.3 in (115.1 cm) wide x 28.3 in (71.9 cm) long
- Skill level: Intermediate
- Terminology: US crochet terms
- Yarn weight: DK (#3) cotton
- Hook: 4 mm (G-6)
- Number of pieces: 16 flower diamonds, 7 full fillers, 2 end fillers, 7 leaf sprigs, 15 tassels
- Layout: 8 diamonds in one row, set on point, with 15 strands below
- Piece size: each diamond measures 4 in (10.2 cm) per side and 5.66 in (14.4 cm) from point to point
- Size before border: 45.3 in (115.1 cm) x 5.66 in (14.4 cm)
- Border depth: 1 in (2.5 cm), on the top edge only
Materials
Yarn: Use a smooth mercerized DK cotton or cotton blend. Cotton holds the lace crisp and hangs straight, and it won’t fuzz in sunlight. Avoid splitty yarns, because the berries and picots need clear stitch definition.
- Light Blue: 250 g, about 575 m (629 yd)
The quantity includes a margin of roughly 15% for gauge swatches, tassel trimming and tails.
Tools:
- 4 mm (G-6) crochet hook
- Tapestry needle
- Scissors
- Stiff card, 4.5 in (11.4 cm) tall, for the tassels
- Rust-proof pins and a blocking mat
- 10 clip curtain rings and a rod
Abbreviations (US Terms)
- ch: chain
- sl st: slip stitch
- sc: single crochet
- hdc: half double crochet
- dc: double crochet
- tr: treble crochet
- sk: skip
- sp: space
- st(s): stitch(es)
- MR: magic ring
- RS / WS: right side / wrong side
Special stitches:
- Picot: ch 3, sl st in the 3rd ch from hook.
- Berry (bry): ch 3, work 4 dc in the 3rd ch from hook, then drop the loop from your hook. Insert the hook from front to back into that same 3rd ch, pick up the dropped loop and pull it through, then ch 1 to lock it. This makes a round knob about 0.4 in (1.0 cm) tall.
- Unit: ch 8, bry. One unit measures 2 in (5.1 cm).
- Leaf: ch 7, sl st in the 2nd ch from hook, then work sc in the next ch, hdc in the next ch, dc in each of the next 2 ch, and hdc in the last ch. That’s 6 sts, and the leaf is 1.2 in (3.0 cm) long.
Gauge and Checkpoints
Make one complete diamond before anything else, because every later measurement depends on it.
- Motif gauge: 17 sc = 4 in (10.2 cm) along one side of Rnd 6
- Filler gauge: 24 dc = 5.66 in (14.4 cm); 1 dc row = 0.47 in (1.2 cm)
- Chain gauge: 5 ch = 1 in (2.5 cm)
Checkpoints for the diamond:
- After Rnd 1, the circle is 1.25 in (3.2 cm) across.
- After Rnd 3, the flower is 3 in (7.6 cm) from petal tip to petal tip.
- After Rnd 5, each side is 3.5 in (8.9 cm).
- After Rnd 6, each side is 4 in (10.2 cm).
If your diamond is too big, go down to a 3.75 mm hook. If it’s too small, go up to a 4.5 mm hook. A difference of 0.25 in (0.6 cm) per diamond adds up to 2.83 in (7.2 cm) across the band, so it’s worth fixing now.
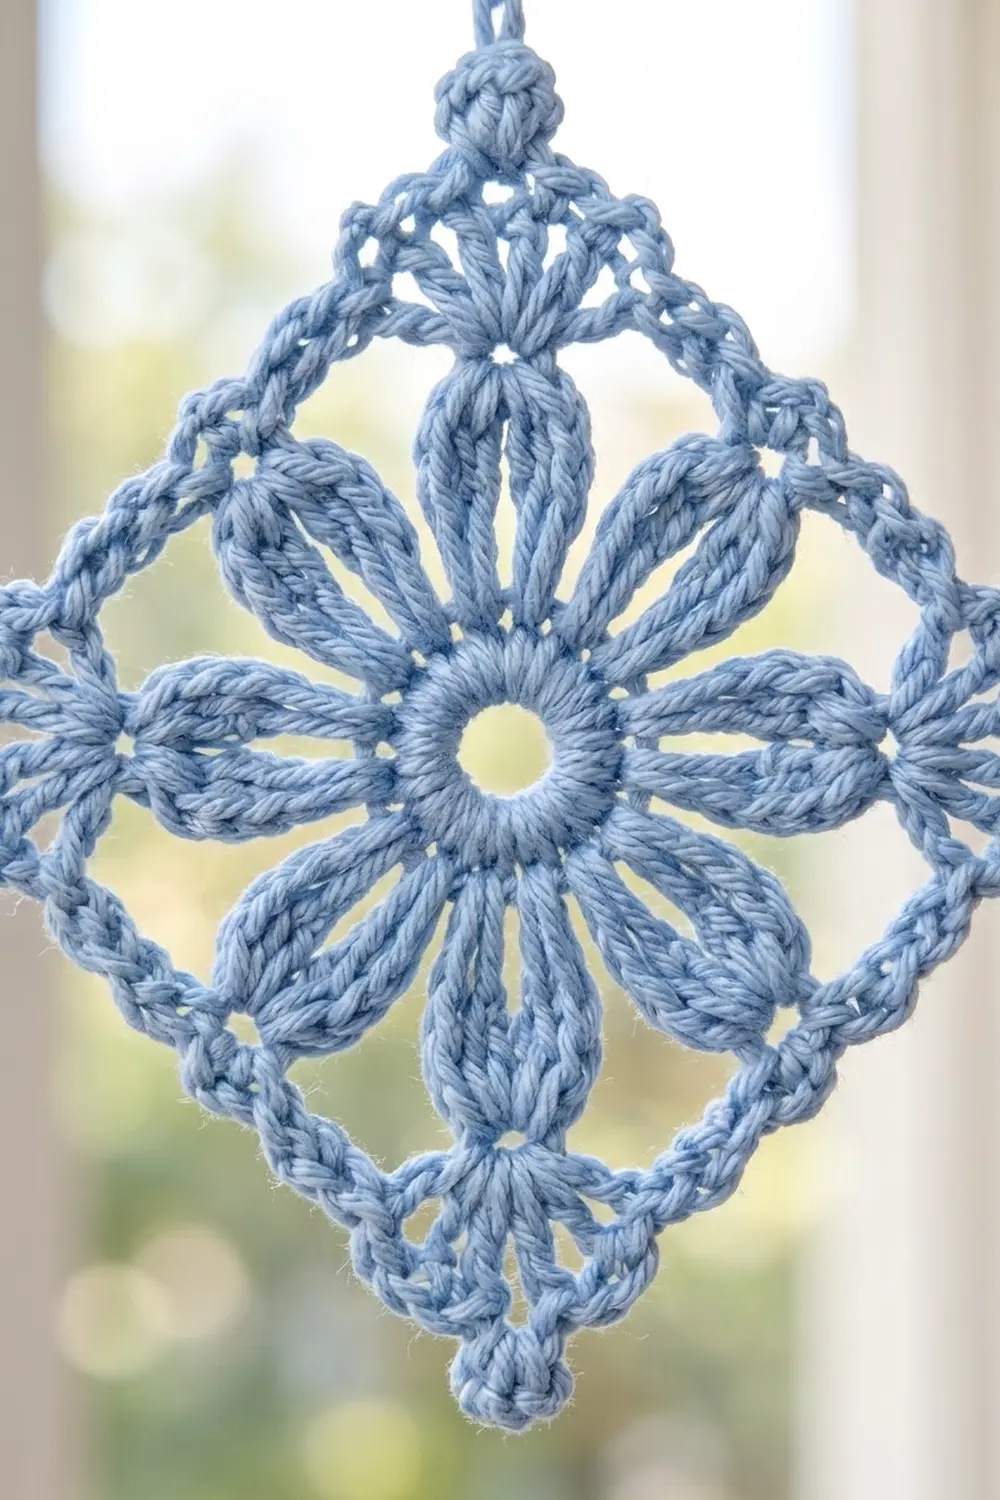
Flower Diamond (Make 16)
Rnd 1: MR, ch 3 (counts as dc), work 15 dc in the ring, then sl st to the top of the ch-3. (16 dc)
Rnd 2: Ch 1, sc in the same st, ch 5, sk 1. Sc in the next st, ch 5, sk 1; repeat from * 6 more times. Sl st to the first sc. (8 sc, 8 ch-5 loops)
Rnd 3: Sl st into the first loop. In each ch-5 loop, work (sc, hdc, 2 dc, tr, 2 dc, hdc, sc). Sl st to the first sc. (8 petals of 9 sts each, 72 sts)
Rnd 4: Sl st in the hdc, the next 2 dc and the tr of the first petal (4 sl sts).
– Ch 1, then work (sc, ch 3, sc) in the same tr; this is a corner.
– Ch 4, sc in the tr of the next petal, ch 4.
– (Sc, ch 3, sc) in the tr of the next petal, ch 4, sc in the tr of the next petal, ch 4; repeat from * 2 more times.
– Sl st to the first sc.
(12 sc, 4 corner ch-3 sps, 8 ch-4 sps) Petals 1, 3, 5 and 7 now point to the corners.
Rnd 5: Sl st into the corner sp. Ch 3 (counts as dc) and work 2 dc in the same sp.
– 4 dc in the ch-4 sp, dc in the sc, 4 dc in the next ch-4 sp, then (3 dc, ch 3, 3 dc) in the corner sp; repeat from * 2 more times.
– 4 dc in the ch-4 sp, dc in the sc, 4 dc in the next ch-4 sp, 3 dc in the first corner sp.
– Ch 3 and sl st to the top of the beginning ch-3.
(15 dc per side, 60 dc, plus 4 corner ch-3 sps) Each side is 3 + 4 + 1 + 4 + 3 = 15.
Rnd 6: Ch 1, sc in the same st and in each of the next 14 dc.
– Work (sc, picot, sc) in the corner sp, then sc in each of the next 15 dc; repeat from * 2 more times.
– Work (sc, picot, sc) in the last corner sp and sl st to the first sc.
(17 sc per side, 68 sc, plus 4 picots) Each side’s 17 sc include the sc on each side of its two corner picots. The picots are not counted as stitches.
Fasten off and weave in the ends. Steam each diamond lightly to 4 in (10.2 cm) per side.
Joining as you go: For diamonds 2 through 8 of the band, join on the last corner of Rnd 6. Replace the picot with this: ch 1, sl st into the side picot of the previous diamond, ch 1, sl st in the base sc. Each diamond touches its neighbor only at that one picot.
Fillers
The fillers turn the zigzag top into a straight edge. Each is worked in rows straight into the V between two diamonds, joining to the diamond edges as you go.
Full Filler (Make 7, Worked in Place)
Each V has two edges of 17 sc: the upper-right side of the left diamond (Side A) and the upper-left side of the right diamond (Side B). Count the sc on each edge from the valley upward.
Row 1: With RS facing, join yarn in the joined picot at the valley. Ch 3 (counts as dc) and work 3 dc in the same picot. Sl st in sc 1–6 of Side B and turn. (4 dc)
Row 2: Sk the sl sts. Work (ch 3, 2 dc) in the first dc, dc in each st to the last st, and 3 dc in the top of the turning ch. Sl st in sc 1–6 of Side A and turn. (8 dc)
Row 3: Repeat Row 2, but sl st in sc 7–12 of Side B. (12 dc)
Row 4: Repeat Row 2, sl st in sc 7–12 of Side A. (16 dc)
Row 5: Repeat Row 2, sl st in sc 13–17 of Side B. (20 dc)
Row 6: Repeat Row 2, sl st in sc 13–17 of Side A. (24 dc) Fasten off.
Each row adds 2 dc at each end, so Row k has 4k dc. Each side joins with 6 + 6 + 5 = 17 sl sts, which uses every sc on that edge. The filler stands 2.83 in (7.2 cm) tall and 5.66 in (14.4 cm) wide at the top.
End Filler (Make 2, Worked in Place)
These fill the corners above the upper-outer side of diamonds 1 and 8.
Row 1: Join yarn in the free side picot. Ch 3 and work 1 dc in the same picot, then turn. (2 dc)
Row 2: Ch 3, dc in each st to the last st, then 3 dc in the top of the turning ch. Sl st in sc 1–6 of the diamond edge and turn. (4 dc)
Row 3: Sk the sl sts. Work (ch 3, 2 dc) in the first dc, then dc in each st to the end. Turn. (6 dc)
Row 4: Repeat Row 2, sl st in sc 7–12. (8 dc)
Row 5: Repeat Row 3. (10 dc)
Row 6: Repeat Row 2, sl st in sc 13–17. (12 dc) Fasten off.
The outer edge stays straight because it gets no increases. The top measures 2.83 in (7.2 cm).
Leaf Sprig (Make 7, Worked Within the Valley Strands)
These steps are part of the valley strands below.
- Ch 30 for the stem, which is 6 in (15.2 cm) long. Make a leaf, then sl st in the 30th stem ch; this is the tip leaf.
- Working back up the stem: sl st in each of the next 4 stem ch, then (leaf, sl st in the same stem ch) twice. Repeat from * 6 more times. Pairs fall on stem ch 26, 22, 18, 14, 10, 6 and 2.
- Sl st in stem ch 1 and fasten off. (15 leaves: 1 tip leaf + 7 pairs)
Make All Pieces
- Flower diamonds: 16 in Light Blue (8 for the band, 8 for the strands)
- Fillers: 7 full and 2 end, worked in place
- Strands: 15 (8 point strands, 7 valley strands), worked in place
- Tassels: 15
Layout grid (E = end filler, F = full filler, D = band diamond):
Top border:  =============================================
Fillers:     E  .  F  .  F  .  F  .  F  .  F  .  F  .  F  .  E
Band:          D1    D2    D3    D4    D5    D6    D7    D8
Strands:       P1  V1  P2  V2  P3  V3  P4  V4  P5  V5  P6  V6  P7  V7  P8
Strand type:   Hi  Lf  Lo  Lf  Hi  Lf  Lo  Lf  Hi  Lf  Lo  Lf  Hi  Lf  Lo
Key: P = point strand, V = valley strand, Hi = diamond set high, Lo = diamond set low, Lf = leaf sprig.
Joining
Band. Join the band diamonds with picot joins during Rnd 6 (see above). That gives 7 joins for 8 diamonds. Keep every diamond oriented with one picot pointing up, one down, and one on each side. Then work the fillers into the 7 Vs and the 2 end corners.
Point strands (8). Join yarn in the bottom picot of a band diamond.
- High (P1, P3, P5, P7): Work 1 unit, then sl st in the top picot of a strand diamond and fasten off. Join yarn in that diamond’s bottom picot, work 5 units and fasten off.
- Low (P2, P4, P6, P8): Work 5 units, attach the diamond the same way, then work 1 unit below it.
Each point strand measures 2 + 5.66 + 10 = 17.66 in, or about 17.7 in (45.0 cm).
Valley strands (7). Join yarn in the joined picot at the valley, working on the underside.
- Work 3 units, then the leaf sprig, and fasten off.
- Join yarn at the base of the tip leaf (stem ch 30) and work 3 units.
Each valley strand measures 6 + 6 + 6 = 18 in (45.7 cm).
Tension: Keep your chains even and slightly loose. Tight chains shorten the strands and make them twist. After each strand, let it hang and compare it with the one before.
Size checkpoint: The band should measure 45.3 in (115.1 cm) wide, because 8 x 5.66 in = 45.28 in.
Border
The border runs along the top edge only. Its gauge is 200 sts = 45.3 in (115.1 cm).
Row 1 (RS): Join yarn at the top outer corner of the left end filler. Sc in each dc and diamond top picot across, as follows:
| Section | Sts |
|---|---|
| Left end filler | 12 |
| Each diamond top picot (8 total) | 1 each |
| Each full filler (7 total) | 24 each |
| Right end filler | 12 |
Turn. (200 sc)
Row 2: Ch 3 (counts as dc). Ch 1, sk 1, dc in the next st; repeat from * 98 more times. Dc in the last st and turn. (1 + 99 x 2 + 1 = 200 sts, counting each ch-1 as a stitch)
Row 3: Ch 1. Sc in each dc and in each ch-1 sp across. (200 sc) Fasten off.
Why the math works: 7 x 24 + 2 x 12 + 8 = 200. That even count lets the mesh in Row 2 begin and end with a dc. Row 1 is 0.25 in (0.6 cm) tall, Row 2 is 0.5 in (1.3 cm) and Row 3 is 0.25 in (0.6 cm), for a total of 1 in (2.5 cm).
Rings: Clip the 10 rings into Row 3 at sts 1, 23, 45, 67, 89, 111, 133, 155, 177 and 199.
Tassels (Make 15)
- Wrap yarn 30 times around the 4.5 in (11.4 cm) card.
- Tie the top with a strand of yarn, then cut the bottom loops.
- Wrap the neck tightly 0.5 in (1.3 cm) below the top.
- Trim the tassel to 4 in (10.2 cm).
- Tie each tassel directly under the last berry of a strand, using an 8 in (20.3 cm) tail.
Valley tassels will hang about 2.5 in (6.4 cm) higher than point tassels. That staggered line is intended.
Final Blocking
- Dampen the valance with a spray bottle until it’s evenly moist but not dripping.
- Lay the band flat and pin the top edge straight to 45.3 in (115.1 cm).
- Pin each band diamond to 4 in (10.2 cm) per side, pinning each corner picot outward.
- Pin each filler so its top row lines up with the border.
- Lay the strands out straight. Pin each strand diamond square and fan the sprig leaves upward at about 45 degrees.
- Steam the tassels and comb them straight with your fingers.
- Let everything dry completely before unpinning, then hang.
Final Quality-Control Checklist
- Every diamond has 17 sc per side plus 4 picots.
- There are 7 band joins, each at a single picot.
- Each full filler has 24 dc on Row 6 and each end filler has 12 dc.
- The top border has 200 sts on all three rows.
- The band is 45.3 in (115.1 cm) wide.
- Point strands are 17.7 in (45.0 cm) and valley strands are 18 in (45.7 cm).
- High and low diamonds alternate across the 8 point strands.
- There are 15 tassels, each 4 in (10.2 cm).
- All ends are woven in securely.
Troubleshooting
- Diamond cups or ruffles: Your Rnd 5 dc are too tight or too loose. Check that you have 15 dc per side and adjust your hook size.
- Filler pulls the diamonds inward: You skipped joining sts. Each edge needs exactly 6 + 6 + 5 sl sts.
- Top edge waves: The border count is off. Recount Row 1 against the table.
- Strands twist: Tighten your chains slightly and block the strands straight while damp.
- Berries go flat: Pull the dropped loop snugly through before the locking ch.
- Leaves droop: Re-block them pinned upward, or use a light spray starch.
Care
Hand wash in cool water with mild soap, press out the water in a towel and lay flat to dry. Re-block lightly if the strands lose their shape.
Final Notes
The measurement chain is simple:
- Each diamond is 4 in (10.2 cm) per side and 5.66 in (14.4 cm) from point to point.
- Eight diamonds make a band 45.3 in (115.1 cm) wide.
- The fillers bring the top edge to 200 sts, and the border adds 1 in (2.5 cm).
- The strands drop 17.7 in (45.0 cm) or 18 in (45.7 cm), and the tassels add 4 in (10.2 cm).
- That gives a finished length of 28.3 in (71.9 cm).
Check your first diamond, and the rest will fall into place.
Happy crocheting!