

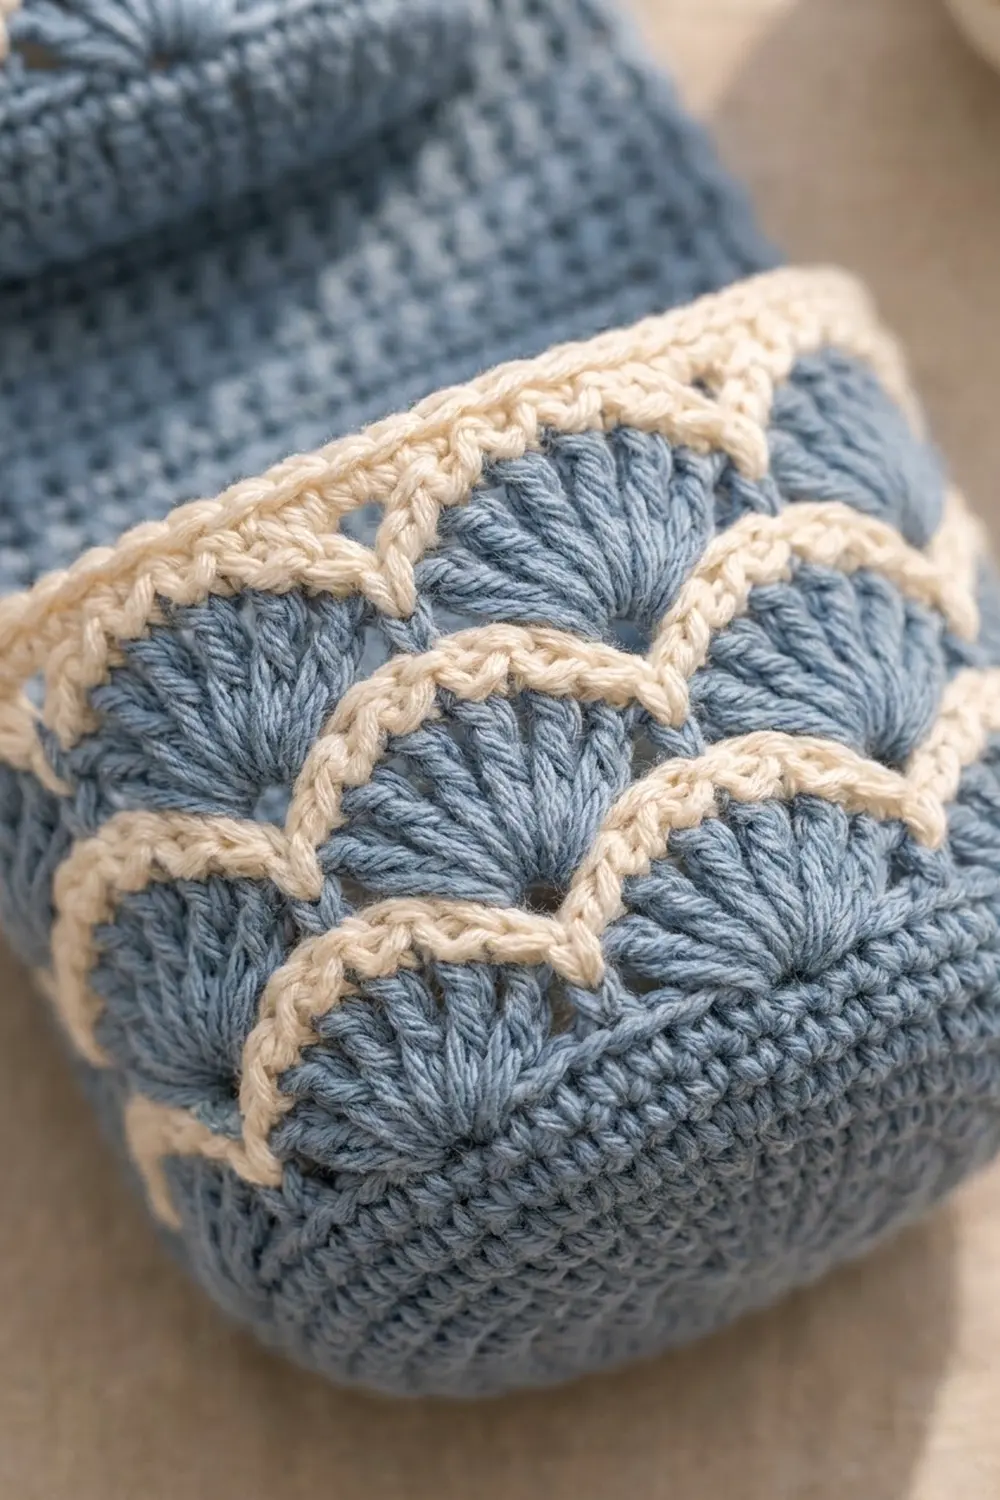
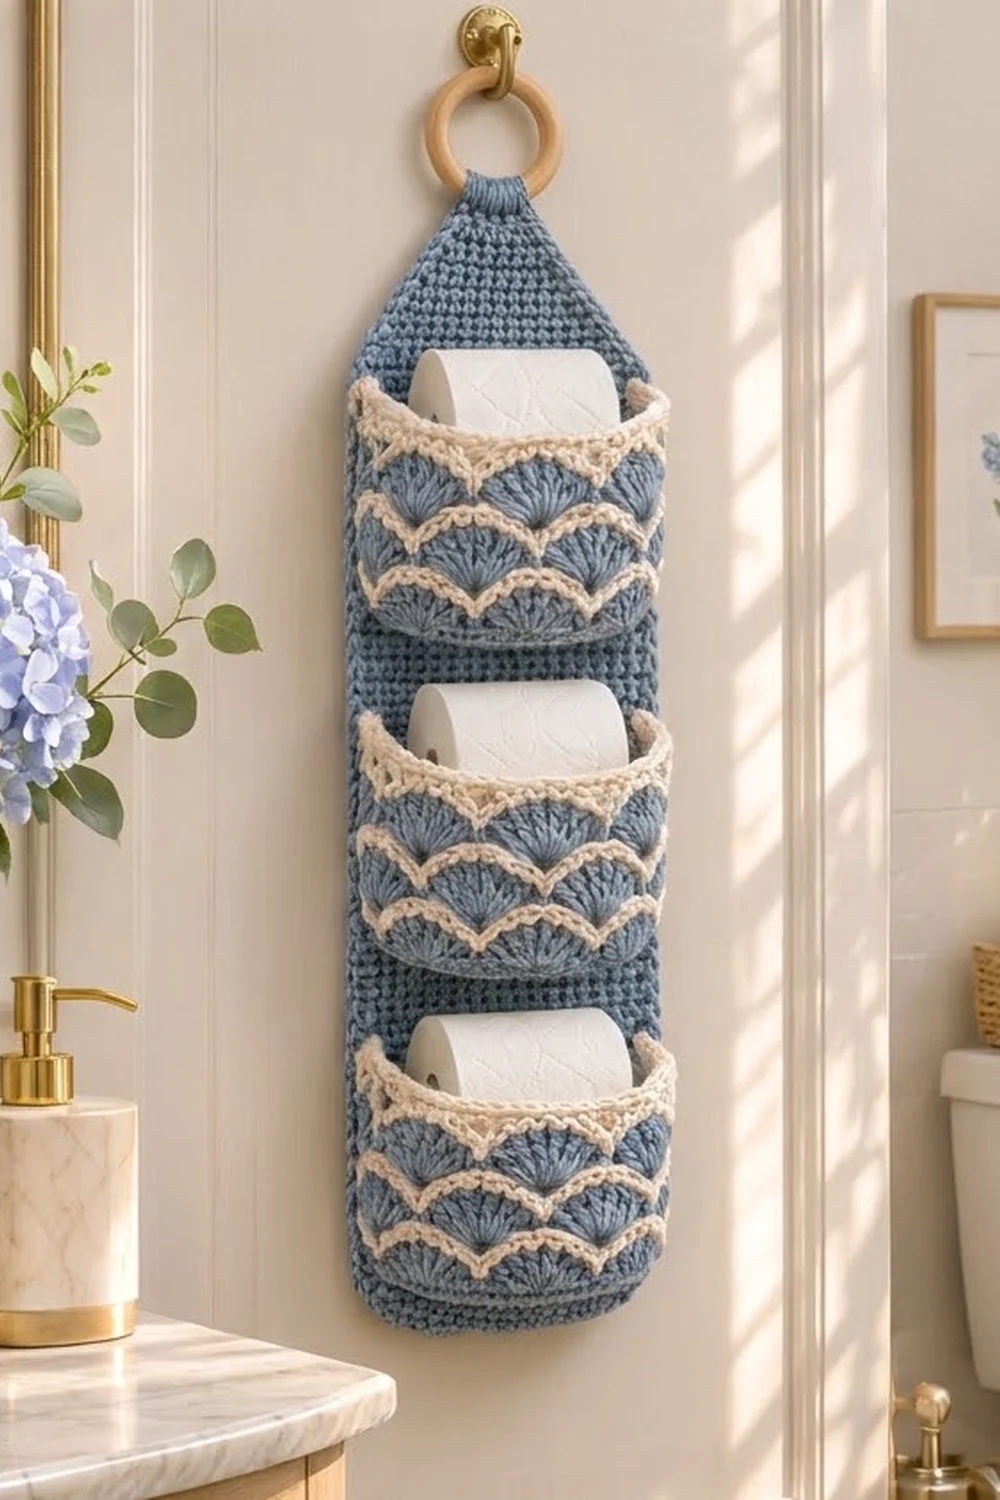
This hanging toilet paper holder keeps three spare rolls tidy on a door or wall. A solid dusty-blue backing panel tapers at the top into a narrow tab, which wraps around a wooden ring. Three oval-based pockets are sewn down the front. Each one is covered in blue fan shells outlined by creamy scalloped lines.
The holder uses two colors, muted denim blue and warm cream. Blue is used for the panel, the pocket bases, and the shells. Cream traces the arches between the rows of shells and forms a rolled rim on each pocket. The look is coastal and calm.
This pattern uses US crochet terms. The finished holder measures 6.5 in (16.5 cm) wide and about 21.5 in (54.6 cm) long, including the ring. Each pocket is about 6.25 in (15.9 cm) wide and 3.75 in (9.5 cm) tall. Each one sticks out about 2.25 in (5.7 cm) from the panel.
First you make one flat panel in single crochet rows, shaping the taper and tab at the top. Then you make three identical pockets in joined rounds, each starting with an oval base. Finally you sew on the pockets, add a single crochet border, and fold the tab over the ring.
Finished Size and Construction
- Finished size: 6.5 in x 21.5 in (16.5 cm x 54.6 cm), including the ring
- Skill level: Easy intermediate
- Terminology: US crochet terms
- Yarn weight: Worsted (#4) cotton
- Hook: 5.0 mm (H-8)
- Number of pieces: 4 (1 backing panel, 3 pockets) plus a wooden ring
- Layout: 3 pockets stacked in 1 vertical column
- Panel size before border: 6 in x 21.1 in (15.2 cm x 53.6 cm)
- Pocket size: base 6.25 in x 2.25 in (15.9 cm x 5.7 cm); wall 3.75 in (9.5 cm) tall
- Border depth: 0.25 in (0.6 cm), one round of sc
Materials
Choose a smooth worsted cotton with about 170 m per 100 g (186 yd per 100 g). Cotton holds the pocket shape and won’t sag under the rolls.
- Blue (Color A): 175 g, about 298 m (326 yd)
- Cream (Color B): 50 g, about 85 m (93 yd)
Tools:
– 5.0 mm (H-8) hook
– Wooden ring, 2 in (5.1 cm) outer diameter
– Tapestry needle
– 6 locking stitch markers
– Scissors
– Measuring tape
– Rustproof pins
– Blocking mat or towel
These quantities include a margin of about 15 percent for swatching and weaving in ends.
Abbreviations (US Terms)
- ch – chain
- sl st – slip stitch
- sc – single crochet
- hdc – half double crochet
- dc – double crochet
- sc2tog – single crochet 2 together
- BLO – back loop only
- rev sc – reverse single crochet (crab stitch)
- sk – skip
- st(s) – stitch(es)
- RS / WS – right side / wrong side
Shell: 5 dc in the same stitch.
Reverse sc: Work from left to right (if you are right-handed). Insert the hook in the next st to the right, yarn over, and pull up a loop. Yarn over again and pull through both loops.
Gauge and Checkpoints
Gauge: 16 sc and 18 rows = 4 in (10.2 cm). That is 4 sts and 4.5 rows per inch.
Test one pocket first. It is the shaped piece, so it tells you more than a flat swatch.
- Pocket base after Rnd 5: 6.25 in x 2.25 in (15.9 cm x 5.7 cm), lying flat.
- Pocket wall after Rnd 16: 3.75 in (9.5 cm) from the BLO ridge to the top of the rim.
- Panel after Row 18: 6 in (15.2 cm) wide and 4 in (10.2 cm) tall.
- Panel after Row 72: 16 in (40.6 cm) tall.
If your pieces are too big, go down one hook size. If they are too small, go up one size. Change the hook, not the stitch counts, because the shell pattern needs exactly 60 stitches.
Backing Panel
With Blue, ch 25.
Row 1 (RS): Sc in 2nd ch from hook and in each ch across, turn. (24 sts)
Rows 2–72: Ch 1 (does not count as a st), sc in each st across, turn. (24 sts)
Checkpoint: the panel measures 6 in x 16 in (15.2 cm x 40.6 cm).
Taper
Row 73: Ch 1, sc2tog, sc in each st to last 2 sts, sc2tog, turn. (22 sts)
Rows 74–81: Repeat Row 73. Counts: 20, 18, 16, 14, 12, 10, 8, 6 sts.
The taper is 9 rows, about 2 in (5.1 cm) tall.
Tab
Rows 82–95: Ch 1, sc in each st across, turn. (6 sts)
The tab is about 3.1 in (7.9 cm) long and 1.5 in (3.8 cm) wide. Fasten off. The total panel length is 95 rows, or 21.1 in (53.6 cm).
Pocket (Make 3)
Work in joined rounds with the RS facing you. Do not turn.
Oval Base
With Blue, ch 18.
Rnd 1: Sc in 2nd ch from hook, sc in next 15 ch, 3 sc in last ch. Working along the opposite side of the chain, sc in next 15 ch, 2 sc in last ch (the same ch as the first sc). Join with sl st to first sc. (36 sts)
Mark the center st of the 3-st group at each end. Move the markers up every round.
Rnd 2: Ch 1, sc in each st around, working 2 sc in each of the 3 sts at each end. Join. (42 sts)
Rnd 3: Ch 1, sc around, working sc in next st, 2 sc in next st 3 times at each end. Join. (48 sts)
Rnd 4: Ch 1, sc around, working sc in next 2 sts, 2 sc in next st 3 times at each end. Join. (54 sts)
Rnd 5: Ch 1, sc around, working sc in next 3 sts, 2 sc in next st 3 times at each end. Join. (60 sts)
Checkpoint: the base lies flat and measures 6.25 in x 2.25 in (15.9 cm x 5.7 cm).
Walls
Rnd 6: Ch 1, sc in BLO of each st around. Join. (60 sts) This makes a ridge that turns the wall upward.
Rnd 7: Ch 1, sc in each st around. Join. (60 sts)
Rnd 8 (Blue shells): Ch 1, sc in first st, sk 2, shell in next st, sk 2, sc in next st, sk 2, shell in next st, sk 2 9 times. Join to first sc. Fasten off. (10 shells + 10 sc = 50 dc + 10 sc = 60 sts)
Rnd 9 (Cream outline): Join Cream in first sc of Rnd 8. Ch 1, sc in each st around. Join. Fasten off. (60 sts)
These sc sit low over the sc between shells (the valleys) and high over the shells. This traces a cream arch over every fan.
Rnd 10 (Blue shells, offset): Join Blue in the cream st above the center (3rd) dc of any Rnd 8 shell. Ch 1, sc in same st, sk 2, shell in next st, sk 2, sc in next st, sk 2, shell in next st, sk 2 9 times. Join. Fasten off. (60 sts)
Each new shell now sits above a valley and each sc sits above a shell center. This creates the offset fish-scale pattern.
Rnd 11 (Cream outline): Join Cream in first sc of Rnd 10. Ch 1, sc in each st around. Join. Fasten off. (60 sts)
Rnd 12 (Blue shells, offset): Work as for Rnd 10, joining above the center dc of any Rnd 10 shell. (60 sts)
Rnd 13 (Cream outline): Join Cream in first sc of Rnd 12. Ch 1, sc in each st around. Join. Do not fasten off. (60 sts)
Cream Rim
Rnd 14 (leveling): Ch 3 (counts as dc) in first st, which sits above a valley. Hdc in next st, sc in next 3 sts, hdc in next st, dc in next st, hdc in next st, sc in next 3 sts, hdc in next st 9 times. Join to top of ch-3. (60 sts worked 1 per existing st + 0 added = 60 sts)
The taller stitches fill the valleys so the rim sits level.
Rnd 15: Ch 1, sc in each st around. Join. (60 sts)
Rnd 16: Ch 1, rev sc in each st around. Join. (60 sts) Fasten off and weave in the ends on the inside.
Checkpoint: the wall is 3.75 in (9.5 cm) tall. If it is shorter, add one round of Cream sc before Rnd 14.
Make All Pieces
- Blue only: 1 backing panel
- Blue and Cream: 3 pockets (Blue for Rnds 1–8, 10, and 12; Cream for Rnds 9, 11, and 13–16)
Layout (panel rows, counted from the bottom):
            ( ring )
            [ tab ]          Rows 82-95
           / taper \         Rows 73-81
   |   top margin      |     Rows 68-72
   |   POCKET 3        |     Rows 51-67
   |   gap             |     Rows 44-50
   |   POCKET 2        |     Rows 27-43
   |   gap             |     Rows 20-26
   |   POCKET 1        |     Rows 3-19
   |   bottom margin   |     Rows 1-2
Each pocket covers 17 rows, about 3.75 in (9.5 cm). Each gap is 7 rows, about 1.6 in (4.1 cm). The top margin is 5 rows, about 1.1 in (2.8 cm).
Joining
Sew each pocket on with Blue yarn and a tapestry needle, using whipstitch.
Stitch-to-stitch logic: Flatten a pocket and mark 16 sts centered along the straight back edge of the base. Rnd 6 was worked in back loops only, so these sts have free front loops. Each panel row has 24 sts. The center 16 are sts 5–20, which leaves 4 sts free on each side.
- Base seam: Whipstitch the 16 free front loops to sts 5–20 of the pocket’s base row (Row 3, 27, or 51). Join one loop to one stitch.
- Side seams: From each end of the base seam, whipstitch straight up the column of st 5 and the column of st 20. Catch the pocket wall at every round, for 17 rows.
- Rim seam: Whipstitch the 16 back sts of Rnd 15 to sts 5–20 of the pocket’s top row (Row 19, 43, or 67).
The back seam uses 16 of the pocket’s 60 sts. The other 44 sts bulge forward and hold the roll.
Tension: Keep the stitches snug but not tight. A tight seam puckers the panel and pulls it narrower. After sewing each pocket, check that the panel is still 6 in (15.2 cm) wide.
Size checkpoint: The panel measures 6 in x 21.1 in (15.2 cm x 53.6 cm), and the pockets stick out about 2.25 in (5.7 cm).
Border
Work one round of Blue sc around the panel at the main gauge of 4 sts per inch. Fold the pockets toward the center so you don’t catch them.
The row ends come at 4.5 per inch. So work 1 sc in each row end, but skip every 9th row end (8 sc per 9 rows).
With RS facing, join Blue in the first foundation st at a bottom corner.
Rnd 1:
- Bottom edge: 3 sc in first st (corner), sc in next 22 sts, 3 sc in last st (corner). (28 sts, both corners included)
- Side, Rows 1–72: 64 sc.
- Taper, Rows 73–81: 12 sc (1 sc in each row end, plus 1 extra sc in every 3rd row end).
- Tab, Rows 82–95: 12 sc (skip 2 row ends, spaced evenly).
- Tab top: 3 sc in first st (corner), sc in next 4 sts, 3 sc in last st (corner). (10 sts, both corners included)
- Second side: 12 sc down the tab, 12 sc down the taper, and 64 sc down Rows 72–1.
Join to first sc. Fasten off. Total: 28 + 64 + 12 + 12 + 10 + 12 + 12 + 64 = 214 sts.
Why the math works: The corner stitches are counted only in the bottom edge and the tab top, so they are never counted twice in the sides. The 16 in (40.6 cm) side gets 64 sts, exactly 4 per inch. The taper’s diagonal edge is about 3 in (7.6 cm), so 12 sts match it. The tab’s 3.1 in (7.9 cm) edge gets 12 sts. Every edge matches the gauge, so nothing ruffles or pulls in. The bordered panel measures 6.5 in x 21.6 in (16.5 cm x 54.9 cm).
Attach the ring: Slip the tab through the ring from front to back. Fold the top 1.5 in (3.8 cm) to the WS. Whipstitch the top edge of the tab across the 6 sts of Row 83. The panel below the fold is about 20.1 in (51.1 cm) long.
Final Blocking
- Soak the holder in cool water and squeeze gently. Do not wring it.
- Roll it in a towel to remove the extra water.
- Pin the panel flat at 6.5 in (16.5 cm) wide, keeping the sides straight.
- Put a toilet roll wrapped in a plastic bag into each pocket so the walls dry rounded.
- Use your fingers to ease the cream rims level.
- Let it dry completely, which takes about 24 hours.
Final Quality-Control Checklist
- The panel is 6.5 in (16.5 cm) wide with straight sides
- Every pocket wall round has 60 sts
- Each pocket has 3 offset rows of blue shells and a level cream rim
- The pockets sit on Rows 3–19, 27–43, and 51–67, centered on sts 5–20
- The border has 214 sts and lies flat
- The ring is secure and the tab seam is hidden on the WS
- All ends are woven in
Troubleshooting
- Base cups upward: Your tension is too tight. Check that you have 60 sts after Rnd 5 and crochet more loosely.
- Base ruffles: Your hook is too large. Go down one size.
- Shells stack instead of offsetting: Start each blue round above a shell center, not a valley.
- Rim is wavy: Rnd 14 was worked as plain sc. Use the dc and hdc stitches to fill the valleys.
- Border ruffles: You missed the row-end skips. Use 8 sc per 9 rows.
- Roll won’t fit: The back seam used more than 16 sts. Unpick it and sew it again.
Care
Hand wash in cool water and lay flat to dry. While the holder is damp, reshape each pocket around a roll.
Final Notes
Here is how the measurements build on each other. A gauge of 4 sts and 4.5 rows per inch gives a 6 in x 21.1 in (15.2 cm x 53.6 cm) panel. Each pocket base reaches 6.25 in x 2.25 in (15.9 cm x 5.7 cm) at 60 sts, and that count stays the same in every round of shells. The 16-st back seam leaves 44 sts at the front to hold the roll. The 214-st border brings the panel to 6.5 in x 21.6 in (16.5 cm x 54.9 cm). With the tab folded over the ring, the finished holder is about 21.5 in (54.6 cm) long.
Happy crocheting!