

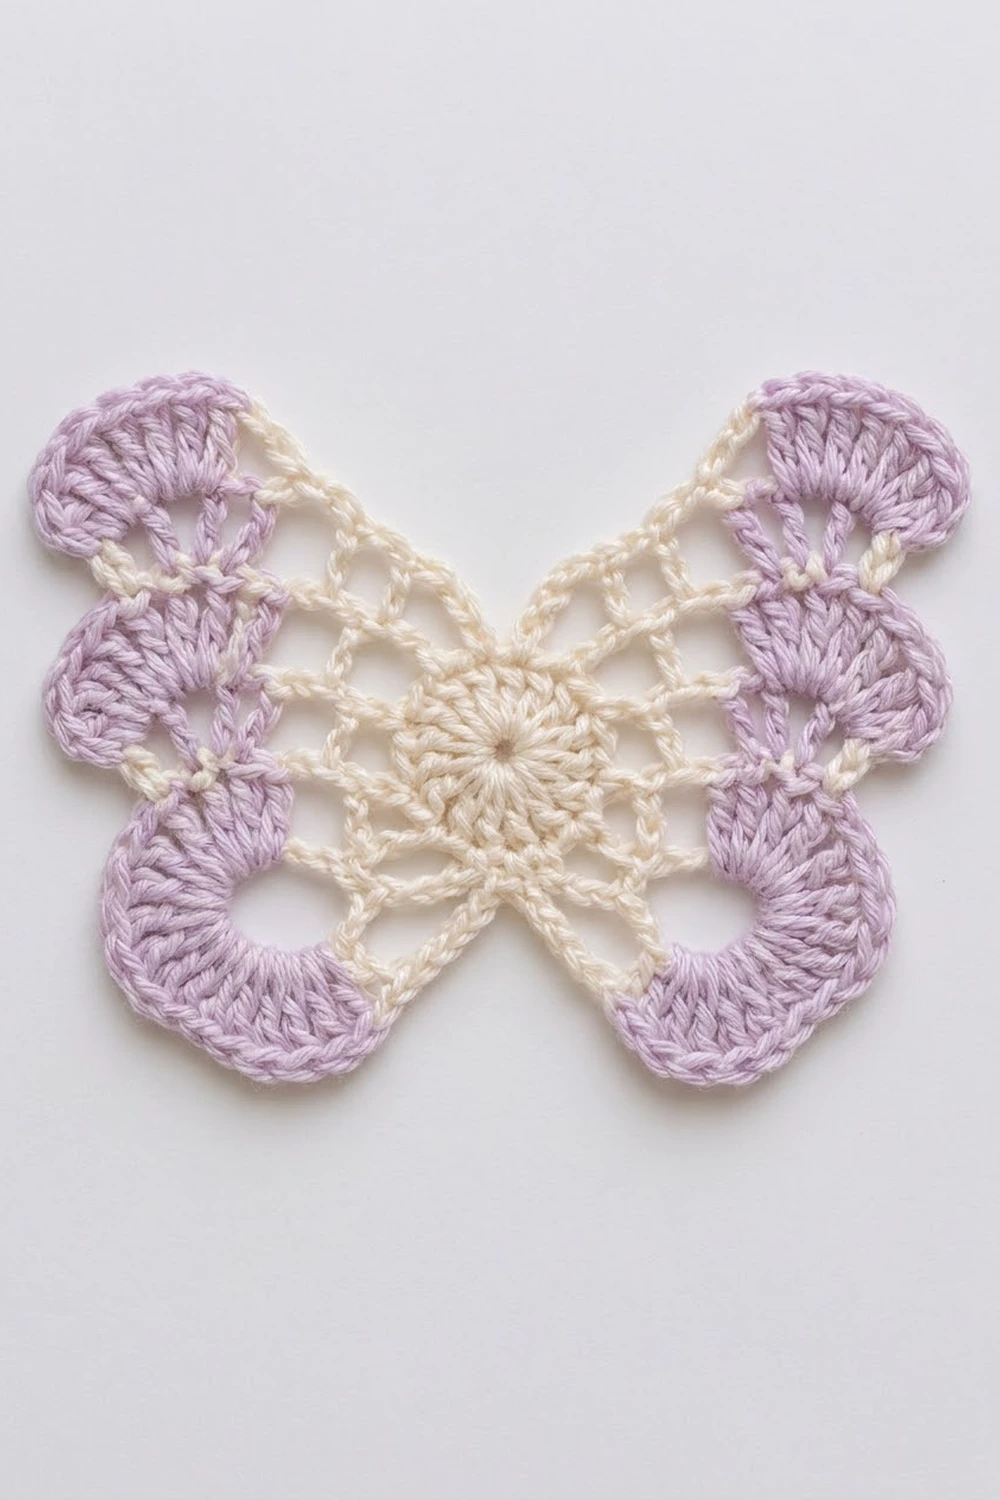
This butterfly motif is light and airy. A small cream rosette forms the body. An open cream mesh fans out from it into two wings, and each wing ends in three lavender shell fans with a neat scalloped rim.
The two colors are soft cream and pale lilac. The cream mesh makes the motif look like lace, and the lavender fans frame the outer edges like painted wing tips. The style is delicate and vintage, but the construction is simple and repetitive.
This pattern uses US crochet terms. The finished butterfly measures 6.5 in (16.5 cm) wide and 4.2 in (10.7 cm) tall.
You crochet the motif in one piece. Start with the center ring, then work each wing back and forth in rows straight off the body. Next, add the lavender fan edging to each wing tip. Last, finish the top and bottom edges with a cream loop edging. There is no sewing except weaving in ends.
Finished Size and Construction
- Finished size: 6.5 in (16.5 cm) wide × 4.2 in (10.7 cm) tall
- Skill level: Easy–Intermediate
- Terminology: US crochet terms
- Yarn weight: DK / light worsted (#3), cotton
- Hook: 3.5 mm (E-4)
- Number of pieces: 1
- Layout: One butterfly, worked from the center outward
- Piece size: 6.5 in × 4.2 in (16.5 cm × 10.7 cm)
- Size before border: 5 in × 3.6 in (12.7 cm × 9.1 cm), cream mesh only
- Border depth: 0.75 in (1.9 cm) of lavender fans at each wing tip; 0.3 in (0.8 cm) of cream loop edging along the top and bottom
Materials
Use a smooth mercerized or combed cotton in DK weight. Cotton holds the fan shapes crisply and blocks flat. Avoid fuzzy or very stretchy yarns, because they blur the mesh.
- Cream (Color A): 8 g, about 18 m (19.7 yd)
- Lavender (Color B): 5 g, about 12 m (13.1 yd)
Tools:
– 3.5 mm (E-4) crochet hook
– Tapestry needle
– Scissors
– Stitch marker (1)
– Ruler or tape measure
– Blocking mat and rust-proof pins
– Spray bottle with water
The yarn amounts include a margin of roughly 50% for swatching, re-working, and weaving in ends.
Abbreviations (US Terms)
- ch – chain
- sl st – slip stitch
- sc – single crochet
- dc – double crochet
- sc2tog – single crochet 2 together
- sp – space
- sk – skip
- tch – turning chain
- RS / WS – right side / wrong side
Special stitch – Fan: Work 9 dc into the same ch-2 space.
Mesh unit: 1 dc plus ch 2. Each ch-2 space counts as one mesh space.
Gauge and Checkpoints
Mesh gauge: 5 mesh spaces × 5 rows = 2 in (5.1 cm) square. One space is 0.4 in (1.0 cm) wide, and one row is 0.4 in (1.0 cm) tall.
Since this is a single motif, the motif works as your gauge test. Measure at each checkpoint below before moving on.
- After the body: 1 in (2.5 cm) across.
- After Wing Row 1: the row is 1.2 in (3.0 cm) long.
- After Wing Row 3: the wing is 1.2 in (3.0 cm) deep from the body and 2.8 in (7.1 cm) tall at its outer edge.
- After Wing Row 5: the wing is 2 in (5.1 cm) deep and 3.6 in (9.1 cm) tall at its outer edge.
- Both wings done: 5 in (12.7 cm) from tip to tip.
- Finished: 6.5 in × 4.2 in (16.5 cm × 10.7 cm).
A difference of up to 0.1 in (0.3 cm) at any checkpoint is fine.
Too big? Go down to a 3.25 mm (D-3) hook, and keep your chains snug.
Too small? Go up to a 3.75 mm (F-5) hook, and pull each dc up to its full height.
Body (Cream)
With Color A, ch 6 and sl st to the first ch to form a ring.
Rnd 1: Ch 3 (counts as dc), work 15 dc in the ring, then sl st to the top of the ch-3. (16 dc)
Pull the starting tail to close the center snugly. Fasten off.
Number the stitches before you start the wings. The ch-3 is dc 1, and the rest follow in order around the ring, ending at dc 16. Hold the ring so dc 1 sits at top center. The stitches divide like this:
- Top waist: dc 15, 16, 1, 2 (4 sts)
- Wing A base: dc 3–6 (4 sts)
- Bottom waist: dc 7–10 (4 sts)
- Wing B base: dc 11–14 (4 sts)
Check: 4 + 4 + 4 + 4 = 16. Place a marker in dc 1.
Checkpoint: 1 in (2.5 cm) across.
Wing A (Cream Mesh)
Row 1 (RS): Join Color A in dc 3. Ch 5 (counts as dc + ch 2), then dc in dc 4, ch 2, dc in dc 5, ch 2, dc in dc 6. (4 dc, 3 sp)
Row 2 (increase row): Ch 5 (counts as dc + ch 2) and turn. Work a dc into the same dc the ch-5 rises from; this adds 1 space. Then work (ch 2, dc in next dc) 3 times, putting the last dc in the 3rd ch of the tch. Ch 2 and work a dc in the same ch to add 1 more space. (6 dc, 5 sp)
Row 3: Repeat Row 2. (8 dc, 7 sp)
Row 4: Repeat Row 2. (10 dc, 9 sp)
Row 5 (straight row): Ch 5 (counts as dc + ch 2) and turn. Work a dc in the next dc, then (ch 2, dc in next dc) across, putting the last dc in the 3rd ch of the tch. (10 dc, 9 sp)
Each increase row adds 1 space at each end, so the space counts go 3, 5, 7, 9, 9. Each increase row adds 2 dc, so the dc counts go 4, 6, 8, 10, 10. Because the wing gets taller with each row, its outer edge flares out.
Fasten off Color A.
Checkpoint: 2 in (5.1 cm) deep and 3.6 in (9.1 cm) tall at Row 5.
Wing B (Cream Mesh)
With RS facing, join Color A in dc 11. Work Rows 1–5 exactly as for Wing A over dc 11–14. (10 dc, 9 sp after Row 5)
Fasten off. Because the body is symmetrical, Wing B automatically mirrors Wing A.
Checkpoint: 5 in (12.7 cm) from wing tip to wing tip, and 1 in (2.5 cm) tall at the waist.
Border
The border has two parts:
- Lavender fans across each wing tip
- Cream loop edging along the top and bottom edges
Border gauge: One fan takes up 3 mesh spaces, or 1.2 in (3.0 cm) of the Row 5 edge, and stands 0.75 in (1.9 cm) tall. Along the straight edges, 2 sc per dc row end equals 5 sc per inch (2.5 cm).
Lavender Fans (worked on each wing)
Row 6: With RS facing, join Color B in the first ch-2 sp of Row 5. Then:
- Sc in that sp, Fan (9 dc) in the next sp, sc in the next sp.
- Sc in the next sp, Fan in the next sp, sc in the next sp.
- Sc in the next sp, Fan in the next sp, sc in the last sp.
(3 fans; 33 sts: 27 dc + 6 sc)
Row 7 (rim): Ch 1 and turn. Work each fan like this:
- Sc in the first sc.
- Sc in the next dc.
- (2 sc in the next dc, sc in the next dc) 4 times.
- Sc in the next sc.
That gives 15 sc per fan. Repeat for all 3 fans. (45 sc)
Fasten off. Repeat Rows 6–7 on the second wing.
Why the math works: Row 5 has 9 spaces, and each fan unit (sc, Fan, sc) uses exactly 3 spaces. 3 × 3 = 9, so the fans fill the edge with nothing left over. Where two fans meet, their sc stitches sit side by side and pull in, which makes the notch between fans. In Row 7, the 9 dc of a fan become 13 sc (1 + 4 × 3), plus 1 sc at each end, for 15 per fan. The 4 increases let the rim curve without cupping.
Cream Loop Edging (top and bottom, worked separately)
Top Edge, Row 1: Turn the butterfly so dc 1 is at the top. With RS facing, join Color A in the Row 7 corner sc of the right-hand wing. Work toward the body:
| Section | Stitches | Count |
|---|---|---|
| Row 7 end, then Row 6 end | 1 sc in each | 2 sc |
| Mesh rows 5 → 1 | 2 sc around each dc row end | 10 sc |
| Top waist (dc 2, then dc 1 + dc 16, then dc 15) | sc in dc 2, sc2tog over dc 1 and dc 16, sc in dc 15 | 3 sts |
| Left wing, mesh rows 1 → 5 | 2 sc around each dc row end | 10 sc |
| Row 6 end, then Row 7 end | 1 sc in each | 2 sc |
Total: 27 sts.
Top Edge, Row 2: Ch 1 and turn. Sc in the first sc, then (ch 3, sk 1, sc in next sc) 13 times. (14 sc, 13 ch-3 loops) Fasten off.
Bottom Edge: Work the same two rows along the bottom edge. Over the bottom waist, sc in dc 10, sc2tog over dc 9 and dc 8, and sc in dc 7. (27 sts in Row 1; 14 sc and 13 loops in Row 2)
Why the math works: Each loop repeat uses 2 stitches, and the row needs 1 extra sc to start. So the row must have an odd number of stitches: 1 + 13 × 2 = 27. Without the sc2tog, the waist would give 4 stitches and the row would total 28, which doesn’t fit the repeat. The sc2tog fixes the count and also pulls in the waist, which sharpens the butterfly shape.
Checkpoint: 6.5 in × 4.2 in (16.5 cm × 10.7 cm).
Final Blocking
- Weave in all ends along stitches of the same color.
- Soak the motif briefly in cool water, then press out the water in a towel without wringing.
- Lay it RS up on the blocking mat.
- Pin the body at center, then pin the waist to 1.6 in (4.1 cm) tall.
- Pin each wing tip so the full width is 6.5 in (16.5 cm).
- Pin the center of each fan so the scallops open evenly. Pin the notches between fans inward.
- Pin each ch-3 loop on the top and bottom edges so the height is 4.2 in (10.7 cm).
- Open the mesh squares gently with your fingertips.
- Let it dry completely before removing the pins.
Final Quality-Control Checklist
- Body has 16 dc, and the center hole is closed.
- Each wing has 9 spaces in Row 5.
- Each wing has 3 fans with 9 dc each.
- Each Row 7 rim has 45 sc.
- Top and bottom edging rows each have 27 sts, then 13 loops.
- Both wings are the same height and depth.
- Width is 6.5 in (16.5 cm) and height is 4.2 in (10.7 cm).
- No ends show on the RS.
Troubleshooting
Mesh looks crooked: Check that every ch-5 counts as a dc + ch 2, and that the last dc of each row goes into the 3rd ch of the tch.
Wing ruffles: You probably added an extra increase. Row 5 must be a straight row.
Fans cup: Loosen your dc, or work the Row 7 rim more loosely.
Fans flare too much: Use 8 dc per fan, and change the Row 7 repeat to (2 sc, sc) 3 times plus 2 sc.
Edging puckers: Work the 2 sc per row end more loosely, or go up one hook size for the edging only.
Wings differ in size: Re-count the spaces in each row; one row is usually short by a space.
Care
Hand wash in cool water with mild soap, press out the water, and dry flat, re-pinning if needed. A cool iron through a pressing cloth will freshen the fans.
Final Notes
The measurements build on each other as you go:
- The body is 1 in (2.5 cm) across.
- Each wing adds 2 in (5.1 cm), for 5 in × 3.6 in (12.7 cm × 9.1 cm) before the border.
- The fans add 0.75 in (1.9 cm) at each tip, for a width of 6.5 in (16.5 cm).
- The cream edging adds 0.3 in (0.8 cm) at the top and bottom, for a height of 4.2 in (10.7 cm).
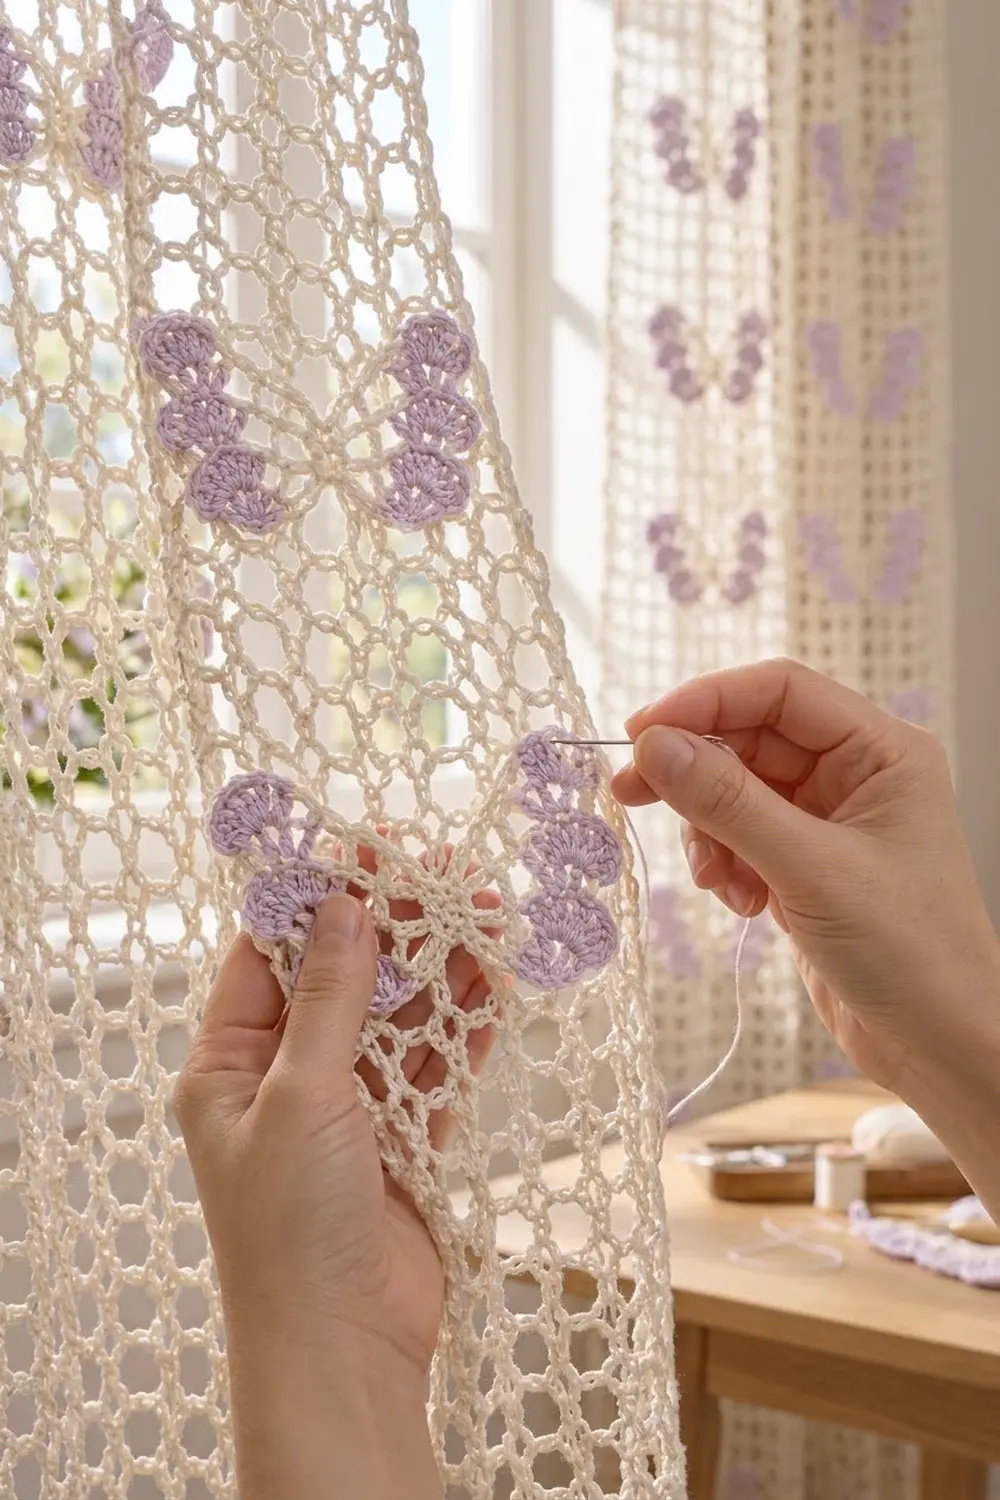
If the gauge is right at each checkpoint, the finished butterfly will match. Use it as an appliqué, a gift-tag accent, or a light decoration on sheer fabric.
Happy crocheting!