

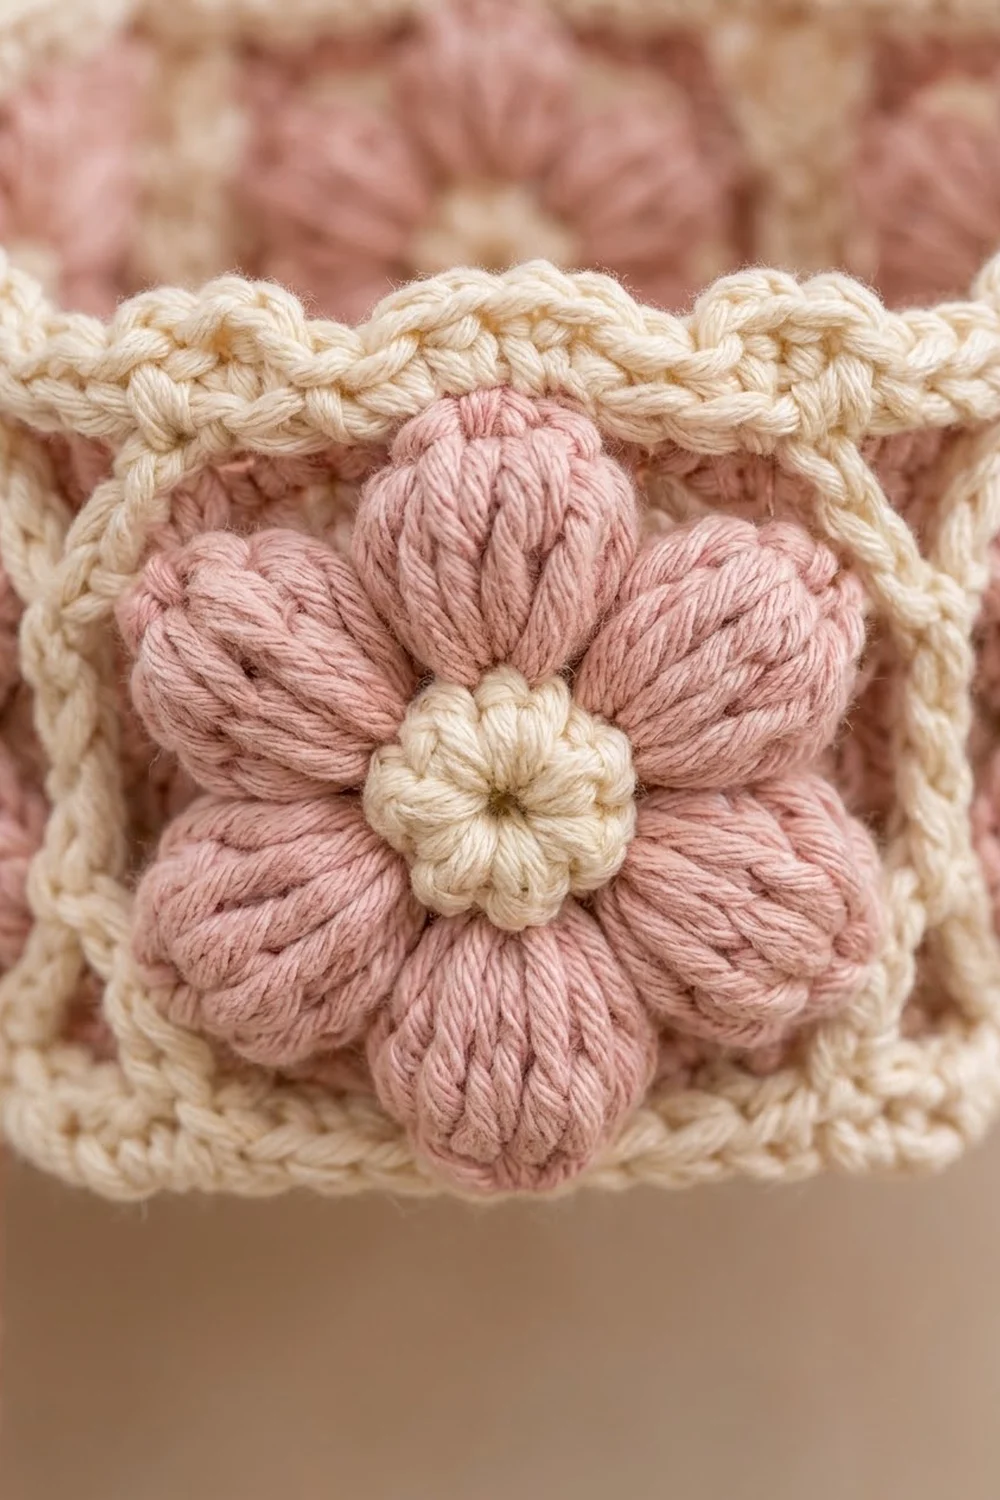
This hanging toilet paper holder has three six-sided baskets stacked on two straps, with one spare roll in each basket. Every basket wall has six squares. Each square has a dusty-pink puff flower with a cream center inside a cream frame, and raised cream seams outline every square.
The colors are soft: dusty pink for the petals and straps, and cream for the centers, frames, bases, seams and rims. It has a cottage look that suits a pale bathroom with brass or wood fittings.
This pattern uses US crochet terms. Each basket is 6 in (15.2 cm) across the flat sides and 4.25 in (10.8 cm) tall. The hanging section is 22 in (55.9 cm) long, measured from the bar down to the bottom fold.
You build it in modules. Make 18 flower squares and 3 hexagon bases. Join six squares into a ring, then close the bottom with a base. Add a three-round rim. Sew the baskets onto two pink straps that fold over a towel bar.
Finished Size and Construction
- Finished basket: 6 in (15.2 cm) across the flat sides, 7 in (17.8 cm) point to point, 4.25 in (10.8 cm) tall
- Hanging length: 22 in (55.9 cm) below the bar
- Skill level: Intermediate
- Terminology: US
- Yarn weight: Worsted (#4) cotton or cotton blend
- Hook: 5.0 mm (H-8)
- Number of pieces: 23 (18 squares, 3 bases, 2 straps)
- Layout: 3 baskets stacked vertically. Each basket is a ring of 6 squares on a hexagon base.
- Square size: 3.5 in (8.9 cm)
- Basket height before border: 3.5 in (8.9 cm)
- Border depth: 0.75 in (1.9 cm)
Materials
Use a smooth worsted cotton or cotton blend. Cotton keeps the puff petals crisp, holds the basket shape and can be washed. A yarn of about 200 m per 100 g matches the gauge below.
- Color A, dusty pink (petals, straps): 150 g, about 300 m
- Color B, cream (centers, frames, bases, seams, rims): 175 g, about 350 m
These quantities include a margin of about 15 percent for a test square and swatching.
Tools:
- 5.0 mm (H-8) crochet hook
- Tapestry needle
- 6 stitch markers
- Scissors and measuring tape
- Blocking mat, rust-proof pins, spray bottle
- Towel bar or rod about 1 in (2.5 cm) in diameter
Abbreviations (US Terms)
- ch – chain
- sl st – slip stitch
- sc – single crochet
- hdc – half double crochet
- dc – double crochet
- sp – space
- st(s) – stitch(es)
- MR – magic ring
- RS / WS – right side / wrong side
- rev sc – reverse single crochet: work sc from left to right (if you are right-handed), going into the next st to the right
Special stitch – Puff: (Yarn over, insert hook, yarn over and pull up a loop to 0.5 in / 1.3 cm) 4 times, so you have 9 loops on the hook. Yarn over, pull through all 9 loops, then ch 1 to lock it.
Gauge and Checkpoints
Gauge: 14 sc and 16 rounds = 4 in (10.2 cm).
Make one square and one base before anything else, and check them at each stage:
- Square after Round 2: 2.5 in (6.4 cm) across the puff tips
- Square after Round 3: 3 in (7.6 cm) square
- Square after Round 4: 3.5 in (8.9 cm) square
- Base after Round 4: 2 in (5.1 cm) across the flat sides
- Base after Round 8: 4 in (10.2 cm) across the flat sides
- Base after Round 12: 6 in (15.2 cm) across the flat sides, with each side 3.5 in (8.9 cm) long
If a piece comes out too big, go down 0.5 mm in hook size. If it comes out too small, go up 0.5 mm. The joins are made stitch to stitch, so each base side must match one square edge.
Flower Square (Make 18)
Round 1 (Color B): MR, ch 1, 8 sc in ring, sl st to first sc. Pull the ring closed and fasten off. (8 sts)
Round 2 (Color A): Join A in any sc. Ch 2, Puff in same st, ch 3. Puff in next st, ch 3; repeat from * 6 more times. Sl st to top of first Puff and fasten off. (8 Puffs, 8 ch-3 sps)*
Checkpoint: 2.5 in (6.4 cm) across. The petals should lie flat.
Round 3 (Color B): Join B in any ch-3 sp. Ch 3 (counts as dc), then work (2 dc, ch 2, 3 dc) in the same sp for the first corner. 3 hdc in next ch-3 sp. (3 dc, ch 2, 3 dc) in next ch-3 sp, 3 hdc in next ch-3 sp; repeat from * 2 more times. Sl st to top of beg ch-3.
(36 sts: 24 dc + 12 hdc, plus 4 corner ch-2 sps; 9 sts per side between corners)*
This round turns the circle into a square. The tall dc groups make the corners, and the shorter hdc groups keep the sides flat.
Round 4 (Color B, trim round): Sl st in next 2 dc and into the corner ch-2 sp. Ch 1, (sc, ch 2, sc) in same sp. Sc in each of next 9 sts, (sc, ch 2, sc) in next ch-2 sp; repeat from * 2 more times. Sc in last 9 sts, sl st to first sc. Fasten off and weave in the ends.
(36 sts worked 1-per-stitch + 8 corner sc = 44 sc, plus 4 corner ch-2 sps)*
Per side: 11 sc between the corner ch-2 sps (1 corner sc + 9 + 1 corner sc).
Checkpoint: 3.5 in (8.9 cm) square.
Hexagon Base (Make 3)
Work the whole base in Color B, in continuous rounds. Mark the last st of each round. Each round adds 6 sts, and stacking the increases in the same places forms the six straight sides.
Round 1: MR, 6 sc in ring. (6 sts, 1 per side)
Round 2: 2 sc in each st. (12 sts, 2 per side)
Round 3: Sc in next st, 2 sc in next st; repeat from * 5 more times. (18 sts, 3 per side)*
Rounds 4–12: *Sc in next (round number minus 2) sts, 2 sc in next st; repeat from * 5 more times.
- Round 4: (24 sts, 4 per side)
- Round 5: (30 sts, 5 per side)
- Round 6: (36 sts, 6 per side)
- Round 7: (42 sts, 7 per side)
- Round 8: (48 sts, 8 per side)
- Round 9: (54 sts, 9 per side)
- Round 10: (60 sts, 10 per side)
- Round 11: (66 sts, 11 per side)
- Round 12: (72 sts, 12 per side)
Sl st in next st and fasten off. Place a marker in the second sc of each Round 12 corner increase, for 6 markers in total. The markers are 12 sts apart.
Checkpoint: 6 in (15.2 cm) across the flat sides, with 3.5 in (8.9 cm) per side.
Make All Pieces
- Flower squares: 18. Each uses Color A for Round 2 and Color B for Rounds 1, 3 and 4.
- Hexagon bases: 3, Color B
- Straps: 2, Color A
Basket layout (seen from above):
        [S1]
   [S6]      [S2]
       (BASE)
   [S5]      [S3]
        [S4]
Tier layout (hanging):
   ||====== BAR ======||
  strap   Basket 1   strap
  strap   Basket 2   strap
  strap   Basket 3   strap
Joining
Squares into a Ring
Use Color B. Hold the squares WS together and sc through both layers, so the seam ridge forms on the RS.
- Hold S1 and S2 WS together with their edges lined up.
- Join B through both corner ch-2 sps. Ch 1, sc through both corner sps.
- Sc through both layers in each of the next 11 sc, then sc through both of the next corner ch-2 sps. (13 sc per seam)
- Fasten off. Add S3, S4, S5 and S6 the same way, for 5 seams.
- Join S6 to S1 to close the ring. (6 seams)
Keep your tension close to your normal sc. Tight seams pucker the ring, and loose seams make the walls lean.
Checkpoint: 21 in (53.3 cm) around the bottom edge (6 x 3.5 in / 8.9 cm).
Base Join
Each square’s bottom edge has 11 sc. At each vertical seam, the two touching corner ch-2 sps count as 1 join point. That gives 12 points per square, which matches the base’s 12 sts per side.
- Hold the base and ring WS together, lining up each vertical seam with a marked base st.
- Join B at one seam. Ch 1, sc through both corner sps and the marked st.
- Sc through the next square sc and the next base st, 11 times. Sc through the next corner-sp pair and the next marked st; repeat from * around, leaving out the last corner join (you worked it at the start). Sl st to first sc.
(6 x (1 + 11) = 72 sc)*
Fasten off. The stitches match 1 to 1, so the base stays flat.
Border (Rim)
Border gauge: 12 sts per square (11 sc + 1 combined corner point) over 3.5 in (8.9 cm). This is the same as the sc gauge.
Round 1 (Color B): Join B in the combined corner sps at any seam. Ch 1, sc in the same place. Sc in each of next 11 sc, sc in next combined corner sps; repeat from * around, leaving out the last corner sc. Sl st to first sc.
(72 sc, 12 per square side)*
Round 2: Ch 2 (does not count as a st), hdc in each st around, sl st to first hdc.
(72 hdc, 12 per square side)
Round 3: Ch 1, rev sc in each st around, sl st to first st. Fasten off.
(72 rev sc, 12 per square side)
Why the math works: The basket walls go straight up, so the rim needs the same 72 sts as the ring, over 21 in (53.3 cm). Each square keeps exactly 12 sts in every round. The corner point at each seam is counted once, so the rim has no extra corner sts. The rev sc gives the twisted, wavy edge.
Checkpoint: The rim is 0.75 in (1.9 cm) deep, and the basket is 4.25 in (10.8 cm) tall.
Straps (Make 2)
Color A: Ch 5.
Row 1: Sc in 2nd ch from hook and in each ch across. (4 sc)
Rows 2–104: Ch 1, turn, sc in each st across. (4 sc)
Sl st evenly along both long edges, then fasten off. Each strap is 1.1 in (2.8 cm) wide and 26 in (66.0 cm) long.
Loops: Fold the bottom 1 in (2.5 cm) under and whipstitch it in place. Fold the top 3 in (7.6 cm) over the bar and whipstitch it closed. If the bar can’t be removed, do this with the strap already on the bar. This leaves 22 in (55.9 cm) of hanging length.
Assembly
- Lay the straps 7 in (17.8 cm) apart, which is the point-to-point width of a basket.
- Set Basket 3 just above the bottom folds. Center one strap over the S6/S1 seam and the other over the S3/S4 seam.
- With Color A, whipstitch each strap to its seam ridge from the base up to Rim Round 1.
- Leave a 1.5 in (3.8 cm) gap, then attach Basket 2. Leave another 1.5 in (3.8 cm) gap, then attach Basket 1.
- The baskets and gaps take up 15.75 in (40.0 cm), which leaves 6.25 in (15.9 cm) of strap between the top basket and the bar.
Final Blocking
- Weave in all the remaining ends.
- Mist each basket until it is damp but not wet.
- Put a toilet roll inside each basket as a form.
- Pin the rim level, 4.25 in (10.8 cm) above the base.
- Shape each puff petal with your fingers.
- Pin the straps flat at 1.1 in (2.8 cm) wide and mist them.
- Let everything dry completely before you hang it.
Final Quality-Control Checklist
- 18 squares, each 3.5 in (8.9 cm) with 44 sc
- 3 bases, each 72 sts with 12 sts per side
- 6 seams of 13 sc per basket, ridges on the RS
- 72 sts in the base join and in every rim round
- Baskets 6 in (15.2 cm) across and 4.25 in (10.8 cm) tall
- Baskets spaced 1.5 in (3.8 cm) apart and hanging level
- No ends showing on the RS
Troubleshooting
- Square cups: Pull the puff loops up to only 0.5 in (1.3 cm), or work ch 4 between the puffs instead of ch 3.
- Square ruffles: Check that the side groups are hdc, not dc, or use a smaller hook for Round 3.
- Base curls up: Count 12 sts per side, and go up 0.5 mm in hook size.
- Base ripples: Recount to 72 sts and rip back to the round where the count went wrong.
- Rim flares: Go down 0.5 mm in hook size for the hdc round.
- Basket tilts: Measure both straps from the bottom fold and re-sew the higher side.
Care
Hand wash in cool water with mild soap. Press out the water with a towel and dry each basket over a roll so it keeps its shape.

Final Notes
The measurements build on each other. Gauge is 14 sc to 4 in (10.2 cm). A square is 3.5 in (8.9 cm) with 11 sc per side, and the base has 12 sts per side. Six squares make a 72-st ring 21 in (53.3 cm) around. The 72-st rim brings each basket to 4.25 in (10.8 cm) tall. Three baskets on 26 in (66.0 cm) straps hang 22 in (55.9 cm) below the bar. If your first square and base match their checkpoints, the rest of the measurements will come out right.
Happy crocheting!