

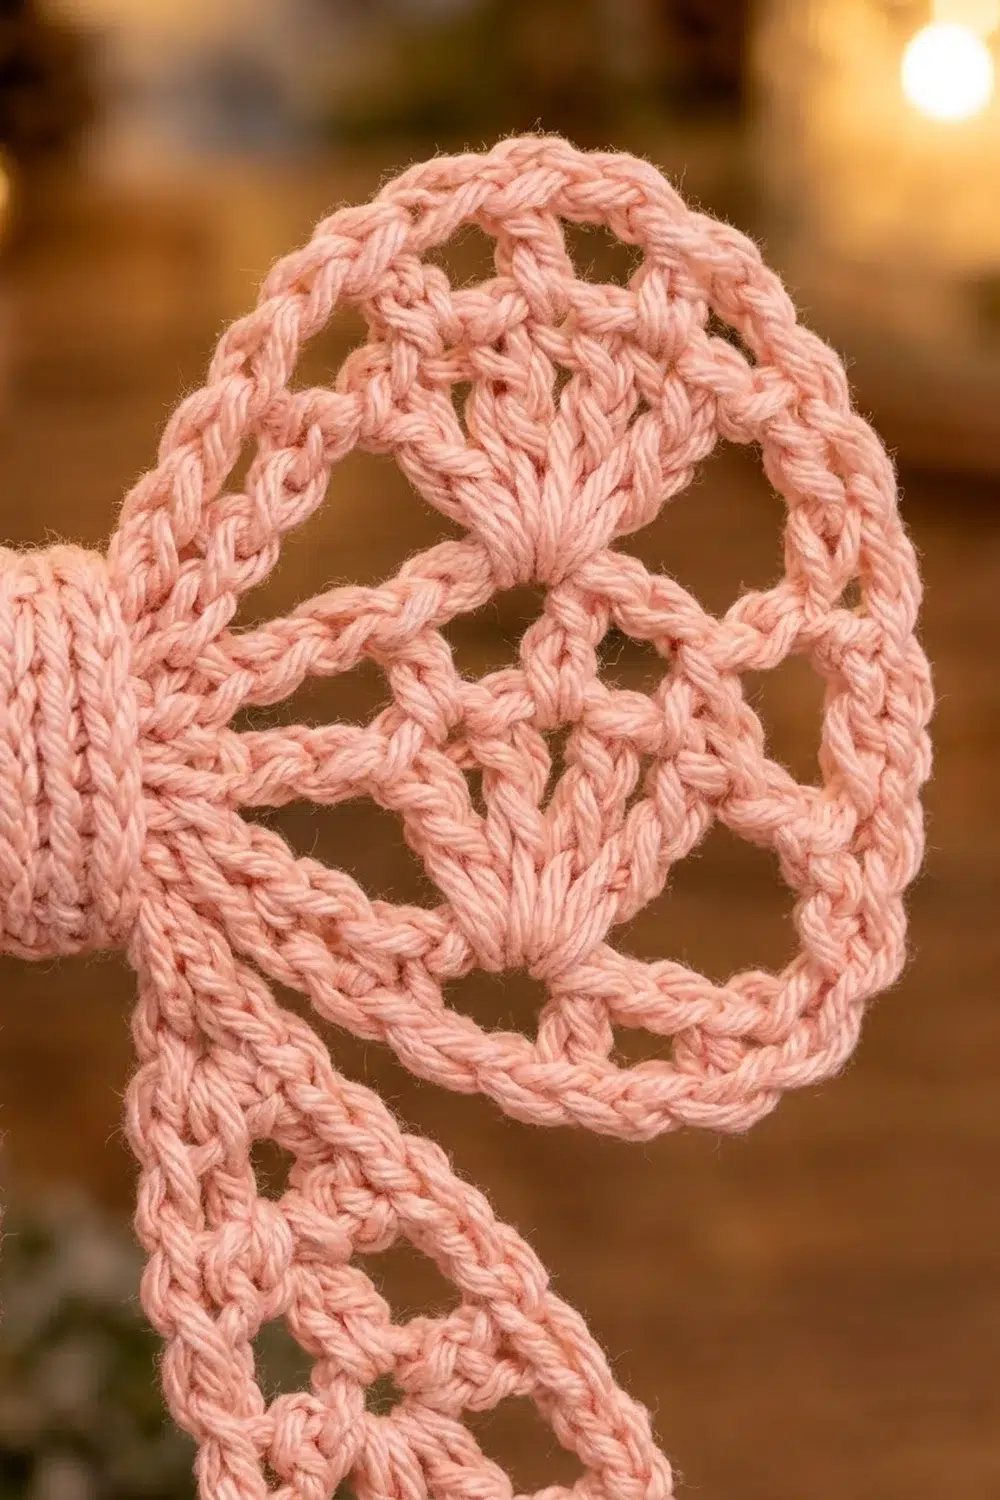
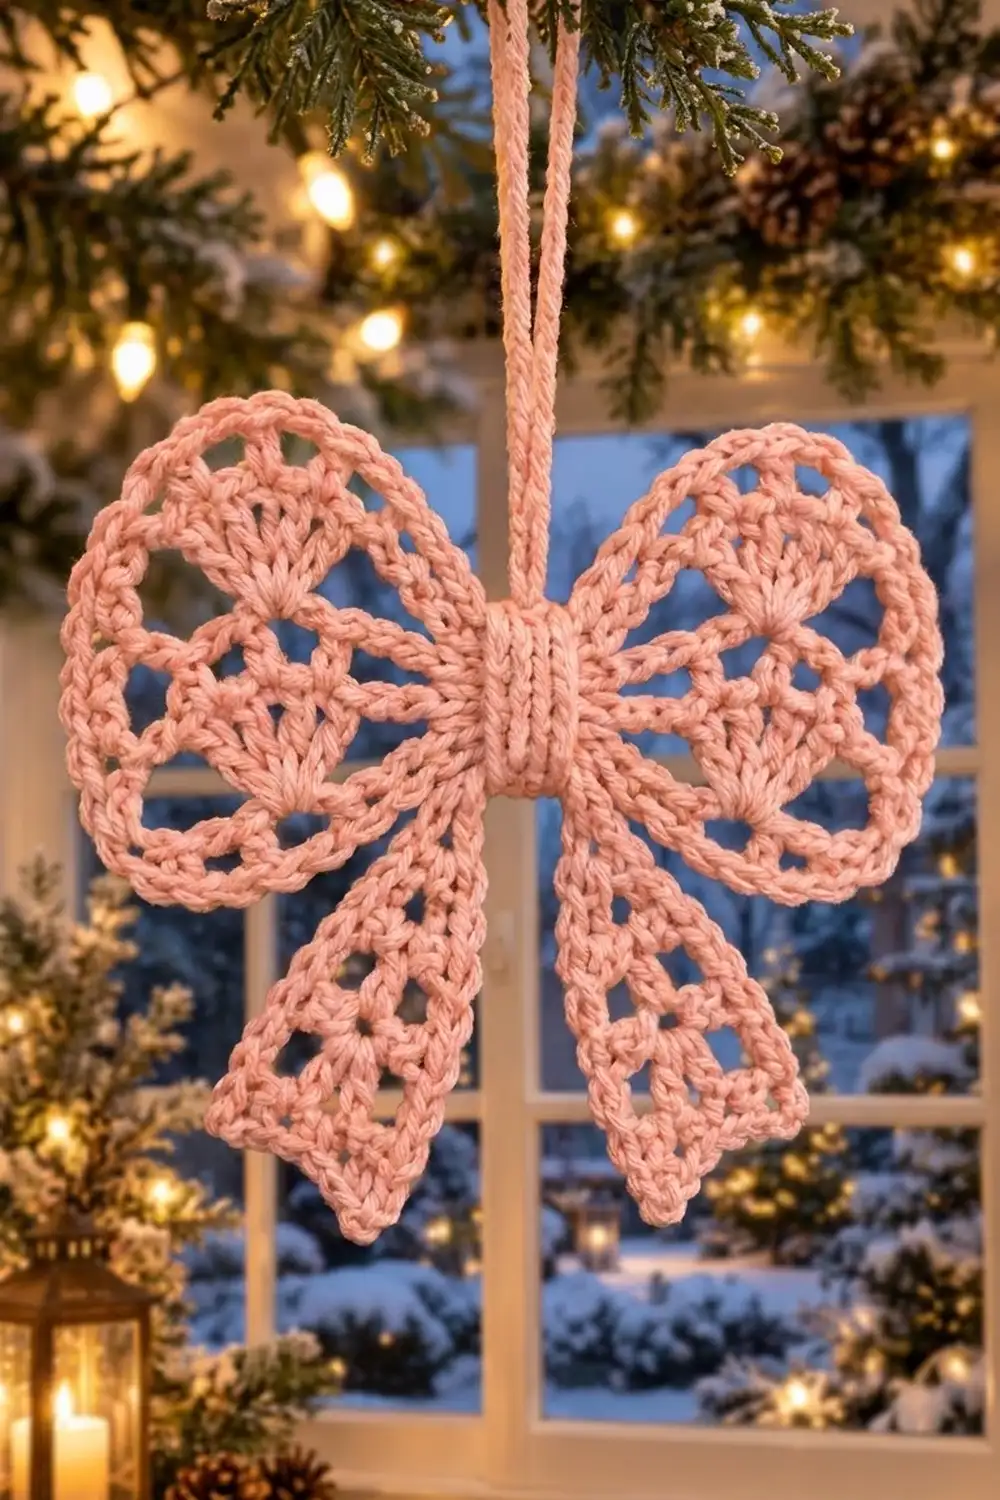
This lace bow ornament is a small, airy holiday piece in a soft blush pink. Two fan-shaped wings sit on either side of a ribbed center band, and two flared lace tails hang below. A slim chain loop on top lets it hang from a tree branch, a window latch, or a gift.
The bow is worked in one color with a light, mercerized cotton. That gives crisp stitch definition, so the dc fans, open chain spaces, and single crochet outline all read clearly. The style is romantic and vintage, but the pattern itself is simple and repetitive.
This pattern uses US crochet terms. The finished bow measures about 3.8 in (9.7 cm) wide and 3.5 in (8.9 cm) tall, not counting the hanging loop.
Construction is short and logical. You work two wings in turned rows that fan out from a magic ring, and two tails in rows that widen from a narrow top. Each piece then gets one round of sc edging. You finish with a small ribbed band that wraps the center, plus a chain hanging loop.
Finished Size and Construction
- Finished size: about 3.8 in (9.7 cm) wide x 3.5 in (8.9 cm) tall, plus a 4 in (10.2 cm) hanging loop
- Skill level: Easy-intermediate
- Terminology: US crochet terms
- Yarn weight: Sport / #2 fine, mercerized cotton
- Hook: 3.0 mm (US C/2 or D/3)
- Number of pieces: 1 finished bow, made of 6 small components (2 wings, 2 tails, 1 center band, 1 hanging loop)
- Layout: Wings left and right, tails angled down, band over the center
- Piece size: each wing 1.9 in (4.8 cm) deep x 2.5 in (6.4 cm) tall; each tail 2.5 in (6.4 cm) long x 1.75 in (4.4 cm) wide at the bottom
- Size before border: wing 1.75 in (4.4 cm) deep x 2.25 in (5.7 cm) tall; tail 2.25 in (5.7 cm) long x 1.5 in (3.8 cm) wide
- Border depth: about 0.15 in (0.4 cm), one round of sc
Materials
Choose a smooth, mercerized cotton in sport weight. Cotton holds the fan shapes after blocking and does not fuzz over the lace holes. Avoid fuzzy or very stretchy yarns, which blur the open spaces.
- Blush pink: 8 g, about 25 m (27 yd)
The quantity includes a margin for your test wing, the sewing tails, and a little frogging. One bow alone usually uses less.
Tools:
– 3.0 mm crochet hook
– Tapestry needle
– Scissors
– Stitch marker
– Rustproof pins and a foam blocking mat
– Spray bottle with water (optional: light spray starch)
– Ruler or tape measure
Abbreviations (US Terms)
- ch – chain
- sl st – slip stitch
- sc – single crochet
- dc – double crochet
- blo – back loop only
- sp(s) – space(s)
- lp(s) – loop(s)
- tch – turning chain
- st(s) – stitch(es)
- rep – repeat
Special stitches:
– Shell: 7 dc worked into the same stitch or space.
– V-st: (dc, ch 3, dc) in the same stitch.
Ch 3 at the start of a row counts as 1 dc throughout. Ch 1 at the start of a row does not count as a stitch.
Gauge and Checkpoints
Gauge: 24 dc and 10 dc rows = 4 in (10.2 cm). In sc, 24 sts and 26 rows = 4 in (10.2 cm).
Lace is hard to measure as a flat swatch, so test one wing first. It is small and tells you everything you need.
Wing checkpoints (measured from the ring outward):
– After Row 1: about 0.4 in (1.0 cm)
– After Row 2: about 0.8 in (2.0 cm)
– After Row 4: about 1.5 in (3.8 cm)
– After Row 5: 1.75 in (4.4 cm) deep, 2.25 in (5.7 cm) across the outer edge
Tail checkpoints:
– After Row 3: about 1.2 in (3.0 cm) long and 1.1 in (2.8 cm) wide
– After Row 6: 2.25 in (5.7 cm) long and 1.5 in (3.8 cm) wide
If your wing is too big, go down 0.25 mm in hook size. If it is too small or cups, go up 0.25 mm. Tight dc fans make the wing curl into a cup; loose ones make it ruffle.
Wings (Make 2)
Each wing is a wedge-shaped fan worked in turned rows from a magic ring. The ring end becomes the point that tucks under the center band.
Row 1: Make a magic ring. Ch 3 (counts as dc), 4 dc in ring. Pull the ring closed. Turn. (5 dc)
Row 2: Ch 5 (counts as dc + ch 2), dc in next dc, ch 2; rep from * 2 more times, dc in top of tch. Turn. (5 dc, 4 ch-2 sps)*
Row 3: Ch 1, sc in first dc, ch 3, sc in next ch-2 sp, ch 3, sc in next dc; rep from * 3 more times, working the last sc into the 3rd ch of the tch. Turn. (9 sc, 8 ch-3 lps)*
Number the sc 1 to 9 for the next row.
Row 4: Ch 3 (counts as dc), skip next ch-3 lp, sc 2, and next ch-3 lp; Shell in sc 3; skip next lp, sc 4, and next lp; sc in sc 5; skip next lp, sc 6, and next lp; Shell in sc 7; skip next lp, sc 8, and next lp; dc in sc 9. Turn. (2 Shells, 1 sc, 2 dc = 17 sts)
This row creates the two outer fans. Together with the Row 1 fan, each wing shows three radiating fans.
Row 5: Ch 1, sc in first dc, ch 3, sc in 3rd dc of next Shell, ch 3, sc in 5th dc of same Shell, ch 3, sc in next st; rep from * once more, working the final sc into the top of the tch. (7 sc, 6 ch-3 lps)*
Do not fasten off. Continue straight into the edging round in the Border section.
Tails (Make 2)
Each tail is worked in turned rows from the narrow top down to a soft point.
Row 1: Ch 6. Dc in 4th ch from hook and in each of next 2 ch. Turn. (4 dc)
Row 2: Ch 3, dc in first st, ch 2, skip next 2 dc, 2 dc in top of tch. Turn. (4 dc, 1 ch-2 sp)
Row 3: Ch 3, dc in first st, skip next dc, 5 dc in ch-2 sp, skip next dc, 2 dc in top of tch. Turn. (9 dc)
The center 5 dc form the first small fan.
Row 4: Ch 3, dc in first st, ch 2, skip next 3 dc, V-st in next dc (the center dc of the fan), ch 2, skip next 3 dc, 2 dc in top of tch. Turn. (6 dc, 2 ch-2 sps, 1 ch-3 sp)
Row 5: Ch 3, dc in first st, ch 2, skip next dc, next ch-2 sp, and next dc; Shell in ch-3 sp; ch 2, skip next dc, next ch-2 sp, and next dc; 2 dc in top of tch. Turn. (11 dc, 2 ch-2 sps)
The ch-2 spaces on each side of the Shell are the open lace windows.
Row 6: Ch 1, sc in first st, ch 3, sc in next ch-2 sp, ch 3, sc in 2nd dc of Shell, ch 3, sc in 4th dc of Shell, ch 3, sc in 6th dc of Shell, ch 3, sc in next ch-2 sp, ch 3, sc in top of tch. (7 sc, 6 ch-3 lps)
The 4th sc sits at the center and becomes the tip of the point. Do not fasten off.
Center Band
Row 1: Ch 5. Sc in 2nd ch from hook and in each ch across. Turn. (4 sc)
Rows 2–14: Ch 1, sc blo in each st across. Turn. (4 sc)
Fasten off, leaving a 10 in (25.4 cm) tail for sewing. The band measures 0.7 in (1.8 cm) wide x 2.2 in (5.6 cm) long. The blo rows form ridges that run vertically once the band is wrapped around the bow.
Hanging Loop
Ch 48, about 8 in (20.3 cm). Fasten off, leaving 4 in (10.2 cm) tails at both ends.
Border
The border is one round of sc around each wing and each tail. It firms the lace, defines the silhouette, and gives the corded outline on the finished bow.
Border gauge: 6 sc = 1 in (2.5 cm). Work 2 sc in each ch-3 lp, 1 sc in each sc, 2 sc in each dc row end, 1 sc in each sc row end, and 3 sc at each corner.
Wing Border
Continue from the end of Row 5.
Rnd 1: Ch 1, 3 sc in last sc made (corner).
– Side 1: working down the row ends, 2 sc in Row 4, 1 sc in Row 3, 2 sc in Row 2, 2 sc in Row 1. (7 sc)
– Point: 1 sc around the closed magic ring. (1 sc)
– Side 2: working up, 2 sc in Row 1, 2 sc in Row 2, 1 sc in Row 3, 2 sc in Row 4. (7 sc)
– Corner: 3 sc in first sc of Row 5. (3 sc)
– Arc: 2 sc in next ch-3 lp, sc in next sc; rep from * 4 more times, 2 sc in last ch-3 lp. (17 sc)*
Sl st to first sc. Total: 3 + 7 + 1 + 7 + 3 + 17 = 38 sc. Fasten off and weave in.
Tail Border
Continue from the end of Row 6.
Rnd 1: Ch 1, 3 sc in last sc made (corner).
– Side 1: 2 sc in each row end of Rows 5 through 1. (10 sc)
– Top: working in the opposite side of the foundation ch, 1 sc at the base of each Row 1 st. (4 sc)
– Side 2: 2 sc in each row end of Rows 1 through 5. (10 sc)
– Corner: 3 sc in first sc of Row 6. (3 sc)
– Bottom: 2 sc in next lp, sc in next sc, 2 sc in next lp, sc in next sc, 2 sc in next lp, 3 sc in center sc (point), 2 sc in next lp, sc in next sc, 2 sc in next lp, sc in next sc, 2 sc in last lp. (19 sc)
Sl st to first sc. Total: 3 + 10 + 4 + 10 + 3 + 19 = 49 sc. Fasten off and weave in.
Why the Math Works
Every count follows the stitches beneath it. Each wing’s Row 5 has 6 lps and 7 sc. The 2 end sc become the corners, and the 5 inner sc each get 1 sc, so the arc is (6 x 2) + 5 = 17. On each tail, the 6 lps give 12 sc, and the 5 inner sc give 1 + 1 + 3 + 1 + 1 = 7, so the bottom is 12 + 7 = 19.
A ch-3 lp is about 0.33 in (0.8 cm) wide, which matches 2 sc at 6 sc per inch. A dc row end is about 0.4 in (1.0 cm) tall, and 2 sc keep it flat without ruffling. The 3-sc corners and the 3-sc tail point let the edge turn sharply without pulling.
Assemble the Bow
- Lay the wings point to point, Row 1 fans facing the center, with the points just touching.
- Place both tails behind the center, top edges overlapping, angled outward about 15 degrees.
- Pinch the center so the wings gather to about 0.7 in (1.8 cm) tall where they meet. Tack all four pieces together through the center with 3–4 stitches.
- Wrap the band around the pinched center, ridges running vertically. Sew the short ends together at the back.
- Fold the hanging loop in half. Thread both ends under the band at the back, knot them, and sew the knot to the back of the band.
Size checkpoint: the bow should now measure about 3.8 in (9.7 cm) wide and 3.5 in (8.9 cm) tall.
Final Blocking
- Mist the assembled bow evenly with water, or with light spray starch for a crisper ornament.
- Lay it face up on the blocking mat.
- Pin each wing at both arc corners and at 2 points along the arc, keeping each wing 2.5 in (6.4 cm) tall.
- Pin each tail at its two bottom corners and its point, at 2.5 in (6.4 cm) long.
- Open each lace hole with a pin tip so the chain spaces sit clean and round.
- Check the overall size: 3.8 in (9.7 cm) wide and 3.5 in (8.9 cm) tall.
- Let it dry completely, ideally overnight, before unpinning.
Final Quality-Control Checklist
- Each wing has 38 border sc and three clear fans.
- Each tail has 49 border sc and a centered point.
- Both wings match in size within 0.1 in (0.3 cm).
- Both tails hang at matching angles.
- The band ridges run vertically and its seam is hidden at the back.
- The hanging loop is secure and centered.
- All ends are woven in and invisible from the front.
- The bow lies flat with no cupping or ruffling.
Troubleshooting
Wing cups into a bowl: your Row 4 Shells are tight. Go up a hook size, or block firmly with starch.
Wing edge ruffles: you may have worked 3 sc into the arc lps. Recheck for 2 sc per lp and a 17-sc arc.
Tail curls inward: this is common with cotton. Block it flat with starch and pin all three bottom points.
Tail point is blunt: confirm you worked 3 sc in the center sc of Row 6.
Band slides around: sew through the tacked center of the bow, not just the band seam.
Lace holes close up: you may be skipping the wrong stitches. Recount Row 4 on the wing and Row 5 on the tail.
Care
Hand wash in cool water with mild soap, press out the water in a towel, and reshape to dry flat. Re-starch if you want it crisp again.
Final Notes
Here is the measurement chain to follow. Each wing grows from 0.4 in (1.0 cm) after Row 1 to 1.75 in (4.4 cm) after Row 5. The border brings it to 1.9 in (4.8 cm) deep and 2.5 in (6.4 cm) tall. Each tail reaches 2.25 in (5.7 cm) after Row 6 and 2.5 in (6.4 cm) after its border. The 0.7 in (1.8 cm) band pulls it all together into a 3.8 in (9.7 cm) x 3.5 in (8.9 cm) bow.
Make one wing first and check it against the checkpoints. Then the rest of the bow will come together quickly.
Happy crocheting!