
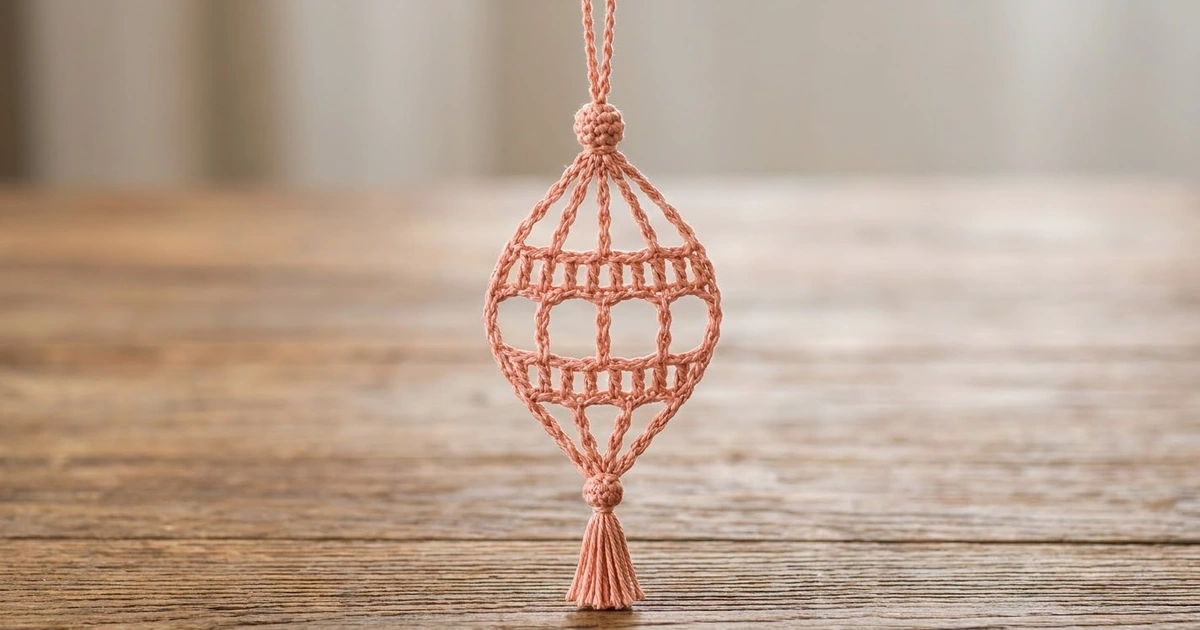
The Blush Lantern is a light, lacy hanging ornament shaped like an old-fashioned glass lantern bauble. It has a pointed onion outline. Two solid bands of double crochet run across the middle, with a row of open windows between them. Twisted chain spokes fan up to a small crocheted bead at the top and down to a matching bead at the bottom. A soft tassel finishes the lower point and a cord loop sits above the top bead.
The sample is worked in a dusty salmon pink cotton. The same pattern also looks lovely in cream, sage green or lavender, and a set of four in mixed colors makes a gentle, vintage-style tree display. Each ornament is made the same way, in one color.
This pattern uses US crochet terms. The finished ornament is about 2.8 in (7.1 cm) wide at its widest point. It is about 5.6 in (14.2 cm) tall from the top of the upper bead to the bottom of the lower bead. With the loop and tassel, it hangs about 8.9 in (22.6 cm) long.
Construction is simple:
- Crochet a small flat body in three rows.
- Add a fan of cord-style chain spokes to each end.
- Frame the sides with two bowed cords.
- Sew on two stuffed beads, then add a loop and a tassel.
Finished Size and Construction
- Finished size: 2.8 in (7.1 cm) wide x 5.6 in (14.2 cm) tall, bead to bead
- Hanging length with loop and tassel: about 8.9 in (22.6 cm)
- Skill level: Easy-intermediate
- Terminology: US crochet terms
- Yarn weight: Sport weight (2) cotton
- Hook: 2.75 mm (US C/2)
- Number of pieces: 1 ornament (one lace body, with 2 small beads and 1 tassel attached)
- Layout: Single vertical ornament; no motifs to join
- Body size (3 rows): 2.4 in (6.1 cm) wide x 1.6 in (4.1 cm) tall
- Size before border (body plus both spoke fans): 2.4 in (6.1 cm) wide x 4.4 in (11.2 cm) tall, hub to hub
- Border depth: Each side bow stands out about 0.2 in (0.5 cm)
Materials
Yarn: Choose a smooth, mercerized sport weight cotton. Cotton holds the open shape well, blocks crisply and shows the twisted texture of the chain cords. Avoid fuzzy or very stretchy yarns, because the spokes will sag and the windows will lose their clean edges.
- Main color (dusty salmon pink): 8 g, about 24 m (26 yd)
- Optional colorways (cream, sage green or lavender): 8 g, about 24 m (26 yd) per ornament
These quantities include a comfortable margin for the gauge check, sewing tails and a full tassel.
Tools:
- 2.75 mm (US C/2) crochet hook
- Tapestry needle
- Small scissors
- Piece of stiff card 2 in (5.1 cm) wide, for the tassel
- A few scraps of matching yarn or fiberfill, for stuffing the beads
- Rustproof pins and a foam blocking mat
- Optional: light spray starch
Abbreviations (US Terms)
- ch – chain
- sl st – slip stitch
- sc – single crochet
- sc2tog – single crochet 2 together
- dc – double crochet
- dtr – double treble crochet
- sp – space
- st(s) – stitch(es)
- MR – magic ring
- rep – repeat
Special technique – Cord spoke:
- Ch the number stated.
- Sl st into the target stitch on the body.
- Sl st into the back bump of each ch, working back toward the hub.
- Finish with a sl st into the hub ring.
The slip stitches tighten the chain and give the spokes their firm, twisted, cord-like look.
Gauge and Checkpoints
- Stitch gauge: 14 dc = 2 in (5.1 cm)
- Chain gauge: 7 ch = 1 in (2.5 cm)
- Row heights: 1 dc row = 0.4 in (1.0 cm); 1 dtr row = 0.8 in (2.0 cm)
Make one complete body (Rows 1–3) and measure it before adding the spokes. It is a quick test piece and tells you everything you need.
Checkpoints:
- After Row 1: the 17 dc measure 2.4 in (6.1 cm) across.
- After Row 3: the body measures 2.4 in (6.1 cm) wide x 1.6 in (4.1 cm) tall.
- After the upper fan: the center spoke spans 1.4 in (3.6 cm) from body to hub.
- After the lower fan: hub to hub measures 4.4 in (11.2 cm).
- Each bead: about 0.6 in (1.5 cm) across.
If your body is too wide or tall, go down to a 2.5 mm hook. If it is too small, go up to a 3.0 mm hook.
Check your chain gauge separately, because many crocheters chain tighter than they stitch. If your chains are tight, chain a little looser instead of adding stitches, so all counts stay the same.
Pattern
Part 1: Body
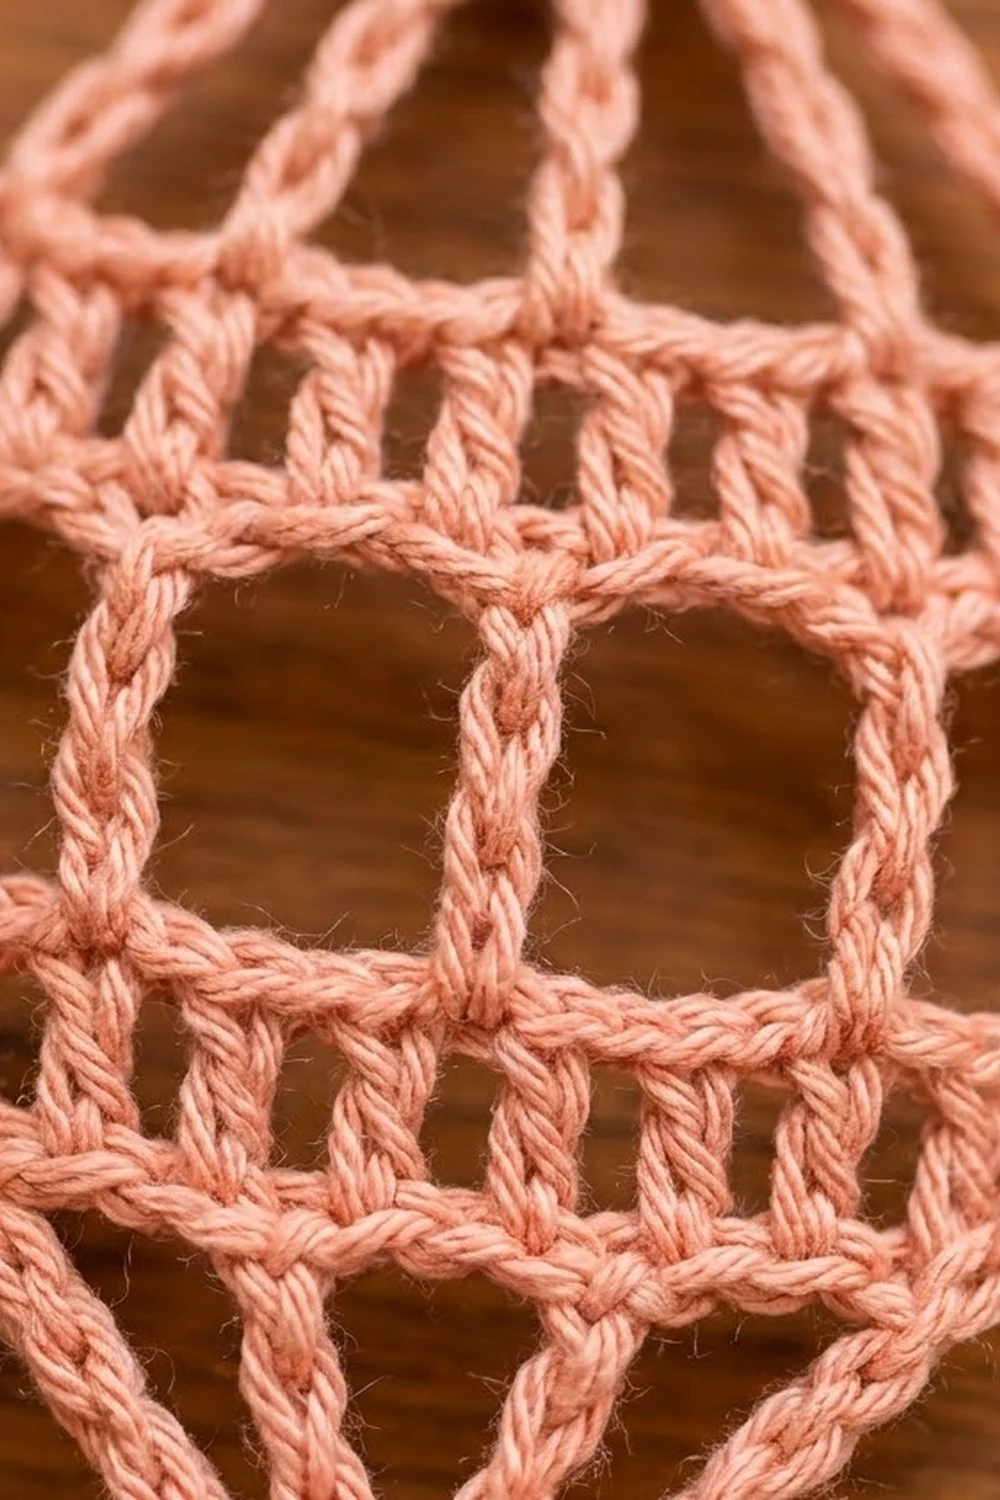
The body is a small flat rectangle: a dc band, a window row and a second dc band. It is symmetrical, so either band can become the top later.
Row 1 (dc band): Ch 19. Dc in 4th ch from hook (the skipped 3 ch count as the first dc) and in each ch across. Turn. (17 dc)
Number the stitches 1 to 17. Stitches 1, 5, 9, 13 and 17 are the “spoke positions.” Every bar and spoke in the ornament lines up with these five stitches.
Row 2 (windows):
- Ch 5. This counts as the first dtr, worked over the first dc.
- Ch 3, skip next 3 dc, dtr in next dc.
- Rep from * 3 more times, working the last dtr in the top of the turning ch-3. Turn. (5 dtr, 4 ch-3 sps)
The three inner dtr form the vertical window bars. The two outer dtr form the side edges.
Row 3 (dc band):
- Ch 3 (counts as first dc).
- 3 dc in next ch-3 sp, dc in next dtr.
- Rep from * 3 more times, working the last dc in the 5th ch of the turning ch-5. Fasten off. (17 dc: 1 + 4 x 4)
Checkpoint: 2.4 in (6.1 cm) wide x 1.6 in (4.1 cm) tall. That height is 0.4 + 0.8 + 0.4 in (1.0 + 2.0 + 1.0 cm).
Part 2: Upper Spoke Fan
The spokes start at a tiny hub ring and run down to the five spoke positions on Row 3.
Hub: With a new length of yarn, ch 6 and sl st in the first ch to form a ring.
Hold the body with Row 3 on top. Work the spokes from right to left, using the cord spoke technique:
- Spoke 1 (outer): Ch 13, sl st in top of dc 1 of Row 3, sl st back along all 13 ch, sl st in ring.
- Spoke 2 (inner): Ch 11, sl st in top of dc 5, sl st back along all 11 ch, sl st in ring.
- Spoke 3 (center): Ch 10, sl st in top of dc 9, sl st back along all 10 ch, sl st in ring.
- Spoke 4 (inner): Ch 11, sl st in top of dc 13, sl st back along all 11 ch, sl st in ring.
- Spoke 5 (outer): Ch 13, sl st in top of dc 17, sl st back along all 13 ch, sl st in ring.
Fasten off. (5 spokes: 58 ch, 58 return sl sts)
Spread the spokes evenly around the lower half of the ring. The center spoke continues the line of the center window bar, and the inner spokes continue the other two bars.
Part 3: Lower Spoke Fan
Turn the body upside down so Row 1 is on top. Work into the foundation chain directly under each spoke position. For dc 1, use the base of the turning chain.
Make a second hub ring exactly as before. Work Spokes 1–5 with the same counts (13, 11, 10, 11, 13 ch), anchoring them under dc 1, 5, 9, 13 and 17. Fasten off. (5 spokes: 58 ch, 58 return sl sts)
Checkpoint: hub to hub is 4.4 in (11.2 cm), which is 1.4 + 1.6 + 1.4 in. In centimeters that is 3.6 + 4.1 + 3.6 cm; the parts add to 11.3 cm only because each one is rounded.
Part 4: Beads (make 2)
Rnd 1: MR, 6 sc in ring. (6 sc)
Rnd 2: 2 sc in each st around. (12 sc)
Rnds 3–4: Sc in each st around. (12 sc)
Stuff firmly with yarn scraps or a small pinch of fiberfill.
Rnd 5: Sc2tog around. (6 sc)
Fasten off, leaving a 6 in (15.2 cm) tail. Each bead is about 0.6 in (1.5 cm) across.
Attach the beads:
- Place the open end of one bead over the upper hub ring.
- Sew the 6 stitches of Rnd 5 around the ring. The MR side becomes the top of the ornament.
- Attach the second bead to the lower hub the same way, with its MR side pointing down.
Part 5: Hanging Loop
Join yarn with a sl st at the center of the top bead’s magic ring. Ch 20, sl st in the same spot, then sl st in each of the 20 ch for a firm cord. Fasten off. The loop hangs about 1.5 in (3.8 cm) above the bead.
Part 6: Tassel
- Wrap yarn 25 times around the 2 in (5.1 cm) card.
- Slide a 6 in (15.2 cm) piece of yarn under the wraps at one edge and tie it tightly.
- Cut the wraps along the opposite edge.
- Wrap a second strand around the bundle 0.25 in (0.6 cm) below the tie, knot it and bury the ends inside.
- Trim the tassel to 1.75 in (4.4 cm).
- Thread the tie ends through the bottom bead’s magic ring and secure them inside the bead.
Border: Side Bows
The border on this ornament is an outline cord on each side of the body. It carries the outer spokes down the sides, so the outer edge reads as one smooth, curved line from bead to bead.
Border gauge: chain gauge, 7 ch = 1 in (2.5 cm).
Right side:
- Join yarn with a sl st in the top of dc 1 of Row 3 (the same stitch as the outer spoke).
- Ch 12 and sl st in the foundation chain under dc 1 of Row 1.
- Sl st back along all 12 ch, then sl st in the starting stitch. Fasten off. (12 ch, 12 return sl sts)
Left side: Work the same way between dc 17 of Row 3 and the foundation under dc 17 of Row 1. (12 ch, 12 return sl sts)
Why the math works:
- Side bows: The body side is 1.6 in (4.1 cm) tall. Twelve chains measure about 1.71 in (4.3 cm), so each cord is slightly longer than the edge it spans and bows out about 0.2 in (0.5 cm). Two bows add 0.4 in (1.0 cm) to the 2.4 in (6.1 cm) body, which gives the 2.8 in (7.1 cm) widest point.
- Center spoke: 10 ch is about 1.43 in (3.6 cm), which matches the straight 1.4 in (3.6 cm) drop.
- Inner spokes: 11 ch is about 1.57 in (4.0 cm), enough for their short diagonal.
- Outer spokes: 13 ch is about 1.86 in (4.7 cm), enough for the longest diagonal plus a gentle curve.
Final Blocking
- Weave in all ends, burying them inside the beads or along the cords.
- Soak the ornament in cool water for 10 minutes, then press out the water in a towel. Do not wring.
- Pin the body flat at 2.4 in (6.1 cm) x 1.6 in (4.1 cm), with a pin at each corner.
- Pin the hubs 4.4 in (11.2 cm) apart, centered above and below the body.
- Ease each spoke straight. Pin each side bow so it curves out about 0.2 in (0.5 cm), and check that the widest point is 2.8 in (7.1 cm).
- Pin the window bars straight and square up the four windows.
- If you want a crisper shape, mist lightly with spray starch.
- Let it dry completely, then unpin and comb the tassel strands straight.
Final Quality-Control Checklist
- Rows 1 and 3 each have 17 dc.
- Row 2 has 5 dtr and 4 even windows.
- Each fan has 5 spokes of 13, 11, 10, 11 and 13 ch.
- Spokes and window bars line up on dc 1, 5, 9, 13 and 17.
- Both side bows have 12 ch and curve evenly.
- The body measures 2.4 in (6.1 cm) x 1.6 in (4.1 cm), and the widest point is 2.8 in (7.1 cm).
- Both beads are firm, round and sewn securely over the hubs.
- The loop is centered on top and the tassel hangs straight.
- No loose ends show.
Troubleshooting
Spokes sag or look wavy: Your chains are too loose. Redo them with a tighter chain, or remove one chain from each outer spoke.
Body curls under the fans: Your spokes are too short. Loosen your chain tension, or add one chain to each spoke on both fans.
Windows look uneven: In Row 2, skip exactly 3 dc each time. In Row 3, work 3 dc into every ch-3 space.
Side bows stick out too far: Use 11 ch instead of 12 on both sides.
Bead looks lumpy: Use less stuffing, or switch to fine yarn scraps cut into short pieces.
Tassel splays out: Wrap the neck more firmly, then steam it lightly while combing.
Care
Hand wash in cool water with mild soap, press dry in a towel and reshape flat. Store it flat or hanging, away from heavy decorations that could crush the beads.

Final Notes
The whole ornament rests on one simple chain of measurements:
- A 17 dc band measures 2.4 in (6.1 cm) wide.
- Three rows make a body 1.6 in (4.1 cm) tall.
- Two fans of 1.4 in (3.6 cm) each bring the hub-to-hub length to 4.4 in (11.2 cm).
- Two beads of 0.6 in (1.5 cm) each make the ornament 5.6 in (14.2 cm) tall.
- The 12 ch side bows widen it to 2.8 in (7.1 cm).
- The 1.5 in (3.8 cm) loop and 1.75 in (4.4 cm) tassel give a lantern about 8.9 in (22.6 cm) long, ready for the tree.
Happy crocheting!