

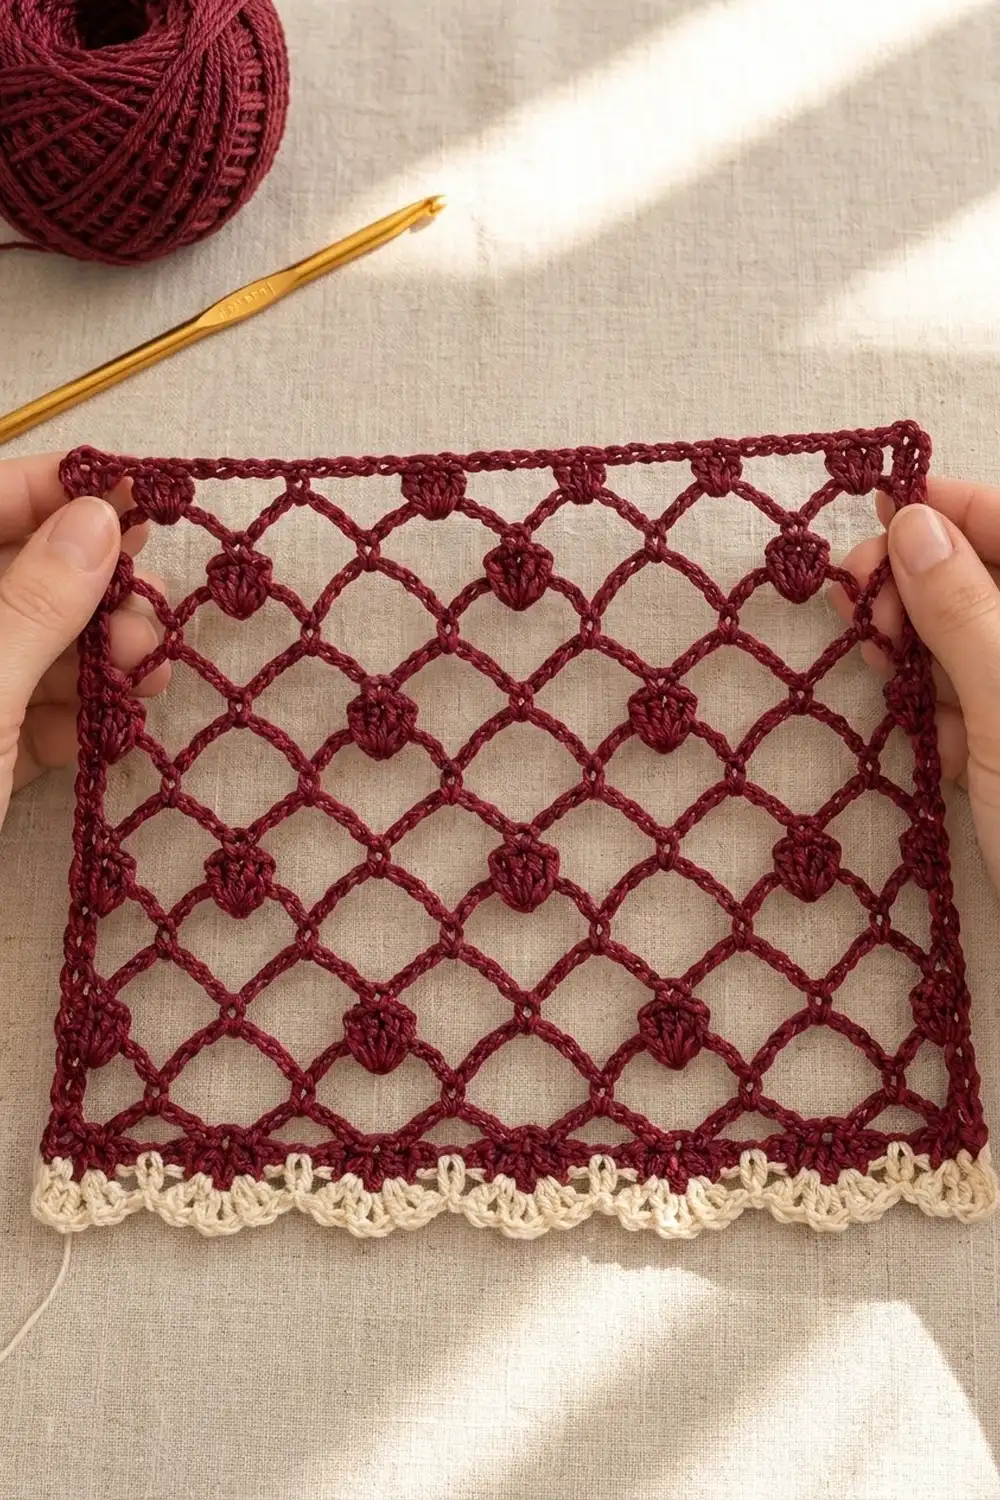
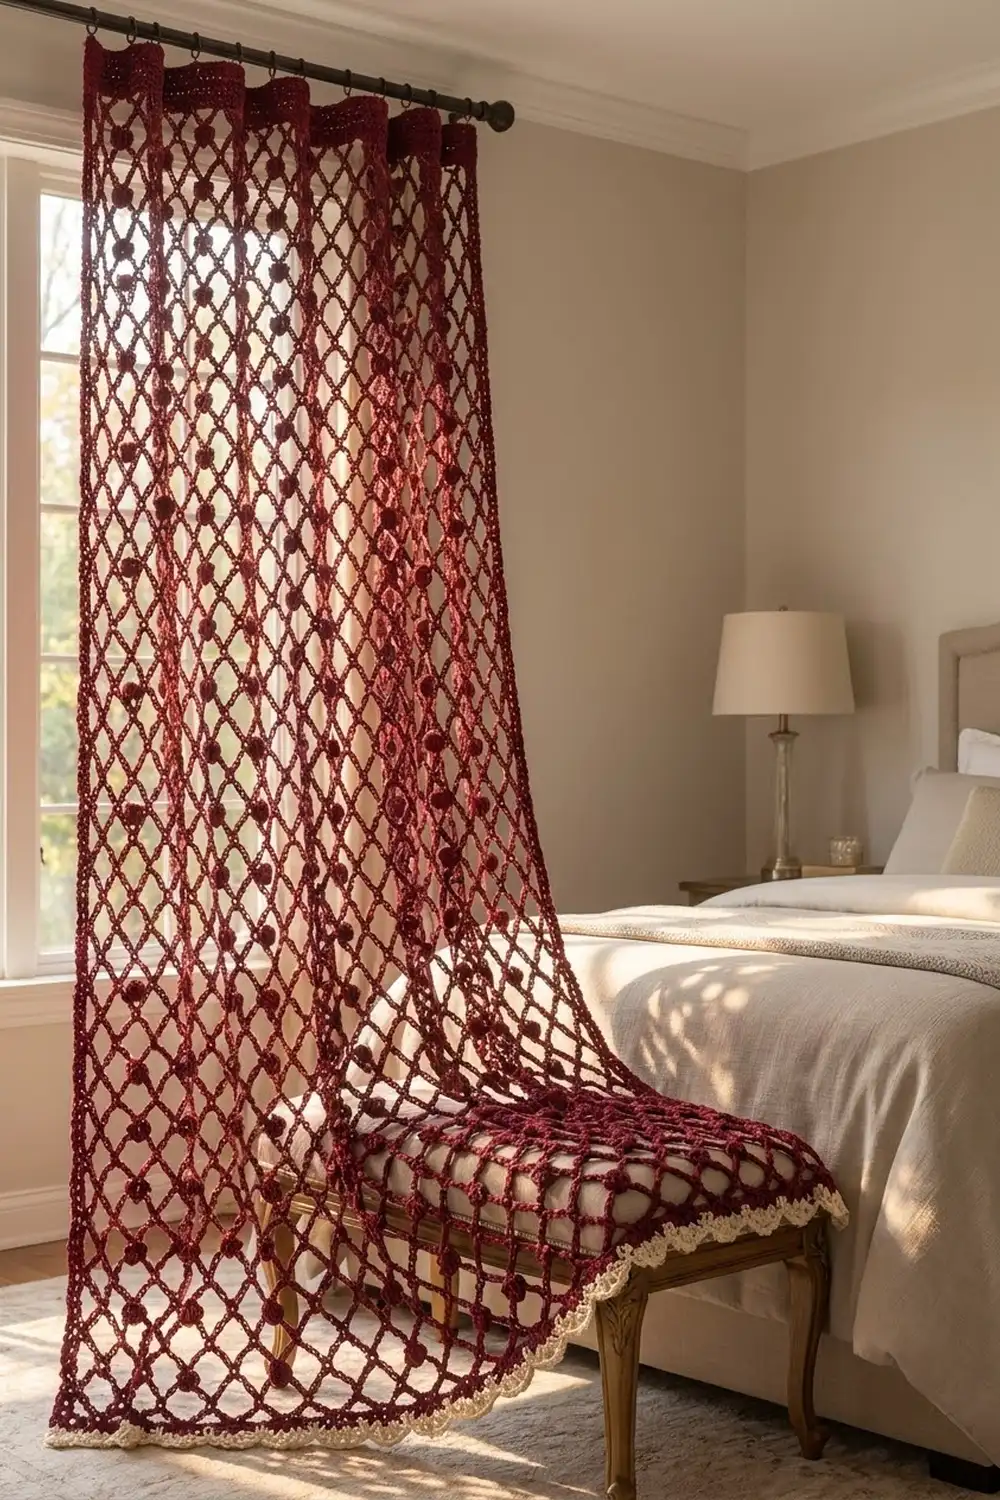
The Bordeaux Lattice Curtain Panel is an open diamond mesh in deep burgundy. Small bobbles sit on every other crossing point, and a cream scalloped edge runs along the hem. When light comes through the window, the lattice throws a soft patterned shadow and the bobbles show up as dark dots across the fabric.
The style is classic and a little romantic. You need only two colors: a rich wine-red for the mesh and a warm cream for the scallops. The bobbles add texture, so the panel doesn’t look like plain netting.
This pattern uses US crochet terms. The finished panel measures 41.5 in x 80 in (105.4 cm x 203.2 cm) after blocking.
The panel is made in one piece. You work the mesh in rows from the hem up to the top, edge all four sides with a round of burgundy single crochet, then add two rows of cream scallops along the bottom edge only. There is no assembly and no seaming.
Finished Size and Construction
- Finished size: 41.5 in x 80 in (105.4 cm x 203.2 cm)
- Skill level: Intermediate
- Terminology: US
- Yarn weight: DK (#3)
- Hook: 4.0 mm (G-6)
- Number of pieces: 1
- Layout: single rectangular panel, worked in rows
- Piece size before border: 41 in x 78.5 in (104.1 cm x 199.4 cm)
- Border depth: 0.25 in (0.6 cm) on the top and sides; 1.25 in (3.2 cm) on the bottom, including the cream scallops
Materials
Pick a smooth DK cotton or cotton blend with good stitch definition. Mercerized cotton holds the open diamond shape well and won’t sag much when it hangs. Avoid fuzzy yarns, because they blur the lattice. The yardage below assumes about 230 m per 100 g.
- Burgundy: 750 g (about 1,725 m)
- Cream: 25 g (about 58 m)
These quantities include a margin of roughly 10 percent for the gauge swatch and small tension differences.
Tools:
- 4.0 mm (G-6) crochet hook
- Tapestry needle
- Stitch markers
- Measuring tape
- Rust-proof pins and a large blocking surface (a bed or clean floor covered with towels works)
- Spray bottle
- Clip rings or a curtain rod, for hanging
Abbreviations (US Terms)
- ch – chain
- sc – single crochet
- dc – double crochet
- sl st – slip stitch
- sk – skip
- sp – space
- tch – turning chain
- RS / WS – right side / wrong side
- rep – repeat
Special stitch – Bobble Knot (BK): All of this is worked into the same ch-5 loop. Sc in the loop, ch 3, then work a 4-dc cluster into the front loop of the sc you just made. For the cluster, yo, insert hook, yo and pull up a loop, yo and draw through 2 loops; rep from * 3 more times, then yo and draw through all 5 loops on the hook. Finish with sc in the same ch-5 loop. The cluster folds over the crossing point and makes a small round bobble. One BK takes the place of one sc in the mesh.
Gauge and Checkpoints
Gauge (blocked): 5 mesh loops and 8 rows = 5 in x 4 in (12.7 cm x 10.2 cm). That works out to 1 loop per 1 in (2.5 cm) of width and 2 rows per 1 in (2.5 cm) of height.
Border gauge: 4 sc = 1 in (2.5 cm).
Test first. Make a gauge swatch before you start the panel. Ch 38 and follow the pattern for 9 loops: Row 1 gives 9 loops. Rows 2 and 4 follow the same logic as the main pattern, with 5 BK on Row 2 and 4 BK on Row 4. Work 13 rows (Row 1, then Rows 2–5 three times). Wet block the swatch and let it dry. It should measure 9 in x 6.5 in (22.9 cm x 16.5 cm).
If it’s too big: try a 3.75 mm hook, or tighten your chains. Loose ch-5 loops are the most common cause.
If it’s too small: go up to a 4.5 mm hook. Mesh shrinks noticeably if your chains are tight.
Checkpoints in the panel:
- After Row 1: 41 in (104.1 cm) wide when lightly stretched
- After Row 21: 10.5 in (26.7 cm) tall
- After Row 81: 40.5 in (102.9 cm) tall
- After Row 157: 78.5 in (199.4 cm) tall
Measure the mesh gently stretched to its natural diamond shape. Don’t measure it pulled flat.
Main Panel
With burgundy, ch 166.
Row 1 (RS): Sc in 2nd ch from hook, ch 5, sk 3 ch, sc in next ch; rep from * 40 more times. Turn. (42 sc, 41 ch-5 loops; all 165 base chains used)
Row 2: Ch 5 (counts as dc + ch 2), BK in first ch-5 loop, ch 5, sc in next loop, ch 5, BK in next loop; rep from * 19 more times, ch 2, dc in last sc. Turn. (21 BK, 20 sc, 40 full ch-5 loops, 2 ch-2 half loops at the edges)
Row 3: Ch 1, sc in first dc, ch 5, sc in next ch-5 loop; rep from * 39 more times, ch 5, sc in 3rd ch of tch. Turn. (42 sc, 41 ch-5 loops)
The half loops at each end of Row 2 keep the side edges straight. Row 3 squares them off again.
Row 4: Ch 5 (counts as dc + ch 2), sc in first ch-5 loop, ch 5, BK in next loop, ch 5, sc in next loop; rep from * 19 more times, ch 2, dc in last sc. Turn. (20 BK, 21 sc, 40 full ch-5 loops, 2 half loops)
Row 5: Work as Row 3. (42 sc, 41 ch-5 loops)
Row 2 places bobbles on the odd crossing points. Row 4 shifts them to the even crossing points. Because of this offset, the bobbles form their own diamond grid inside the mesh. Both bobble rows are worked from the same side, so all the bobbles puff out toward the RS.
Rows 6–157: Rep Rows 2–5 thirty-eight more times. (Rows 2–5 worked 39 times in total, 157 rows)
Row 157 is a Row 3–type row: 42 sc and 41 ch-5 loops. Don’t fasten off. The panel now measures 41 in x 78.5 in (104.1 cm x 199.4 cm).
Row-end count for the border: the panel has 79 odd rows ending in a sc and 78 even rows ending in a dc.
Border
The border starts with one burgundy round on all four sides. Then two cream rows go along the bottom edge only.
The side counts below do not include the corners. Each corner is a separate ch-1 space. The first and last sc of the top and bottom edges sit right next to those corner spaces.
Round 1 (burgundy): Ch 1, turn.
- Top: Sc in first sc, 3 sc in next ch-5 loop, sc in next sc; rep from * 40 more times. (165 sc: 42 sc into stitches + 123 sc into loops) Ch 1 for the corner.
- Side 1: Working down the row-ends, put 1 sc in each sc row-end (79 sc) and 3 sc around each dc row-end (234 sc). (313 sc) Ch 1 for the corner.
- Bottom: Working in the free loops of the foundation chain, sc in each of the 165 chains. (165 sc) Ch 1 for the corner.
- Side 2: Work as Side 1. (313 sc) Ch 1 for the corner, then sl st to the first sc.
(956 sc + 4 ch-1 corner sps) Fasten off.
Why the math works: At 4 sc per inch, 165 sc covers 41.25 in (104.8 cm). That matches the 41 in (104.1 cm) mesh width once the loops relax. On the sides, each pair of rows (1 sc row-end + 1 dc row-end) is 1 in (2.5 cm) tall and gets 1 + 3 = 4 sc. That’s the same 4 sc per inch. The 313 sc cover 78.25 in (198.8 cm), which is within a quarter inch of the body length, and blocking takes up the difference. With the same rate on all four sides, the edges stay flat instead of ruffling or pulling in.
Cream Row 1: With the RS facing, join cream in the first sc of the bottom edge. Ch 1, sc in the same st and in each sc across. Turn. (165 sc)
Cream Row 2 (scallops): Ch 1, sc in first sc, sk 1, 5 dc in next sc, sk 1, sc in next sc; rep from * 40 more times. (41 scallops, 42 sc, 247 sts total: 1 + 41 x 6) Fasten off.
Why the scallops fit: 165 = (4 x 41) + 1. Each scallop uses exactly 4 sts, so you get 41 scallops and the row ends neatly on a sc. That’s also one scallop for each of the 41 mesh loops, so the scallops line up under the lattice columns.
Weave in all ends along the solid edging, not inside the mesh, where tails would show against the light.
Final Blocking
- Soak the panel in cool water with a little wool wash or mild soap for 15 minutes.
- Gently press out the water. Don’t wring it. Roll it in towels to remove more moisture.
- Lay it flat with the RS up on a blocking surface big enough for the full 80 in (203.2 cm) length.
- Pin the four corners first so the panel measures 41.5 in x 80 in (105.4 cm x 203.2 cm).
- Pin along each side every 4 in (10.2 cm), keeping the edges straight.
- Use your fingers to open each diamond evenly, and nudge each bobble so it sits centered on its crossing point.
- Pin each cream scallop at its tip so the hem points line up evenly.
- Mist any areas that dried before you shaped them. Leave the panel until it’s completely dry, usually 24 hours.
Final Quality-Control Checklist
- Panel measures 41.5 in x 80 in (105.4 cm x 203.2 cm) after blocking
- Every Row 2–type row has 21 BK; every Row 4–type row has 20 BK
- The bobbles form an even offset diamond grid, all puffing toward the RS
- Side edges are straight, with no scalloping or pulling
- Corners are square, each with a ch-1 space
- 41 cream scallops along the hem, evenly spaced
- All ends are woven into solid edging and trimmed close
Troubleshooting
The sides wave or ruffle: You’ve put too many sc into the row-ends. Go back to 1 sc per sc row-end and 3 per dc row-end.
The sides pull inward: There are too few edging stitches, or your edging tension is tight. Check the 313 count, or loosen your sc.
The bobbles flop to different sides: Make sure every BK row is worked with the same side facing you. Recount your rows.
The bobble count is off: Put a marker in the first BK of each bobble row and count against 21 or 20 before you turn.
The panel is narrower at the top: Your chains got tighter as you worked. Keep every ch-5 the same length, and check your width at each checkpoint.
The scallops don’t end on a sc: Count Cream Row 1 again. It must be exactly 165 sc.
The panel grows when it hangs: This is normal for mesh. Expect up to 1–2 in (2.5–5.1 cm) of drop. If you need an exact length, block it hanging, or leave out one 4-row repeat before you start the border.
Care
Hand wash in cool water, or machine wash on a cold delicate cycle inside a large mesh bag. Lay flat to dry, reshaping the diamonds while the panel is damp.
Final Notes
Everything in this panel comes back to one measurement: 1 mesh loop and 2 rows per inch. That gives 41 loops across for 41 in (104.1 cm) and 157 rows for 78.5 in (199.4 cm). The burgundy edging works at 4 sc per inch on every side, which takes the panel to 41.5 in (105.4 cm) wide. The 165 bottom stitches divide neatly into 41 cream scallops, and the hem brings the total length to 80 in (203.2 cm). If you check your gauge at the swatch, at Row 1, and at each height checkpoint, the finished panel will hang straight and even.
Clip it to a rod, open the curtains, and let the light come through the lattice.
Happy crocheting!