

Bubbles is a fish that “eats” your plastic grocery bags. You stuff bags in through the open mesh at the top and pull them out one at a time through the round mouth at the bottom. It hangs from a cabinet hook and turns a messy pile of bags into something you’ll be happy to leave on display.
The body is light blue. It has a solid single crochet head and a diamond-mesh body that narrows toward the tail. The tail band, the two-lobed tail fin, the hanging loop and the two side fins are cream. The eyes are small white crocheted rings around black safety eyes. A pink body with the same cream trim works just as well.
This pattern uses US crochet terms. The finished body is 18.5 in (47.0 cm) long and 6 in (15.2 cm) wide across the head. With the tail fin it measures about 20.5 in (52.1 cm) long, and about 10 in (25.4 cm) across the side fins.
You make the body in one piece, in joined rounds, starting at the mouth. First comes the solid head. Then comes the chain-loop mesh, which narrows in three stages. Last is a cream band that gathers closed. The fins and eyes are made separately and sewn on.
Finished Size and Construction
- Finished size: 18.5 in (47.0 cm) body length; 20.5 in (52.1 cm) including the tail fin
- Skill level: Easy (advanced beginner)
- Terminology: US crochet terms
- Yarn weight: Worsted weight (#4) cotton
- Hook: 5.0 mm (H-8)
- Number of pieces: 1 body, 2 side fins, 2 tail lobes, 2 eye rings
- Layout: One tube-shaped body worked from the bottom up, with appliqués sewn on
- Head size: 6 in (15.2 cm) wide flat x 4 in (10.2 cm) tall
- Size before border: 17.5 in (44.5 cm) long (head plus mesh)
- Border (tail band) depth: about 1 in (2.5 cm) before gathering
Materials
Use a smooth worsted weight cotton or cotton blend. Cotton holds its shape, so the mesh doesn’t sag under a load of bags, and it washes well. Acrylic also works, but it stretches more, so expect the mesh to come out a little longer.
The amounts below assume about 1.7 m per gram, which is typical for worsted cotton:
- Light blue (main color): 90 g, about 153 m
- Cream (fins, tail, band): 30 g, about 51 m
- White (eye rings): 5 g, about 9 m
All amounts include a safety margin of about 10–15%.
Tools:
- 5.0 mm (H-8) crochet hook
- Two 15 mm black safety eyes with washers
- Stitch marker
- Tapestry needle
- Scissors
- Measuring tape
- Rustproof pins
Abbreviations (US Terms)
- ch – chain
- sl st – slip stitch
- sc – single crochet
- inc – 2 sc in the same stitch
- sc2tog – single crochet 2 together
- sk – skip
- sp – space
- st(s) – stitch(es)
- MR – magic ring
Special stitch – Mesh loop: A chain (ch 5, ch 4 or ch 3, depending on the round) followed by 1 sc in the next ch-space. The sc is the anchor point. Each loop forms one side of a diamond.
Gauge and Checkpoints
Gauge: 16 sc x 18 rounds = 4 in (10.2 cm) in sc worked in the round.
Test with one piece first: make the head (Rounds 1–18) and measure it. It works as your swatch and stays in the finished holder.
Checkpoints:
- After Round 1: The mouth opening is 3 in (7.6 cm) wide when flattened.
- After Round 3: The piece is a shallow cup, 6 in (15.2 cm) wide flat.
- After Round 18: The head is 4 in (10.2 cm) tall.
- After Round 28: The full body is about 11.5 in (29.2 cm) long, lightly stretched lengthwise.
- After Round 40: The full body is about 17.5 in (44.5 cm) long.
If the head is too big, go down to a 4.5 mm hook. If it is too small, go up to a 5.5 mm hook. Correct the head before you start the mesh, because the mesh can’t fix a head that is the wrong width.
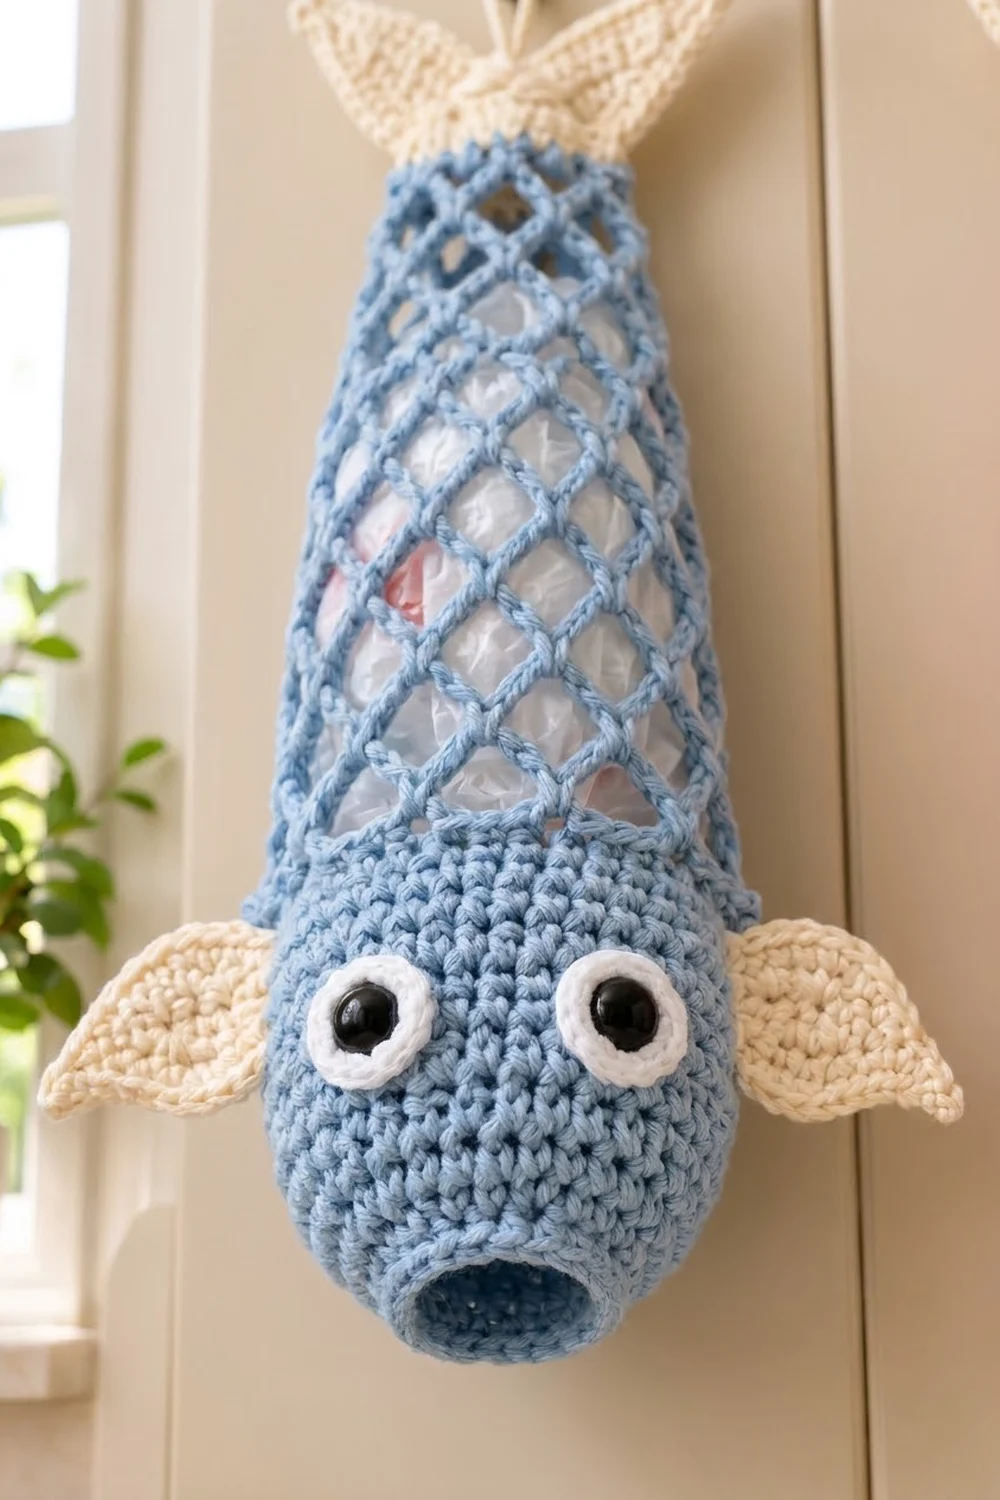
Body Pattern
Work in joined rounds. Join each round with a sl st into the first sc. The ch 1 at the start of a round does not count as a stitch.
Head (Light Blue)
Foundation: Ch 24 and sl st into the first ch to form a ring, taking care not to twist the chain.
Round 1: Ch 1, sc in each ch around, join. (24 sts)
Round 2: Ch 1, sc in next st, inc in next st 12 times, join. (36 sts)
Round 3: Ch 1, sc in next 2 sts, inc in next st 12 times, join. (48 sts)
Rounds 4–18: Ch 1, sc in each st around, join. (48 sts each round)
You now have a solid, rounded head with straight sides. Check that it is 4 in (10.2 cm) tall and 6 in (15.2 cm) wide flat.
Mesh Body (Light Blue)
Round 19 (mesh setup): Ch 1, sc in first st. Ch 5, sk 3 sts, sc in next st 11 times. Ch 5, sk 3 sts, then sl st into the first sc to join. (12 sc, 12 ch-5 loops)
Check: 1 sc + (11 x 4 sts) + 3 skipped sts = 48 sts used, which is every stitch of Round 18.
Round 20: Sl st in each of the next 2 ch. Ch 1, sc in the same ch-5 sp. Ch 5, sc in next ch-5 sp 11 times. Ch 5, join to the first sc. (12 ch-5 loops)
Rounds 21–28: Repeat Round 20. (12 ch-5 loops each round)
Rounds 29–34 (first taper): Sl st in each of the next 2 ch. Ch 1, sc in the same sp. Ch 4, sc in next sp 11 times. Ch 4, join. (12 ch-4 loops each round)
Rounds 35–40 (second taper): Sl st in the next ch. Ch 1, sc in the same sp. Ch 3, sc in next sp 11 times. Ch 3, join. (12 ch-3 loops each round)
On the final join of Round 40, pull through cream and fasten off the light blue.
There are always 12 loops per round, so the diamonds stack in straight columns. Only the chain length changes. Shorter chains make smaller diamonds, which is what narrows the body from 6 in (15.2 cm) to about 4.5 in (11.4 cm) wide. Keep your chains the same size throughout. One tight round shows up as a visible “waist” in the mesh.
Side Fins (Make 2, Cream)
Work in rows and turn at the end of each row. The ch 1 does not count as a stitch.
Row 1: Ch 2, 2 sc in 2nd ch from hook. (2 sts)
Row 2: Ch 1, inc in each st. (4 sts)
Row 3: Ch 1, sc in each st. (4 sts)
Row 4: Ch 1, inc, sc in next 2 sts, inc. (6 sts)
Row 5: Ch 1, sc in each st. (6 sts)
Row 6: Ch 1, inc, sc in next 4 sts, inc. (8 sts)
Row 7: Ch 1, sc in each st. (8 sts)
Row 8: Ch 1, inc, sc in next 6 sts, inc. (10 sts)
Row 9: Ch 1, sc in each st. (10 sts)
Edging: Do not turn. Ch 1, then work:
- 1 sc in each of the 10 sts across Row 9 (this is the base)
- 1 sc in each of 8 row ends (Rows 9–2) down the first side
- 3 sc in the foundation ch at the tip
- 1 sc in each of 8 row ends (Rows 2–9) up the second side
Join. (10 + 8 + 3 + 8 = 29 sts)
Fasten off and leave a 12 in (30.5 cm) tail for sewing. Each fin is a pointed teardrop about 2.5 in (6.4 cm) wide and 2 in (5.1 cm) tall.
Tail Lobes (Make 2, Cream)
Work Rows 1–9 as for the side fins, then continue:
Row 10: Ch 1, inc, sc in next 8 sts, inc. (12 sts)
Row 11: Ch 1, sc in each st. (12 sts)
Edging: Work as for the side fins:
- 12 sc across the base
- 1 sc in each of 10 row ends (Rows 11–2) down the first side
- 3 sc in the tip
- 1 sc in each of 10 row ends (Rows 2–11) up the second side
Join. (12 + 10 + 3 + 10 = 35 sts)
Fasten off and leave a long tail. Each lobe is about 3 in (7.6 cm) wide and 2.4 in (6.1 cm) tall.
Eye Rings (Make 2, White)
Round 1: MR, 8 sc into the ring, join. (8 sts)
Round 2: Ch 1, inc in each st, join. (16 sts)
Fasten off and leave a tail. Push a 15 mm safety eye through the center hole. Each ring is about 1.1 in (2.8 cm) across.
Border: Cream Tail Band and Mouth Edge
Border gauge: The border uses the same gauge as the body, 16 sc = 4 in (10.2 cm). For the per-side counts below, flatten the tube and count each side as half the round.
Round 41 (conversion round): Ch 1, sc in next sc, 2 sc in next ch-3 sp 12 times, join.
This gives 12 sts (1 in each sc) + 24 sts (2 in each of the 12 spaces) = 36 sts, or 18 per side. At gauge, 36 sts make a 9 in (22.9 cm) circumference. That matches the top of the ch-3 mesh, so the band neither flares out nor pulls in.
Round 42: Ch 1, sc in next st, sc2tog 12 times, join. (24 sts, 12 per side)
Round 43: Ch 1, sc in each st, join. (24 sts, 12 per side)
Round 44: Ch 1, sc2tog 12 times, join. (12 sts, 6 per side)
Round 45: Ch 1, sc2tog 6 times, join. (6 sts, 3 per side)
Why the math works: Each decrease round divides evenly into the previous count: 36, 24, 12, 6. The decreases stack in line, so the band closes into a neat, even point with no puckers.
Hanging loop: Ch 16, sl st into the top of Round 45. Ch 1, work 22 sc into the chain loop, then sl st to join. This makes a firm loop about 2 in (5.1 cm) tall. Fasten off, thread the tail through the 6 remaining stitches, and pull tight to close the top.
Mouth edge: Join light blue at the foundation ring. Sl st in each of the 24 foundation chains and join. (24 sl sts) This firms up the mouth so it stays round while bags are pulled through.
Assembly
- Eyes: Place the eyes between Rounds 8 and 12, about 1.5 in (3.8 cm) apart center to center. Push each safety eye through the head. Reach in through the mouth and attach the washer from the inside. Sew the outer edge of each white ring flat.
- Side fins: Pin a fin to each side of the head at Rounds 14–18, tip pointing up and out. Sew along the full 10-st base.
- Tail lobes: Pin the bases of the lobes on either side of the gathered top, angled into a V. Sew them through the band, below the hanging loop.
Before sewing, look at the fish from the front and check that both eyes and both fins sit at the same height.
Final Blocking
- Lightly spray the mesh and all the cream pieces with water.
- Lay the holder flat on a blocking mat, eyes facing up.
- Gently stretch the mesh lengthwise until the diamonds open evenly and the body measures 18.5 in (47.0 cm).
- Pin the head to 6 in (15.2 cm) wide.
- Pin the fins and tail lobes flat so the tips come to sharp points.
- Let it dry completely, about 24 hours.
Final Quality-Control Checklist
- [ ] Head is 48 sts around and 4 in (10.2 cm) tall
- [ ] Every mesh round has exactly 12 loops
- [ ] Diamonds line up in straight columns
- [ ] Round 41 has 36 sts; Round 45 has 6 sts
- [ ] Top is pulled tightly closed with no gap
- [ ] Hanging loop is firm and centered
- [ ] Eye washers are fully locked
- [ ] Both fins sit at the same height
- [ ] Mouth is 3 in (7.6 cm) wide flat
- [ ] All tails are woven in and secured
Troubleshooting
Mesh spirals: You probably skipped the starting sl sts. Always slip to the middle of the loop before the first sc.
11 or 13 loops: Count the anchor stitches at the end of every round, and frog back to the last correct round.
Tail band ruffles: Your tension is too loose. Use a 4.5 mm hook for Rounds 41–45.
Mouth stretches out of shape: Add a second sl st round, or work the edge with a smaller hook.
Fins flop over: Sew along the whole base, not just the center.
Body too short: Add one or two ch-5 rounds before the first taper.
Bags pull out in clumps: Stuff bags in loosely from the top, one at a time.
Care
Hand wash, or machine wash cold on a gentle cycle inside a laundry bag. Reshape and dry flat, and skip the tumble dryer to protect the safety eyes and keep the mesh from stretching.
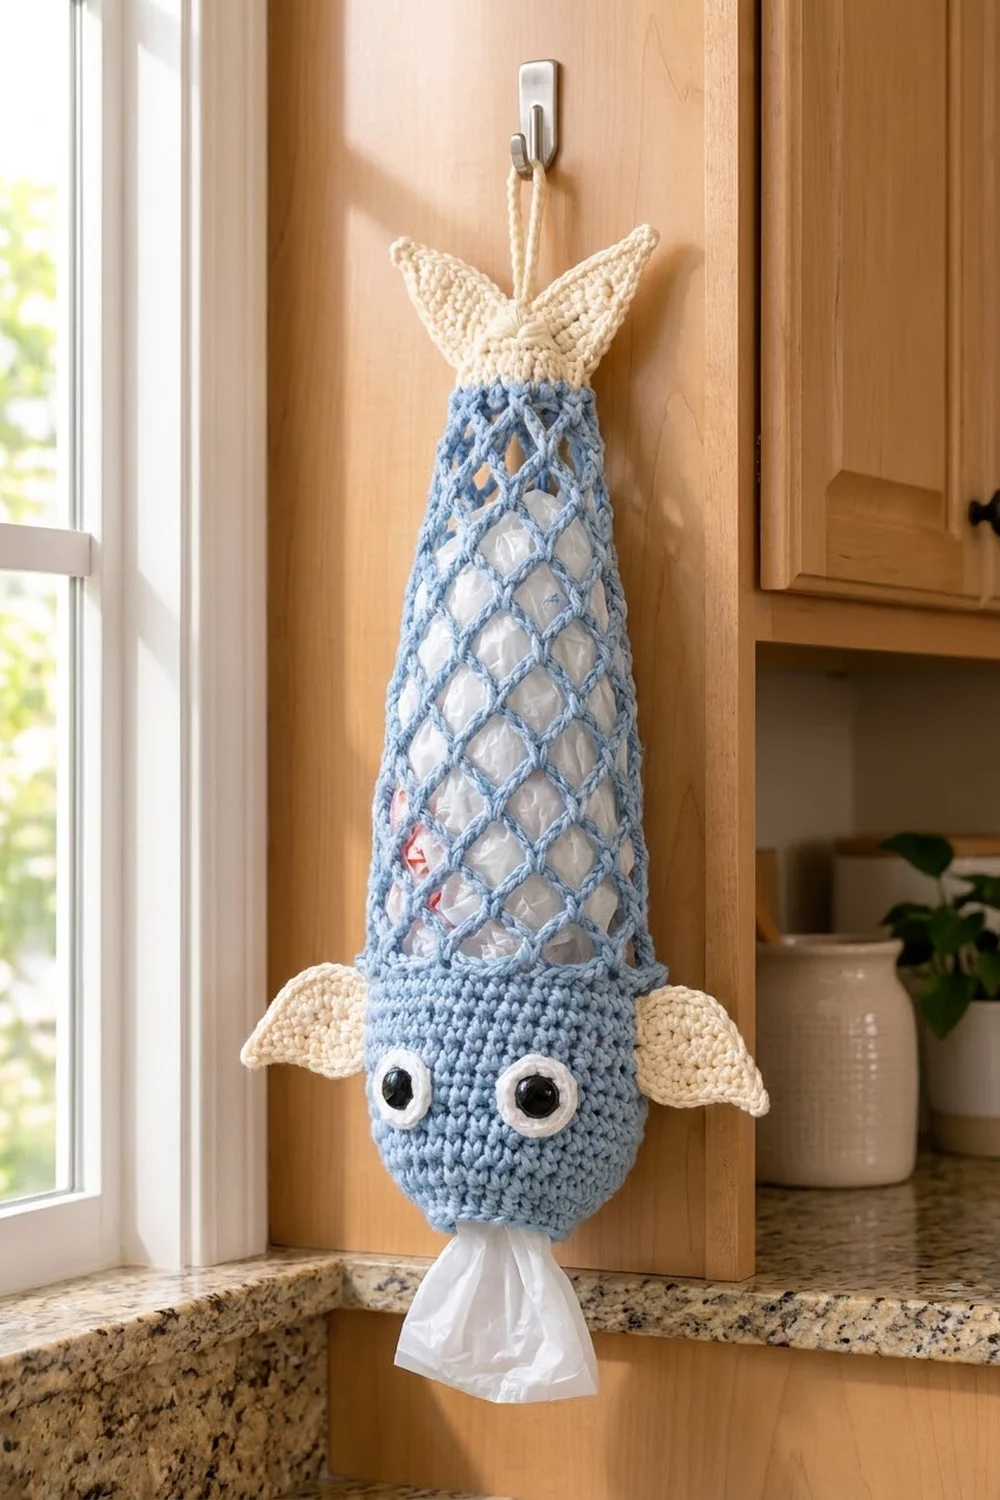
Final Notes
Each measurement builds on the one before it:
- The 24-st mouth grows to a 48-st head, 6 in (15.2 cm) wide and 4 in (10.2 cm) tall.
- The 48 sts turn into 12 mesh loops.
- The mesh narrows through ch-5, ch-4 and ch-3 rounds to a 17.5 in (44.5 cm) body.
- The 12 loops convert to a 36-st cream band that gathers down to 6 sts.
If your head matches gauge, the rest of the fish falls into place. Fill Bubbles with bags, hang it on a hook, and enjoy a tidier cabinet.
Happy crocheting!