

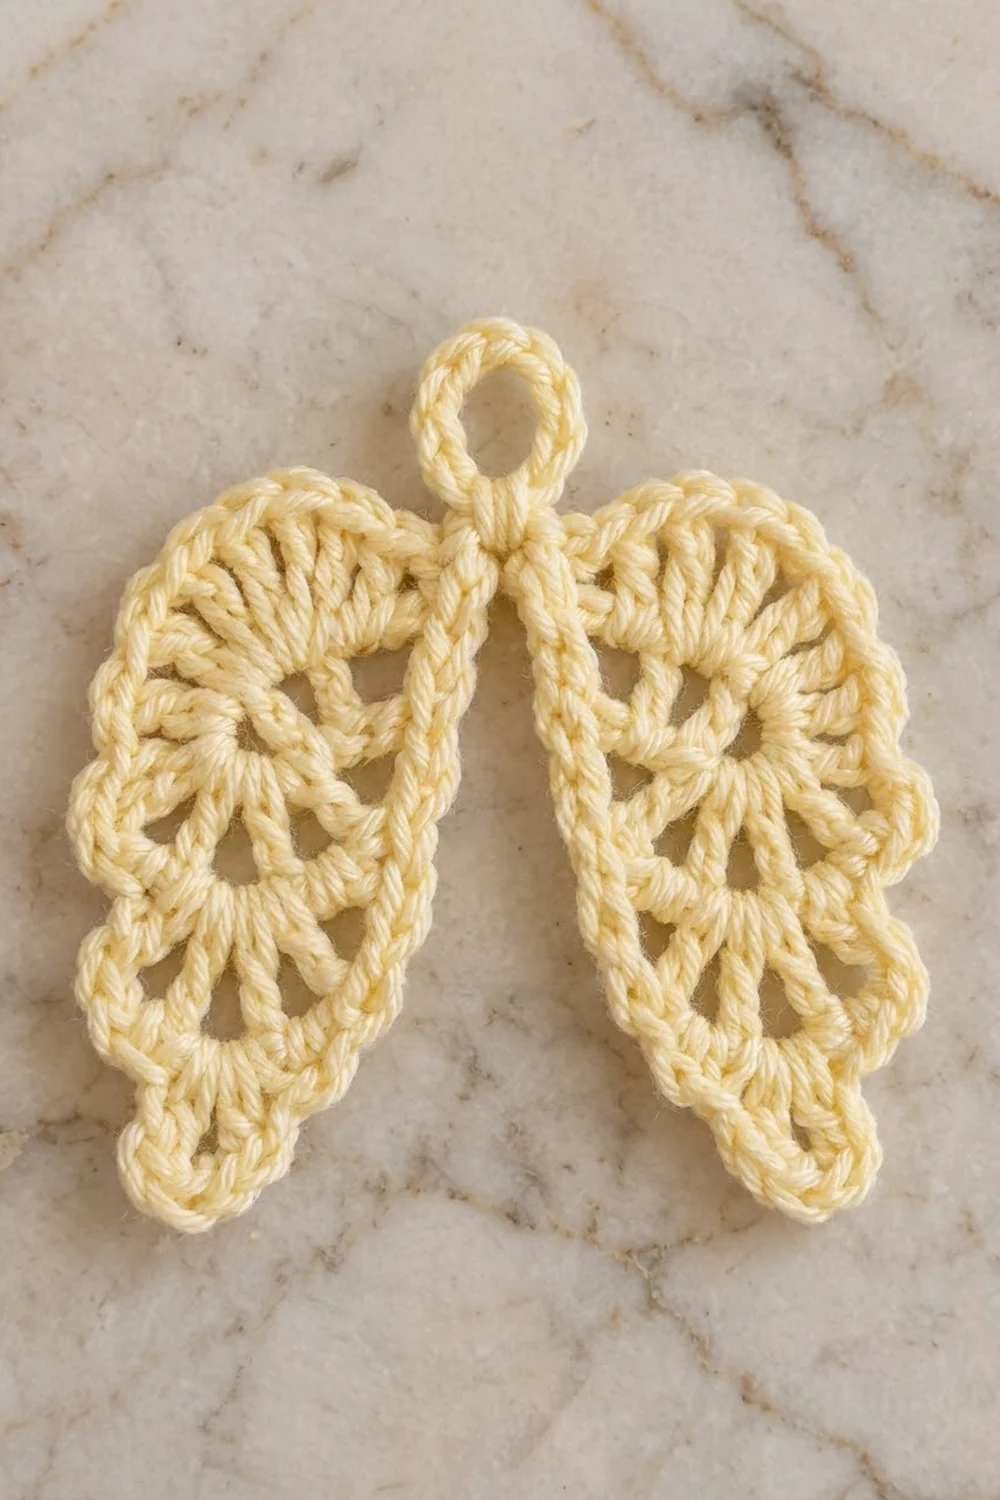
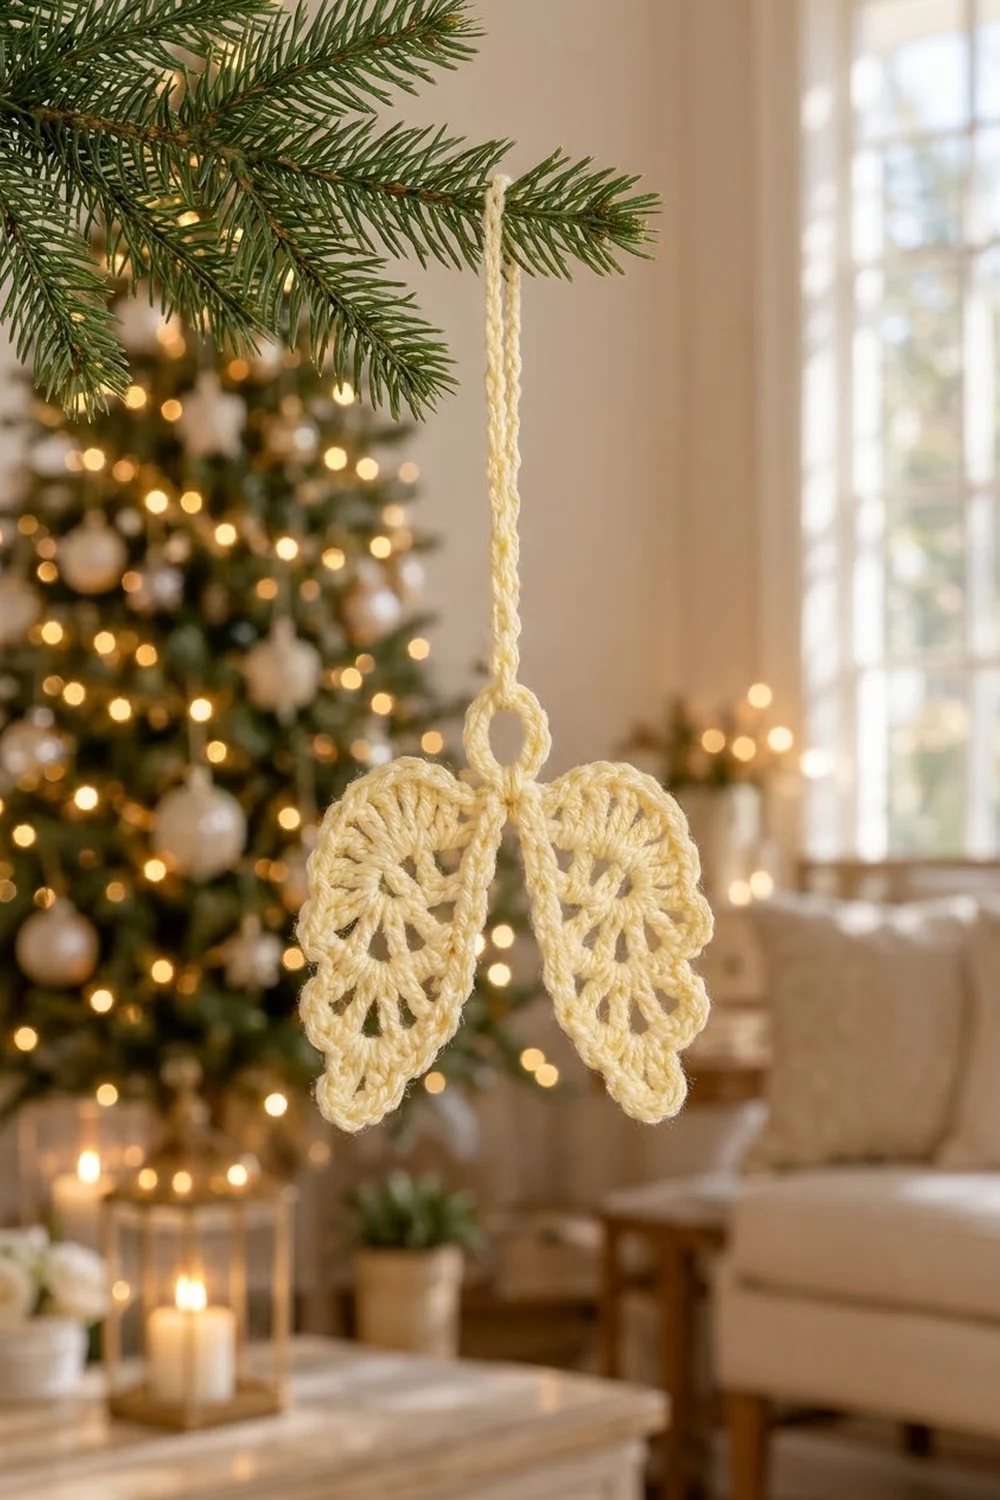
These little angel wings are an openwork ornament in soft butter yellow. Two teardrop-shaped wings hang from a small hanging loop, and a few wraps of yarn cinch them together at the center. Each wing has an open fan of double crochet spokes, a smooth inner edge, and a row of rounded scallops along the bottom and outer curve.
The design uses one color, a pale buttery cream-yellow. In a single shade the lace pattern stays the focus. It looks calm and vintage, which suits a Christmas tree, a window, a gift package, or a nursery shelf.
The finished motif measures about 5.5 in (14.0 cm) wide and 4.5 in (11.4 cm) tall, including the hanging loop. The pattern uses US crochet terms.
It’s one continuous piece. First you chain a hanging loop. Each wing then grows from the base of that loop around its own foundation chain, so there’s no sewing. Every wing gets three rounds: a shaped leaf, a lace round of chain spaces, and a scalloped edging round. A short yarn wrap at the center finishes the motif.
Finished Size and Construction
- Finished size: 5.5 in (14.0 cm) wide x 4.5 in (11.4 cm) tall, loop included
- Skill level: Easy+ (you should know how to work around a foundation chain)
- Terminology: US crochet terms
- Yarn weight: DK / light (3), cotton or cotton blend
- Hook: 3.5 mm (US E-4)
- Number of pieces: 1 motif, worked continuously (no sewing)
- Layout: hanging loop at top center, one wing hanging down to each side
- Piece size (one wing, finished): 3.75 in (9.5 cm) long x 2.25 in (5.7 cm) wide
- Size before border: each wing 3.25 in (8.3 cm) x 1.75 in (4.4 cm); full motif about 4.75 in (12.1 cm) x 4.0 in (10.2 cm)
- Border depth: about 0.25 in (0.6 cm) on each edge
- Hanging loop: about 0.75 in (1.9 cm) across
Materials
Yarn advice: Use a smooth, mercerized or combed cotton DK. Cotton shows the lace spokes and scallops clearly and holds its shape after blocking. Avoid fuzzy or very splitty yarns, which blur the chain spaces. An acrylic DK also works, but the scallops will be a little softer.
- Butter yellow (main and only color): 10 g, about 23 m (25 yd)
One motif uses about 5 g (12 m / 13 yd). The amount listed includes a margin for your gauge swatch, tails, and the center wrap.
Tools:
- 3.5 mm (US E-4) crochet hook
- Tapestry needle
- 2 locking stitch markers
- Rust-proof pins and a foam blocking mat
- Small spray bottle of water
- Ruler or measuring tape
- Scissors
Abbreviations (US Terms)
- ch – chain
- sl st – slip stitch
- sc – single crochet
- hdc – half double crochet
- dc – double crochet
- sk – skip
- sp(s) – space(s)
- st(s) – stitch(es)
- RS – right side
Special stitches
- Shell: 5 dc in the same ch-2 sp.
- Lace unit: dc in the indicated st, ch 2. In the side sections it’s worked as (dc in next st, ch 2, sk next st).
Gauge and Checkpoints
Gauge: 5 dc = 1 in (2.5 cm) with a 3.5 mm hook. Gauge is not critical for an ornament, but it controls the final size and how open the lace looks.
Test one wing first. Make the hanging loop and Wing 1, then measure before you start Wing 2.
Checkpoints:
- Hanging loop: about 0.75 in (1.9 cm) across, laid flat.
- After Round 1: the leaf measures 2.75 in (7.0 cm) long x 1.25 in (3.2 cm) wide.
- After Round 2: 3.25 in (8.3 cm) long x 1.75 in (4.4 cm) wide.
- After Round 3: 3.75 in (9.5 cm) long x 2.25 in (5.7 cm) wide.
- Full motif, blocked: 5.5 in (14.0 cm) x 4.5 in (11.4 cm).
If your wing is too big (more than 0.25 in / 0.6 cm over at Round 1), go down to a 3.25 mm hook or tighten your chains. If it’s too small, or the lace spaces close up, go up to a 3.75 mm (F-5) hook. Rip back and fix gauge at Round 1, because every later round is built on its 35 stitches.
Pattern
Hanging Loop
Leave a 12 in (30.5 cm) tail. You’ll use it for the center wrap.
Ch 12, sl st in the first ch to form a ring. This is the hanging loop. The sl st is the loop base, and both wings start here. Do not fasten off.
Wing 1 (Left Wing)
Foundation: Ch 15. Chain #1 is the one right beside the loop base, and chain #15 is the last one you made.
Round 1 (leaf shape): 5 dc in 3rd ch from hook (chain #13; the 2 skipped ch do not count). This is the bottom tip.
- Up the first side: dc in each of next 4 ch, hdc in each of next 4 ch, sc in each of next 3 ch.
- Top tip: 3 sc in last ch (chain #1).
- Rotate and work into the free loops on the other side of the chain: sc in each of next 3 ch, hdc in each of next 4 ch, dc in each of next 4 ch.
- Bottom tip: 5 dc in the same ch as the first 5 dc.
Sl st in first dc to join. (35 sts: 10 dc at the bottom tip, 11 sts up each long side, 3 sc at the top tip.)
The graded stitch heights make a teardrop: wide and round at the bottom, narrow at the top where the wing meets the loop.
Orientation check: Hold the motif with the loop at the top and the wing hanging to the left. Rounds travel counterclockwise, so the first long side of every round runs up the right-hand edge of the wing. On Wing 1, that’s the inner edge, closest to the center.
In Rounds 2 and 3, the first 5 dc of the bottom tip are called B1–B5 and the last 5 dc are B6–B10.
Round 2 (lace round): Ch 5 in the same st (counts as dc + ch 2) at B1. (Dc in next st, ch 2) in each of B2–B5. (5 lace units.)
- Inner edge: sc in each of next 11 sts.
- Top tip: sc in each of next 3 sc.
- Outer edge: sc in each of next 3 sc, then (dc in next st, ch 2, sk next st) 4 times. (4 lace units.)
- Bottom tip: (dc in next st, ch 2) in each of B6–B10. (5 lace units.)
Sl st in 3rd ch of beginning ch-5 to join. (14 dc including the beginning ch, 14 ch-2 sps, 17 sc.)
The bottom tip gets a lace unit in every stitch, so it fans out into the open spokes around the rounded end. The outer side skips every other stitch, so it lies flat. The inner edge stays solid.
Continue straight to the border (Round 3) below. Then come back for Wing 2.
Wing 2 (Right Wing)
With RS facing, join yarn with a sl st in the loop base, right beside Wing 1’s top tip.
Foundation and Round 1: Work exactly as for Wing 1. (35 sts.)
Orientation check: Hold the motif with the loop at the top. Wing 2 hangs to the right, so its first long side (the right-hand edge) is the outer edge.
Round 2 (lace round): Ch 5 in the same st (counts as dc + ch 2) at B1. (Dc in next st, ch 2) in each of B2–B5. (5 lace units.)
- Outer edge: (dc in next st, ch 2, sk next st) 4 times over the 4 dc and 4 hdc. (4 lace units.) Sc in each of next 3 sc.
- Top tip: sc in each of next 3 sc.
- Inner edge: sc in each of next 11 sts.
- Bottom tip: (dc in next st, ch 2) in each of B6–B10. (5 lace units.)
Sl st in 3rd ch of beginning ch-5 to join. (14 dc including the beginning ch, 14 ch-2 sps, 17 sc.)
The counts match Wing 1 exactly, but the lace sits on the opposite long side, so the two wings mirror each other. Continue to the border.
Border: Scalloped Edging (Round 3 of Each Wing)
Border gauge: One shell is about 0.5 in (1.3 cm) wide along the edge and stands about 0.25 in (0.6 cm) tall. The sc edge on the plain side adds a bit less than that.
Number the ch-2 sps 1–14 in the order you made them in Round 2.
Wing 1, Round 3
Sl st into sp 1. Ch 1, sc in same sp.
- Inner half of bottom tip: shell in sp 2, sc in sp 3, shell in sp 4, sc in sp 5. (2 shells.)
- Plain zone: sc in each of the 17 sc (11 along the inner edge, 3 across the top tip, 3 at the top of the outer edge).
- Outer edge and outer half of bottom tip: shell in sp 6, sc in sp 7, shell in sp 8, sc in sp 9, shell in sp 10, sc in sp 11, shell in sp 12, sc in sp 13, shell in sp 14. (5 shells.)
Sl st in first sc to join. (59 sts: 7 shells = 35 dc, 7 sc in sps, 17 sc in the plain zone.) Fasten off and weave in the tail.
Wing 2, Round 3
Sl st into sp 1. Ch 1, sc in same sp.
- Bottom tip and outer edge: shell in sp 2, sc in sp 3, shell in sp 4, sc in sp 5, shell in sp 6, sc in sp 7, shell in sp 8, sc in sp 9. (4 shells.)
- Plain zone: sc in each of the 17 sc (3 at the top of the outer edge, 3 across the top tip, 11 along the inner edge).
- Rest of bottom tip: shell in sp 10, sc in sp 11, shell in sp 12, sc in sp 13, shell in sp 14. (3 shells.)
Sl st in first sc to join. (59 sts: 7 shells = 35 dc, 7 sc in sps, 17 sc in the plain zone.) Fasten off and weave in the tail.
Why the Math Works
- Round 2 makes 14 ch-2 sps on each wing: 5 + 4 + 5. Fourteen is even, so (sc, shell) alternates around the lace zone with no leftovers. It starts with sc in sp 1 and ends with a shell in sp 14, right next to that first sc.
- On both wings, the 17 sc of the plain zone sit between two spaces that alternate correctly. On Wing 1 that’s sp 5 (sc) then sp 6 (shell). On Wing 2 it’s sp 9 (sc) then sp 10 (shell).
- Each wing has 7 shells x 5 dc = 35 dc, plus 7 + 17 = 24 sc, for 59 sts.
- Both wings end with identical counts, so they block to the same 3.75 in (9.5 cm) x 2.25 in (5.7 cm).
Center Wrap
Thread the 12 in (30.5 cm) starting tail onto the needle. Wrap it firmly 4 times around the narrow junction just below the hanging loop, where both top tips meet. Pass the needle up under the wraps, then down through the center. Weave in the tail and trim. This cinch keeps the loop upright and gives the motif its tied-ribbon center.
Final Blocking
- Weave in all tails before blocking, but don’t trim them close yet.
- Spritz the motif until it’s evenly damp, not dripping. For crisper lace, soak it in cool water for 5 minutes and roll it in a towel.
- Lay it RS up on the blocking mat with the hanging loop at the top center.
- Angle the wings outward so the bottom tips are 5.5 in (14.0 cm) apart at their widest point.
- Pin each bottom tip so the wing measures 3.75 in (9.5 cm) from top tip to bottom tip.
- Pin each of the 7 shells individually so every scallop is rounded and open.
- Gently open the lace spokes with a pin tip.
- Pin the hanging loop into a neat circle 0.75 in (1.9 cm) across.
- Let it dry completely, at least 6 hours. Unpin, then trim the tails.
Final Quality-Control Checklist
- Each wing has exactly 7 shells.
- The inner edge of each wing is smooth sc, with no shells.
- The wings mirror each other, with the lace and scallops on the outer side of both.
- 14 open ch-2 spokes are visible in each wing before the border covers them.
- Each wing measures 3.75 in (9.5 cm) x 2.25 in (5.7 cm).
- The full motif measures 5.5 in (14.0 cm) x 4.5 in (11.4 cm).
- The hanging loop is round, centered, and about 0.75 in (1.9 cm) across.
- The center wrap is tight and tidy, with no tails showing.
- Both wings hang at the same angle when the motif is held by its loop.
Troubleshooting
The wing curls into a cone. Round 2 has too many lace units on a side. Check that you skipped every other stitch on the long side and only worked one unit per stitch at the bottom tip.
The bottom tip ruffles. Your chains are too loose. Make the ch-2 sps tighter, or go down half a hook size for Round 2 only.
Both wings have scallops on the same side. Wing 2’s lace was worked on its inner edge. Redo Wing 2’s Round 2 and remember: the first long side of Wing 2 is the outer edge.
The shells pucker. Count 5 dc per shell, not 6. Also check that each sc goes into a space, not a stitch.
The hanging loop twists. Your loop chain twisted before you joined. Remake it, checking that the chain is flat before the sl st.
Care
Hand wash in cool water with mild soap, press out the water in a towel, and dry flat, reshaping the scallops with your fingers. Store the ornament flat or hang it by its loop, away from direct sunlight to protect the pale yellow.
Final Notes
Here’s the measurement chain:
- 5 dc = 1 in (2.5 cm)
- Hanging loop: 0.75 in (1.9 cm)
- After Round 1: 2.75 in (7.0 cm) x 1.25 in (3.2 cm), 35 sts
- After Round 2: 3.25 in (8.3 cm) x 1.75 in (4.4 cm), 14 ch-2 sps and 17 sc
- After the border: 3.75 in (9.5 cm) x 2.25 in (5.7 cm), 59 sts with 7 shells
- Full motif, blocked: 5.5 in (14.0 cm) x 4.5 in (11.4 cm)
If you hit each checkpoint, you’ll end up with a matched pair of lacy wings that hang straight from their loop. Make one for a tree branch, a gift tag, or a window, and enjoy watching the scallops catch the light.
Happy crocheting!