

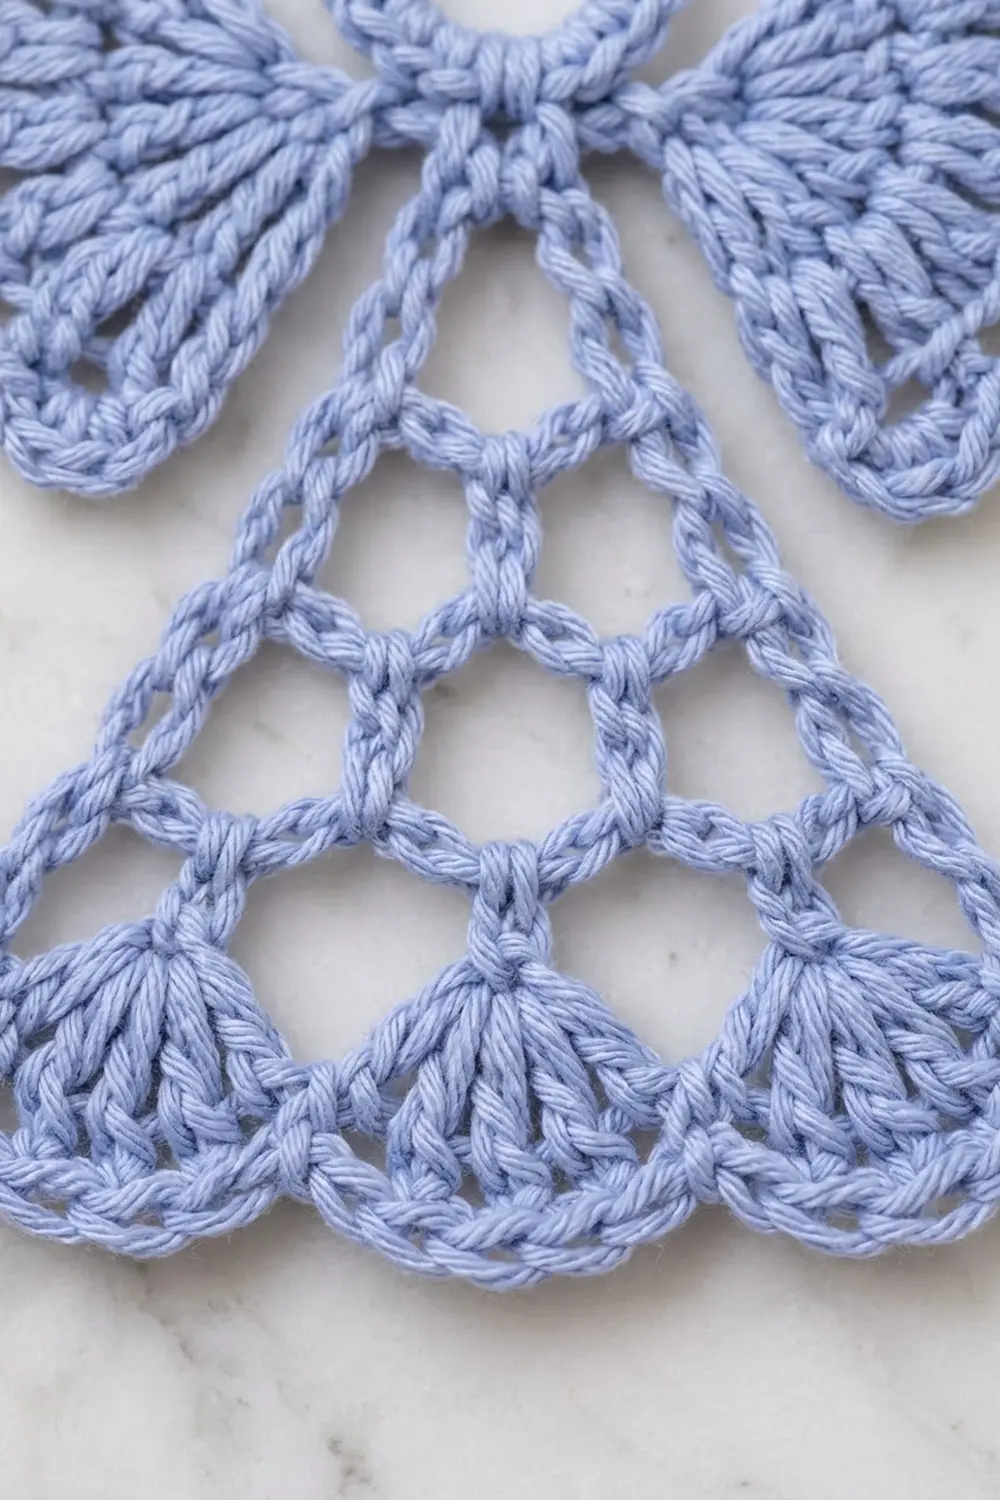
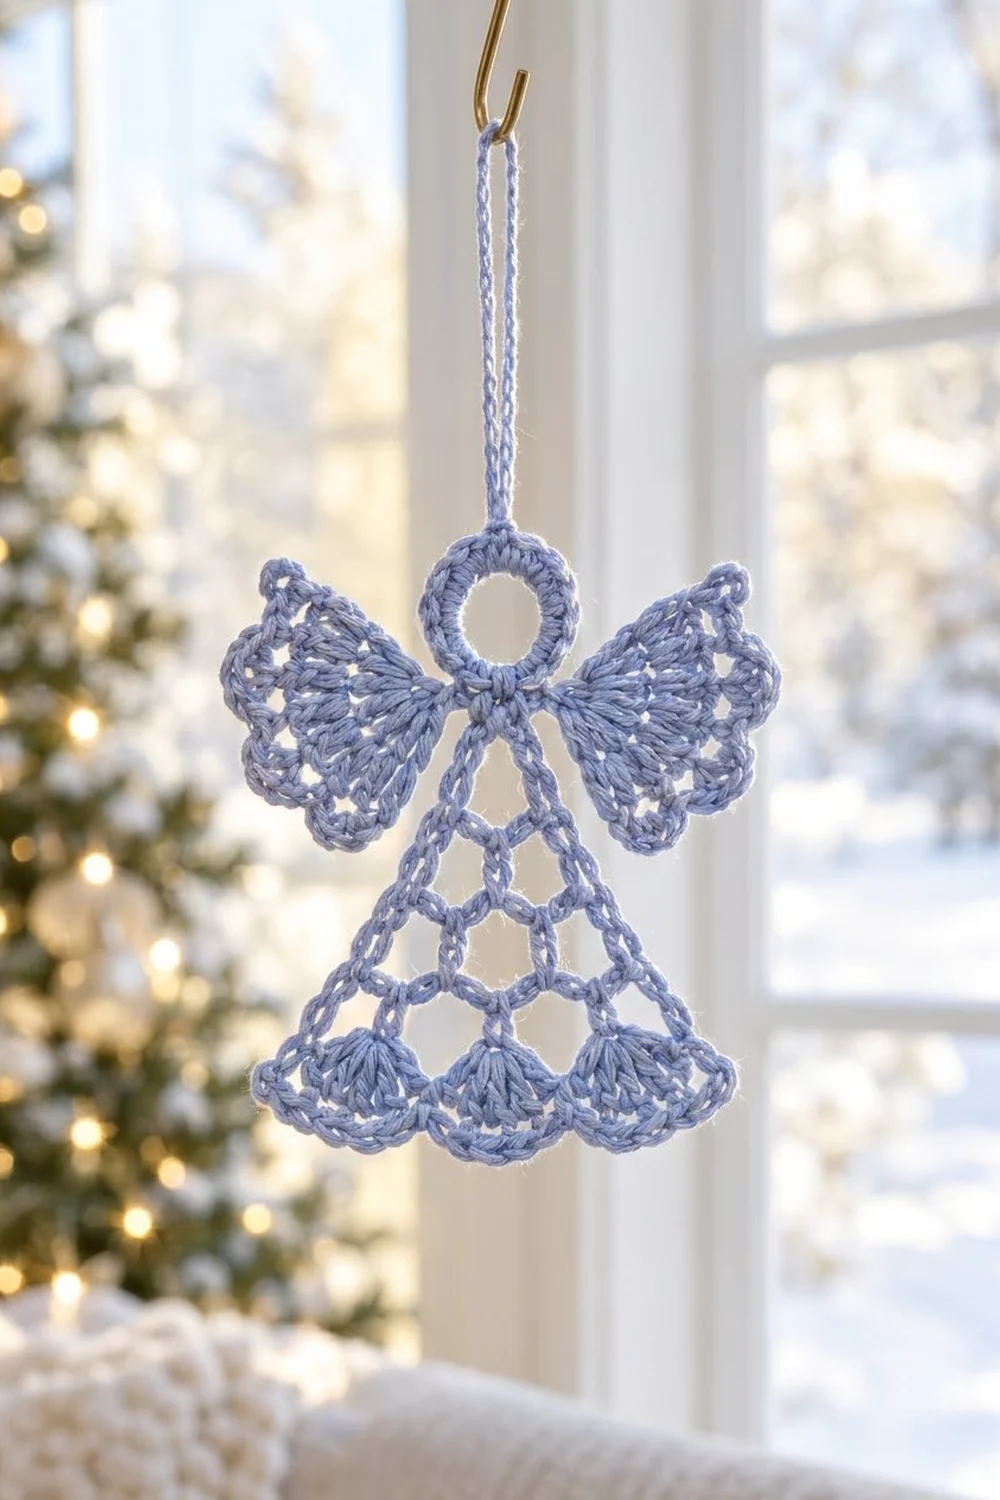
This little lace angel looks delicate but works up quickly. She has a round open head, two fan-shaped wings with scalloped edges, and a bell-shaped skirt of open chain mesh that ends in three plump shell fans.
The sample uses one soft periwinkle blue. A single color keeps the focus on the texture: the solid double crochet rays in the wings, the airy diamonds in the skirt, and the picot-scalloped hem. Mercerized cotton gives crisp stitch definition and takes starch well.
The pattern uses US crochet terms throughout. The finished angel measures 5 in (12.7 cm) across the wings and 4.75 in (12.1 cm) from the top of the head to the hem. The hanging loop adds 1.25 in (3.2 cm), for an overall height of 6 in (15.2 cm).
The whole angel is one piece. You crochet the head ring first and add a hanging loop. Then you work each wing directly off the side of the head and crochet the skirt downward from the bottom of the head in turned rows. One edging pass finishes the skirt sides and hem.
Finished Size and Construction
- Finished size: 5 in (12.7 cm) wingspan x 4.75 in (12.1 cm) tall, plus a 1.25 in (3.2 cm) hanging loop
- Skill level: Easy-intermediate
- Terminology: US crochet terms
- Yarn weight: DK (3) mercerized cotton
- Hook: 3.5 mm (E-4)
- Number of pieces: 1 (worked in one piece, no sewing)
- Layout: single standalone ornament
- Piece size: head ring 1.25 in (3.2 cm) across; each wing 2 in (5.1 cm) from shoulder to tip
- Size before border: hem 4 in (10.2 cm) wide; 4.5 in (11.4 cm) from head top to hem
- Border depth: 0.25 in (0.6 cm), one edging pass
Materials
Choose a smooth, mercerized DK cotton or cotton blend. Fuzzy or very soft acrylic yarns blur the mesh and won’t hold a crisp shape after blocking. A tightly plied cotton shows every dc ray in the wings.
Yarn:
- Periwinkle blue: 12 g / 28 m (about 31 yd)
These quantities include a margin of about 20% for your gauge swatch, tails, and any frogging. One angel uses close to 10 g.
Tools:
- 3.5 mm (E-4) crochet hook
- Tapestry needle
- Scissors
- 2 locking stitch markers
- Ruler or tape measure
- Blocking mat and rust-proof pins
- Optional: fabric stiffener or spray starch
Abbreviations (US Terms)
- ch – chain
- sl st – slip stitch
- sc – single crochet
- hdc – half double crochet
- dc – double crochet
- sk – skip
- st(s) – stitch(es)
- sp – space
- RS – right side
Special stitch – Scallop: (sc, hdc, 2 dc, hdc, sc) all worked into the same ch-4 loop. One scallop = 6 sts.
Special stitch – Shell: 9 dc worked into the same ch-5 loop.
Gauge and Checkpoints
Swatch gauge: 24 sc = 4 in (10.2 cm) with a 3.5 mm hook. That is 6 sc per inch (2.5 cm).
Make one test angel before you make a set. Because the piece is small, the head ring is your fastest gauge check.
Checkpoints:
- Head ring: 1.25 in (3.2 cm) outer diameter after Round 1.
- Hanging loop: 1.25 in (3.2 cm) long when folded.
- Wing after Row 2: 1.25 in (3.2 cm) from shoulder to edge.
- Wing after Row 4: 2 in (5.1 cm) from shoulder to tip.
- Skirt after Row 4: 2.25 in (5.7 cm) wide.
- Skirt after Row 7: 3.75 in (9.5 cm) wide.
- Skirt after Row 8: 4 in (10.2 cm) wide at the hem.
- After border: 4.5 in (11.4 cm) hem width and 4.75 in (12.1 cm) total height.
If your angel is too big: go down to a 3.25 mm hook, or pull each chain snug before you work into it. Loose chains are the most common cause of an oversized mesh.
If your angel is too small: go up to a 3.75 mm hook. Don’t add extra chains to the loops, because that changes the stitch counts in the shells and the border.
Head
Foundation: Ch 14, sl st into first ch to form a ring.
Round 1 (RS): Ch 1, work 24 sc into the ring, sl st into first sc to join. (24 sc)
Number the stitches in your head, starting with the joining sc as sc 1 at the top of the head. Counting clockwise with RS facing, sc 13 sits at the bottom center. Place a marker in sc 13.
Checkpoint: the ring should lie flat and measure 1.25 in (3.2 cm) across. If it ruffles, you have too many stitches. If it cups, check that you worked into the ring and not into the chains.
Hanging Loop
Ch 16, sl st into the same sc 1. (1 ch-16 loop)
Fasten off and weave the tail in through the back of the head stitches. The loop folds to about 1.25 in (3.2 cm).
Wings (Make 2, Worked Directly Onto the Head)
The wings fan out from the lower sides of the head, close to the neck. The right wing uses sc 10 and sc 11. The left wing mirrors it on sc 15 and sc 16.
Wing Base: With RS facing, join yarn with a sl st in sc 10. Ch 6, sl st in sc 11. (1 ch-6 loop)
Row 1: Turn. Ch 3 (counts as dc), work 12 dc into the ch-6 loop. (13 dc)
Row 2: Turn. Ch 3 (counts as dc), dc in the same st, work 2 dc in each of the next 11 dc, dc in the top of the turning ch. (25 dc)
Here is how the count works: 2 sts in the first st + 22 sts in the next 11 sts + 1 st in the turning ch = 25 dc. These dc pairs form the solid rays of the wing.
Row 3: Turn. Ch 1, sc in the first dc, ch 4, sk 2 dc, sc in next dc; repeat from * 7 more times. (9 sc, 8 ch-4 loops)*
Check: 1 sc + (8 repeats x 3 sts used) = 25 sts. The last sc lands in the top of the turning ch.
Row 4: Turn. Ch 1, work 1 Scallop in each ch-4 loop across. (8 scallops, 48 sts)
Fasten off, leaving an 8 in (20.3 cm) tail. Weave the tail back along the wing base so it reinforces the shoulder.
Second wing: Join with a sl st in sc 15, ch 6, sl st in sc 16, then repeat Rows 1–4 exactly.
Checkpoint: each wing measures 2 in (5.1 cm) from shoulder to tip, and the full wingspan is 5 in (12.7 cm).
Skirt
You work the skirt downward from the bottom of the head in turned rows. Each mesh row adds exactly one ch-5 loop: the two edge loops each get 2 sc, while every middle loop gets a single sc.
Row 1: With RS facing, join yarn with a sc in sc 12. Ch 5, sk sc 13, sc in sc 14. (2 sc, 1 ch-5 loop)
Row 2: Turn. Ch 1, (sc, ch 5, sc, ch 5, sc) all in the ch-5 loop. (3 sc, 2 ch-5 loops)
Rows 3–7 (mesh increase rows): Turn. Ch 1, (sc, ch 5, sc) in the first ch-5 loop, *ch 5, sc in the next ch-5 loop; repeat from * across, then ch 5, sc again in the same last loop.
Each row has one more loop than the row before. Complete counts per row:
- Row 3: 4 sc, 3 ch-5 loops
- Row 4: 5 sc, 4 ch-5 loops
- Row 5: 6 sc, 5 ch-5 loops
- Row 6: 7 sc, 6 ch-5 loops
- Row 7: 8 sc, 7 ch-5 loops
Checkpoint: after Row 4 the skirt is 2.25 in (5.7 cm) wide. After Row 7 it is 3.75 in (9.5 cm) wide, and the mesh is 2.5 in (6.4 cm) deep below the head.
Row 8 (shell row): Turn. Ch 1, sc in the first ch-5 loop, Shell in the next loop, sc in the next loop; repeat from * 2 more times. (3 shells, 4 sc = 31 sts)*
The placement is symmetrical. Loops 1, 3, 5 and 7 each get one sc, and loops 2, 4 and 6 each get one Shell. That is 4 sc + 27 dc = 31 sts.
Fasten off. The shells add 0.75 in (1.9 cm) of depth, so the skirt now hangs 3.25 in (8.3 cm) below the neck.
Checkpoint: the angel now measures 4.5 in (11.4 cm) from head top to hem, and the hem is 4 in (10.2 cm) wide.
Border
The border is one edging pass that straightens the two slanted skirt sides and adds a picot scallop to the hem. It starts and ends at the neck.
Border gauge: 6 sc per inch (2.5 cm), the same as the swatch. Each side of the mesh is 3 in (7.6 cm) long and has 6 row-end loops (one from each of Rows 2–7).
The side counts below do not include the corner groups. The corners are counted separately.
Border pass: With RS facing, join yarn with a sl st in the Row 1 sc at sc 14.
- First side: Work 3 sc in each of the 6 row-end loops down to the hem. (18 sc)
- First corner: (sc, ch 2, sc) in the end sc of Row 8. (2 sc, 1 ch-2 sp)
- Hem: Sc in the first dc of the next Shell, (ch 3, sc in next dc) 8 times; sc in the next Row 8 sc between shells; repeat from * once more, then sc in the first dc of the last Shell, (ch 3, sc in next dc) 8 times. (29 sc, 24 ch-3 picots)*
- Second corner: (sc, ch 2, sc) in the end sc of Row 8. (2 sc, 1 ch-2 sp)
- Second side: Work 3 sc in each of the 6 row-end loops up to the neck. (18 sc)
Sl st into the Row 1 sc at sc 12. Fasten off.
Total border count: 18 + 18 side sc, 29 hem sc, and 4 corner sc = 69 sc, plus 24 ch-3 picots and 2 ch-2 corner spaces.
Why the math works: each ch-5 row-end loop spans about 0.5 in (1.3 cm). At 6 sc per inch, 3 sc fill exactly 0.5 in (1.3 cm). So 6 loops x 3 sc = 18 sc across a 3 in (7.6 cm) side, and the edge lies flat without pulling or rippling. On the hem, each Shell has 9 dc, so 9 sc with 8 ch-3 picots between them follow the fan stitch for stitch. The 2 extra sc go into the 2 Row 8 sc between the shells: 3 x 9 + 2 = 29 sc.
Checkpoint: the border adds 0.25 in (0.6 cm) all around. The hem now measures 4.5 in (11.4 cm), and the angel is 4.75 in (12.1 cm) tall without the loop.
Final Blocking
- Weave in all remaining tails, working through solid stitches rather than the mesh chains.
- Soak the angel in cool water for 10 minutes, then press out the water in a towel. Don’t wring it.
- For a stiff ornament, dip it in fabric stiffener or mist it well with spray starch now.
- Lay the angel RS up on the blocking mat.
- Pin the head into a true circle, 1.25 in (3.2 cm) across.
- Pin the skirt sides straight, then pin the hem to 4.5 in (11.4 cm) wide. Put one pin in each ch-3 picot so the scallops open evenly.
- Open each skirt mesh loop into a neat diamond with a pin or blunt needle.
- Pin the wings so the total span is 5 in (12.7 cm). Pin each scallop point and spread the dc rays evenly.
- Pin the hanging loop straight up from sc 1.
- Let it dry completely, at least 12 hours, before unpinning.
Final Quality-Control Checklist
- Head is a flat ring of 24 sc, 1.25 in (3.2 cm) across.
- Hanging loop sits at the top center, directly above the hem center.
- Both wings have 25 dc in Row 2, 8 loops in Row 3, and 8 scallops in Row 4.
- Wings start at sc 10–11 and sc 15–16, so they mirror each other.
- Skirt Row 7 has 7 ch-5 loops, and Row 8 has 3 shells of 9 dc.
- Each skirt side has 18 border sc.
- The hem has 24 ch-3 picots, 8 per shell.
- Finished size: 5 in (12.7 cm) wingspan, 4.75 in (12.1 cm) tall, 6 in (15.2 cm) with the loop.
- All tails are woven in and trimmed close.
Troubleshooting
Wings sit at different heights. One wing base was probably worked into the wrong pair of sc. Count from sc 1 again: sc 10–11 and sc 15–16 sit at the same height on either side.
Wing ruffles. Row 2 may have too many dc. Recount to 25, and check that the turning ch gets only 1 dc.
Skirt is lopsided. One edge increase was missed. Every mesh row must begin with (sc, ch 5, sc) in the first loop and end with an extra ch 5, sc in the last loop.
Skirt narrows instead of flaring. Your chains are too tight. Loosen them, or use a hook 0.25 mm larger for the ch-5 loops only.
Shells are crowded or cupping. The shells will open with blocking. If they still cup, the ch-5 loops in Row 7 are too short.
Skirt sides wave after the border. You worked more than 3 sc into some row-end loops. Each side should have exactly 18 sc.
Hem picots twist. Keep the ch-3 relaxed and pin every picot during blocking.
Care
Hand wash in cool water with a mild soap, press dry in a towel, and reshape flat. If the angel was starched, starch it again after washing to bring back its stiffness.
Final Notes
Here is the full measurement chain. A 1.25 in (3.2 cm) head ring confirms your gauge. Two wings of 25 dc fan out to a 5 in (12.7 cm) span. Seven mesh rows widen the skirt to 3.75 in (9.5 cm), and the shell row brings it to 4 in (10.2 cm). The border finishes the hem at 4.5 in (11.4 cm), with an angel 4.75 in (12.1 cm) tall.
If every checkpoint matches, your angel will block into the same crisp, airy shape as the sample, ready to hang on a tree, a gift, or a window.
Happy crocheting!