

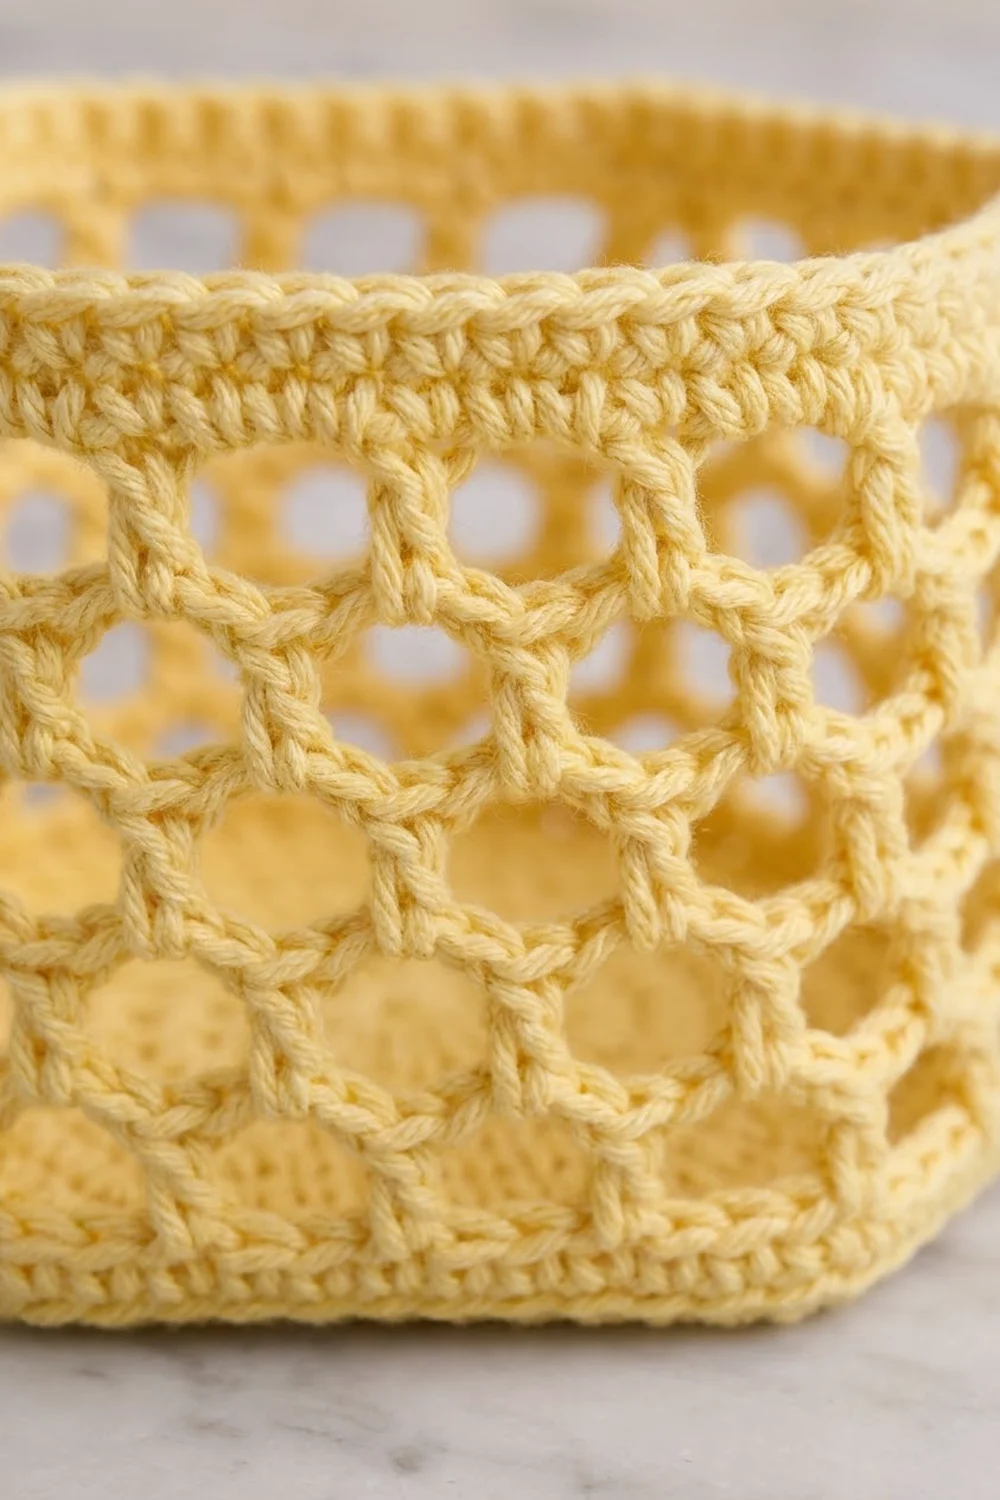
This hanging organizer stacks three hexagon baskets on two crocheted straps that meet at a wooden ring. Each basket has a solid base, open honeycomb walls and a firm single crochet rim. Hang it from a towel hook and it holds three standard toilet paper rolls, or washcloths, soaps and small bathroom items.
The sample uses one color only, a soft butter yellow, in worsted-weight cotton. The pale shade shows off the honeycomb texture, and the natural wood ring keeps the look calm and simple. It suits farmhouse, cottage or minimal bathrooms.
This pattern uses US crochet terms. Each finished basket measures 7 in (17.8 cm) across the flats, 8 in (20.3 cm) corner to corner and 4.5 in (11.4 cm) tall. When hung, the organizer is about 26 in (66.0 cm) long from the top of the ring to the bottom basket.
The construction is straightforward. You work each base in joined rounds, turn the walls up with a back-loop round, then crochet the mesh and the rim. The straps are worked lengthwise in three rows. To finish, you sew the straps to opposite corners of each basket and fold them over the ring.
Finished Size and Construction
- Finished size (hanging): about 8 in (20.3 cm) wide x 26 in (66.0 cm) long
- Skill level: Easy+ (simple rounds, chain mesh, sewing)
- Terminology: US crochet terms
- Yarn weight: worsted / Aran (#4), 100% cotton
- Hook: 5.0 mm (US H-8)
- Number of pieces: 3 baskets + 2 straps + 1 wooden ring
- Layout: baskets stacked in one vertical column, 2 in (5.1 cm) apart
- Piece size (one basket): 7 in (17.8 cm) across the flats x 4.5 in (11.4 cm) tall
- Size before rim (border): wall height 3.75 in (9.5 cm)
- Rim (border) depth: 0.75 in (1.9 cm), 3 rounds of sc
Materials
Yarn: Pick a smooth, firm worsted cotton or cotton blend. Cotton holds the hexagon shape, copes with bathroom humidity and resists stretching under the weight of paper rolls. Avoid acrylic, because it sags in the mesh. Avoid very splitty yarn too, because it makes the arches hard to read.
- Butter yellow: 200 g, about 320 m (350 yd)
- Each basket uses about 45 g (72 m / 79 yd)
- Each strap uses about 8 g (13 m / 14 yd)
These quantities include a margin of roughly 25 percent for your gauge basket, sewing tails and small gauge differences.
Tools:
– 5.0 mm (US H-8) crochet hook
– One wooden ring, 3 in (7.6 cm) outer diameter
– 6 locking stitch markers
– Tapestry needle
– Scissors
– Measuring tape
– Blocking mat, pins and a spray bottle
Abbreviations (US Terms)
- ch: chain
- sl st: slip stitch
- sc: single crochet
- dc: double crochet
- BLO: back loop only
- sp: space
- st(s): stitch(es)
- sk: skip
- arch: a ch-3 loop in the mesh
Special stitch: Honeycomb arch. Work (sc in next arch, ch 3). Each new sc lands in the center of an arch from the round below, so the mesh shifts half a repeat every round. That offset creates the honeycomb openings.
Gauge and Checkpoints
Gauge: 14 dc and 8 dc rounds = 4 in (10.2 cm). Each dc round adds 0.5 in (1.3 cm) to the radius of the hexagon, so the measurement across the flats grows by 1 in (2.5 cm) per round.
Make one complete basket before you start the others. That basket is your full-size gauge swatch.
Checkpoints (measured flat, across the flats):
– After Rnd 3: 3 in (7.6 cm)
– After Rnd 5: 5 in (12.7 cm)
– After Rnd 7: 7 in (17.8 cm)
– After Rnd 15 (end of mesh): wall height 3.75 in (9.5 cm)
– After Rnd 18: wall height 4.5 in (11.4 cm)
If your piece is too big, switch to a 4.5 mm hook. If it is too small, switch to a 5.5 mm hook. A base that cups like a bowl is too tight, so go up a size. A base that ruffles is too loose, so go down a size.
Basket Base (make 3)
Each round starts with ch 3, which counts as the first dc. Join each round with a sl st to the top of the beginning ch-3.
Rnd 1: Make a magic ring. Ch 3, dc in ring, ch 2, 2 dc in ring, ch 2; repeat from * 4 more times. Join, then pull the ring closed. (12 dc, 6 ch-2 sps)
Rnd 2: Ch 3, dc in next dc, (dc, ch 2, dc) in next ch-2 sp, dc in next 2 dc; repeat from * 4 more times, then (dc, ch 2, dc) in the last ch-2 sp. Join. (24 dc: 4 per side, 6 ch-2 sps)
Rnd 3: Ch 3, dc in each dc to the next ch-2 sp, (dc, ch 2, dc) in ch-2 sp, dc in each dc to the next ch-2 sp; repeat around, ending with (dc, ch 2, dc) in the last sp. Join. (36 dc: 6 per side)
Rnds 4–7: Repeat Rnd 3. Each round adds 2 dc per side, which is 12 per round.
– Rnd 4: 48 dc (8 per side)
– Rnd 5: 60 dc (10 per side)
– Rnd 6: 72 dc (12 per side)
– Rnd 7: 84 dc (14 per side), 6 ch-2 corner sps
Check that the base lies flat and measures 7 in (17.8 cm) across the flats.
Basket Walls
Rnd 8 (conversion round): Ch 1. Working in BLO, sc in each dc around. Work 1 sc into each ch-2 corner sp. Join to the first sc. (84 sc + 6 corner sc = 90 sc)
Each side now has 15 sc: 14 worked into that side’s dc, plus 1 corner sc. Put a marker in each corner sc. The unworked front loops form the outside ridge that makes the walls stand up.
Rnd 9 (set-up mesh): Ch 1, sc in first sc, ch 3, sk 2, sc in next sc, ch 3, sk 2; repeat from * 28 more times. Join to the first sc. (30 sc, 30 arches: 5 per side)
Each repeat uses exactly 3 sts of Rnd 8, and 90 ÷ 3 = 30 arches with nothing left over.
Rnd 10: Sl st in the first 2 ch to reach the center of the first arch. Ch 1, sc in the same arch, ch 3, sc in next arch, ch 3; repeat from * 28 more times. Join to the first sc. (30 sc, 30 arches)
Rnds 11–15: Repeat Rnd 10. (30 arches each round)
The 7 mesh rounds (Rnds 9–15) are each about 0.5 in (1.3 cm) tall, which gives 3.5 in (8.9 cm) of mesh. Add the 0.25 in (0.6 cm) of Rnd 8 and the wall measures 3.75 in (9.5 cm). The mesh shifts half a repeat every round, so move your corner markers up as you go and keep them lined up with the base corners.
Rim (Border)
Rim gauge: 15 sc fit along one side of about 4 in (10.2 cm). One round of sc adds 0.25 in (0.6 cm) of height.
Rnd 16 (trim round): Ch 1, sc in first sc, 2 sc in next arch, sc in next sc, 2 sc in next arch; repeat from * around. Join. (30 sc + 60 sc in arches = 90 sc: 15 per side)
Rnd 17: Ch 1, sc in each sc around. Join. (90 sc: 15 per side)
Rnd 18: Ch 1, sc in each sc around. Join. Fasten off and weave in the ends. (90 sc: 15 per side)
Why the math works: Each side of the base ends with 14 dc. Rnd 8 adds 1 corner sc per side, giving 15 sts per side, and that count already includes the corner stitch. The mesh uses 3 sts per arch, so 5 arches sit on each side. Rnd 16 gives back 3 sts per repeat (1 sc on the sc plus 2 sc in the arch), so the rim also has 15 sts per side and 90 in total. That matches the conversion round exactly. Nothing is added or lost, so the walls rise straight with no flare or pull.
Strap (make 2)
Strap gauge: 14 sc = 4 in (10.2 cm), which is 3.5 sc per 1 in (2.5 cm).
Foundation: Ch 92.
Row 1: Sc in 2nd ch from hook and in each ch across. Turn. (91 sc)
Rows 2–3: Ch 1, sc in each sc across. Turn. (91 sc)
Fasten off and leave a 24 in (61.0 cm) tail for sewing. Each strap is 26 in (66.0 cm) long and 0.75 in (1.9 cm) wide.
Make All Pieces
You need 5 crocheted pieces in total, all in butter yellow:
– 3 baskets: about 45 g each, 135 g total
– 2 straps: about 8 g each, 16 g total
Lay the pieces out in this arrangement before joining:
            ( RING )
           /        \
     STRAP A        STRAP B
        |              |
   C1 [  BASKET 1  ] C4
        |   2 in gap   |
   C1 [  BASKET 2  ] C4
        |   2 in gap   |
   C1 [  BASKET 3  ] C4
        |____tail_____|
C1 and C4 are opposite corners of each hexagon, with 3 sides between them. Strap A runs down every C1 and Strap B runs down every C4.
Joining
Method: Whipstitch with the strap tail on a tapestry needle. Center the strap over the corner and sew both long edges flat against the outside of the basket wall.
Strap allocation (stitches along each strap, from the top):
– Ring fold: 5 sts, about 1.5 in (3.8 cm)
– Drop to Basket 1: 21 sts, 6 in (15.2 cm)
– Basket 1: 16 sts, about 4.5 in (11.4 cm)
– Gap: 7 sts, 2 in (5.1 cm)
– Basket 2: 16 sts
– Gap: 7 sts
– Basket 3: 16 sts
– Base tail: 3 sts, about 1 in (2.5 cm)
Total: 5 + 21 + 16 + 7 + 16 + 7 + 16 + 3 = 91 sts, exactly the length of the strap.
Stitch-to-stitch logic: Each basket wall is 11 rounds tall (Rnd 8, 7 mesh rounds and 3 rim rounds). Spread the 16 strap sts over that height. Make one whipstitch through each strap edge stitch, catching the nearest solid part of the wall; in the mesh, that means a sc rather than an empty arch. Begin at the rim: strap st 1 goes to Rnd 18, and strap st 16 goes to the Rnd 8 ridge.
Order: Sew Strap A to Basket 1, then Basket 2, then Basket 3. Fold the 3-st tail under the base and tack it to Rnd 7. Repeat with Strap B on the opposite corners. Last, pass both strap tops through the ring from front to back, fold each 5-st end down and sew it firmly to the strap below.
Tension: Keep each stitch snug but not tight, because puckering distorts the mesh. Sew two passes at each ring fold, since those points carry the full weight.
Size checkpoint: Lay the organizer flat. The straps should run parallel, 8 in (20.3 cm) apart, and every gap should be 2 in (5.1 cm).
Final Blocking
- Spray each basket until damp but not dripping.
- Stuff each basket firmly with a folded towel or a paper roll wrapped in plastic.
- Pinch the six wall corners crisp, in line with the base corners.
- Press the base flat with your palm until the Rnd 8 ridge is sharp.
- Pin the straps straight on a mat and mist them lightly.
- Let everything dry completely, about 24 hours.
- Remove the stuffing and hang the organizer.
Final Quality-Control Checklist
- Each base has 84 dc and measures 7 in (17.8 cm) across the flats
- Rnd 8 has 90 sc and a visible outside ridge
- Every mesh round has 30 arches, 5 per side
- The rim has 90 sc, 15 per side, and stands straight
- All three baskets are 4.5 in (11.4 cm) tall
- Each strap has 91 sts and measures 26 in (66.0 cm)
- Straps sit on opposite corners C1 and C4 of every basket
- Every gap is 2 in (5.1 cm)
- Ring folds are double-stitched
- All ends are woven in on the inside
Troubleshooting
Base cups upward: Tension is too tight. Go up a hook size or loosen the ch-2 corners.
Base ruffles: Tension is too loose, or a side has an extra dc. Recount each side.
Walls flare out: Rnd 8 has more than 90 sc. Work only 1 sc in each corner sp.
Walls lean in: A corner sc is missing in Rnd 8. Rework the round to 90.
Arch count is off: You missed the first arch when starting a round. Always sl st to the arch center before the ch 1.
Basket tilts when hung: The straps are not on truly opposite corners. Count 3 sides between C1 and C4 and resew.
Wavy rim: Some arches in Rnd 16 got 3 sc. Work exactly 2 sc per arch.
Care
Hand wash in cool water with mild soap and press out the excess water. Reshape over a towel and lay flat to dry.

Final Notes
The measurement chain works like this. A 7-round base is 7 in (17.8 cm) across, with 14 dc per side. One corner sc per side brings each side to 15 sts and the round to 90. The mesh divides those 90 sts into 30 arches, and the rim turns them back into 90 sc, so the walls stay straight at 4.5 in (11.4 cm). The 91-st straps break down exactly into the ring fold, the drop, three baskets, two 2 in (5.1 cm) gaps and the base tail. If your gauge matches at every checkpoint, the organizer will hang level at about 26 in (66.0 cm).
Happy crocheting!