

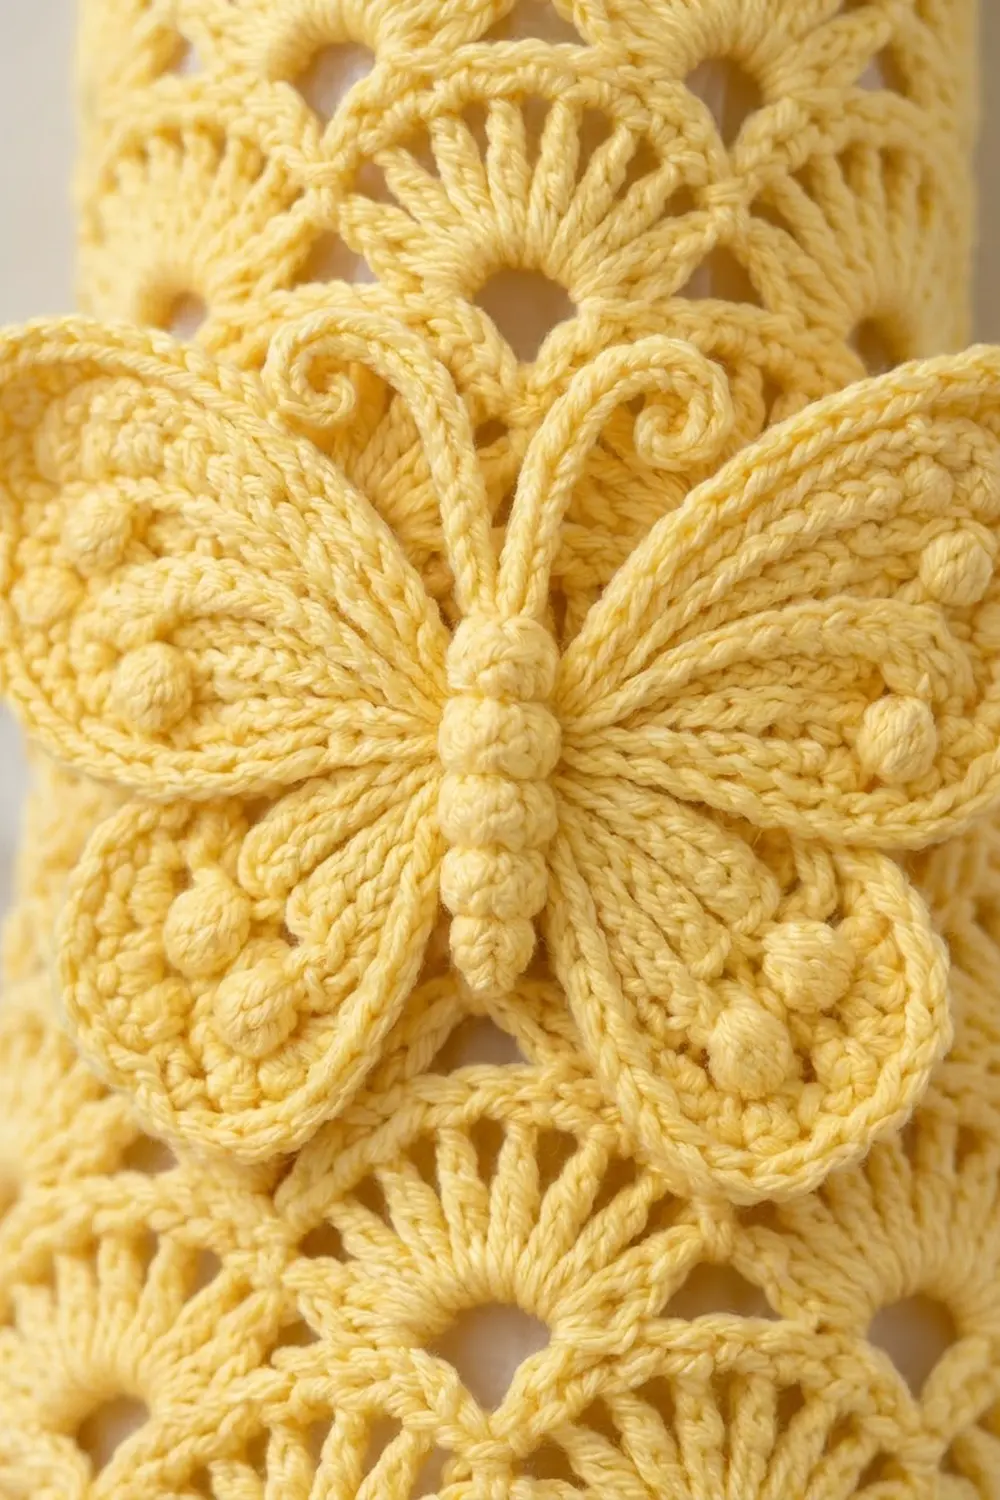
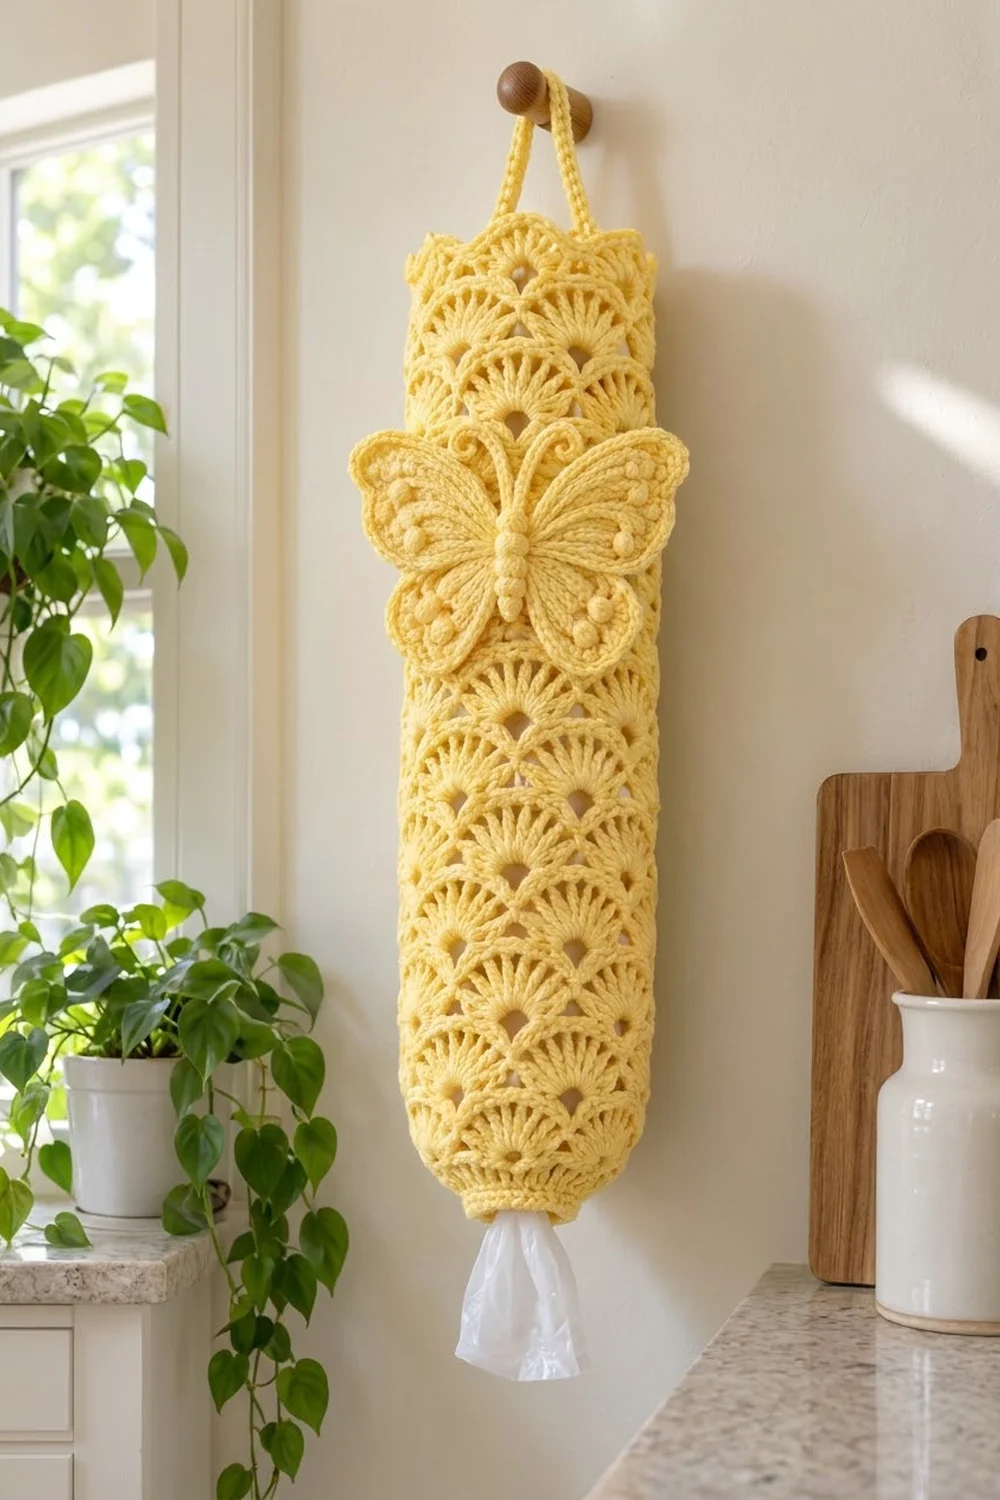
This plastic bag holder is a tall, soft tube of fan shells in one pale butter-yellow yarn. Each fan opens over a small eyelet, so the surface looks like rows of little sunrises. A textured butterfly sits near the top, with bobble dots on the wings, a segmented body, and curled antennae.
The holder hangs from a wall peg by a narrow corded loop. Bags go in through the scalloped top and come out one at a time through the small, firm opening at the bottom. It feels bright and cottage-style in a kitchen.
The pattern uses US crochet terms. The finished holder is 6 in (15.2 cm) wide laid flat, 12 in (30.5 cm) around, and 19 in (48.3 cm) tall, plus a 3 in (7.6 cm) loop.
You work the body bottom-up in one seamless piece: a solid single crochet cup around the opening, 21 rounds of offset fan shells, and a scalloped border. Then you make the butterfly and sew it to the front.
Finished Size and Construction
- Finished size: 6 in (15.2 cm) wide flat (12 in / 30.5 cm around) x 19 in (48.3 cm) tall, plus a 3 in (7.6 cm) loop
- Skill level: Intermediate
- Terminology: US crochet terms
- Yarn weight: Worsted (#4) cotton or cotton blend
- Hooks: 5.0 mm (H-8) for the body, 4.0 mm (G-6) for the butterfly
- Number of pieces: 1 seamless tube, plus 1 butterfly appliqué (wings, body, 2 antennae) sewn on
- Layout: Single vertical tube; butterfly centered on the front, just below the border
- Size before border: 17.75 in (45.1 cm) tall (2 in / 5.1 cm cup + 15.75 in / 40.0 cm of shells)
- Border depth: 1.25 in (3.2 cm)
- Butterfly: 5 in (12.7 cm) wingspan x 4 in (10.2 cm) tall
Materials
Choose a smooth worsted cotton or cotton blend. Cotton keeps the shells crisp, resists stretching under the weight of bags, and washes well. A pale yellow with good stitch definition shows the fans and bobbles best.
- Butter yellow: 165 g, about 330 m (360 yd) total
- Tube, border, and loop: 150 g, about 300 m
- Butterfly: 15 g, about 30 m
Quantities include a margin of about 15% for swatching and tension differences.
Tools: 5.0 mm (H-8) and 4.0 mm (G-6) hooks, tapestry needle, 4 locking stitch markers, measuring tape, stiff cardboard about 5.5 in (14.0 cm) wide, rust-proof pins, blocking mat or towel, spray bottle.
Abbreviations (US Terms)
- ch – chain
- sl st – slip stitch
- sc – single crochet
- sc2tog – single crochet 2 together
- dc – double crochet
- tr – treble crochet
- sk – skip
- sp – space
- st(s) – stitch(es)
- rnd(s) – round(s)
- rep – repeat
Shell: 7 dc in the same st.
Bobble: [Yarn over, insert hook in st, pull up a loop, yarn over, pull through 2 loops] 3 times in the same st, yarn over, pull through all 4 loops. Counts as 1 st.
Popcorn (pc): 5 dc in the same st, drop the loop, insert hook front to back in the first dc, pull the dropped loop through. Counts as 1 st.
Gauge and Checkpoints
Sc gauge (5.0 mm hook): 16 sc and 18 rnds = 4 in (10.2 cm).
Shell gauge: 1 shell repeat (6 base sts) = 1.5 in (3.8 cm) wide. 4 shell rounds = 3 in (7.6 cm), so each shell round is 0.75 in (1.9 cm).
Test first. Treat the bottom cup and first 4 shell rounds as your test section. If they measure correctly, the rest will too.
Checkpoints:
- After Rnd 1: 6 in (15.2 cm) around, about 1.9 in (4.8 cm) across.
- After Rnd 9: 12 in (30.5 cm) around, 6 in (15.2 cm) flat, 2 in (5.1 cm) tall.
- After Rnd 13: 5 in (12.7 cm) tall.
- After Rnd 30: 17.75 in (45.1 cm) tall.
- After the border: 19 in (48.3 cm) tall.
- After butterfly Rnd 5: 5 in (12.7 cm) wingspan.
Too big? Go down one hook size. Too small? Go up one hook size. Correct any difference over 0.25 in (0.6 cm) at Rnd 9, because it multiplies over 21 shell rounds.
Tube Body
Work in joined rounds with the right side facing. Do not turn. The beginning ch-1 never counts as a stitch.
Bottom Cup
With the 5.0 mm hook, ch 24. Join with a sl st to the first ch without twisting.
Rnd 1: Ch 1, sc in each ch around, join to first sc. (24 sc)
Rnds 2–3: Ch 1, sc in each st around, join. (24 sc)
Rnd 4: Ch 1, *sc in next 2 sts, 2 sc in next st; rep from * 7 more times, join. (32 sc)
Rnd 5: Ch 1, sc in each st around, join. (32 sc)
Rnd 6: Ch 1, *sc in next 3 sts, 2 sc in next st; rep from * 7 more times, join. (40 sc)
Rnd 7: Ch 1, sc in each st around, join. (40 sc)
Rnd 8: Ch 1, *sc in next 4 sts, 2 sc in next st; rep from * 7 more times, join. (48 sc)
Rnd 9: Ch 1, sc in each st around, join. (48 sc)
Rnd 1 is the dispensing opening. The gradual increases form a rounded, solid cup.
Fan Shell Section
Rnd 10 (Shell Rnd A): Ch 1, sc in first st, *sk 2 sts, shell in next st, sk 2 sts, sc in next st; rep from * 6 more times, sk 2 sts, shell in next st, sk 2 sts, join to first sc. (8 shells + 8 sc = 64 sts)
Rnd 11 (Shell Rnd B): Ch 3 (counts as dc), 3 dc in same sc, sk 3 dc, sc in center (4th) dc of next shell, *shell in next sc, sc in center dc of next shell; rep from * 6 more times, 3 dc in first sc, join to top of ch-3. (8 shells + 8 sc = 64 sts)
The split shell totals 3 dc + ch-3 + 3 dc = 7 sts, with the ch-3 at its center.
Rnd 12 (Shell Rnd C): Ch 1, sc in top of ch-3, *shell in next sc, sc in center dc of next shell; rep from * 6 more times, shell in last sc, join to first sc. (8 shells + 8 sc = 64 sts)
Each shell sits over a sc, and each sc sits over a shell center. The 3 skipped dc on each side leave a small eyelet under every fan.
Rnds 13–30: Rep Rnds 11–12 nine more times. (64 sts every round)
You now have 21 shell rounds, 15.75 in (40.0 cm) of shells. Total height: 17.75 in (45.1 cm). Do not fasten off.
Border
Border gauge: The border returns to 16 sc = 4 in (10.2 cm), so 48 sts measure exactly 12 in (30.5 cm) around, matching the shells. Flattened, each side holds 24 sts. Mark the round start and the st 24 sts later as the two folds.
Rnd 31 (conversion round): Ch 1, sc in first sc, *sc in next dc, sc2tog, sc in next dc (shell center), sc2tog, sc in next dc, sc in next sc; rep from * around, omitting the final sc on the last rep, join.
Count: 32 sc worked 1-per-existing-stitch + 16 sc2tog + 0 added = 48 sts (24 per side). Each 8-st repeat (7 dc + 1 sc) becomes 6 sts, so the top does not flare.
Rnd 32: Ch 1, sc in each st around, join. (48 sc; 24 per side)
Rnd 33 (scallop round): Ch 1, sc in first st, *sk 2 sts, shell in next st, sk 2 sts, sc in next st; rep from * 6 more times, sk 2 sts, shell in next st, sk 2 sts, join. (8 sc + 56 dc = 64 sts; 4 scallops and 32 sts per side)
Rnd 34 (trim round): Sl st in each st around. (64 worked 1-per-existing-stitch + 0 added = 64 sl st; 32 per side.) Fasten off.
Why the math works: 48 divides by 6, so the 6-st scallop repeat fits exactly 8 times, 4 per side. Each scallop spans 1.5 in (3.8 cm), the width of one body shell. In Rnd 31, the shell-center sc is the 4th st of each repeat. That is exactly where Rnd 33 places its scallop, so the scallops line up with the fans below.
Hanging Loop
Flatten the tube along the markers. Choose one side as the back. Find the sc between its 2nd and 3rd scallops (back center).
With the 5.0 mm hook, join yarn in that sc, ch 30, sl st in the same sc. Work 36 sc around the ch-30 loop, sl st in the same sc. Fasten off. The loop rises about 3 in (7.6 cm).
Butterfly Appliqué
Use the 4.0 mm hook for firm wings and round bobbles.
Wings
Rnd 1: Magic ring, ch 1, 8 sc in ring, join. (8 sc)
Rnd 2: Ch 1, *sc in next st, ch 4; rep from * 7 more times, join. (8 sc + 8 ch-4 sps)
Number the spaces 1–8. Spaces 1–2 form the upper right wing, 3–4 lower right, 5–6 lower left, and 7–8 upper left.
Rnd 3:
- Upper wing: (sl st, ch 3, 2 dc, 4 tr) in sp 1, (4 tr, 2 dc, ch 3, sl st) in sp 2. (12 sts)
- Lower wing: (sl st, ch 2, 5 dc) in sp 3, (5 dc, ch 2, sl st) in sp 4. (10 sts)
- Rep the lower wing in sps 5–6 and the upper wing in sps 7–8.
Join. (12 + 10 + 10 + 12 = 44 sts.) Wingspan: about 4.5 in (11.4 cm). Turn so the next round’s bobbles pop toward the right side.
Rnd 4 (wrong side facing): Work around each wing, with a sl st in the Rnd 2 sc between wings.
- Each upper wing: 3 sc in ch-3 sp, sc in next 2 dc, 2 sc in each of next 8 tr, working (sc, bobble) instead in the 2nd, 4th, and 6th tr, sc in next 2 dc, 3 sc in ch-3 sp. (23 sc + 3 bobbles = 26 sts)
- Each lower wing: 2 sc in ch-2 sp, sc in next 3 dc, 2 sc in each of next 4 dc, working (sc, bobble) instead in the 2nd and 3rd, sc in next 3 dc, 2 sc in ch-2 sp. (16 sc + 2 bobbles = 18 sts)
Total: 26 + 18 + 18 + 26 = 88 sts, plus 4 sl sts between wings. Join.
Rnd 5 (right side facing): Turn. Sl st in each of the 88 sts, skipping the 4 sl sts between wings, for a raised outline. (88 sl st) Fasten off with a 24 in (61.0 cm) tail. Wingspan: 5 in (12.7 cm).
Body
Ch 13.
Row 1: Pc in 4th ch from hook (head), sl st in next ch, *bobble in next ch, sl st in next ch; rep from * 3 more times. (1 pc + 4 bobbles + 5 sl st = 10 sts) Fasten off with a 12 in (30.5 cm) tail.
The body is about 3 in (7.6 cm) long, with a round head and 4 raised segments.
Antennae (make 2)
Ch 8, 3 sc in 2nd ch from hook, sl st in each of next 6 ch. Fasten off. The 3 sc curl the tip.
Attaching the Butterfly
Slip the cardboard inside the tube so you sew through the front layer only. Center the butterfly on the front, with the top of the upper wings 0.5 in (1.3 cm) below Rnd 31.
Sew the wings along their Rnd 4 edge with small stitches. Sew the body down the center, head up. Sew the antennae to the head and curl them outward. Weave in all ends.
Final Blocking
- Lightly mist the holder with water. Do not soak.
- Keep the cardboard inside so the tube lies flat and even.
- Shape it to 6 in (15.2 cm) wide and 19 in (48.3 cm) tall.
- Open each fan with your fingers so the eyelets show.
- Pin each scallop into a smooth curve.
- Shape the wings and push the bobbles outward from behind.
- Let it dry completely, then remove the pins and cardboard.
Final Quality-Control Checklist
- Bottom opening is about 1.9 in (4.8 cm) across and firm.
- Tube is 12 in (30.5 cm) around, 6 in (15.2 cm) flat.
- 21 shell rounds, each with 8 shells and 8 sc.
- Shells alternate cleanly, with an eyelet under each fan.
- Border has 8 scallops, 4 per side.
- Total height is 19 in (48.3 cm), within 0.25 in (0.6 cm).
- Loop is at the back center and secure.
- Butterfly is 5 in (12.7 cm) wide, centered, and sewn through the front only.
- All ends are woven in.
Troubleshooting
The tube spirals. Join every round and start each round exactly as written.
Shell count is off. Count 8 shells and 8 sc after each round. One missed sc shifts every round above.
The top flares. Rnd 31 must end with 48 sts. Recount the sc2tog.
The opening is too loose. Redo Rnd 1 with the 4.0 mm hook, then switch back.
Bobbles sink to the back. Work wing Rnd 4 with the wrong side facing.
The butterfly puckers the tube. Sew with the cardboard inside and keep stitches relaxed.
Care
Hand wash in cool water with mild soap, roll in a towel, and dry flat with the cardboard inside. Reshape the scallops and bobbles while damp.
Final Notes
The measurement chain is simple. A 24-st ring makes a 6 in (15.2 cm) opening. Three increase rounds grow the cup to 48 sts, 12 in (30.5 cm) around and 2 in (5.1 cm) tall. Eight 1.5 in (3.8 cm) shell repeats hold that width through 21 rounds of 0.75 in (1.9 cm), reaching 17.75 in (45.1 cm). The border returns to 48 sts and adds 1.25 in (3.2 cm), for 19 in (48.3 cm) total.
Check your gauge at Rnd 9 and Rnd 13, and the rest follows. Hang it up, fill it with bags, and enjoy the butterfly every time you reach for one.
Happy crocheting!