

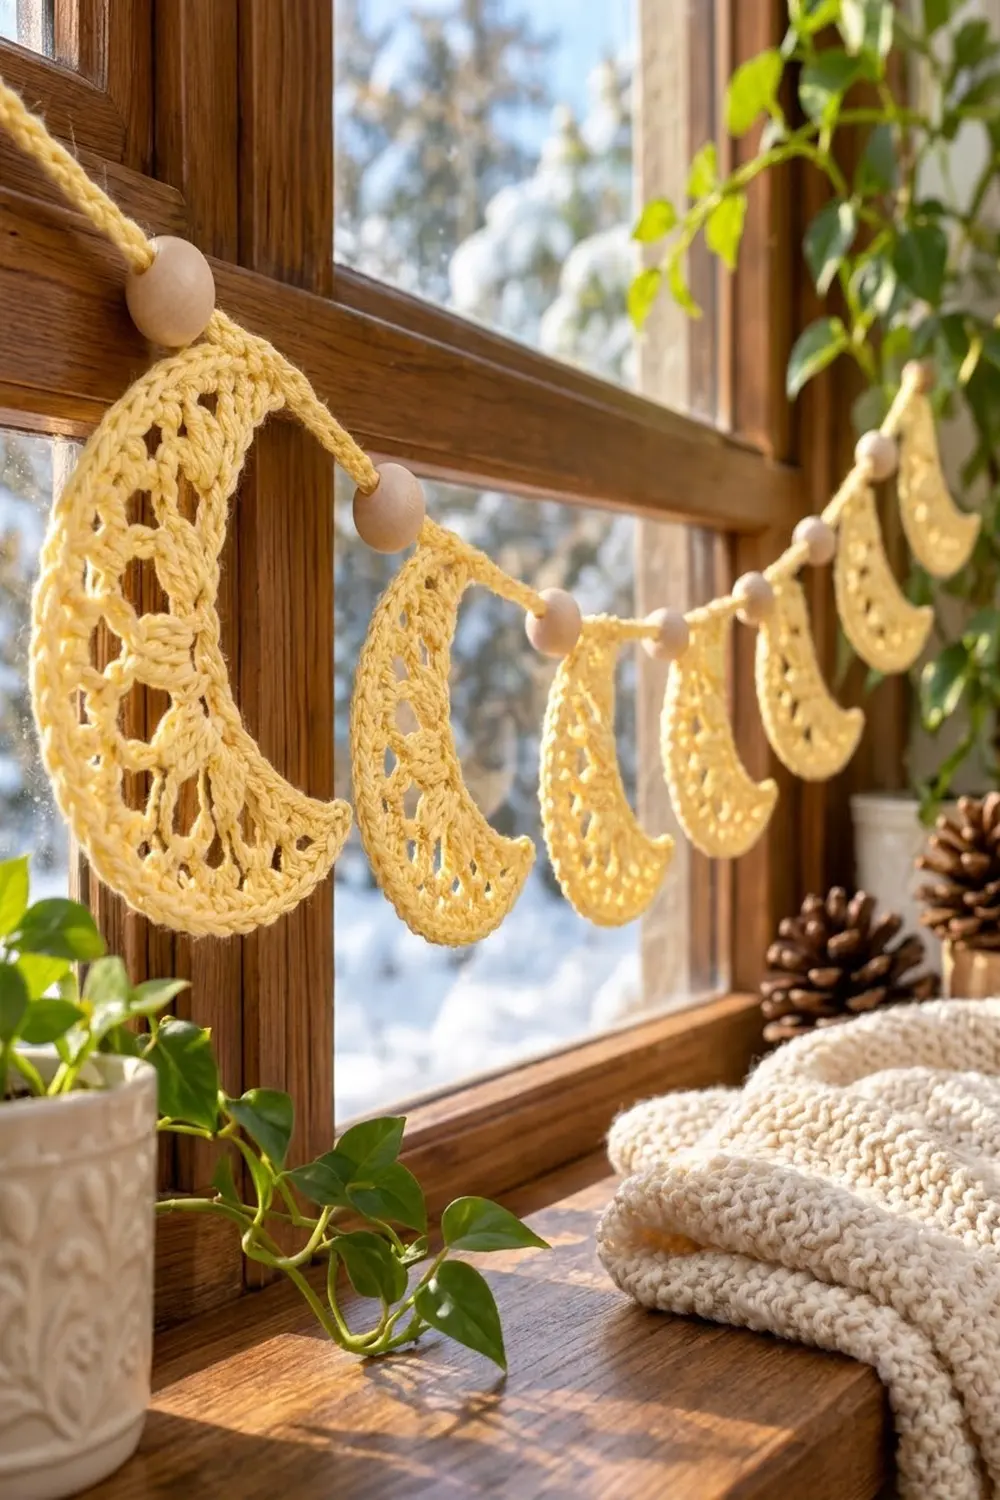
The Buttercup Moon Garland is six lacy crescent moons in soft butter yellow, strung on a simple chain cord with natural wooden beads. Each moon has a solid inner curve, a ring of cluster petals and an open mesh outer edge. Light shows through the lace nicely when the garland hangs in a window.
It’s a quiet, cozy piece in a single color. It works for a nursery, a reading nook, a winter windowsill or a celestial-themed party. Since there’s only one yarn color, the texture is what you notice: rounded petals, airy loops and a clean, crisp edge.
This pattern uses US crochet terms. Each finished moon measures 4.5 in (11.4 cm) from tip to tip and 2.5 in (6.4 cm) across. The beaded section of the garland is 27.5 in (69.9 cm) long, and the total length with ties is 43.5 in (110.5 cm).
Each moon is worked flat in four short rows, starting from a foundation chain that becomes the inner curve. The rows use short stitches at the ends and tall stitches in the middle, so the piece curves into a crescent with tapered tips. A single crochet border round finishes each moon. Last, you chain a cord with pre-strung beads and slip stitch each moon onto it as you go.
Finished Size and Construction
- Finished moon size: 4.5 in (11.4 cm) tip to tip × 2.5 in (6.4 cm) wide
- Garland length: 27.5 in (69.9 cm) beaded section + two 8 in (20.3 cm) ties = 43.5 in (110.5 cm)
- Skill level: Easy–Intermediate
- Terminology: US
- Yarn weight: DK / light (#3), cotton or cotton blend
- Hook: 3.5 mm (E-4)
- Number of pieces: 6 moons + 1 chain cord
- Layout: 6 moons in a single line, with 1 bead between each pair and 1 bead at each end (7 beads)
- Moon size before border: 4.25 in (10.8 cm) × 2.25 in (5.7 cm)
- Border depth: 1/8 in (0.3 cm) on every edge
- Center-to-center spacing: 4.5 in (11.4 cm)
Materials
Yarn: Use a smooth mercerized or matte cotton in DK weight. Cotton holds its shape at the tips and shows the lace clearly. Acrylic also works, but it may need blocking with a light spray starch to keep the tips crisp.
- Pale butter yellow: 30 g / 66 m (72 yd)
- About 15 g / 33 m for the 6 moons (2.5 g / 5.5 m each)
- About 2 g / 4.5 m for the cord
These quantities include a generous margin for gauge swatching, weaving in ends and a spare moon.
Tools:
- 3.5 mm (E-4) crochet hook
- 7 round wooden beads, 1/2 in (1.3 cm), with a hole of at least 4 mm
- Big-eye beading needle or dental floss threader (for stringing the beads)
- Tapestry needle
- Scissors
- Blocking mat and rust-proof pins
- Spray bottle with water (optional: light spray starch)
- 2 stitch markers
Abbreviations (US Terms)
- ch – chain
- sl st – slip stitch
- sc – single crochet
- hdc – half double crochet
- dc – double crochet
- sp – space
- st(s) – stitch(es)
- RS / WS – right side / wrong side
- cl – 3-dc cluster (see below)
Special stitch – 3-dc cluster (cl): Yarn over, insert hook in the indicated space, yarn over and pull up a loop, yarn over and draw through 2 loops. Repeat from * to * 2 more times (4 loops on hook). Yarn over and draw through all 4 loops. Each cluster counts as 1 stitch.
Gauge and Checkpoints
Gauge: 20 sc and 22 rows = 4 in (10.2 cm) in sc worked in rows. Chain cord gauge: 5 ch = 1 in (2.5 cm).
You don’t need a full swatch. Make one complete moon first and use it as your gauge piece. Check it against these points:
- After Row 1: A straight strip of 15 sts measuring 3 in (7.6 cm).
- After Row 3: The strip starts to curve and the six petals fan outward.
- After Row 4: The piece is a crescent measuring 4.25 in (10.8 cm) tip to tip and 2.25 in (5.7 cm) wide.
- After the border: The moon measures 4.5 in (11.4 cm) × 2.5 in (6.4 cm), and the band is 1.5 in (3.8 cm) deep at the center.
If your moon is too big: Go down to a 3.25 mm (D-3) hook. Also check that your chain loops aren’t loose; ch-3 loops that are too long make the outer edge ruffle.
If your moon is too small or cups: Go up to a 3.75 mm (F-5) hook, and work the foundation chain more loosely.
Small differences of up to 1/4 in (0.6 cm) won’t matter for a garland, but make sure all six moons match each other.
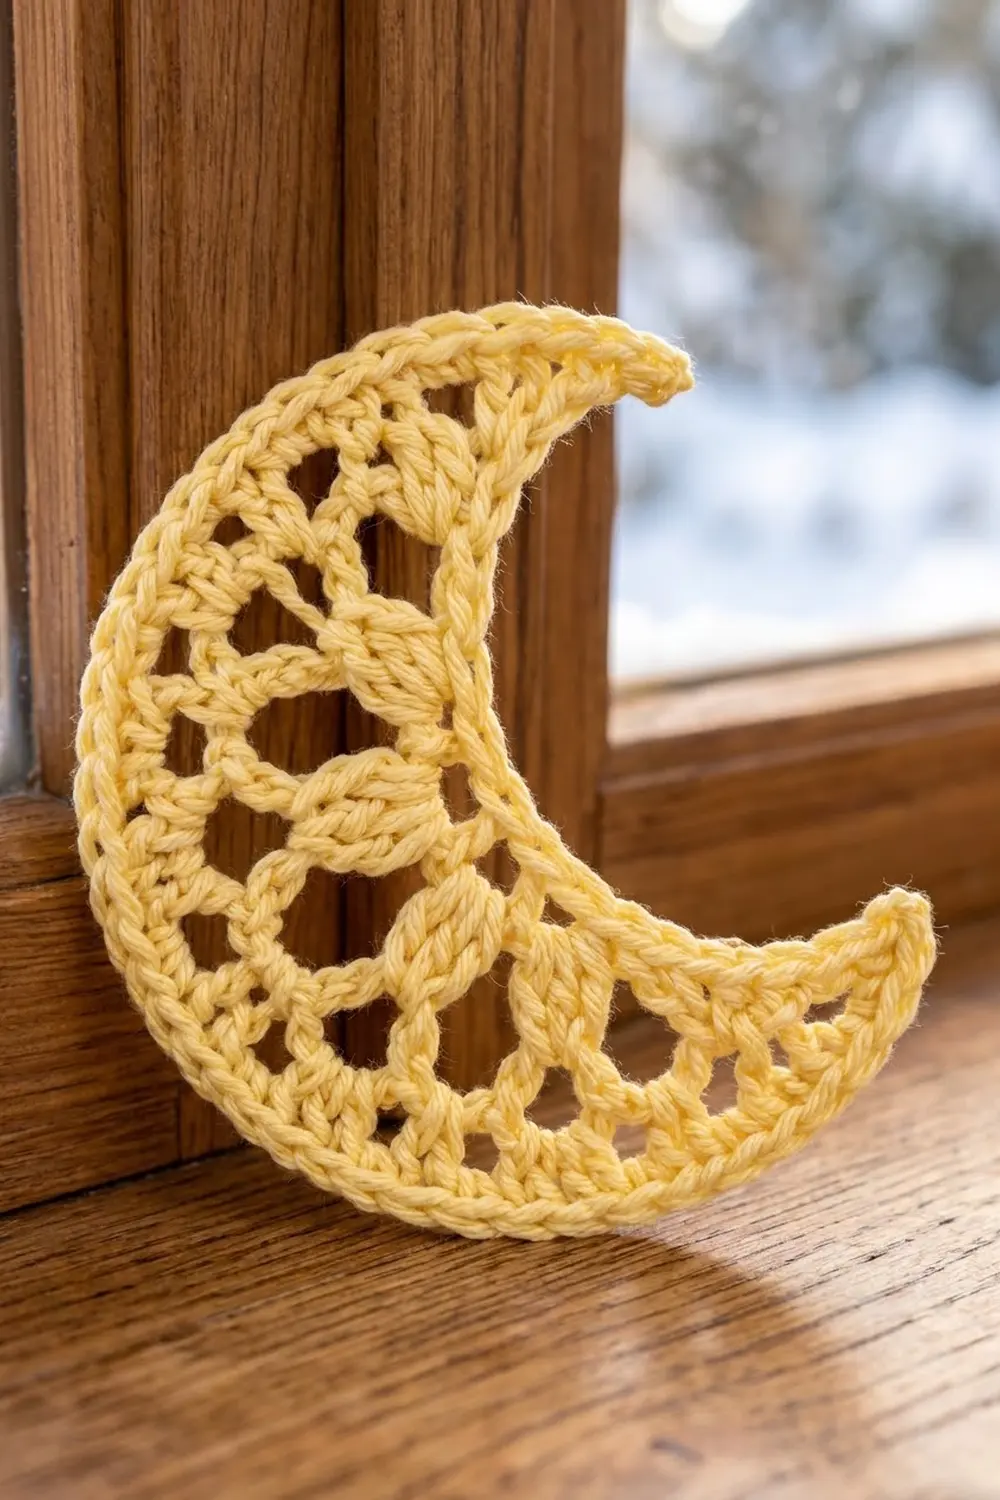
Moon Pattern (Make 6)
The moon is worked flat in rows. Rows 1 and 3 are RS rows, and Rows 2 and 4 are WS rows. The turning ch 1 never counts as a stitch.
Foundation: Leaving a 6 in (15.2 cm) tail, ch 16.
Row 1 (RS): Sc in 2nd ch from hook and in the next ch, hdc in each of the next 2 ch, dc in each of the next 7 ch, hdc in each of the next 2 ch, sc in each of the last 2 ch. Turn.
(15 sts: 4 sc, 4 hdc, 7 dc)
The foundation chain will become the smooth inner curve. Place a marker in the first sc of this row so you can find your RS later.
Row 2 (WS – spoke row): Ch 1, sc in each of the first 2 sts, hdc in each of the next 2 sts, dc in the next dc, ch 2, skip the next dc, dc in the next dc. Repeat from * to * 2 more times. Hdc in each of the next 2 sts, sc in each of the last 2 sts. Turn.
(11 sts + 3 ch-2 sps: 4 sc, 4 hdc, 3 dc)
Check: the 7 dc of Row 1 are used as 1 + (3 × 2) = 7, so the row still covers all 15 stitches.
Wait, recount: dc in the first dc, then three repeats of (skip 1, dc in next), gives 4 dc spokes in total.
(Corrected count: 12 sts + 3 ch-2 sps: 4 sc, 4 hdc, 4 dc)
Row 3 (RS – petal row): Ch 1, sc in each of the first 2 sts, hdc in each of the next 2 sts, dc in the next dc, (cl, ch 3, cl) in the next ch-2 sp, dc in the next dc. Repeat from * to * 2 more times. Hdc in each of the next 2 sts, sc in each of the last 2 sts. Turn.
(18 sts + 3 ch-3 sps: 4 sc, 4 hdc, 4 dc, 6 cl)
This row grows the outer edge. Each pair of clusters opens into a petal shape, which is why the piece starts to curve.
Row 4 (WS – mesh row): Ch 1, sc in each of the first 2 sts, hdc in each of the next 2 sts, dc in the next dc, ch 3, skip the cl, sc in the next ch-3 sp, ch 3, skip the cl, dc in the next dc. Repeat from * to * 2 more times. Hdc in each of the next 2 sts, sc in each of the last 2 sts. Turn. Do not fasten off.
(15 sts + 6 ch-3 sps: 4 sc, 4 hdc, 4 dc, 3 sc in the petal spaces)
The dc in this row sit right on top of the Row 2 spokes, so the spokes line up from the inner curve to the edge. Continue straight to the border round (see the Border section). Every moon gets its border before it is joined to the cord.
Make All Pieces
- Pale butter yellow: 6 moons, all worked through Row 4 and the Border round
- Chain cord: 1, worked last (see Joining)
- Beads: 7
Turn all the moons the same way, RS facing you, with Tip A at the top. Tip A is the ch-2 point made right after the 33 outer-arc sc of the border.
Layout grid (left to right):
CORD: TIE – BEAD – MOON 1 – BEAD – MOON 2 – BEAD – MOON 3 – BEAD – MOON 4 – BEAD – MOON 5 – BEAD – MOON 6 – BEAD – TIE
Joining
Method: Moons are joined to the cord as you chain it, with a single sl st through Tip A. There is no sewing.
Prepare: Use the big-eye needle or floss threader to string all 7 beads onto the yarn before you start. Push them down the ball, out of the way.
Cord:
- Leaving a 6 in (15.2 cm) tail, make a slip knot and ch 40. This is the first tie, 8 in (20.3 cm) long.
- Slide Bead 1 up against the hook and ch 10. The first chain closes behind the bead and locks it in place.
- Hold Moon 1 with RS facing you. Insert the hook from front to back through the Tip A ch-2 sp and sl st.
- Ch 10.
- Slide up the next bead and ch 10. Join the next moon as in Step 3, then ch 10.
- Repeat Step 5 until all 6 moons are joined.
- Slide Bead 7 up, ch 40 for the second tie, and fasten off.
Stitch-to-stitch logic: Each moon has exactly 10 ch on each side of it, and each bead sits between two 10-ch segments. The beaded section totals 12 segments × 10 ch = 120 ch, which is 24 in (61 cm), plus 7 beads × 0.5 in (1.3 cm) = 3.5 in (8.9 cm). That makes 27.5 in (69.9 cm). The whole cord is 40 + 120 + 40 = 200 ch plus 6 joining sl sts.
Tension: Chain at the same easy tension as your stitches. A tight cord twists and makes the moons spin. A loose cord sags between the beads.
Size checkpoint: Lay the garland flat after joining Moon 2. The space from the center of Moon 1 to the center of Moon 2 should be 4.5 in (11.4 cm): 2 in (5.1 cm) + 0.5 in (1.3 cm) + 2 in (5.1 cm). If it’s off by more than 1/4 in (0.6 cm), adjust your chain tension before you go on.
Border (Worked on Each Moon After Row 4)
Border gauge: 5 sc = 1 in (2.5 cm) along straight edges. Along the outer arc, 3 sc fill each ch-3 loop.
Border Round (RS): Continuing from Row 4, with the RS now facing you:
Outer arc: Ch 1, sc in each of the first 4 sts (2 sc, 2 hdc), sc in the next dc, 3 sc in the next ch-3 sp, sc in the next sc, 3 sc in the next ch-3 sp, sc in the next dc. Repeat from * to * 2 more times. Sc in each of the last 4 sts.
(33 sc = 4 + 1 + (3 × 8) + 4)
Tip A: Ch 2.
Tip A side: Work down the row ends, 1 sc in each of the 4 row ends.
(4 sc)
Inner curve: Working into the free loops of the foundation chain, sc in each of the 15 ch.
(15 sc)
Tip B side: Work up the row ends, 1 sc in each of the 4 row ends.
(4 sc)
Tip B: Ch 2, then sl st to the first sc of the round. Fasten off, leaving a 6 in (15.2 cm) tail.
Round total: 33 + 4 + 15 + 4 = 56 sc + 2 ch-2 tip points.
Why the math works: The inner curve has the same 15 stitches as Row 1, so it stays smooth without ruffling or puckering. The outer arc has 33 sc, more than twice the inner count. That difference of 18 sc, spread over 1.5 in (3.8 cm) of depth, makes the band bend through almost a half circle into the crescent shape. Each tip side gets exactly one sc per row end because every row starts and ends with sc. The ch-2 points add length at the very tips without making them wider, so the tips stay pointed.
Final Blocking
- Weave in all tails along the border on the WS. Keep them out of the lace.
- Mist each moon until it’s damp but not dripping.
- Pin it RS up on the mat. Put one pin in each ch-2 tip and one in the center of the outer arc.
- Ease the moon out to 4.5 in (11.4 cm) tip to tip and 2.5 in (6.4 cm) wide.
- Pin out each ch-3 loop on the outer edge so the mesh opens evenly.
- Use a pin tip to open each petal so the clusters lie flat and point outward.
- If you’re using starch, spray lightly now.
- Let the moons dry completely, at least 6 hours. Block the moons before you join them to the cord.
- Once the garland is joined, hang it and gently straighten each moon so it hangs from Tip A.
Final Quality-Control Checklist
- All 6 moons measure 4.5 in (11.4 cm) × 2.5 in (6.4 cm), within 1/4 in (0.6 cm) of each other.
- Each moon has 6 cluster petals and 4 dc spokes.
- Each border round has 56 sc + 2 ch-2 tips.
- The inner curve is smooth, with no ruffles.
- Both tips come to a clear point.
- All 7 beads are evenly spaced, with 10 ch on each side of every moon.
- All moons face the same direction and hang from Tip A.
- Both ties are 8 in (20.3 cm) long.
- No tails are visible from the RS.
Troubleshooting
The outer edge ruffles. Your ch-3 loops are too loose, or you worked 4 sc into a loop. Re-chain tighter and keep to exactly 3 sc per loop.
The moon stays straight instead of curving. Your clusters may be too tight. Pull up each loop of the cluster to full dc height. Also check that each petal space has both clusters.
The inner curve puckers. You skipped a foundation chain. Work exactly 15 sc along it.
The tips are blunt. Don’t skip the ch-2 at each tip, and pin the points while blocking.
The moons spin on the cord. The cord is twisted. Hang the garland and let it relax, or re-chain it a little looser.
A bead slides around. The chain after the bead was too loose. Pull that first chain snug against the bead.
Care
Hand wash in cool water with mild soap, roll it in a towel to remove water, and dry the moons flat and pinned to keep their shape. If you used starch, re-starch after washing.
Final Notes
Here’s the full measurement chain. Row 1 is 15 sts, 3 in (7.6 cm). After Row 4, the crescent is 4.25 in (10.8 cm) × 2.25 in (5.7 cm). The border (56 sc + 2 tips) brings it to 4.5 in (11.4 cm) × 2.5 in (6.4 cm). Six moons on a 200-ch cord with 7 beads make a beaded section of 27.5 in (69.9 cm) and a full garland of 43.5 in (110.5 cm).
Once your first moon matches the checkpoints, the other five will go quickly.
Happy crocheting!