

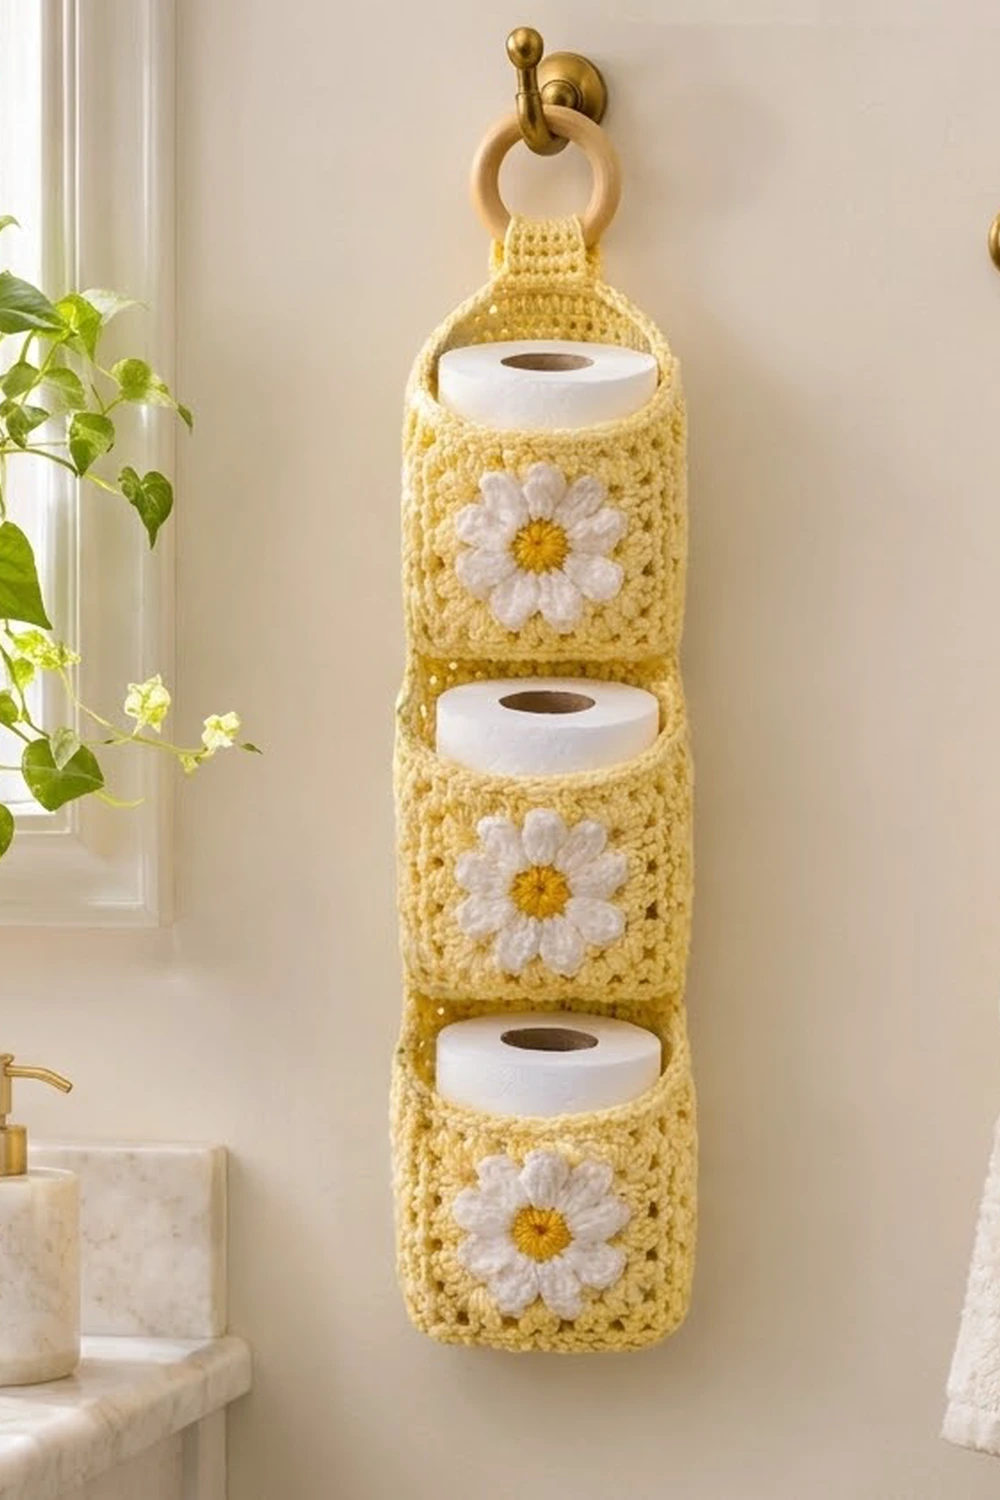
This hanging toilet paper holder has three stacked, box-shaped pockets in soft buttercup yellow. Each pocket front carries a white daisy with a golden center, set into a classic granny square. The sides, back and base are plain granny squares, and a firm single crochet rim finishes every opening.
It is a cheerful cottage-style piece for a small bathroom. It hangs from a wooden ring on a wall hook and holds three standard rolls off the floor. The palette is simple: pale yellow for the structure, white for the petals and golden yellow for the flower centers.
The pattern uses US crochet terms. The finished holder is 5 in (12.7 cm) wide and 5 in (12.7 cm) deep. The three-pocket stack is 16.5 in (41.9 cm) tall, plus a hanging tab of about 2 in (5.1 cm) above the top rim.
Construction is modular. You make 15 squares that all measure 5 in (12.7 cm) and have 25 single crochet per side. Each pocket is five squares sewn into an open box. You then add a rim to each pocket, stack the three pockets back to back, and work a tab that wraps around the ring.
Finished Size and Construction
- Finished size: 5 in (12.7 cm) wide x 5 in (12.7 cm) deep x 16.5 in (41.9 cm) tall, plus a hanging tab
- Skill level: Intermediate (easy stitches, careful assembly)
- Terminology: US crochet terms
- Yarn weight: Worsted (#4), 100% cotton
- Hook: 4.5 mm (US 7)
- Number of pieces: 15 squares (3 daisy squares, 12 plain squares), plus a tab worked in place
- Layout: 3 open boxes stacked vertically. Each box has 1 daisy front, 2 plain sides, 1 plain back and 1 plain base
- Piece size: 5 in (12.7 cm) square, 25 sc per side
- Size before border: each box is 5 in (12.7 cm) on every side
- Border depth: a 2-round sc rim adds 0.5 in (1.3 cm), so each pocket is 5.5 in (14.0 cm) tall
Materials
Use a smooth worsted-weight cotton or cotton blend. Cotton holds the box shape, doesn’t stretch much under a roll’s weight, and handles bathroom humidity well. Avoid fluffy acrylics because the granny texture and petals lose their definition.
- Color A, pale buttercup yellow (main): 260 g, about 445 m
- Color B, white (petals): 20 g, about 34 m
- Color C, golden yellow (centers): 10 g, about 17 m
These quantities include a margin of about 10–15% for a gauge swatch, seams and weaving in ends.
Tools
- 4.5 mm (US 7) crochet hook
- Tapestry needle
- 4–6 locking stitch markers
- Wooden ring, 2.5 in (6.4 cm) diameter
- Scissors and a tape measure
- Optional: 3 pieces of plastic canvas cut to 4.75 in (12.1 cm) square, to stiffen the bases
Abbreviations (US Terms)
- ch: chain
- sl st: slip stitch
- sc: single crochet
- hdc: half double crochet
- dc: double crochet
- sp: space
- st(s): stitch(es)
- RS: right side
- WS: wrong side
Special stitch: Petal. Work (hdc, 3 dc, hdc) all in the same stitch.
Granny corner. Work (3 dc, ch 2, 3 dc) all in the same corner ch-2 sp.
Gauge and Checkpoints
Gauge: 5 sc and 4 sc rows = 1 in (2.5 cm).
Before making all 15 pieces, make one plain square and measure it. Every later step depends on the 5 in (12.7 cm) square with 25 sc per side.
Plain square checkpoints (measured flat, edge to edge):
- After Round 1: 1 in (2.5 cm)
- After Round 3: 2.5 in (6.4 cm)
- After Round 5: 4 in (10.2 cm)
- After Round 7: 5 in (12.7 cm)
Daisy square checkpoints:
- After Round 3 (petals): about 2.25 in (5.7 cm) across
- After Round 5: 2.5 in (6.4 cm), the same size as plain Round 3
- After Round 9: 5 in (12.7 cm)
If your square is too big, go down to a 4 mm (US 6) hook. If it’s too small, go up to a 5 mm (US 8) hook. Don’t fix the size by adding or skipping stitches. The 25-stitch edge has to stay the same so the seams line up.
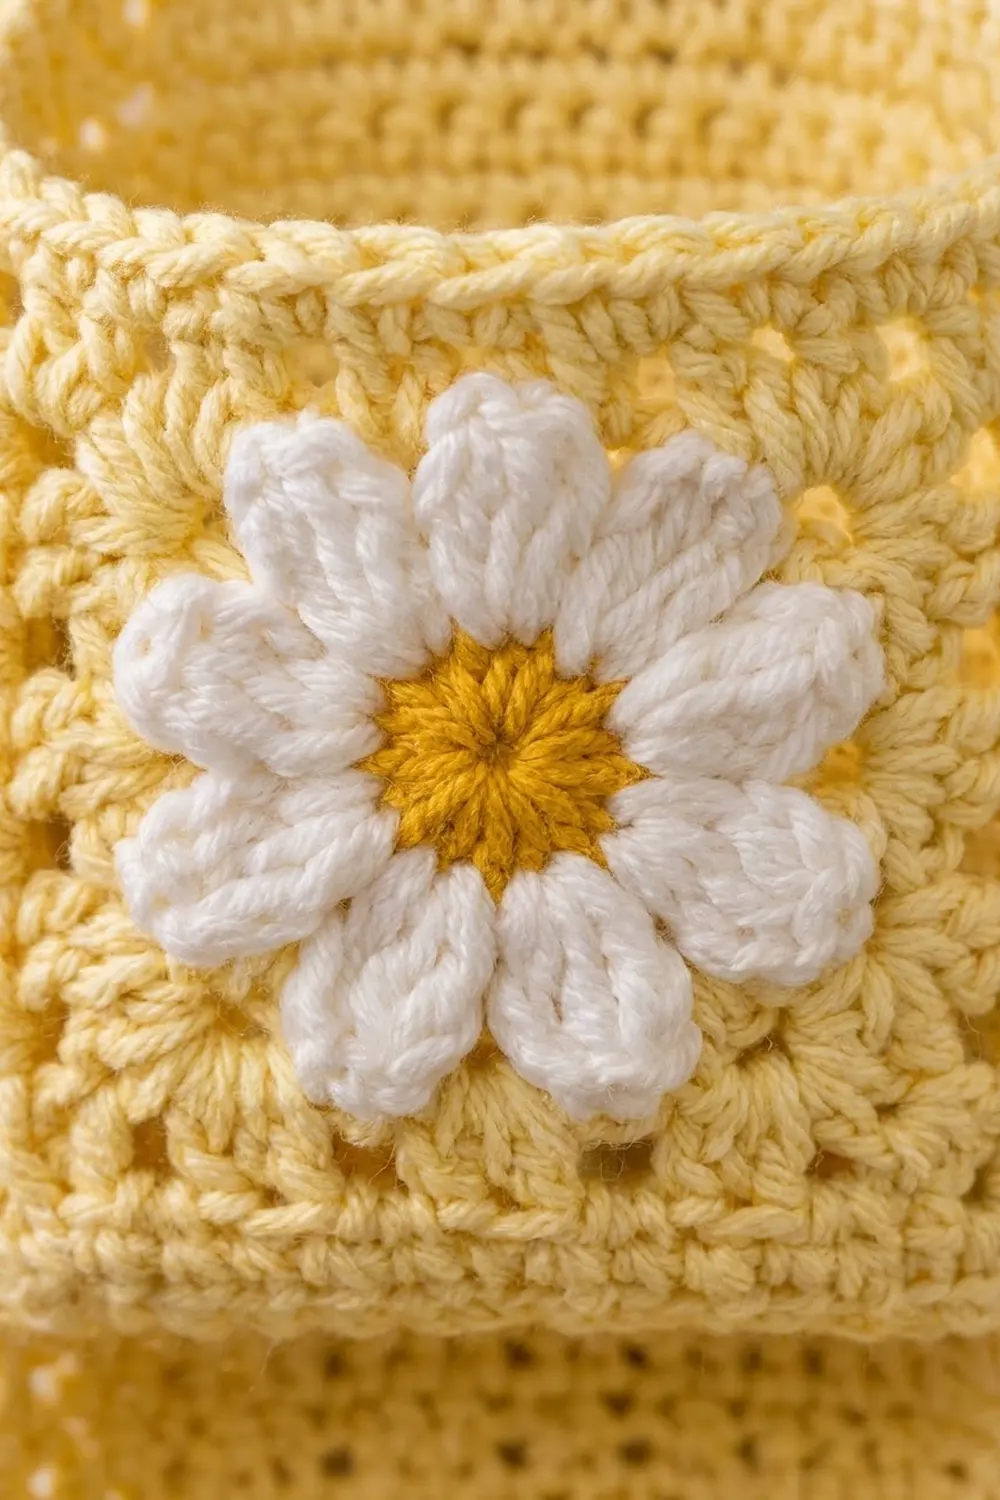
Daisy Square (Make 3)
Round 1 (Color C): Make a magic ring. Ch 1, then work 8 sc into the ring. Join with a sl st to the first sc. Pull the ring closed. (8 sc)
Round 2 (Color C): Ch 1, then work 2 sc in each st around. Join. Fasten off. (16 sc)
Round 3 (Color B): Join B in any st. Sc in the next st, then work a Petal in the next st. Repeat from * to * 7 more times. Join to the first sc. Fasten off. (8 petals: 8 sc + 40 petal sts = 48 sts)
The petals are rounded and stand slightly forward. Each sc between two petals anchors the next round.
Round 4 (Color A, framework round): Working behind the petals, join A around the post of any sc between two petals. Ch 4, then sc around the post of the next sc between petals. Repeat from * to * 7 more times, ending with a sl st in the joining st. (8 ch-4 sps)
The chains sit behind the petals, so the daisy stays layered on top of the square.
Round 5 (Color A, conversion round): Sl st into the first ch-4 sp. Ch 3 (counts as dc), then work (2 dc, ch 2, 3 dc) in the same sp for the first corner. Work 3 dc in the next sp. Work a Granny corner in the next sp, then 3 dc in the next sp. Repeat from * to * 2 more times. Join to the top of the ch-3.
This round turns 8 spaces into 4 corners. Count 4 corners x 6 dc plus 4 side groups x 3 dc. (24 + 12 = 36 dc, 4 corner ch-2 sps, 9 dc per side)
Round 6: Sl st to the corner sp. Work a Granny corner in each corner sp and 3 dc in each sp between groups along the sides. Join. (48 dc, 12 dc per side)
Round 7: Repeat Round 6. (60 dc, 15 dc per side)
Round 8: Repeat Round 6. (72 dc, 18 dc per side, with 6 groups and 5 side spaces on each side)
Round 9 (trim round): Ch 1. Work 1 sc in each dc and 1 sc in each sp between groups. Work (sc, ch 2, sc) in each corner sp. Join and fasten off.
Per side, that is 18 sc in the dc plus 5 sc in the side spaces plus 2 corner sc. (18 + 5 + 2 = 25 sc per side, 100 sc total, plus 4 corner ch-2 sps)
The corner ch-2 spaces are not counted as stitches. Each corner has two separate sc, one at the end of one side and one at the start of the next side. So 4 x 25 = 100 with no double counting.
Plain Square (Make 12)
Use Color A throughout.
Round 1: Make a magic ring. Ch 3 (counts as dc), then work 2 dc in the ring. Ch 2, 3 dc in the ring. Repeat from * to * 2 more times. Ch 2, then join to the top of the ch-3. (12 dc, 3 dc per side)
Round 2: Sl st to the corner sp. Work a Granny corner in each corner sp. Join. (24 dc, 6 per side)
Round 3: Work a Granny corner in each corner and 3 dc in each side sp. (36 dc, 9 per side)
Round 4: Repeat Round 3. (48 dc, 12 per side)
Round 5: Repeat Round 3. (60 dc, 15 per side)
Round 6: Repeat Round 3. (72 dc, 18 per side)
Round 7 (trim round): Work this exactly like Daisy Round 9. (18 + 5 + 2 = 25 sc per side, 100 sc total)
Leave a 24 in (61.0 cm) tail on 4 of the plain squares for sewing.
Make All Pieces
- Daisy squares (A, B, C): 3, one per pocket front
- Plain squares (A): 12, which is 4 per pocket (left side, right side, back and base)
Pocket net (one pocket, seen from the outside):
            [ Back  ]
[ Side L ]  [ Base  ]  [ Side R ]
            [ Daisy ]
Stack layout (seen from the front):
     [  Tab + ring  ]
[ Pocket 1 – top    ]
[ Pocket 2 – middle ]
[ Pocket 3 – bottom ]
Before joining, lightly block every square to 5 in (12.7 cm). Make sure each daisy sits upright, with one petal pointing to the top center.
Joining
Method: Whipstitch with Color A through the outer loops only, with the RS of both squares facing out. This leaves a neat flat ridge on the inside.
Stitch-to-stitch logic: Each edge has 25 sc, so every seam pairs 25 stitches with 25 stitches. Start in corner sc to corner sc and finish corner sc to corner sc. Fold the ch-2 corner spaces inside the seam and don’t count them.
For each pocket:
- Join Side L, Daisy, Side R and Back in a row, using 3 vertical seams of 25 sts each.
- Fold the row into a tube and close it by sewing Back to Side L (25 sts).
- Sew the Base to the four bottom edges, 25 sts per edge, for 100 sts total. Add the optional plastic canvas inside before you close the last edge.
Tension: Pull each stitch snug but not tight. Tight seams pucker the walls and make the box narrower than 5 in (12.7 cm). Loose seams gap where the squares meet the base.
Size checkpoint: Each box should measure 5 in (12.7 cm) wide, deep and tall. Check that a roll, about 4.5 in (11.4 cm) across, slides in easily.
Border (Pocket Rim)
Border gauge: 5 sc = 1 in (2.5 cm) along the edge. Two rim rounds = 0.5 in (1.3 cm) tall.
Work these rounds around the top opening of each pocket.
Round 1 (RS): Join A in the first sc after the seam at the back right corner. Ch 1. Work 1 sc in each sc around the opening, and skip the ch-2 corner sps folded into the seams. Join. (25 sc per side x 4 sides = 100 sc)
Round 2: Ch 1, sc in each st around. Join and fasten off. (100 sc: Front 25, Side L 25, Back 25, Side R 25)
Why the math works: The opening is the top edges of four squares, each with 25 sc that already include their own 2 corner sc. Seams add no stitches, so 4 x 25 = 100. The rim has no corner increases because the box corners are folds, not flat corners. That keeps the rim straight and the walls upright, so each pocket ends up 5.5 in (14.0 cm) tall.
Stacking: Line up Pocket 2 under Pocket 1 and Pocket 3 under Pocket 2, all with the daisies facing front. Whipstitch the top of the back-wall rim of the lower pocket (25 sts) to the base seam along the back wall of the upper pocket (25 sts). Sew only the back walls together. The fronts and sides stay free, so each rim can tip forward slightly for loading. Stacked height: 3 x 5.5 in = 16.5 in (41.9 cm).
Hanging tab: On Pocket 1, with RS of the back wall facing, count the 25 rim sts. Skip 8 sts, join A in the 9th st, and sc in sts 9–17. (9 sc, 8 sts left free on each side: 8 + 9 + 8 = 25)
Rows 2–18: Ch 1, turn, sc in each st. (9 sc per row, 18 rows = 4.5 in, 11.4 cm long; 1.8 in, 4.6 cm wide)
Fold the tab over the wooden ring toward the inside of the back wall. Sew Row 18 to the inside of the back wall, just below the rim. This leaves a loop of about 2 in (5.1 cm) above the rim.
Final Blocking
- Mist the whole holder with water until it is damp but not dripping.
- Shape each pocket over a 5 in (12.7 cm) box, or put a rolled towel inside to square the corners.
- Press each rim flat and level with your fingers.
- Fluff the petals forward and smooth the daisy centers.
- Hang it from the ring, or lay it on its back with the pockets stuffed, until it is completely dry.
- Remove the forms and check the measurements.
Final Quality-Control Checklist
- Every square is 5 in (12.7 cm), with 25 sc per side
- All three daisies are upright, centered and facing front
- Every seam is 25 sts to 25 sts, with no gaps at the corners
- Each rim has 100 sc in each of its 2 rounds
- Each pocket is 5.5 in (14.0 cm) tall, and the stack is 16.5 in (41.9 cm)
- The tab is 9 sts wide, centered on the back wall, and sewn securely around the ring
- All ends are woven in at least 2 in (5.1 cm) and hidden in seams
Troubleshooting
- Squares are different sizes: Recheck the trim round. You need exactly 25 sc per side, with 1 sc per side space.
- Daisy center bulges: Round 4 chains are too long. Try ch 3 instead of ch 4.
- Petals hide under the yellow: Work Round 4 strictly behind the petals, around the posts.
- Box leans or twists: Seams were started off-corner. Unpick them and match corner sc to corner sc.
- Rim ruffles: You probably worked into the corner spaces. Skip them and keep 100 sc.
- Holder sags forward: Add plastic canvas bases, or sew the side walls to each other for 1 in (2.5 cm) at the back corners.
Care
Hand wash in cool water with mild soap and press out the water in a towel. Reshape the pockets and dry flat or hanging, away from direct heat.
Final Notes
The whole holder follows one measurement chain. Each square is 5 in (12.7 cm) with 25 sc per side. Five squares make a 5 in (12.7 cm) box, and the 2-round rim adds 0.5 in (1.3 cm) to make a 5.5 in (14.0 cm) pocket. Three pockets stack to 16.5 in (41.9 cm), and the 9-stitch tab sits centered on the back wall at 8 + 9 + 8 = 25. If your first square measures right, everything else will fit.
Happy crocheting!