

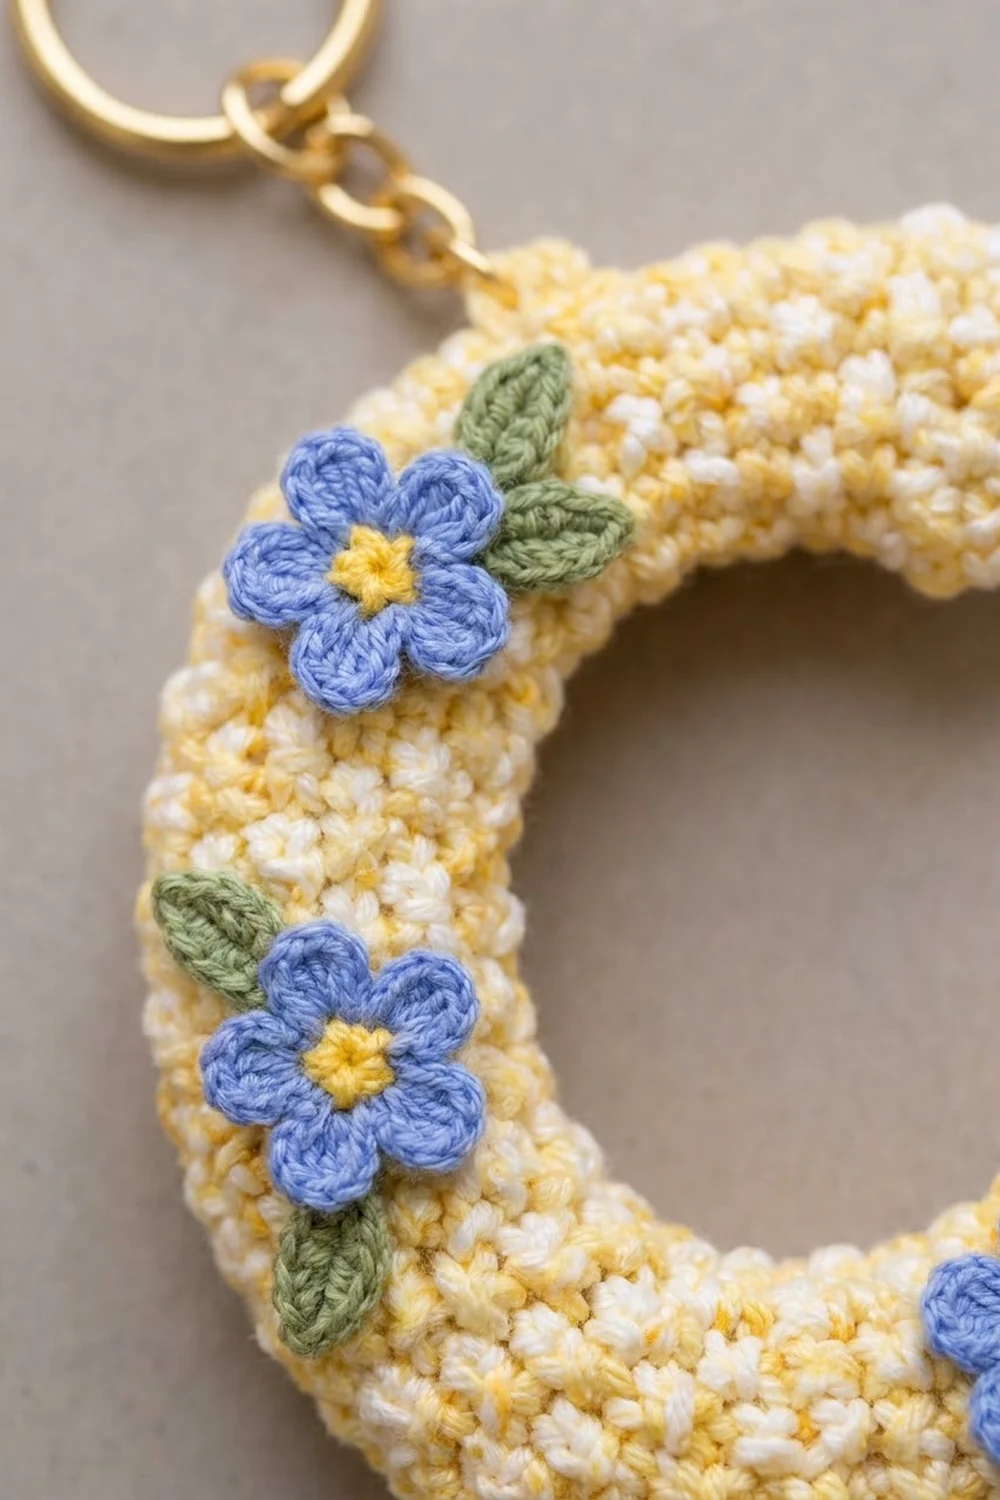
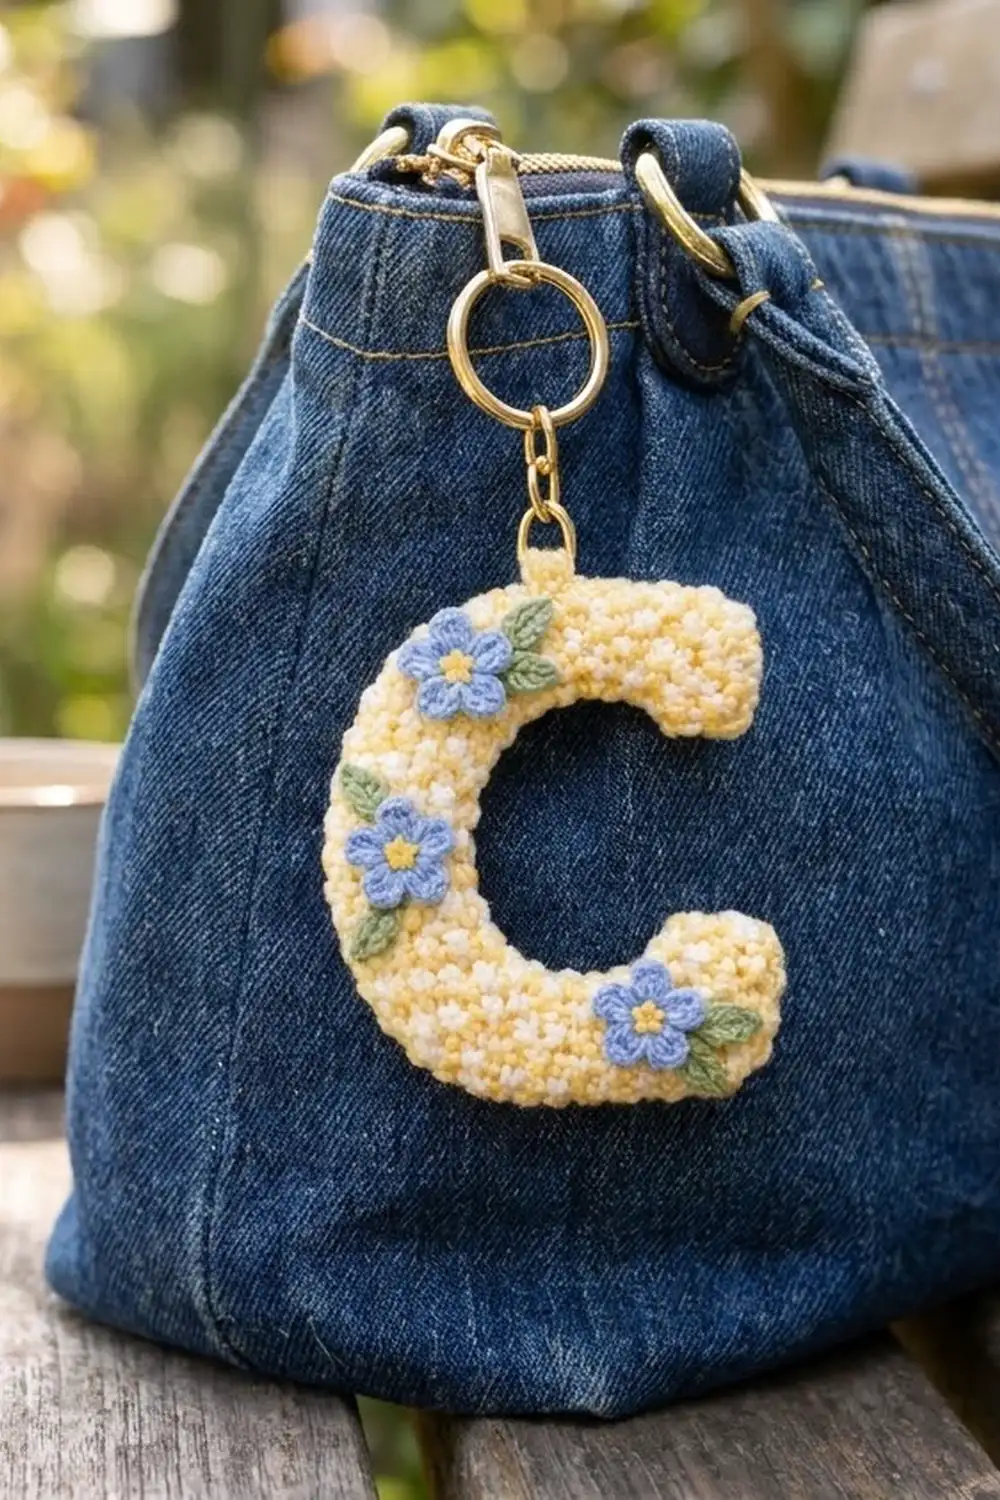
This little letter C is a soft, squishy bag charm. It has a speckled butter-yellow body and three tiny periwinkle forget-me-nots with sage-green leaves. It’s a quick, cheerful make for a monogram gift, a backpack tag or a key finder that’s easy to spot in a full tote.
The speckled look comes from holding one strand of yellow and one strand of cream cotton together. Every stitch mixes the two colors in a slightly different way, so you get a soft confetti effect with no color changes. The flowers and leaves are worked with a single strand so they stay small and crisp.
The finished charm is about 4.5 in (11.4 cm) tall, 3.5 in (8.9 cm) wide and 0.6 in (1.5 cm) thick, not counting the hardware. With the key ring attached, it hangs about 6.5 in (16.5 cm) long. This pattern uses US crochet terms throughout.
You work the body as one continuous tube in spiral rounds. It starts with a rounded end cap, runs along a straight arm, curves into the C shape using “curve rounds”, runs along a second straight arm and closes with a decrease round. Next you add a crocheted hanging loop. Last, you make three flowers and six leaves and sew them onto the front.
Finished Size and Construction
- Finished size: 4.5 in (11.4 cm) tall x 3.5 in (8.9 cm) wide x 0.6 in (1.5 cm) thick
- Skill level: Easy / advanced beginner
- Terminology: US crochet terms
- Yarn weight: Sport-weight (#2) cotton. The body uses two strands held together, which works like a worsted weight (#4).
- Hooks: 3.5 mm (E-4) for the body, 2.5 mm (B/C) for the flowers and leaves
- Number of pieces: 1 body, plus 3 flower appliqués and 6 leaf appliqués
- Layout: One single letter. There is no assembly grid.
- Piece size: The tube is 12 stitches around, about 1 in (2.5 cm) wide when lightly stuffed.
- Size before border: 4.5 in x 3.5 in (11.4 cm x 8.9 cm)
- Border depth: None, 0 in (0 cm). The closed tube ends are the finished edges.
Materials
Yarn: Use a smooth, mercerized sport-weight cotton, about 50 g per 155 m (1.7 oz per 170 yd). Cotton gives clear stitches and holds the letter’s shape. Acrylic also works, but the charm will be a little softer and fuzzier.
- Color A, butter yellow: 8 g (about 25 m). This covers the body and the flower centers.
- Color B, cream: 8 g (about 25 m) for the body
- Color C, periwinkle blue: 2 g (about 6 m) for the petals
- Color D, sage green: 2 g (about 6 m) for the leaves
These amounts include a margin of about 25% above what the sample used.
Tools:
- 3.5 mm (E-4) and 2.5 mm (B/C) crochet hooks
- 2 locking stitch markers
- About 5 g of polyester fiberfill
- Tapestry needle
- Scissors
- Gold split key ring, 1 in (2.5 cm), with a short chain of about 1 in (2.5 cm)
- Gold jump ring, 8 mm, plus 2 pairs of flat-nose pliers
- Optional: chopstick for stuffing, and pins for placing the flowers
Abbreviations (US Terms)
- MR: magic ring
- ch: chain
- sl st: slip stitch
- sc: single crochet
- hdc: half double crochet
- dc: double crochet
- inc: 2 sc in the same stitch
- sc2tog: single crochet 2 together (invisible decrease recommended)
- st(s): stitch(es)
- Rnd: round
- ( ): stitch count at the end of the round
Special stitch: curve round (CR). Work this over the 12 stitches of the tube: hdc in next 6 sts, sc in next 2 sts, sl st in next 2 sts, sc in next 2 sts (12).
The hdc half is taller, so it becomes the outer edge of the C. The sc and sl st half is shorter, so it becomes the inner edge. Repeating this round bends the tube into an even arc while the stitch count stays at 12.
Gauge and Checkpoints
Body gauge: 5 sc and 5.5 rounds = 1 in (2.5 cm), worked in the round with Colors A and B held together on a 3.5 mm hook.
Flower gauge: One finished flower is 0.8 in (2.0 cm) across, made with a single strand on a 2.5 mm hook.
Work Rnds 1 to 8 first and use them as your gauge test. The tube should be 2.4 in (6.1 cm) around and about 1.5 in (3.8 cm) long, including the end cap.
- If it’s too big: Go down 0.25 mm in hook size, or crochet more tightly.
- If it’s too small: Go up 0.25 mm.
- If stuffing shows through: Go down a hook size even if the size is right. Amigurumi fabric needs to be dense.
Checkpoints:
- After Rnd 8: the tube is 1.5 in (3.8 cm) long.
- After Rnd 34: the outer edge is about 6.9 in (17.5 cm) and the inner edge about 4.7 in (11.9 cm). The piece makes a rough C.
- After Rnd 41: the letter is 4.5 in x 3.5 in (11.4 cm x 8.9 cm).
Body
Use the 3.5 mm hook with Colors A and B held together. Work in continuous spiral rounds and don’t join. Move a marker up to the first stitch of each round.
Rnd 1: 6 sc in MR. (6)
Rnd 2: Inc in each st around. (12) This is a growth round, and 12 is the full count for this round.
Rnds 3–8: Sc in each st around. (12) This is the first straight arm and its rounded end.
Checkpoint: The tube is 1.5 in (3.8 cm) long and 2.4 in (6.1 cm) around.
Before you start the curve, decide which side will be the outer edge of the C. Count the next 6 stitches from your round marker, then place a second marker in the 6th stitch. The 6 stitches from the round marker up to the second marker are the outer half. Keep them on the same side for every curve round. If the spiral drifts, line the hdc stitches up with the column below rather than with the marker.
Rnds 9–34: CR in each round. (12 in each round) That is 26 curve rounds.
Stuff the tube lightly every 6 to 8 rounds as you go. Use small tufts and push them in with a chopstick. Stuffing as you work keeps the curve smooth. Aim for a cushioned tube about 0.6 in (1.5 cm) thick, not a firm cylinder.
Checkpoint: Lay the piece flat. The curved section should form a half circle with the outer edge on the outside. The gap inside the C should be about 1.5 in (3.8 cm) across at its widest.
Rnds 35–40: Sc in each st around. (12) This is the second straight arm. It should point the same way as the first arm and run parallel to it.
Finish stuffing. Push a little extra fiberfill into this arm so it matches the first one.
Rnd 41: Sc2tog 6 times. (6) This is a decrease round that turns 12 stitches into 6.
Fasten off and leave a 6 in (15.2 cm) tail. Weave the tail through the front loops of the last 6 stitches, pull it tight to close the hole and weave in the end.
Shaping: Press the letter gently flat with your palm so the stroke is about 1 in (2.5 cm) wide. If one arm sits too high or too low, roll it gently between your fingers until the two arms line up.
Border (Hanging Loop and Edge Finish)
This piece has no traditional border because its only edges are the two closed tube ends. Instead, you add a hanging loop to the top arm.
Loop gauge: 1 ch with a single strand of Color A on the 3.5 mm hook = 0.2 in (0.5 cm).
- Find the top of the upper arm, about 2 rounds in from where the curve starts (around Rnd 10). Choose the top-most stitch on the outer edge.
- Join a single strand of Color A with a sl st in that stitch. Ch 6, skip 1 stitch to the left, and sl st in the next stitch. This makes a 6-ch loop.
- Work 8 sc into the loop, then sl st into the starting stitch. (8 sc)
Fasten off and weave in the ends through the inside of the tube.
Why the math works: Six chains at 0.2 in (0.5 cm) each make a loop about 1.2 in (3.0 cm) around, and 8 sc fit across it without ruffling. The loop ends up about 0.4 in (1.0 cm) tall. That’s just big enough for an 8 mm jump ring and still sturdy.
Hardware: Open the jump ring sideways with two pliers. Thread it through the loop and the end link of the chain, then close it fully. The split key ring hangs from the other end of the chain.
Flowers (Make 3)
Use the 2.5 mm hook and a single strand of yarn.
Rnd 1 (Color A): 5 sc in MR, then sl st to the first sc. (5) Fasten off Color A.
Rnd 2 (Color C): Join in any stitch. In each stitch, work (sl st, ch 2, 2 dc, ch 2, sl st). (5 petals) This is a conversion round: you work into each of the 5 existing stitches once and add 1 petal per stitch.
Fasten off and leave a 10 in (25.4 cm) tail for sewing. Pull the magic ring tight. If the center needs a little more yellow, add one French knot with Color A.
Checkpoint: The flower is 0.8 in (2.0 cm) across, with five round, separate petals.
Leaves (Make 6)
Use the 2.5 mm hook and Color D.
Ch 5. Starting in the 2nd ch from the hook, work sl st, sc, hdc, then 3 dc in the last ch. Now work along the other side of the chain: hdc, sc, sl st. (9 sts)
Fasten off and leave an 8 in (20.3 cm) tail. Each leaf is about 0.5 in (1.3 cm) long and has a pointed tip.
Appliqué Placement
Pin the pieces before you sew. Have the second arm (Rnds 35–40) at the bottom so the hanging loop sits at the top.
- Flower 1: On the upper curve, just left of where the top arm starts. Put one leaf at the upper right of the flower and one at its right side.
- Flower 2: Centered on the left side of the curve. Put one leaf above it and one below it, both angled toward the left edge.
- Flower 3: On the lower arm near the end. Put one leaf at its upper right and one at its lower right.
Tuck the base of each leaf about 0.1 in (0.3 cm) under the edge of its flower. Sew the leaves first, then the flowers. Use small stitches through the back of the petals so the stitches don’t show. Bring the needle in and out between the body stitches without pulling. Pulled stitches will dimple the stuffing.
Final Blocking
- Mist the charm lightly with water. Don’t soak it, because the stuffing would take a long time to dry.
- Lay it flat on a towel and shape the C. Line up the two arms, round off the curve and flatten the stroke to 1 in (2.5 cm) wide.
- Gently pinch each flower so the petals open evenly. Smooth each leaf to a clear point.
- Measure: 4.5 in (11.4 cm) tall and 3.5 in (8.9 cm) wide.
- Let it dry completely, about 6 to 8 hours, before you attach it to a bag.
Final Quality-Control Checklist
- [ ] The body is 12 sts around through Rnds 2 to 40, with no extra or missing stitches.
- [ ] The outer edge has the hdc columns and the inner edge has the shorter stitches, all along the curve.
- [ ] Both arms are about the same length and run parallel to each other.
- [ ] The stuffing is even, with no lumps or empty spots at the ends.
- [ ] Both end holes are fully closed and no stuffing shows.
- [ ] The hanging loop is firm and centered on the top arm.
- [ ] The jump ring is fully closed with no gap.
- [ ] There are 3 flowers and 6 leaves, all sewn flat, with no loose petals.
- [ ] All tails are woven inside the tube.
Troubleshooting
The tube twists instead of curving. The hdc half has drifted around the tube. Frog back to where it went off. Line the hdc up with the column below and move your second marker every round.
The C is too open, like a U. Add 2 to 4 more curve rounds. Keep the total even so the arms still meet the curve evenly.
The C is too closed, like an O. Remove 2 curve rounds, or swap the 2 sl sts in a few rounds for sc.
The fabric is lumpy. There is too much stuffing in small clumps. Pull some out and tease it into fluffier pieces.
The petals curl up. Steam them lightly and press them flat with your fingers, then let them cool.
The flowers sink into the body. Your sewing stitches are too tight. Loosen them and catch only the surface of the body.
Care
Spot clean with mild soap and cool water, then reshape and lay flat to dry. Don’t machine wash or tumble dry.
Final Notes
The measurements build on each other. A gauge of 5 sc and 5.5 rounds per 1 in (2.5 cm) gives a 12-stitch tube 2.4 in (6.1 cm) around. Light stuffing makes that tube 1 in (2.5 cm) wide. Twenty-six curve rounds bend it into the arc, and the two straight arms finish the letter at 4.5 in x 3.5 in (11.4 cm x 8.9 cm).
If you get gauge on the first 8 rounds, the rest of the letter follows. You can use the same tube and curve-round method for other rounded letters like O, G and U by changing the number of curve rounds and straight rounds.
Happy crocheting!