

This plastic bag holder looks like a soft yellow tulip. It has an open diamond mesh body, so you can see the bags inside and take one out easily. Two solid petals wrap the top and cross at the front, and a slim loop lets you hang it from a hook or cabinet knob.
The design uses one color, a warm butter yellow, worked in cotton. Cotton gives the mesh good stitch definition and keeps the petals firm. The look is simple and cheerful, and it fits a farmhouse or cottage kitchen.
This pattern uses US crochet terms. The finished body is about 6 in (15.2 cm) wide when laid flat at the collar and about 7 in (17.8 cm) at the widest part of the mesh. It is about 13 in (33.0 cm) long. With the hanging loop, it hangs about 17.5 in (44.5 cm) long.
You work the body in one piece from the bottom up. You start with a solid band that has eyelets for the drawstring, then work a chain-loop diamond mesh, then a solid collar. Last, you work two petals in rows. The hanging loop, drawstring and bobbles are small separate parts that you add during finishing.
Finished Size and Construction
- Finished size: about 6 in (15.2 cm) wide at the collar, 7 in (17.8 cm) at the widest, 13 in (33.0 cm) long
- Hanging length with loop: about 17.5 in (44.5 cm)
- Skill level: Easy / Advanced Beginner
- Terminology: US crochet terms
- Yarn weight: Worsted (#4), cotton
- Hook: 5.0 mm (H-8)
- Number of pieces: 1 main body, plus 1 hanging loop, 1 drawstring and 2 bobbles
- Layout: One seamless tube worked in joined rounds, with two petals worked in rows at the top
- Circumference of the solid rounds: 48 sts = 12 in (30.5 cm)
- Size before border: about 12.8 in (32.5 cm) long
- Border depth: one round of reverse sc on the bottom edge and one round of sc around each petal, about 0.25 in (0.6 cm)
Materials
Yarn: Use a smooth worsted-weight cotton or cotton blend. Pure cotton holds the petal shape best. Acrylic also works, but the mesh will stretch more under the weight of the bags.
- Butter Yellow: about 100 g / 180 m (197 yd)
This amount includes a margin of about 15 percent for your gauge swatch and small differences in tension.
Tools:
- 5.0 mm (H-8) crochet hook
- Tapestry needle
- Stitch marker
- Scissors
- A small amount of yarn scraps for stuffing the bobbles
- Rust-proof pins and a spray bottle for blocking
Abbreviations (US Terms)
- ch: chain
- sl st: slip stitch
- sc: single crochet
- dc: double crochet
- sc2tog: single crochet 2 together
- sk: skip
- sp: space
- st(s): stitch(es)
- FLO / BLO: front loop only / back loop only
- MR: magic ring
- rev sc: reverse single crochet (crab stitch)
Special stitch: Reverse single crochet (rev sc). Work from left to right (or right to left if you crochet left-handed). Insert the hook into the next stitch to the right, yarn over, pull up a loop, then yarn over and pull through both loops on the hook. This makes a corded, twisted edge.
Gauge and Checkpoints
Gauge: 16 sc and 18 rounds = 4 in (10.2 cm) in sc worked in rounds.
Gauge matters most in the solid rounds, because the mesh loops are anchored to them. Before you start, work the base band (Rounds 1–5) and measure it. This band is your test piece.
Checkpoints:
- After Round 5: the band is 12 in (30.5 cm) around, or 6 in (15.2 cm) laid flat, and about 1.1 in (2.8 cm) tall.
- After Round 8: the piece is about 3 in (7.6 cm) long from the bottom edge.
- After Round 16: the piece is about 9 in (22.9 cm) long.
- After Round 19: the piece is about 10.5 in (26.7 cm) long.
- After Round 23: the piece is about 11.5 in (29.2 cm) long.
- After the petals: the piece is about 12.8 in (32.5 cm) long. It reaches about 13 in (33.0 cm) after blocking.
If your band is too big (more than 6.5 in / 16.5 cm laid flat), change to a 4.5 mm hook. If it is too small (less than 5.5 in / 14.0 cm laid flat), change to a 5.5 mm hook. Don’t change the stitch counts, because every repeat depends on 48 stitches.
Main Body
Base Band
Foundation: Ch 48. Without twisting the chain, sl st into the first ch to make a ring. This ring is the bottom opening.
Round 1: Ch 1, sc in each ch around, then sl st to the first sc to join. (48 sts)
Rounds 2–3: Ch 1, sc in each st around, then join. (48 sts)
Round 4 (eyelet round): Ch 1, sc in the next 3 sts, ch 1, sk 1 st. Repeat from * 12 times in total, then join. (36 sc + 12 ch-1 sps = 48 sts)
Round 5: Ch 1, sc in each sc and in each ch-1 sp around, then join. (48 sts)
The 12 eyelets are evenly spaced, one every 1 in (2.5 cm). The drawstring will go through them.
Diamond Mesh
The mesh has 12 chain loops in every round. Each round’s sc goes into the center of a loop from the round below, and this staggering forms the diamonds. The middle rounds use longer loops to create the gentle bulge.
Round 6: Ch 1, sc in the first st, ch 5, sk 3 sts, sc in the next st. Repeat from * 10 more times. To finish, ch 5, sk the last 3 sts and sl st to the first sc. (12 sc + 12 ch-5 loops)
The 12 sc of this round sit on stitches 1, 5, 9 and so on through 45. Each loop covers 4 base stitches: 12 x 4 = 48.
Round 7: Sl st into each of the first 3 ch of the first loop to reach its center. Ch 1, sc in the same loop, ch 5, sc in the next ch-5 loop. Repeat from * 10 more times. To finish, ch 5 and sl st to the first sc. (12 loops)
Round 8: Repeat Round 7. (12 loops)
Rounds 9–16: Sl st into each of the first 3 ch of the first loop. Ch 1, sc in the same loop, ch 6, sc in the next loop. Repeat from * 10 more times. To finish, ch 6 and sl st to the first sc. (12 ch-6 loops in each round)
Rounds 17–19: Work the same way as Round 7, using ch-5 loops. (12 loops in each round)
Check your measurement now. The mesh should be about 7 in (17.8 cm) across at its widest when laid flat, and about 6 in (15.2 cm) at Round 19.
Collar
Round 20 (conversion round): Ch 1, sc in the first sc, 3 sc in the next ch-5 loop, sc in the next sc, 3 sc in the next ch-5 loop. Repeat from * 10 more times, then join. (12 sc worked 1 per existing sc + 36 sc worked into the loops = 48 sts)
Rounds 21–23: Ch 1, sc in each st around, then join. (48 sts)
At the end of Round 23, don’t fasten off. Fold the body flat with the joining seam at the center back. Count 6 sts to the left of the seam and place a marker. This marked stitch is st 1. Number the rest of the stitches 1 to 48 going around in your working direction. Fasten off.
Petals
The two petals share 8 stitches where they overlap: sts 1–4 and 25–28. Petal 1 is worked in front loops, so it sits on the outside. Petal 2 is worked in back loops, so it rises just behind Petal 1. Where the petals overlap at the front, they cross and form the V shape.
Petal 1 (front petal): Join the yarn in the front loop of st 1.
- Row 1: Ch 1, then sc in the FLO of sts 1–28. Turn. (28 sts)
- Row 2: Ch 1, sc in each st across. Turn. (28 sts)
- Row 3: Ch 1, sc2tog, sc in the next 24 sts, sc2tog. Turn. (26 sts)
- Row 4: Ch 1, sc2tog, sc in the next 22 sts, sc2tog. Turn. (24 sts)
- Row 5: Ch 1, sc2tog, sc in the next 20 sts, sc2tog. Turn. (22 sts)
- Row 6: Ch 1, sc2tog, sc in the next 18 sts, sc2tog. (20 sts) Don’t turn. Go straight on to the petal edging in the Border section.
Petal 2 (back petal): Join the yarn in the back loop of st 25. Work Row 1 as: ch 1, then sc in the BLO of sts 25–48, continuing around into sts 1–4. Turn. (24 + 4 = 28 sts) Work Rows 2–6 exactly as for Petal 1.
Each petal is about 1.3 in (3.3 cm) tall. The decreases taper each petal into a rounded tip at the sides.
Border
Border gauge: Work rev sc and the edging sc at the body gauge, 16 sts = 4 in (10.2 cm). Edge stitches that are worked too loosely will ruffle.
Petal edging (each petal): With the right side facing, work this edging around the side edges and top of the petal:
- Side edge: work 6 sc down the row ends, 1 per row, to the base of the petal.
- Top edge: work 2 sc in the first st of Row 6, sc in the next 18 sts, and 2 sc in the last st. (22 sts)
- Other side edge: work 6 sc along the row ends.
The petal has 6 + 22 + 6 = 34 sts. Fasten off.
The 2-sc corners are already counted in the 22 sts of the top edge. Don’t add them again.
Bottom edge: Turn the body upside down. Join the yarn in any foundation chain loop. Ch 1, then rev sc in each foundation ch around, and join. (48 sts) Fasten off.
Why the math works: The bottom edge has one stitch for each of the 48 foundation chains, so it stays exactly 12 in (30.5 cm) around. On the petals, one sc per row end lies flat because 6 sc rows are about as tall as 6 sc stitches are wide. The 2 extra corner stitches let the edging turn smoothly around the top.
Finishing Parts
Hanging loop: Ch 41.
– Row 1: Sc in the 2nd ch from the hook and in each ch across. Turn. (40 sts)
– Row 2: Ch 1, sc in each st across. (40 sts) Fasten off and leave a long tail.
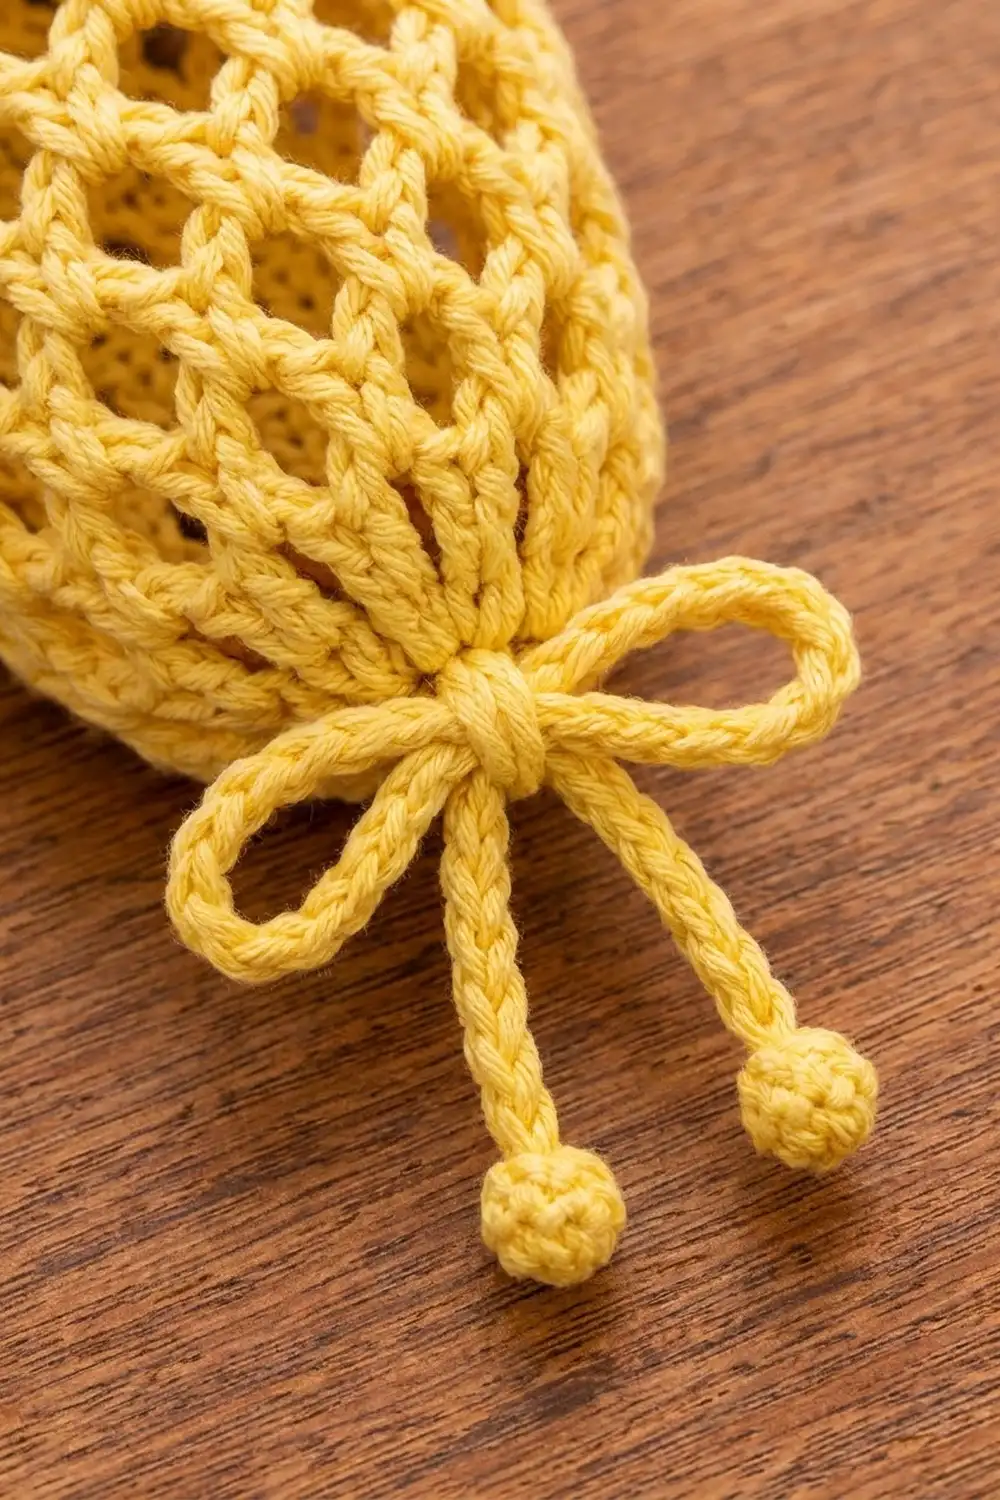
The strip is 10 in (25.4 cm) long. Fold it in half. Sew 0.5 in (1.3 cm) of each end to the inside of the collar at the center back, over the joining seam. This leaves a loop that rises about 4.5 in (11.4 cm) above the collar.
Drawstring: Ch 121. Sl st in the back bump of the 2nd ch from the hook and of each ch across. (120 sts) The cord is about 30 in (76.2 cm) long.
Bobbles (make 2):
– Round 1: 6 sc in a MR. (6 sts)
– Round 2: 2 sc in each st around. (12 sts)
– Round 3: Sc in each st around. (12 sts)
– Round 4: Sc2tog 6 times. (6 sts)
Stuff the bobble firmly with yarn scraps and close the opening. Each bobble is about 0.75 in (1.9 cm) across. Sew one bobble to each end of the drawstring.
Weave the drawstring in and out through the 12 eyelets of Round 4, starting and ending at the center front. Pull it until the opening is about 2 in (5.1 cm) across, then tie a bow.
Final Blocking
- Weave in all the yarn ends along the solid rounds, not through the mesh.
- Lightly spray the body until it is evenly damp.
- Stuff the body loosely with a rolled towel so the mesh opens into even diamonds.
- Shape the bulge. Aim for about 7 in (17.8 cm) laid flat at the widest point and 6 in (15.2 cm) at the collar.
- Pin the petal tips outward so the two petals cross cleanly at the front.
- Let it dry completely, then remove the towel and the pins.
Final Quality-Control Checklist
- [ ] The base band and collar each have 48 sts, and each measures 12 in (30.5 cm) around.
- [ ] Every mesh round has 12 loops, with no loop skipped or doubled.
- [ ] Each petal ends with 20 sts in Row 6 and has 34 sts of edging.
- [ ] The petals overlap by 4 sts on each side and cross at the front.
- [ ] The hanging loop is sewn securely at the center back.
- [ ] The drawstring passes through all 12 eyelets, and the bow sits at the center front.
- [ ] The finished length is about 13 in (33.0 cm).
Troubleshooting
- The mesh slants in a spiral: Make sure you sl st across 3 chains to reach the center of the loop at the start of every round.
- The body is too long: Work only 6 rounds of ch-6 loops in Rounds 9–16 instead of 8.
- The petals flop down: Use a smaller hook for the petals, or block them with a little spray starch.
- The collar puckers: Check Round 20. It must end with exactly 48 sts, with 3 sc in each loop.
- The bottom edge flares: Work the rev sc more tightly, or go down one hook size for that round.
Care
Hand wash in cool water and lay flat to dry, reshaping the bulge while the piece is damp. Don’t tumble dry, because heat can shrink the cotton and stiffen the mesh.

Final Notes
Every measurement in this pattern builds on the previous one. The 48-stitch base band sets the 12 in (30.5 cm) circumference. That circumference divides into 12 mesh loops of 4 stitches each. The mesh converts back to 48 stitches at the collar, and the two 28-stitch petals overlap by 4 stitches on each side. If your base band measures correctly, the finished holder will measure about 6 in (15.2 cm) wide and 13 in (33.0 cm) long.
Happy crocheting!