

The Seaside Shell Hanging Basket is a three-tier wall organizer. It is made from three round crochet baskets in graduated sizes, linked by two chunky cords that meet in a hanging point at the top. It is sized for standard toilet paper rolls, but it also works for washcloths, toiletries, hair accessories or small plant pots.
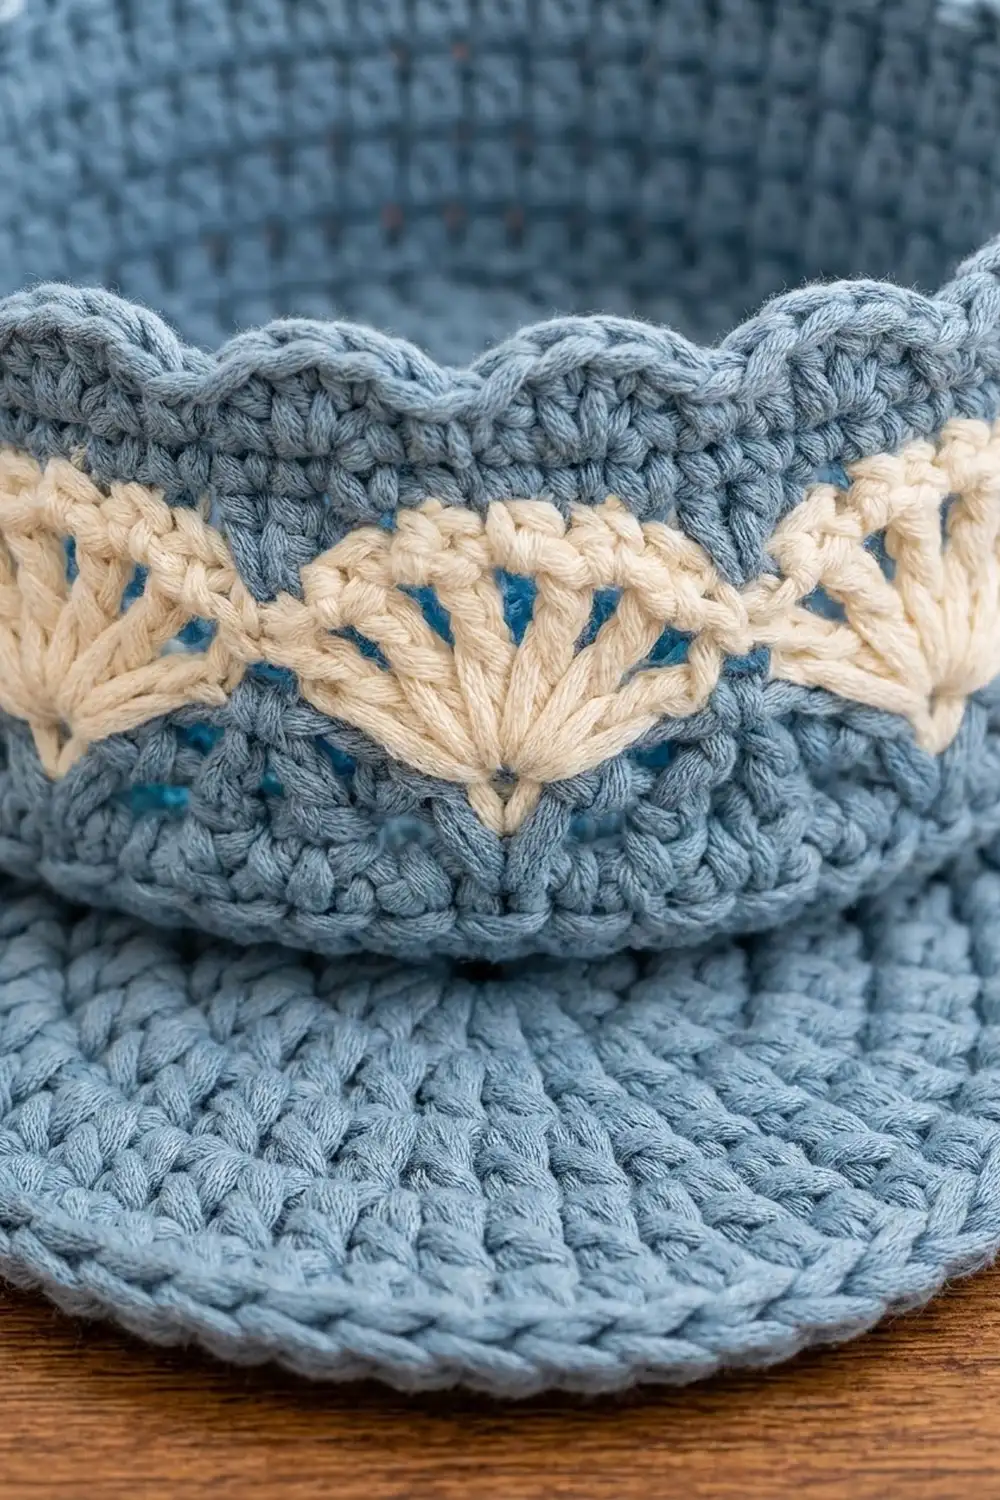
Each basket is worked in dusty blue cotton with one round of cream fan shells around the middle, a wavy blue band above the fans and a small scalloped rim. The look is soft and coastal. The firm single crochet fabric keeps each basket upright, even when it is empty.
This pattern uses US crochet terms. From the peg to the bottom of the large basket, the finished organizer measures about 23.5 in (59.7 cm). The bases measure about 5.5 in (14.0 cm), 6.5 in (16.5 cm) and 7.5 in (19.1 cm) across. Each basket is about 3.5 in (8.9 cm) tall.
The construction is simple. You crochet a flat base in joined rounds, then turn up the wall with a back-loop round. Next come the cream shell round and the blue leveling rounds, and the basket finishes with a scalloped rim. Finally, you sew two slip-stitch cords to opposite sides of all three baskets and join them at the top.
Finished Size and Construction
- Finished size (hanging): about 23.5 in (59.7 cm) tall
- Skill level: Easy+ (basic stitches, color changes, simple sewing)
- Terminology: US crochet terms
- Yarn weight: worsted / aran (#4) cotton or cotton blend
- Hook: 5.0 mm (H-8)
- Number of pieces: 5 (3 baskets + 2 cords)
- Layout: 3 baskets stacked vertically, small at the top, large at the bottom
- Piece sizes: Small base 5.5 in (14.0 cm), Medium 6.5 in (16.5 cm), Large 7.5 in (19.1 cm); all walls 3.5 in (8.9 cm) tall
- Wall height before rim: about 3 in (7.6 cm)
- Rim depth: about 0.5 in (1.3 cm)
- Cords: 25 in (63.5 cm) each before joining
Materials
Choose a smooth, firm cotton or cotton blend. Cotton holds its shape well and does not stretch much under the weight of paper rolls. Avoid very soft, fuzzy or splitty yarns, because the baskets will slump and the stitch definition will be lost.
For the colors shown, use a muted dusty blue for the main color and a warm cream for the shells. Strong contrast makes the fans stand out. For a different look, try sage with white or blush with ivory.
- Dusty blue (main color): about 100 g, about 180 yd (165 m)
- Cream (contrast color): about 15 g, about 30 yd (27 m)
Tools:
- 5.0 mm (H-8) crochet hook
- Tapestry needle
- 4 locking stitch markers
- Scissors
- Measuring tape
- Wooden peg or wall hook for hanging
These quantities include a margin of about 25% to cover your gauge swatch and differences in tension.
Abbreviations (US Terms)
- ch – chain
- sl st – slip stitch
- sc – single crochet
- dc – double crochet
- tr – treble crochet
- inc – 2 sc in the same stitch
- BLO – back loop only
- MR – magic ring
- st(s) – stitch(es)
- sp – space
- sk – skip
Special stitch – Shell: 7 dc worked in the same stitch.
Special stitch – Scallop: 5 dc worked in the same stitch.
Standing tr: With a slip knot on the hook, yarn over twice, insert the hook in the stitch and complete a tr as normal.
Gauge and Checkpoints
Gauge: 14 sc and 14 rounds = 4 in (10.2 cm) in firm single crochet.
To check your gauge flat, ch 17. Sc in the 2nd ch from the hook and in each ch across (16 sc). Work 16 rows in total, then measure 4 in (10.2 cm) in the center of the swatch.
Make the Small basket first. It is the quickest piece, and it shows whether your gauge is right before you start the larger ones.
Checkpoints:
- After base Round 6 (36 sts): about 3.3 in (8.4 cm) across
- Small base, Round 10: about 5.5 in (14.0 cm) across
- After Wall Round 5: wall about 1.5 in (3.8 cm) tall
- After Wall Round 9: wall about 3 in (7.6 cm) tall
- After rim: wall about 3.5 in (8.9 cm) tall
If your base is too big, go down a hook size. If it is too small, go up a hook size. If the base ruffles, your tension is loose for the increases. If it cups, your tension is tight. Fix the base before moving on, because every later count depends on it.
Basket Base (All Sizes)
Work in joined rounds with dusty blue. The ch 1 at the start of each round does not count as a stitch. Join each round with a sl st to the first sc.
Round 1: Make an MR, ch 1, 6 sc in the ring, join. (6 sts)
Round 2: Ch 1, inc in each st around, join. (12 sts)
Round 3: Ch 1, sc in next st, inc in next st; repeat 6 times, join. (18 sts)
Round 4: Ch 1, sc in next 2 sts, inc in next st; repeat 6 times, join. (24 sts)
Round 5: Ch 1, sc in next 3 sts, inc in next st; repeat 6 times, join. (30 sts)
Round 6: Ch 1, sc in next 4 sts, inc in next st; repeat 6 times, join. (36 sts)
Continue the same way, working 1 more sc between increases each round. Each round has 6 more stitches than the round before. To keep the circle round instead of hexagonal, move the increase to the middle of the sc group on every other round.
Round 7: 42 sts
Round 8: 48 sts
Round 9: 54 sts
Round 10: 60 sts – Small stops here.
Round 11: 66 sts
Round 12: 72 sts – Medium stops here.
Round 13: 78 sts
Round 14: 84 sts – Large stops here.
Do not fasten off.
Basket Wall (All Sizes)
The final base count for each size is called the wall count: 60 (Small), 72 (Medium) or 84 (Large). All three are multiples of 12, so every pattern repeat below fits evenly.
Place a marker in the first stitch of Wall Round 1. This is st 1. Every round starts in this same column, so the joins stack in a straight line. That line becomes the place where one of the cords is sewn on.
Wall Round 1: Ch 1, sc in BLO of each st around, join. (60 / 72 / 84 sts) The unworked front loops form a crisp ridge, and the wall turns upward.
Wall Rounds 2–5: Ch 1, sc in each st around, join. (60 / 72 / 84 sts)
On the last join of Wall Round 5, pull through with cream. Fasten off blue.
Checkpoint: the wall is about 1.5 in (3.8 cm) tall.
Wall Round 6 (cream shells): Ch 1, sc in first st, sk 2 sts, Shell in next st, sk 2 sts, sc in next st; repeat around. End the last repeat with sk 2 sts, Shell in next st, sk 2 sts, then join with a sl st to the first sc. Fasten off cream.
Each repeat uses 6 stitches of the round below, which gives 10 / 12 / 14 shells.
Count: 10 sc + 70 dc = 80 (Small); 12 sc + 84 dc = 96 (Medium); 14 sc + 98 dc = 112 (Large).
Wall Round 7 (blue fill): Join blue with a standing tr in the first sc of Round 6 (the st 1 column). Ch 3, sc in 4th (center) dc of next Shell, ch 3, tr in next sc; repeat around. End with sc in the center dc of the last Shell and ch 3, then join with a sl st to the top of the first tr.
Count: 10 tr + 10 sc + 20 ch-3 sps (Small); 12 tr + 12 sc + 24 ch-3 sps (Medium); 14 tr + 14 sc + 28 ch-3 sps (Large).
The tall tr stitches fill the valleys between the shells. This leaves blue triangles that frame each cream fan, and the wall top becomes level again.
Wall Round 8 (conversion): Ch 1, sc in first tr, 2 sc in next ch-3 sp, sc in next sc, 2 sc in next ch-3 sp, sc in next tr; repeat around, leaving out the final sc, and join.
Count: 20 sc worked 1-per-stitch + 40 sc added in the spaces = 60 (Small); 24 + 48 = 72 (Medium); 28 + 56 = 84 (Large). You are back to the wall count.
Wall Round 9: Ch 1, sc in each st around, join. (60 / 72 / 84 sts)
Checkpoint: the wall is about 3 in (7.6 cm) tall. Do not fasten off. The rim comes next (see Border).
Make All Pieces
Baskets (3):
- Small: base Rounds 1–10, wall count 60, 10 shells
- Medium: base Rounds 1–12, wall count 72, 12 shells
- Large: base Rounds 1–14, wall count 84, 14 shells
Each basket uses only one cream round. Allow about 7 yd (6 m) of cream for the Small, 9 yd (8 m) for the Medium and 11 yd (10 m) for the Large.
Cords (2), dusty blue held double:
Holding 2 strands of blue together, ch 101. Sl st in the back bump of the 2nd ch from the hook and in the back bump of each ch across. (100 sl sts) Fasten off, leaving a 12 in (30.5 cm) tail for sewing.
Cord gauge: 4 ch = 1 in (2.5 cm). Check after 20 ch, which should measure 5 in (12.7 cm). Each finished cord is 25 in (63.5 cm) long. For the braided look shown, give the cord a gentle twist as you work.
Layout grid (top to bottom):
        /\        <- cords overlap 1 in and hang on peg
       /  \       <- free cord, 34 ch each side
   |  SMALL  |    <- 14 ch sewn per side
   |         |    <- gap, 12 ch
   | MEDIUM  |    <- 14 ch sewn per side
   |         |    <- gap, 12 ch
   |  LARGE  |    <- 14 ch sewn per side
Cord chain map, starting from the bottom end: 14 + 12 + 14 + 12 + 14 + 34 = 100 ch.
Joining
The cords are whipstitched to the outside of each wall, on opposite sides.
Stitch-to-stitch logic: On each basket, one cord sits over the st 1 column and the other sits over the opposite column. The shells start at st 1 and repeat every 6 stitches, so the opposite column always lands on the sc between two shells:
- Small: st 1 and st 31 (5 shells apart)
- Medium: st 1 and st 37 (6 shells apart)
- Large: st 1 and st 43 (7 shells apart)
Mark these columns on each basket before you sew.
Sewing:
- Lay one cord with its bottom end level with the base ridge of the Large basket at st 1. Pin the first 14 ch of the cord up the wall so they end just under the rim.
- Using a blue tail, whipstitch the cord to the wall. Take one stitch through each sc round and one through the cream sc. Pass the cord behind the rim scallop.
- Leave the next 12 ch of the cord unsewn. This makes the 3 in (7.6 cm) gap.
- Sew the next 14 ch to the Medium basket at st 1. Leave 12 ch unsewn, then sew the next 14 ch to the Small basket at st 1.
- Repeat steps 1–4 with the second cord on the opposite columns.
- Overlap the top 1 in (2.5 cm) of both cords and whipstitch them together securely.
Tension: Keep your sewing snug but not tight. If you pull hard, the wall puckers and the shells tilt. The cord should lie flat against the wall with no gaps.
Size checkpoint: Each sewn segment is 3.5 in (8.9 cm). Each gap is 3 in (7.6 cm). The free top section of each cord is 8.5 in (21.6 cm) before the overlap. The basket section is 16.5 in (41.9 cm) tall and the hanging point adds about 7 in (17.8 cm), for a total of about 23.5 in (59.7 cm).
Border: Scalloped Rim
Work the rim on each basket before sewing on the cords. Continue in blue from Wall Round 9.
Border gauge: One scallop repeat uses 4 stitches. It is about 1.1 in (2.8 cm) wide and adds about 0.5 in (1.3 cm) of height.
Rim Round (Wall Round 10): Ch 1, sc in first st, sk 1 st, Scallop in next st, sk 1 st, sc in next st; repeat around. End the last repeat with sk 1 st, Scallop in next st, sk 1 st, then join with a sl st to the first sc. Fasten off and weave in the end.
Counts:
- Small: 60 ÷ 4 = 15 scallops; 15 sc + 75 dc = 90 sts
- Medium: 72 ÷ 4 = 18 scallops; 18 sc + 90 dc = 108 sts
- Large: 84 ÷ 4 = 21 scallops; 21 sc + 105 dc = 126 sts
Why the math works: Each wall count is a multiple of 12. That means it divides by 6 for the shell round and by 4 for the rim, so neither round ends with a half repeat at the join. The scallops are worked into a full round of 60 / 72 / 84 stitches, so there are no extra stitches to hide and the rim lies even all the way around.
Final Blocking
- Weave in all ends on the inside of each basket.
- Lightly mist each basket with water until it is damp, not soaked.
- Fill each basket with a paper roll or a rolled towel that matches the base diameter.
- Press the base flat on a table and shape the wall so it stands straight up.
- Pinch each scallop into an even curve and spread each cream shell into a fan.
- Let the baskets dry completely, which takes about 24 hours.
- Hang the assembled organizer and leave it for a few hours so the cords straighten under the weight of the empty baskets.
Final Quality-Control Checklist
- Bases measure 5.5 in (14.0 cm), 6.5 in (16.5 cm) and 7.5 in (19.1 cm) across.
- Bases lie flat, with no ruffling or cupping.
- Each wall has the correct shell count: 10, 12 or 14.
- Each rim has the correct scallop count: 15, 18 or 21.
- The cords are attached at opposite columns and line up vertically.
- The gaps between baskets are equal, 3 in (7.6 cm) each.
- The baskets hang level, not tilted.
- All ends are woven in securely.
Troubleshooting
Base ruffles: There are too many stitches for your tension. Go down a hook size or tighten your increases.
Base cups like a bowl: Your tension is too tight. Go up a hook size.
Base looks hexagonal: Move the increase position on every other round.
Shell count is off: Recount the wall round. It must be exactly 60, 72 or 84.
Wall flares outward: Wall Round 1 was worked in both loops. Work it in BLO.
Shells lean to one side: Make sure you skip exactly 2 stitches on both sides of each Shell.
Rim waves unevenly: Check that Wall Round 9 has the full wall count before you start the scallops.
Basket tilts when hung: The cords are not on true opposite columns. Recount and re-sew.
Cords stretch too much: Use a firmer cotton, or work the cords with a smaller hook.
Care
Hand wash in cool water with mild soap. Press the water out in a towel, then reshape and dry flat. Do not tumble dry.

Final Notes
The whole project depends on one measurement chain. Your gauge of 14 sc and 14 rounds per 4 in (10.2 cm) sets the base sizes. The base sizes set the wall counts of 60, 72 and 84. Those counts give 10, 12 and 14 shells and 15, 18 and 21 scallops, with no stitches left over. The cords then hold each basket on true opposite sides, 3 in (7.6 cm) apart, for a finished length of about 23.5 in (59.7 cm). Check each link as you go, and the baskets will hang straight and even.
Happy crocheting!