

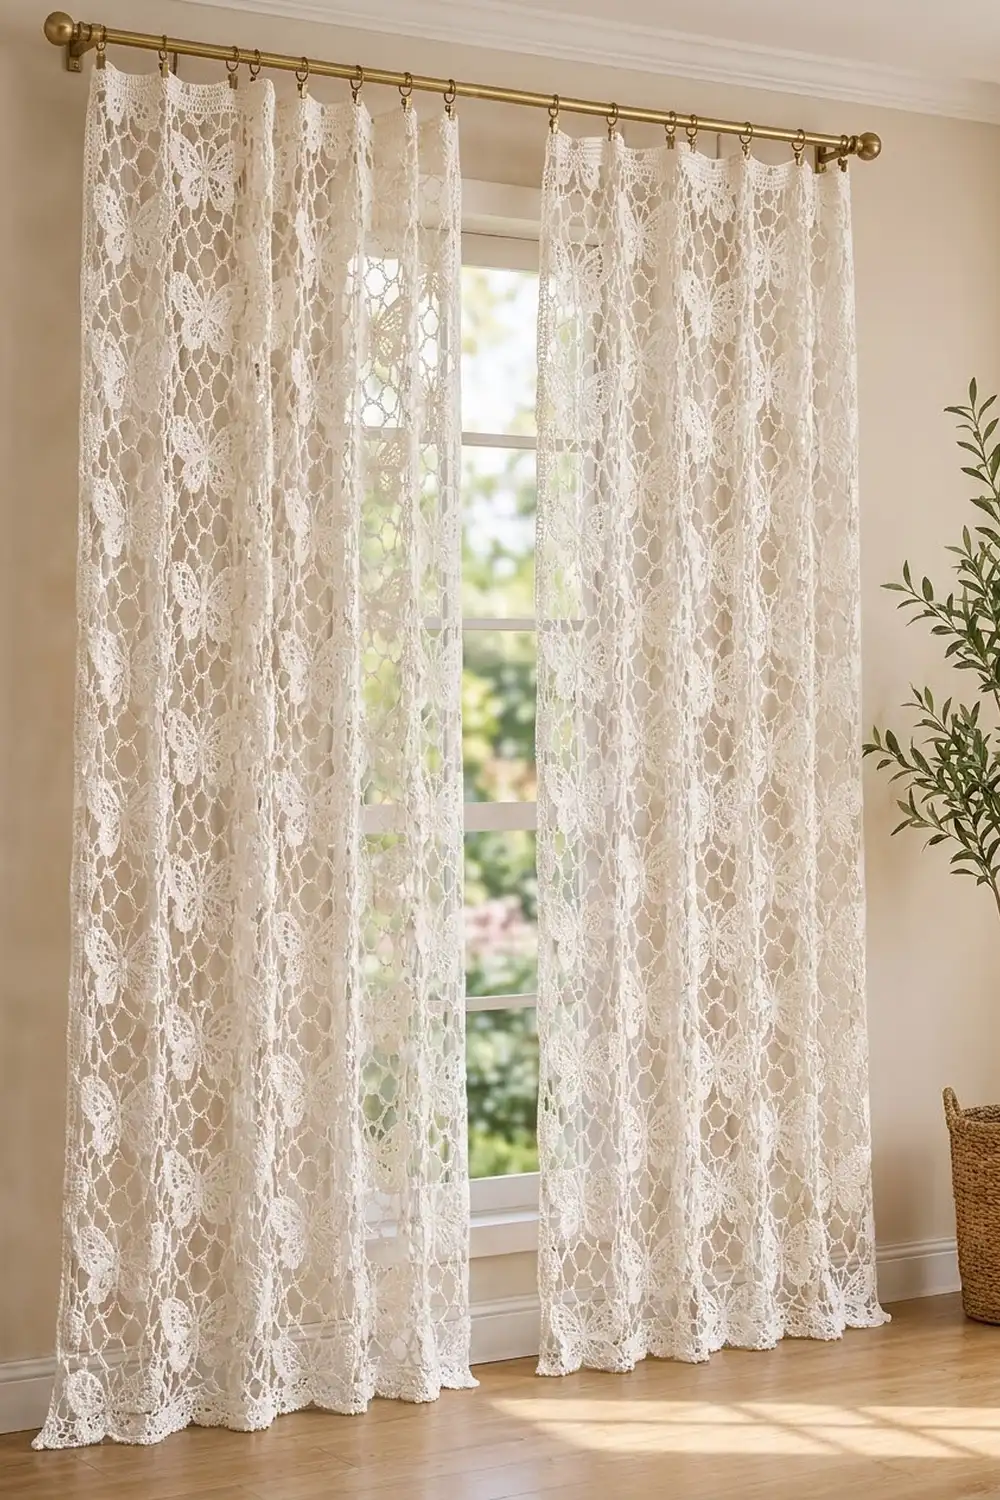
These airy curtain panels scatter rows of lacy butterflies across an open diamond mesh. When light comes through, the butterflies show up as solid shapes against the net, and the room still stays bright.
The pair is worked in one natural white mercerized cotton. That keeps the look clean and slightly vintage, and it suits cottage, farmhouse, or neutral modern rooms. All instructions use US crochet terms.
Each finished panel measures 41 in (104.1 cm) wide by 84 in (213.4 cm) long. It is built from 8 in (20.3 cm) square butterfly blocks, laid out 5 across and 10 down.
You crochet each butterfly from its body outward. Chain-mesh rounds then square off the motif, and the last round joins each block to its neighbors as you go. A border finishes the panel with single crochet on all sides, a solid band at the top for clip rings, and shell scallops along the bottom. Make two panels for a pair.
Finished Size and Construction
- Finished panel size: 41 x 84 in (104.1 x 213.4 cm)
- Skill level: Intermediate
- Terminology: US crochet terms
- Yarn weight: DK (3) mercerized cotton
- Hook: 3.5 mm (E-4)
- Number of pieces: 50 blocks per panel, 100 blocks for the pair
- Layout: 5 blocks wide x 10 blocks tall per panel
- Block size: 8 x 8 in (20.3 x 20.3 cm)
- Panel size before border: 40 x 80 in (101.6 x 203.2 cm)
- Border depth: 0.5 in (1.3 cm) on each side, 2.25 in (5.7 cm) at the top, and 1.75 in (4.4 cm) at the bottom
Materials
- Yarn: DK-weight mercerized cotton. A crisp, smooth cotton shows the stitch detail and holds the mesh open. Avoid fuzzy or very soft blends, because they stretch when hung.
- Natural white: 1,400 g / 3,164 m for the pair. That is 28 balls of 50 g / 113 m each. One panel uses about 700 g / 1,582 m.
- 3.5 mm (E-4) crochet hook
- Tapestry needle
- Stitch markers
- Rust-proof pins and a large blocking surface
- Spray bottle
- Measuring tape
- 9 to 10 clip curtain rings per panel
The quantities include a safety margin of about 10 percent.
Abbreviations (US Terms)
- ch – chain
- sl st – slip stitch
- sc – single crochet
- hdc – half double crochet
- dc – double crochet
- tr – treble crochet
- sk – skip
- sp – space
- st(s) – stitch(es)
- RS – right side
Picot: (sc, ch 3, sc) in one space.
Standing sc: Start with a slip knot on the hook, insert the hook into the stitch, and complete a sc.
Gauge and Checkpoints
Before starting a panel, make one complete block and block it. On a curtain this size, gauge decides everything.
Check your block at these stages:
- Body after Rnd 1: about 2.2 in (5.6 cm) long.
- Butterfly after Rnd 4: about 5.5 in (14.0 cm) wide x 4.75 in (12.1 cm) tall, with the wings opened flat.
- After Rnd 6: about 6.75 in (17.1 cm) square.
- Finished block after Rnd 7: 8 in (20.3 cm) per side, measured corner to corner. Each side has 6 ch-8 loops, and each loop spans about 1.33 in (3.4 cm).
- Border gauge: 18 sc = 4 in (10.2 cm), and 2 dc rows = 1 in (2.5 cm).
A finished block should measure between 7 7/8 in (20.0 cm) and 8 1/8 in (20.6 cm). Ten blocks in a column multiply any error by ten.
If your block is too big, switch to a 3.25 mm hook. If it’s too small, switch to a 3.75 mm hook. Make a new test block either way. Keep your chains relaxed and even, because tight chains make the mesh cup.

Butterfly Block (make 50 per panel)
Body
Foundation: Ch 11.
Rnd 1: Sc in the 2nd ch from the hook and in the next 8 ch, then work 3 sc in the last ch. Working along the other side of the chain, sc in the next 8 ch and work 2 sc in the last ch. Sl st to the first sc. (22 sc)
The end with the 3-sc group is the tail. The end with the 2-sc group, plus st 1, is the head.
Wing Loops
Rnd 2: Ch 1, then work the anchors and loops in this order:
- Sc in st 1, ch 12, sk 3, sc in st 5. This is the upper wing loop.
- Ch 9, sk 3, sc in st 9. This is the lower wing loop.
- Ch 2, sk 1, sc in st 11 (tail center).
- Ch 2, sk 1, sc in st 13.
- Ch 9, sk 3, sc in st 17 (lower wing loop).
- Ch 12, sk 3, sc in st 21 (upper wing loop).
- Ch 2, sk st 22, sl st to the first sc.
(7 sc, 2 ch-12 loops, 2 ch-9 loops, 3 ch-2 sps)
Wing Fill
Upper wing: (sc, hdc, 2 dc, [ch 1, tr] 9 times, ch 1, 2 dc, hdc, sc) in one loop. Each upper wing has 17 sts and 10 ch-1 sps.
Lower wing: (sc, hdc, [ch 1, dc] 7 times, ch 1, hdc, sc) in one loop. Each lower wing has 11 sts and 8 ch-1 sps.
Rnd 3: Ch 1, then work around in this order:
- Sc in the first sc.
- Work an upper wing in the ch-12 loop, then sc in the next sc.
- Work a lower wing in the ch-9 loop, then sc in the next sc.
- Work 2 sc in the ch-2 sp, sc in the tail sc, 2 sc in the next ch-2 sp, and sc in the next sc.
- Work a lower wing in the ch-9 loop, then sc in the next sc.
- Work an upper wing in the ch-12 loop, then sc in the next sc.
- Work 2 sc in the head ch-2 sp. Sl st to the first sc.
(2 upper wings + 2 lower wings + 13 body sc = 69 sts and 36 ch-1 sps)
Wing Edge and Antennae
Rnd 4: Sl st in the first sc, then work around:
- Upper wing: Sc in each of the first 4 sts. [Picot in the next ch-1 sp, sc in the next tr] 9 times. Picot in the last ch-1 sp, then sc in each of the last 4 sts. (37 sc, 10 picots)
- Sl st in the body sc.
- Lower wing: Sc in the first 2 sts. [Picot in the next ch-1 sp, sc in the next dc] 7 times. Picot in the last ch-1 sp, then sc in the last 2 sts. (27 sc, 8 picots)
- Sl st in each of the 5 body sts across the tail.
- Work the second lower wing, a sl st in the body sc, and then the second upper wing.
- Sl st in the next body sc.
- Head and antennae: Sl st in the first head sc. Make an antenna: ch 8, sl st in the 3rd ch from the hook to form a tiny curled tip, then sl st in the next 5 ch. Sl st in the second head sc and make a second antenna the same way. Sl st to the beginning sl st.
(128 sc, 36 picots, 2 antennae) Fasten off.
The sl sts give the body its slim ridged edge, and the picots give the wings their scalloped outline.
Mesh Rounds
In Rnd 5, count the upper-wing picots starting from the head and the lower-wing picots starting from the waist.
Rnd 5: Join with a standing sc in the sl st between the antennae (the head anchor). Then work:
- Right side: Ch 7, sc in upper picot 1. [Ch 6, sc in the next odd picot] 4 times, which puts sc in picots 3, 5, 7 and 9. Ch 9, sk the last upper picot and lower picot 1, and sc in lower picot 2. [Ch 6, sc in the next even picot] 3 times, which puts sc in picots 4, 6 and 8. Ch 7, sc in the tail center sl st.
- Left side: Ch 7, sc in lower picot 8. [Ch 6, sc in the next even picot] 3 times, which puts sc in picots 6, 4 and 2. Ch 9, sc in upper picot 9. [Ch 6, sc in the next odd picot] 4 times, which puts sc in picots 7, 5, 3 and 1. Ch 7, sl st to the first sc.
(20 sc, 20 loops: 4 ch-7, 14 ch-6, 2 ch-9)
On each side, the 3rd and 8th loops counted from the head will become corners.
Rnd 6: Sl st to the center of the first loop, then ch 1 and sc in the same loop. Work:
- Ch 8, sc in the next loop.
- Ch 8, (sc, ch 10, sc) in the next loop. This is a corner.
- [Ch 8, sc in the next loop] 4 times, then ch 8, (sc, ch 10, sc) in the next loop. Repeat from * 2 more times.
- [Ch 8, sc in the next loop] twice, then ch 8 and sl st to the first sc.
(24 sc, 24 loops: 20 ch-8 and 4 ch-10) Each side now has 5 ch-8 loops between its corners. This is a conversion round: 20 sc worked one per existing loop, plus 4 extra sc added at the corners. Fasten off.
Rnd 7: Join with a standing sc in any ch-10 corner loop. This sc is the corner anchor. [Ch 8, sc in the next ch-8 loop] 5 times, then ch 8 and sc in the next corner loop. Repeat from * 3 more times, leaving out the final corner sc. Sl st to the first sc.
(24 sc, including 4 corner anchors, and 24 ch-8 loops) Each side has 7 sc anchors, counting both corner anchors, with 6 ch-8 loops between them. Fasten off.
Make All Pieces
Per panel, make 50 blocks in natural white. Work Rnds 1–6 on all of them. Work Rnd 7 on the first block only, then use Rnd 7 to join each of the others as you go.
For the pair, make 100 blocks.
Layout for each panel (B = one block):
B B B B B   row 1 (top)
B B B B B   row 2
B B B B B   row 3
B B B B B   row 4
B B B B B   row 5
B B B B B   row 6
B B B B B   row 7
B B B B B   row 8
B B B B B   row 9
B B B B B   row 10 (bottom)
Check that every butterfly faces the same way, with the head toward the top of the panel.
Joining
Use the join-as-you-go method on Rnd 7. Work the panel row by row from the top left.
On a side you are joining:
- Corner: Work the corner sc, then sl st into the neighbor’s corner anchor, going under both loops.
- Loops: Replace each “ch 8” with this sequence: ch 4, sl st into the matching ch-8 loop of the neighbor, ch 4. Then sc in the next loop of the current block.
How the stitches line up: Each side has 6 loops, so 6 loops join to 6 loops, one to one. The joining loop still uses 8 chains plus a sl st, so it is the same length as a free loop. No extra stitches are added at a seam.
Where four blocks meet: Join the new corner only to the corner that is already joined. Use one sl st per corner.
Tension: Count your chains exactly. Short joining chains pucker the seams, and long ones let the mesh sag.
Size checkpoint: After the first row of 5 blocks, the strip should measure 40 x 8 in (101.6 x 20.3 cm) lying flat. Once the panel is fully joined, it should measure 40 x 80 in (101.6 x 203.2 cm).
Border
Border gauge: 18 sc = 4 in (10.2 cm), which is 4.5 sc per inch.
Rnd 1: With RS facing, join in any loop on the panel edge. Work 6 sc in each ch-8 loop and 3 sc in each of the 4 panel corner anchors. Don’t work any stitches at the seam points between blocks.
- Top and bottom: 5 blocks x 6 loops = 30 loops, so 30 x 6 = 180 sc.
- Long sides: 10 x 6 = 60 loops, so 60 x 6 = 360 sc.
- Total: 2 x 180 + 2 x 360 + 4 x 3 = 1,092 sc.
Why the math works: At 4.5 sc per inch, 180 sc measures 40 in (101.6 cm) and 360 sc measures 80 in (203.2 cm). That matches the joined panel exactly, so the edge lies flat without ruffling or pulling in.
Rnd 2: Sc in each sc, working 3 sc in each corner center st. Sl st to join.
- Between the corner center sts, the top and bottom now have 184 sc each, and the long sides have 364 sc each.
- Total: 1,092 + 8 = 1,100 sc.
Fasten off. Rnds 1–2 add about 0.5 in (1.3 cm) on every edge, which makes the panel 41 in (104.1 cm) wide.
Top band:
- Row 1: With RS facing, join at the top right corner center st. Ch 3 (counts as dc), then dc in each st across to the top left corner center st. (186 dc)
- Rows 2–3: Ch 3 and turn, then dc in each st across. (186 dc)
- Row 4: Ch 1 and turn, then sc in each st across. (186 sc)
Fasten off. The band is 1.75 in (4.4 cm) deep.
Bottom scallops:
- Row 1: With RS facing, join with a standing sc in the bottom corner center st. [Ch 6, sk 4, sc in next st] 37 times. This uses 1 + 37 x 5 = 186 sts. (38 sc, 37 loops)
- Row 2: Ch 1 and turn. Work (sc, hdc, 5 dc, hdc, sc) in each loop, then sl st in the last sc. (37 shells, 333 sts)
The scallops are 1.25 in (3.2 cm) deep. The finished length is 80 + 0.5 + 1.75 + 0.5 + 1.25 = 84 in (213.4 cm).
Final Blocking
- Lay the panel flat on clean towels or blocking mats. Work in sections if you don’t have room for the whole panel.
- Pin the outer edges to 41 x 84 in (104.1 x 213.4 cm).
- Pin each block corner along the seam lines so the grid squares up to 8 in (20.3 cm) per block.
- Open each butterfly’s wings and pin the outermost picots.
- Mist the panel evenly until it is damp, but not soaking wet.
- Let it dry completely before you unpin it.
- Pin each scallop point along the bottom edge.
Final Quality-Control Checklist
- Every block measures 8 in (20.3 cm), give or take 1/8 in (0.3 cm).
- All butterflies face up.
- Every seam joins 6 loops to 6 loops, with no twisted joins.
- Border Rnd 1 has 180 sc across the top and bottom and 360 sc down each side.
- The top band and the bottom scallops each start from 186 sts.
- All yarn ends are woven through solid stitches, not mesh chains.
- The panel hangs straight with no wavy edges.
Troubleshooting
- Blocks are cupped: Your chains are too tight. Loosen them or go up a hook size.
- Edges ruffle: You are working more than 6 sc per loop. Recount.
- Edges pull in: Check whether you skipped loops at the seam points. Every loop needs its 6 sc.
- Wings curl: Block with more pins at the picots. Check that the tr fans have all 10 ch-1 sps.
- Panel too long after hanging: Cotton relaxes over time. Block it firmly, and choose a tightly plied yarn.
- Corners gap at four-way joins: Make sure each new corner is joined with one sl st to the already-joined corner.
Care
Hand wash in cool water with mild soap, and press out the water in a towel without wringing. Lay the panel flat to dry, re-pinning it if needed, and don’t hang it while it’s wet.
Final Notes
The measurement chain is simple. Each block is 8 in (20.3 cm) and has 6 loops per side. Five blocks make 40 in (101.6 cm), and ten blocks make 80 in (203.2 cm). Working 6 sc per loop at 4.5 sc per inch keeps the border exactly that size. The edging, band and scallops then bring each panel to 41 x 84 in (104.1 x 213.4 cm). If your test block is right, the rest of the panel will follow.
Happy crocheting!