

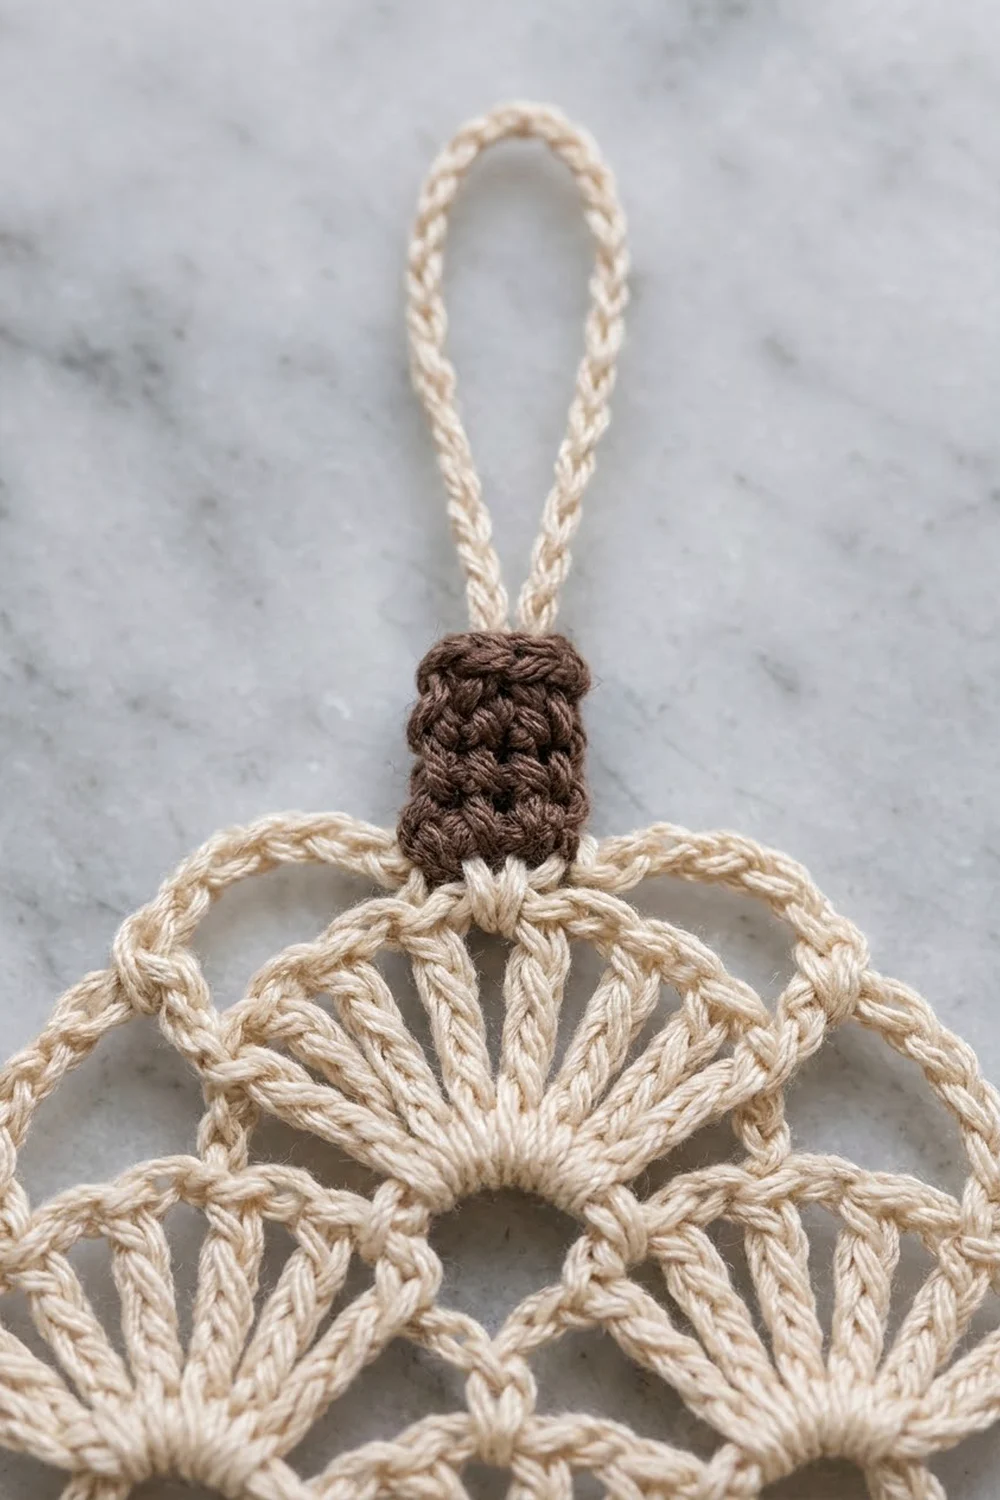
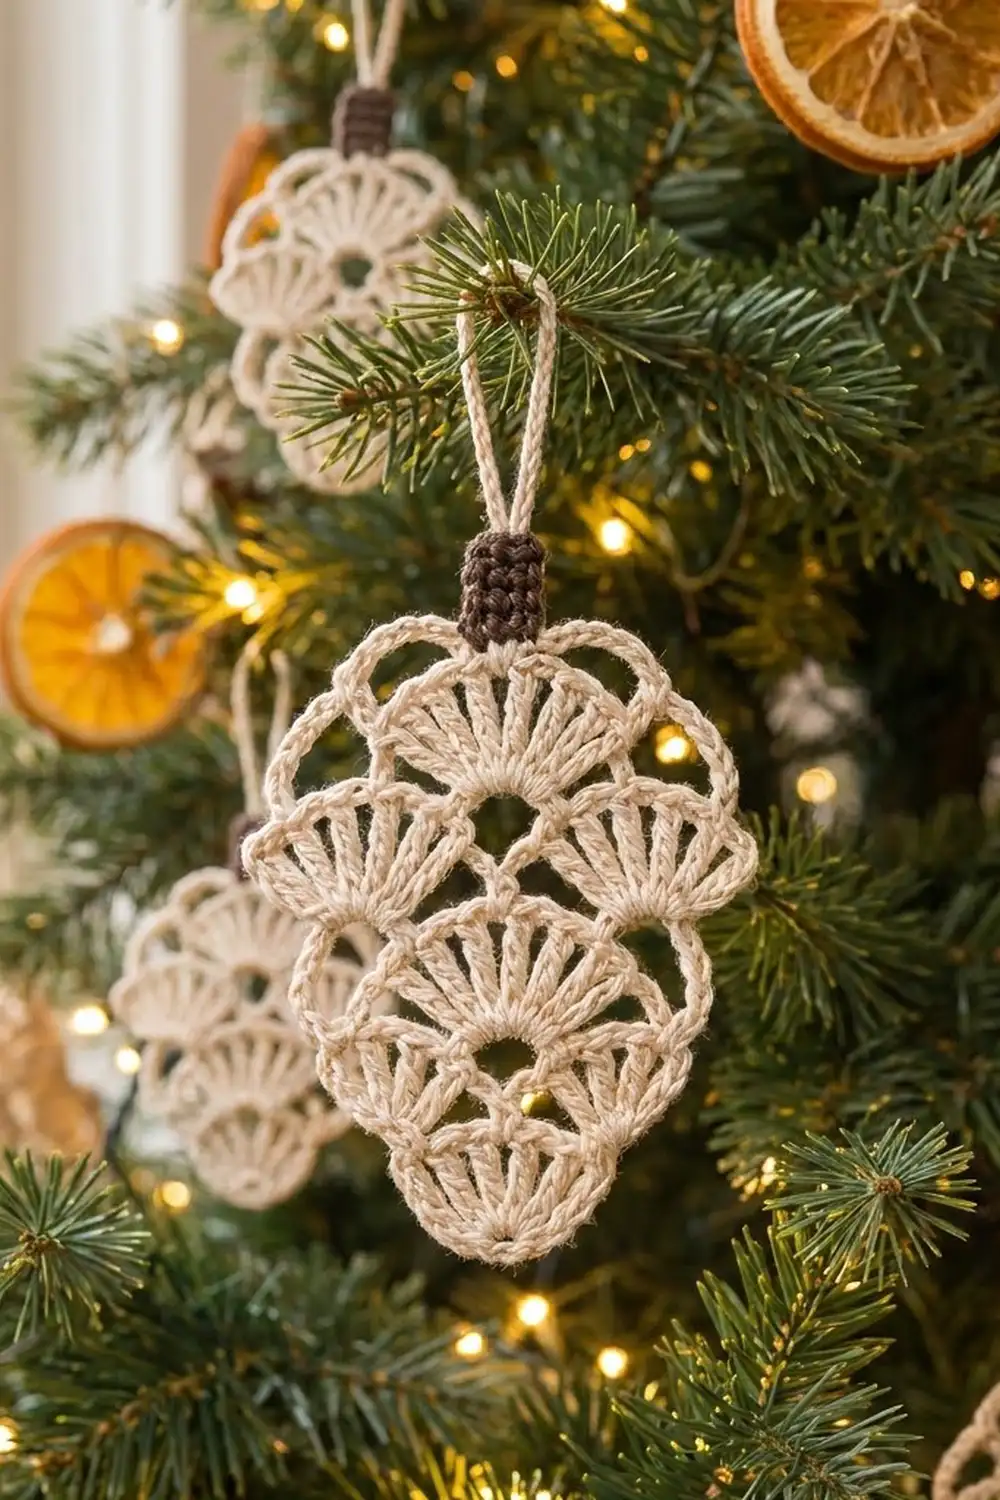
This little pine cone is one flat piece of cream cotton lace. Fan-shaped shells stack in staggered tiers, much like the scales on a real cone. Small openings between the shells let the tree lights show through, and chain arches soften the outline along the sides and top.
A solid chocolate-brown cap sits at the top, with a simple cream chain loop for hanging. The two-color look is quiet and rustic. It suits farmhouse, Scandinavian, or natural-themed trees, and it also works as a gift-wrap topper.
This pattern uses US crochet terms throughout. The finished lace body measures 3.25 in (8.3 cm) wide by 4.5 in (11.4 cm) tall. With the cap, the ornament is 5 in (12.7 cm) tall, and with the hanging loop it is about 7 in (17.8 cm) tall.
You work the body bottom-up in 10 turned rows, starting from a small ring. Rows alternate between “setup” rows, which place V-stitches and single crochet anchors, and “shell” rows, which fill those spaces with fans of double crochet. A five-row brown cap and a chain loop finish the piece. There is no sewing and no joining.
Finished Size and Construction
- Finished size: 3.25 in (8.3 cm) wide × 4.5 in (11.4 cm) tall (body only); 5 in (12.7 cm) tall with cap; about 7 in (17.8 cm) tall with loop
- Skill level: Easy-Intermediate
- Terminology: US crochet terms
- Yarn weight: DK / Light (#3) cotton
- Hook: 3.5 mm (E-4)
- Number of pieces: 1
- Layout: Single flat motif, worked in turned rows
- Piece size: 3.25 in × 4.5 in (8.3 cm × 11.4 cm) body
- Size before border: 3.25 in × 4.5 in (8.3 cm × 11.4 cm); the edge is built into the rows
- Border depth: None added; the edge arches and cap are part of the main rows
Materials
Yarn: Use a smooth, tightly plied DK cotton or a cotton blend. Mercerized cotton gives the crisp, rope-like stitch definition shown here. Avoid fuzzy or very soft acrylic, because the shells will lose their sharp fan shape.
- Cream (Color A): 10 g / about 25 m per ornament
- Dark Brown (Color B): 2 g / about 5 m per ornament
These quantities include a margin of roughly 20% for your gauge swatch and weaving in ends. One 50 g ball of cream makes about four ornaments.
Tools:
– 3.5 mm (E-4) crochet hook
– Tapestry needle
– Scissors
– Rust-proof pins and a foam blocking mat
– Spray bottle with water, or a light fabric stiffener (optional)
– Ruler or tape measure
Abbreviations (US Terms)
- ch – chain
- sl st – slip stitch
- sc – single crochet
- dc – double crochet
- sp(s) – space(s)
- st(s) – stitch(es)
- sk – skip
- RS / WS – right side / wrong side
- beg – beginning
Special stitches:
– V-st (narrow): (dc, ch 2, dc) in the same stitch.
– V-st (wide): (dc, ch 3, dc) in the same stitch.
– Shell: the stated number of dc worked into the same space. A beginning shell starts with ch 3, which counts as the first dc.
– Standing sc: with a slipknot on your hook, insert the hook into the stitch and work a sc without joining by sl st first.
Gauge and Checkpoints
Gauge matters less here than for a garment, but it controls the final size and how crisp the shells look. Make the first ornament as your test piece and measure it at each checkpoint.
- After Row 1: the single shell measures 1.25 in (3.2 cm) wide × 0.75 in (1.9 cm) tall.
- After Row 3: the piece measures 2.5 in (6.4 cm) wide across the two shells.
- After Row 5: the piece measures 2.75 in (7.0 cm) wide across the side arches and 2.5 in (6.4 cm) tall.
- After Row 7: the piece measures 3.25 in (8.3 cm) wide (widest point) and 3.5 in (8.9 cm) tall.
- After Row 10: the body measures 4.5 in (11.4 cm) tall.
Too big? Go down to a 3.25 mm (D-3) hook, or tighten the chain arches. Loose chains are the most common cause of a floppy outline.
Too small or stiff? Go up to a 3.75 mm (F-5) hook. If the shells cup instead of lying flat, the hook is too small.
A difference of 0.25 in (0.6 cm) is fine for an ornament. If you’re off by more than that at Row 3, change the hook before going on.
Pattern: Pine Cone Body
The body is worked in Cream (Color A). Turn at the end of every row. The beginning ch-3 counts as a dc, and the beginning ch-5 or ch-6 counts as a dc plus chains, as noted.
Row 1 (RS): Ch 4 and sl st to the first ch to form a ring. Ch 3 (counts as dc), then work 6 dc in the ring. Do not join. Turn.
(7 dc: 1 shell. This forms the narrow, rounded bottom of the cone.)
Row 2 (WS): Ch 5 (counts as dc + ch 2), dc in the first dc. This makes the first narrow V-st at the edge. Ch 3, sk 2 dc, sc in the next dc (the 4th, or center, dc). Ch 3, sk 2 dc, then work a narrow V-st in the top of the beg ch-3. Turn.
(2 narrow V-sts, 1 sc, 2 ch-3 sps)
Row 3 (RS): Sl st into the first ch-2 sp. Ch 3 (counts as dc), then work 6 dc in the same sp to complete the first shell. Ch 1, sk the ch-3 sp, sc in the sc. Ch 1, sk the ch-3 sp, then work 7 dc in the last ch-2 sp. Turn.
(14 dc, 1 sc, 2 ch-1 sps: 2 shells. The sc between the shells creates the first diamond opening.)
Row 4 (WS): Ch 6 (counts as dc + ch 3). Sc in the center (4th) dc of the first shell, then ch 3. Work a wide V-st in the sc between the shells, then ch 3. Sc in the center (4th) dc of the next shell, ch 3, and dc in the top of the beg ch-3. Turn.
(2 edge dc, 1 wide V-st, 2 sc, 4 ch-3 sps)
Row 5 (RS): Ch 1, sc in the first dc. Ch 4, sk the ch-3 sp, and sc in the next sc. This is the first edge arch. Ch 2, then work 9 dc in the ch-3 sp of the V-st (center shell). Ch 2, sc in the next sc, ch 4, and sc in the 3rd ch of the beg ch-6. Turn.
(9 dc, 4 sc, 2 ch-4 arches, 2 ch-2 sps: 1 center shell with an arch on each side)
Row 6 (WS): Ch 5 (counts as dc + ch 2), dc in the first sc. Ch 5, then sk the ch-4 arch, the sc, the ch-2 sp, and 4 dc. Sc in the center (5th) dc of the shell. Ch 5, sk the remaining 4 dc, the ch-2 sp, the sc, and the ch-4 arch. Work a narrow V-st in the last sc. Turn.
(2 narrow V-sts, 1 sc, 2 ch-5 sps)
Row 7 (RS): Sl st into the first ch-2 sp. Ch 3 (counts as dc), then work 8 dc in the same sp. Ch 2, sk the ch-5 sp, sc in the sc. Ch 2, sk the ch-5 sp, then work 9 dc in the last ch-2 sp. Turn.
(18 dc, 1 sc, 2 ch-2 sps: 2 larger shells. This is the widest row, at 3.25 in / 8.3 cm.)
Row 8 (WS): Ch 6 (counts as dc + ch 3). Sc in the center (5th) dc of the first shell, then ch 3. Work a wide V-st in the sc between the shells, then ch 3. Sc in the center (5th) dc of the next shell, ch 3, and dc in the top of the beg ch-3. Turn.
(2 edge dc, 1 wide V-st, 2 sc, 4 ch-3 sps)
Row 9 (RS): Ch 1, sc in the first dc. Ch 4, sk the ch-3 sp, and sc in the next sc. Ch 2, then work 7 dc in the ch-3 sp of the V-st. Ch 2, sc in the next sc, ch 4, and sc in the 3rd ch of the beg ch-6. Turn.
(7 dc, 4 sc, 2 ch-4 arches, 2 ch-2 sps: the smaller top shell brings the outline back in)
Row 10 (WS): Ch 1, sc in the first sc. Ch 5, sk the ch-4 arch, the sc, the ch-2 sp, and 3 dc, then sc in the center (4th) dc of the shell. Ch 5, sk the remaining 3 dc, the ch-2 sp, the sc, and the ch-4 arch, then sc in the last sc. Fasten off Cream, leaving a 4 in (10.2 cm) tail.
(3 sc, 2 ch-5 arches. These two arches form the rounded top of the cone.)
Checkpoint: The body should measure 3.25 in (8.3 cm) at its widest and 4.5 in (11.4 cm) tall. You should see 1–2–1–2–1 shells from bottom to top, with diamond openings above each sc anchor.
Pattern: Cap
The cap is worked in Dark Brown (Color B) directly on top of Row 10.
Row 11 (RS): With RS facing, join Brown with a standing sc in the 4th ch of the first ch-5 arch. Sc in the 5th ch of the same arch, then sc in the center sc. Sc in the 1st and 2nd ch of the next ch-5 arch. Turn.
(5 sc)
Rows 12–15: Ch 1, sc in each sc across. Turn.
(5 sc in each row)
At the end of Row 15, fasten off Brown. The cap measures about 0.6 in (1.5 cm) wide × 0.5 in (1.3 cm) tall.
Pattern: Hanging Loop
With the last row of the cap facing you, join Cream with a sl st in the center (3rd) sc of Row 15. Ch 20, then sl st in the same sc. Fasten off.
The ch-20 measures about 4 in (10.2 cm), so the folded loop stands about 2 in (5.1 cm) above the cap.
Border
This ornament has no separate border. The edge finish is built into the main rows, so the outline stays light and lacy, just like the photo.
Edge gauge: Each ch-4 side arch spans about 0.5 in (1.3 cm), and each ch-5 top arch spans about 0.75 in (1.9 cm).
Per-side edge count:
– Left side and right side (each): 1 shell edge from Row 1, 1 shell edge from Row 3, 1 ch-4 arch from Row 5, 1 shell edge from Row 7, and 1 ch-4 arch from Row 9. That is 5 edge elements per side.
– Top: 2 ch-5 arches from Row 10, joined at the center sc, with the 5-sc cap sitting on that center.
Why the math works: Each shell row adds width with V-sts, and each arch row pulls the edge in with short chains. The 7-dc, 9-dc, 9-dc, and 7-dc shell sizes give the oval its taper: 2.5 in (6.4 cm), then 3.25 in (8.3 cm), then back in. The cap’s 5 sc use exactly 2 ch on each side of the center sc (2 + 1 + 2 = 5), so the cap stays centered.
Final Blocking
- Weave in all ends along the matching color, Cream into cream stitches and Brown into the cap, before blocking.
- Spray the ornament until it is evenly damp, or dip it briefly in diluted fabric stiffener for a firmer ornament.
- Pin it to the mat with RS up, starting at the center bottom and the cap.
- Pin the widest points of Row 7 out to 3.25 in (8.3 cm).
- Pin the total body height to 4.5 in (11.4 cm).
- Pin each side arch and each top arch into a smooth curve, and open each diamond hole with a pin.
- Fan each shell evenly so the dc spread out like a scale.
- Let it dry completely before removing the pins, about 4–6 hours, or overnight if you used stiffener.
Final Quality-Control Checklist
- Body is 3.25 in × 4.5 in (8.3 cm × 11.4 cm).
- Shell counts are 7, 7+7, 9, 9+9, 7 from bottom to top.
- Each shell sits centered over its V-st or sc anchor.
- Four diamond openings are clearly visible.
- Side arches curve outward evenly on both sides.
- The cap is 5 sc wide, centered, and solid brown.
- The hanging loop is centered and about 2 in (5.1 cm) tall.
- All ends are woven in and invisible from the RS.
Troubleshooting
The shells cup or ruffle. Your tension is too tight for the number of dc. Go up a hook size, or ease your dc tension.
The outline is lopsided. Check that you placed the sc in the true center dc of each shell: the 4th of 7, or the 5th of 9.
The side arches sag. Your chains are too loose. Work them firmly, or reduce the ch-4 to ch-3.
The cap tilts. Recount Row 11. It must be exactly 2 ch, the center sc, then 2 ch.
The ring hole is visible at the bottom. Pull the ring’s starting tail tight before weaving it in.
The ornament won’t stay flat on the tree. Re-block it with fabric stiffener.
Care
Hand wash in cool water with mild soap, press out the water in a towel, and re-block flat to dry. If you stiffened it, simply re-spray and reshape when needed.
Final Notes
Here is the full measurement chain at a glance:
- Row 1 shell: 1.25 in (3.2 cm) wide
- Row 3: 2.5 in (6.4 cm) wide
- Row 5: 2.75 in (7.0 cm) wide and 2.5 in (6.4 cm) tall
- Row 7: 3.25 in (8.3 cm) wide and 3.5 in (8.9 cm) tall
- Row 10: 4.5 in (11.4 cm) tall
- With cap: 5 in (12.7 cm) tall
- With loop: about 7 in (17.8 cm) tall
If your test ornament hits these checkpoints, every ornament after it will match. One afternoon gives you a small set for the tree.
Happy crocheting!