

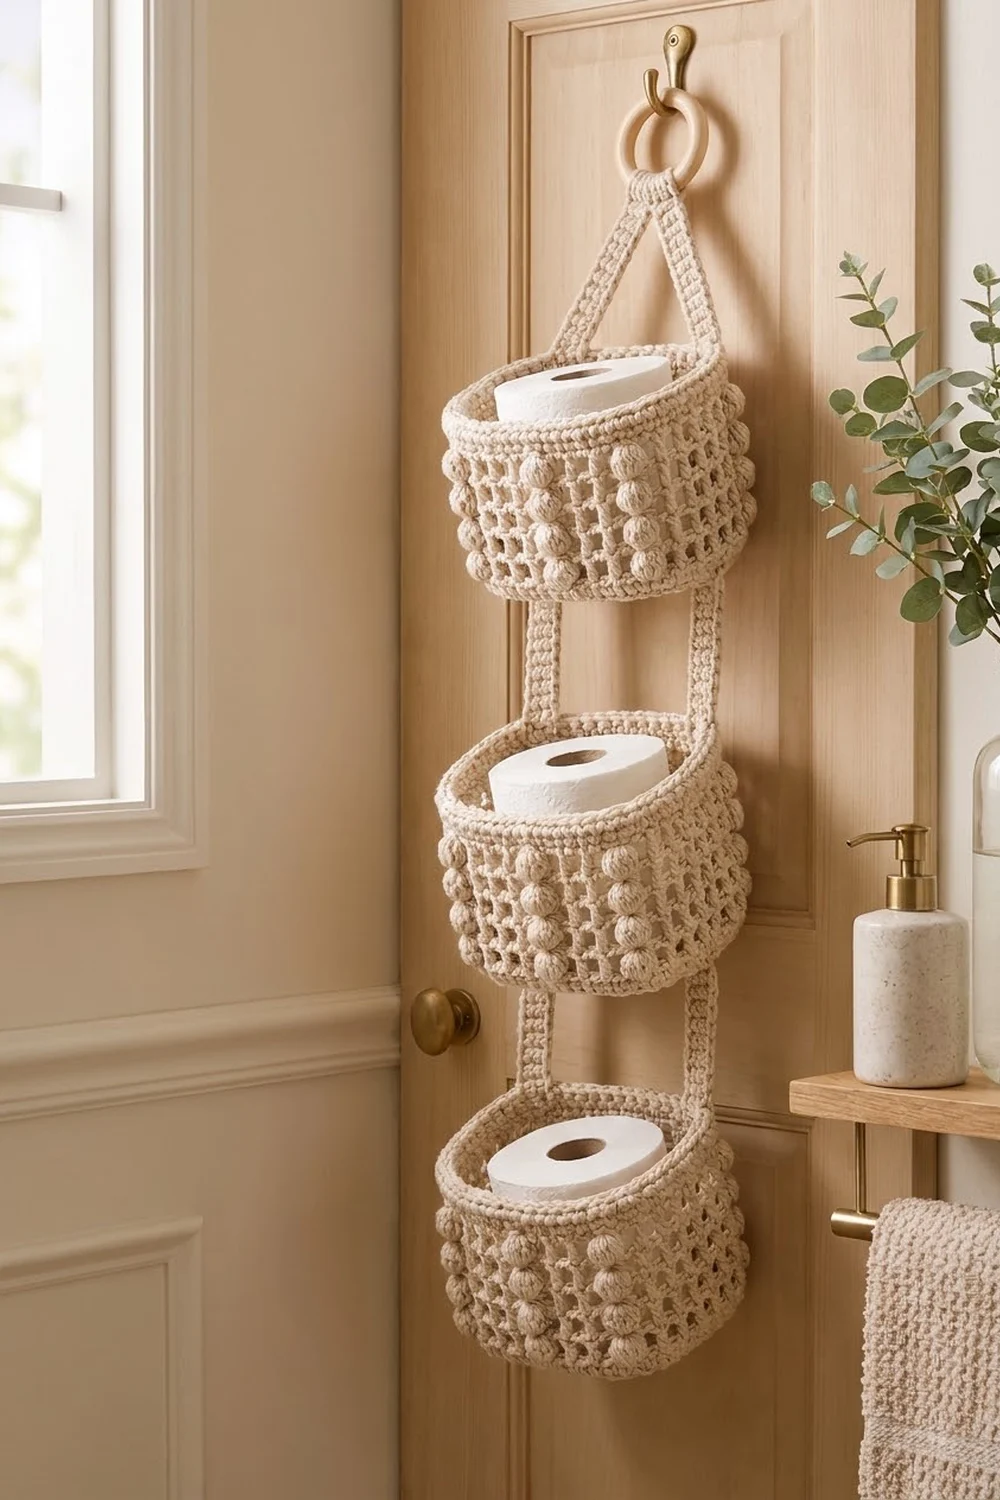
The Oat Bobble Hanging Basket is a three-tier wall organizer. Three soft-square baskets hang in a vertical column, linked by narrow crocheted straps. Two longer straps rise from the top basket to a natural wooden ring. Each basket holds a standard toilet paper roll with room to spare, and the organizer hangs on any bathroom door hook.
The whole piece uses one oatmeal cream color. The basket walls are open filet-style mesh with raised columns of bobbles. A firm single crochet band runs along the bottom and top of each wall. A rolled reverse single crochet rim finishes every basket, for a calm, textured, slightly farmhouse look.
This pattern uses US crochet terms. Each finished basket is 6.25 in (15.9 cm) square at the base and 4 in (10.2 cm) tall. The assembled organizer is about 24.5 in (62.2 cm) long from the top of the ring.
Here is how it’s built. You crochet a solid double crochet square base and round its corners with single crochet. Then you turn the walls up through the back loops and work the mesh-and-bobble rounds, a single crochet band and the rolled rim. The straps are short single crochet strips with eyelets, whipstitched to the side walls.
Finished Size and Construction
- Finished basket size: 6.25 in x 6.25 in x 4 in (15.9 cm x 15.9 cm x 10.2 cm)
- Assembled length: about 24.5 in (62.2 cm), including the ring
- Skill level: Intermediate
- Terminology: US crochet terms
- Yarn weight: Bulky (#5) cotton or cotton blend
- Hook: 5.0 mm (H-8)
- Number of pieces: 9 crocheted pieces (3 baskets, 4 connecting straps, 2 hanger straps) plus 1 wooden ring
- Layout: 3 baskets in one vertical column, with 2 straps per gap
- Base size: 6.25 in (15.9 cm) square after the rounding round
- Basket height before rim border: 3.75 in (9.5 cm)
- Rim border depth: 0.25 in (0.6 cm)
Materials
Choose a smooth, firm bulky cotton or cotton blend. Cotton holds the basket shape and shows the bobbles clearly. Avoid fuzzy or stretchy yarns, because they sag under the weight of the rolls.
- Oatmeal cream (only color): 450 g, about 540 m (590 yd), based on roughly 120 m per 100 g
- About 120 g (144 m) per basket
- About 35 g (42 m) for all 6 straps
These quantities include a margin of roughly 10% for swatching and seaming.
Tools:
- 5.0 mm (H-8) crochet hook
- Wooden ring, 2.5 in (6.4 cm) outer diameter
- Tapestry needle
- 8 locking stitch markers
- Ruler or tape measure
- Pins and a spray bottle
Abbreviations (US Terms)
- ch: chain
- sl st: slip stitch
- sc: single crochet
- dc: double crochet
- BLO: back loop only
- rev sc: reverse single crochet (crab stitch)
- sp: space
- st(s): stitch(es)
- MR: magic ring
Bobble: *Yo, insert hook in the indicated st, yo and pull up a loop, yo and draw through 2 loops; repeat from * 3 more times (5 loops on hook), yo and draw through all 5 loops. A bobble counts as 1 st.
Mesh cell (M): Dc in the next st, ch 1, skip the next st. Each cell uses 2 sts.
Bobble cell (B): Bobble in the next st, ch 1, skip the next st. Each cell uses 2 sts.
Gauge and Checkpoints
- Single crochet: 14 sts x 16 rows = 4 in (10.2 cm)
- Double crochet: 14 sts x 8 rows = 4 in (10.2 cm)
Make one complete basket before starting the others. That basket is your real gauge test.
Base checkpoints (measured straight across the middle):
- Rnd 1: 1.75 in (4.4 cm)
- Rnd 2: 2.75 in (7.0 cm)
- Rnd 3: 3.75 in (9.5 cm)
- Rnd 4: 4.75 in (12.1 cm)
- Rnd 5: 5.75 in (14.6 cm)
- Rnd 6: 6.25 in (15.9 cm)
Wall checkpoints (measured up from the base fold):
- After Rnd 8: 0.5 in (1.3 cm)
- After Rnd 13: 3 in (7.6 cm)
- After Rnd 16: 3.75 in (9.5 cm)
- After Rnd 17: 4 in (10.2 cm)
If the base after Rnd 6 is larger than 6.5 in (16.5 cm), switch to a 4.5 mm hook. If it is smaller than 6 in (15.2 cm), switch to a 5.5 mm hook. A basket that’s too small won’t fit a 4.5 in (11.4 cm) roll.

Basket (Make 3)
Base
Rnd 1: MR, ch 3 (counts as dc), 2 dc in ring, ch 2, *3 dc in ring, ch 2; repeat from * 2 more times. Sl st to top of beg ch-3. (12 dc, 4 ch-2 corner sps; 3 dc per side)
Rnd 2: Sl st in next dc and into ch-2 sp, ch 3 (counts as dc), (dc, ch 2, 2 dc) in same sp. *Dc in each dc to next corner sp, (2 dc, ch 2, 2 dc) in corner sp; repeat from * 2 more times, dc in each remaining dc. Sl st to top of beg ch-3. (28 dc; 7 dc per side)
Rnd 3: Repeat Rnd 2. (44 dc; 11 dc per side)
Rnd 4: Repeat Rnd 2. (60 dc; 15 dc per side)
Rnd 5: Repeat Rnd 2. (76 dc; 19 dc per side)
Each side between two corner spaces now has 19 dc, including the 2 dc beside each corner space.
Rnd 6 (rounding round): Sl st in next dc and into ch-2 sp, ch 1, 3 sc in same corner sp. *Sc in each of next 19 dc, 3 sc in next corner sp; repeat from * 2 more times. Sc in each of the remaining 19 sts, including the beg ch-3 and the dc you slipped across. Sl st to first sc.
Count: 76 sc (1 in each dc) + 12 sc (3 in each of the 4 corner sps) = 88 sc.
Place a marker in the first sc of each 3-sc corner group. A “segment” is 3 corner sc plus 19 side sc, for 22 sts. 4 segments x 22 = 88. The 3-sc corners soften the square into the rounded silhouette.
Walls
Rnd 7 (turning round): Ch 1, sc in BLO of each st around. Sl st to first sc. (88 sc)
The unused front loops form a ridge, and the walls fold up along it.
Rnd 8: Ch 1, sc in each st around. Sl st to first sc. (88 sc)
Label the segments from the first marker as front, side, back, side.
- Segment A (front/back, 11 cells): M, B, M, M, M, B, M, M, M, B, M
- Segment B (sides, 11 cells): M, B, M, M, M, M, M, M, M, B, M
Rnd 9: Ch 4 (counts as dc and ch 1), skip next st. This is the first M of Segment A. Complete Segment A, then work Segment B, Segment A and Segment B. Sl st to 3rd ch of beg ch-4.
Count: 34 dc + 10 bobbles + 44 ch-1 sps = 88 sts (44 cells).
Rnds 10–13: Ch 4 (counts as dc and ch 1). Work each cell over the matching cell below: dc in dc, bobble in bobble, and ch 1 over each ch-1 sp. Sl st to 3rd ch of beg ch-4. (88 sts each round)
You now have 5 mesh rounds. Each bobble column is 5 bobbles tall. There are 3 columns on the front, 3 on the back and 2 on each side. Never turn, so the bobbles stay on the outside.
Rnd 14: Ch 1, sc in each dc or bobble and in each ch-1 sp around. Sl st to first sc. Count: 44 sc (1 in each dc or bobble) + 44 sc (1 in each ch-1 sp) = 88 sc.
Rnds 15–16: Ch 1, sc in each st around. Sl st to first sc. (88 sc each round)
The wall now stands 3.75 in (9.5 cm) tall.
Straps
Connecting Strap (Make 4)
Ch 4.
Row 1: Sc in 2nd ch from hook and in next 2 ch. (3 sc)
Row 2: Ch 1, turn, sc in each st. (3 sc)
Row 3 (eyelet): Ch 1, turn, sc in first st, ch 2, skip next st, sc in last st. (2 sc, 1 ch-2 sp)
Row 4: Ch 1, turn, sc in first st, sc in ch-2 sp, sc in last st. (3 sc)
Rows 5–19: Repeat Row 2.
Row 20 (eyelet): Repeat Row 3.
Row 21: Repeat Row 4.
Row 22: Repeat Row 2. Fasten off, leaving a 16 in (40.6 cm) tail.
The finished strap is 22 rows long: 5.5 in (14.0 cm) long and about 0.85 in (2.2 cm) wide. There is one eyelet in the 3rd row from each end.
Hanger Strap (Make 2)
Work Rows 1–4 as for the connecting strap, then repeat Row 2 for Rows 5–36. Fasten off, leaving a 16 in (40.6 cm) tail. The finished strap is 36 rows, or 9 in (22.9 cm), long, with one eyelet near the bottom end.
Make All Pieces
All 9 pieces use oatmeal cream.
- Baskets: 3 (about 120 g each)
- Connecting straps: 4
- Hanger straps: 2
Layout, from top to bottom:
          ( RING )
         /        \
   [hanger]      [hanger]
  [====== BASKET 1 ======]
   [strap]        [strap]
  [====== BASKET 2 ======]
   [strap]        [strap]
  [====== BASKET 3 ======]
Finish the rim border on every basket before joining, so the straps sit against a fixed edge.
Rim Border
Work the rim on each basket right after Rnd 16.
Border gauge: You work 1 rev sc into each st, so the rim matches the sc gauge of 14 sts = 4 in (10.2 cm). It adds 0.25 in (0.6 cm) of height.
Rnd 17: Ch 1, do not turn. Working from left to right (right to left if you crochet left-handed), rev sc in each st around. Sl st to first rev sc. Fasten off and weave in the ends. (88 rev sc; 22 per segment)
Why the math works: The rim has the same 88 sts as the base perimeter (4 segments x 22 sts). That makes the opening exactly as wide as the base, so the walls stand straight without flaring or pulling in. Each rev sc twists into a cord, which gives the rolled, rope-like rim without changing the stitch count.
Each finished basket measures 6.25 in x 6.25 in x 4 in (15.9 cm x 15.9 cm x 10.2 cm).
Joining
Method: Whipstitch the straps on with their tails. Each strap end overlaps the outside of a side wall (Segment B) by 6 rows, or 1.5 in (3.8 cm). Center each strap over the plain mesh in the middle of the side wall.
Stitch-to-stitch logic: One strap row is 0.25 in (0.6 cm), the same height as one sc round. One mesh round equals 2 strap rows.
- At a basket top: The 6 overlapping strap rows cover Rnd 17, Rnds 16–14 (4 rows total) and Rnd 13 (2 rows). The strap end sits flush with the top of the rim.
- At a basket bottom: The 6 overlapping rows cover Rnds 7–8 (2 rows) and Rnds 9–10 (4 rows). The strap end sits flush with the fold ridge.
Steps:
- Pin one end of a connecting strap to a side wall of Basket 1, with the strap end at the fold ridge. Whipstitch around the overlap, taking 1 stitch per strap row.
- Pin the other end to the matching side of Basket 2, with the strap end flush with the rim. Sew it the same way.
- Repeat on the opposite side. Then join Basket 2 to Basket 3 the same way.
- Pass Rows 31–36 of each hanger strap through the ring. Fold them back onto Rows 25–30 and sew them down.
- Sew Rows 1–6 of each hanger strap to the side walls of Basket 1, flush with the rim.
Tension: Keep your whipstitches snug but not tight. If you pull too hard, the mesh will pucker under the strap.
Size checkpoint: Each gap between baskets should measure 2.5 in (6.4 cm), which is 10 free strap rows. The total length should be about 24.5 in (62.2 cm).
Final Blocking
- Mist each basket until it’s damp, not soaked.
- Stuff each basket firmly with a folded towel.
- Square the corners and confirm the base measures 6.25 in (15.9 cm).
- Press each bobble outward so the columns stand proud.
- Pin the straps flat and straight.
- Let everything dry completely before hanging.
Final Quality-Control Checklist
- Each base measures 6.25 in (15.9 cm), with 88 sts in Rnd 6.
- The walls are 4 in (10.2 cm) tall, with firmly rolled rims.
- Each basket has 10 bobble columns, each 5 bobbles tall.
- Each side wall has a plain mesh center under the straps.
- The connecting straps are 5.5 in (14.0 cm) long, and the hanger straps are 9 in (22.9 cm).
- The gaps between baskets are equal at 2.5 in (6.4 cm).
- All ends are woven in on the inside.
Troubleshooting
- The base ruffles: Your dc stitches are too loose. Go down one hook size.
- The base cups: Check that each corner has (2 dc, ch 2, 2 dc).
- The walls flare out: Recount Rnd 7. It must have exactly 88 sts.
- The bobbles look flat: Pull up all 4 loops of each bobble to the same height, then push the bobbles outward.
- The bobble columns drift: Each segment must have exactly 11 cells.
- The baskets tilt: Re-pin the straps so both sides have identical overlaps.
Care
Hand wash in cool water with mild soap. Reshape the baskets while damp and dry them stuffed with a towel.
Final Notes
The measurement chain is short and reliable. At 14 sts = 4 in (10.2 cm), the dc base reaches 5.75 in (14.6 cm). The 88-st rounding round brings it to 6.25 in (15.9 cm). The mesh rounds and sc bands build the walls to 3.75 in (9.5 cm), and the rim brings them to 4 in (10.2 cm). Strap overlaps of 6 rows and gaps of 2.5 in (6.4 cm) stack the three baskets into a 24.5 in (62.2 cm) organizer. Check each measurement as you go, and the finished piece will hang straight.
Happy crocheting!