
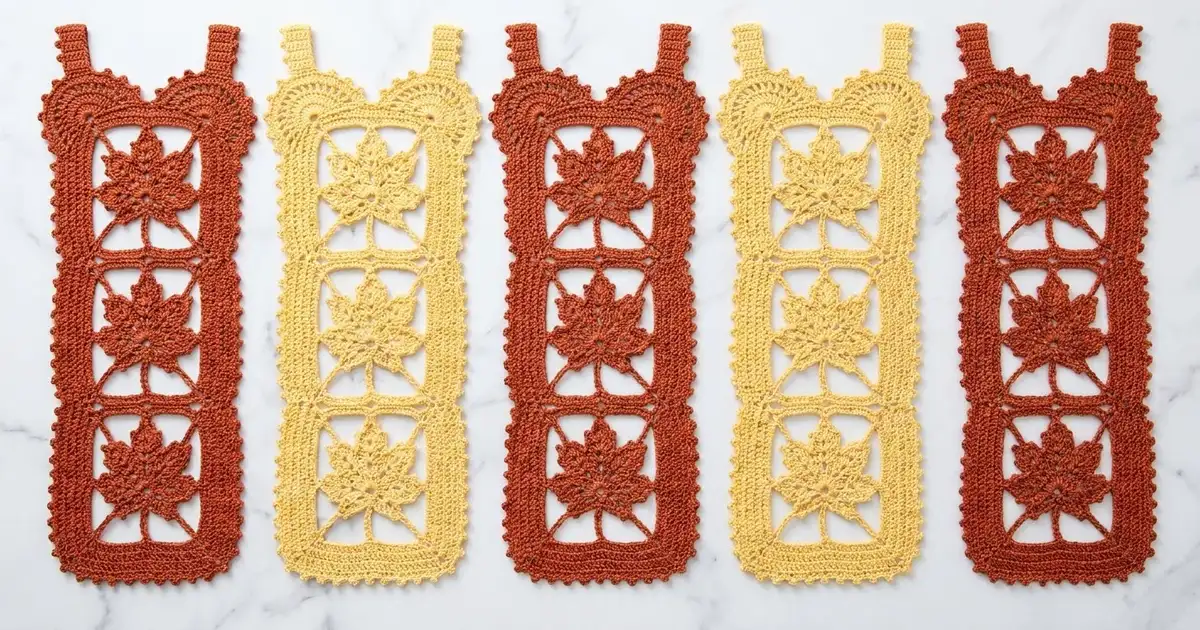
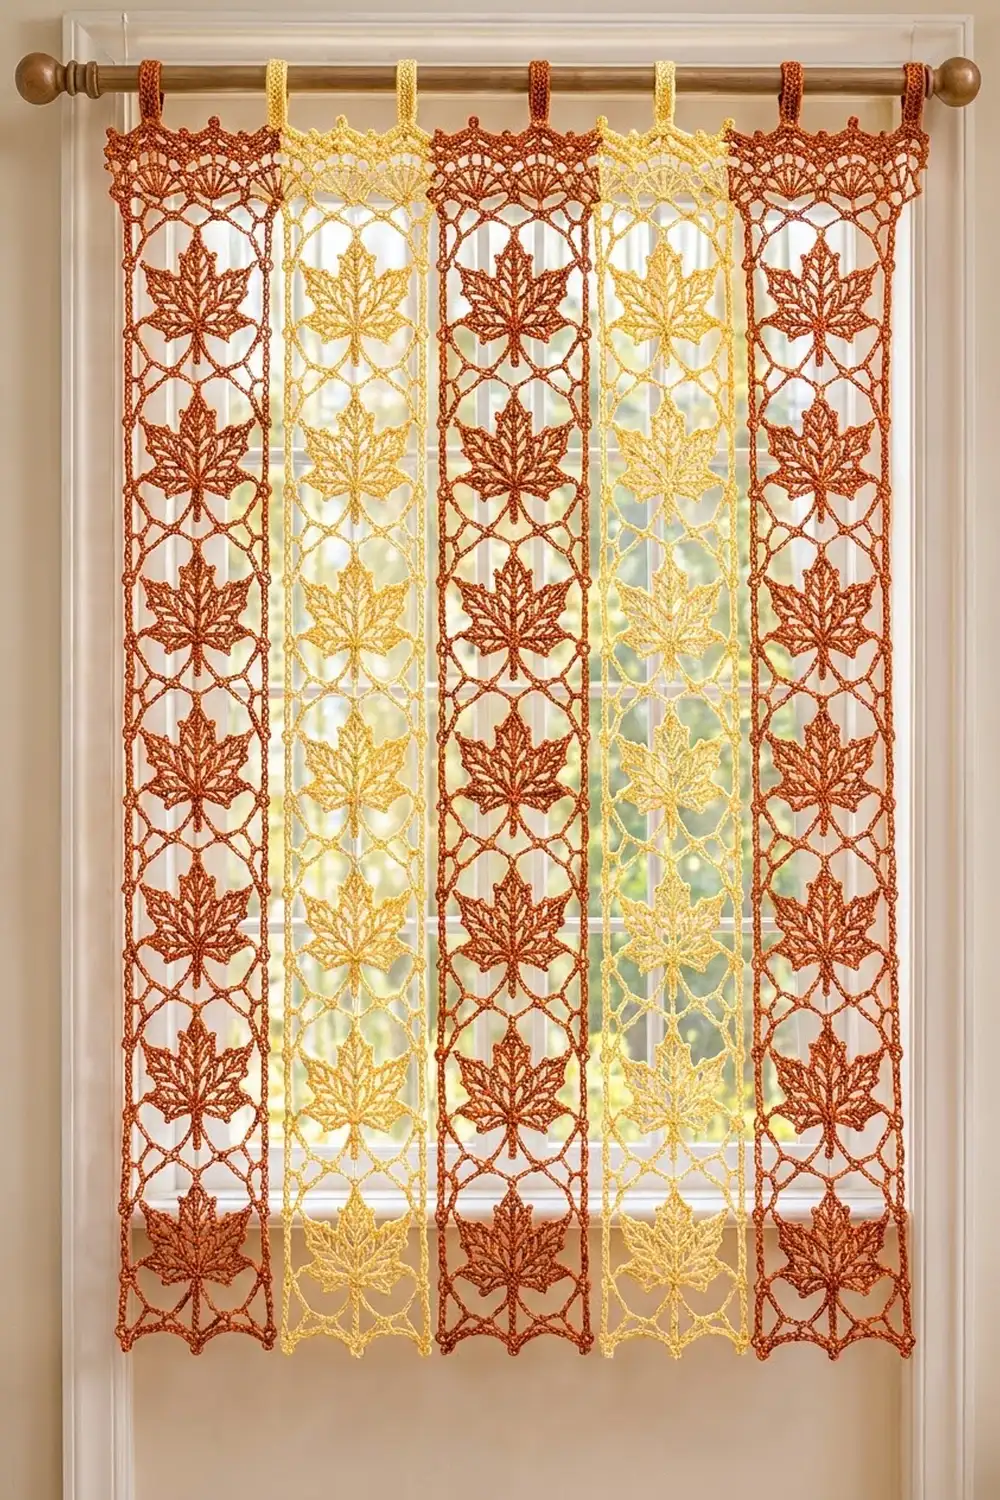
Bring falling leaves indoors with a curtain made of airy lace strips. Each strip is a column of openwork maple leaves set inside a picot mesh frame. The strips have a fan-scalloped top and hang from simple tabs, so light comes through every vein and notch.
This version alternates three rust strips with two butter yellow strips. The warm rust and soft yellow look like autumn foliage against a bright window, and the gaps between the loose strips let you push them aside one at a time.
The pattern uses US crochet terms. Each finished strip measures 8.5 in (21.6 cm) wide by 57.75 in (146.7 cm) long, not counting the tabs. Five strips cover a window about 42 in (106.7 cm) wide.
The construction is modular. You crochet each leaf in four rounds and square it into an 8 in (20.3 cm) block with four frame rounds. Then you join seven blocks into a column, add a border with fan edging, and sew on two tabs.
Finished Size and Construction
- Finished strip: 8.5 × 57.75 in (21.6 × 146.7 cm)
- Skill level: Intermediate
- Terminology: US
- Yarn weight: Sport (#2) mercerized cotton
- Hook: 3.25 mm (US D/3)
- Number of pieces: 35 leaf blocks and 10 tabs, made into 5 separate strips
- Layout: 5 strips × 7 blocks each, hung side by side and not joined
- Block size: 8 × 8 in (20.3 × 20.3 cm)
- Strip size before border: 8 × 56 in (20.3 × 142.2 cm)
- Border depth: 0.25 in (0.6 cm) at the sides and bottom, 1.5 in (3.8 cm) at the top
Materials
Use a smooth, mercerized cotton so the veins and picots stay crisp. Avoid fuzzy or very stretchy fibers, because the long chain loops will droop.
- Rust (Color A): 225 g / 675 m (about 150 m per 50 g)
- Butter yellow (Color B): 150 g / 450 m
Both quantities include a margin of about 15% for gauge differences and tails.
Tools:
– 3.25 mm (US D/3) hook
– Tapestry needle
– Stitch markers
– Rust-proof pins and a large blocking surface
– Spray bottle
– Tape measure
– Curtain rod
Abbreviations (US Terms)
- ch – chain
- sl st – slip stitch
- sc – single crochet
- dc – double crochet
- tr – treble crochet
- dtr – double treble (yarn over 3 times, then work off the loops 2 at a time)
- sk – skip
- sp – space
- st(s) – stitch(es)
- RS / WS – right side / wrong side
Picot: Ch 3, then sl st in the 3rd ch from the hook.
Gauge and Checkpoints
Gauge: 22 sc and 26 rows = 4 in (10.2 cm) in sc.
Make one complete block before you start production. Check these measurements as you go:
- After Rnd 1: the ring is about 0.75 in (1.9 cm) across.
- After Rnd 2: the center vein is about 3 in (7.6 cm) long, measured from the ring.
- After Rnd 4: the leaf is 5 in (12.7 cm) wide and 6 in (15.2 cm) tall, including the stem.
- After Rnd 6: the piece is about 7 in (17.8 cm) across.
- After Rnd 8: the block is 8 × 8 in (20.3 × 20.3 cm), lightly blocked.
If the block is too big, go down half a hook size. If it is too small, go up half a size. Don’t change the stitch counts, because the border math depends on 44 sc per block side.
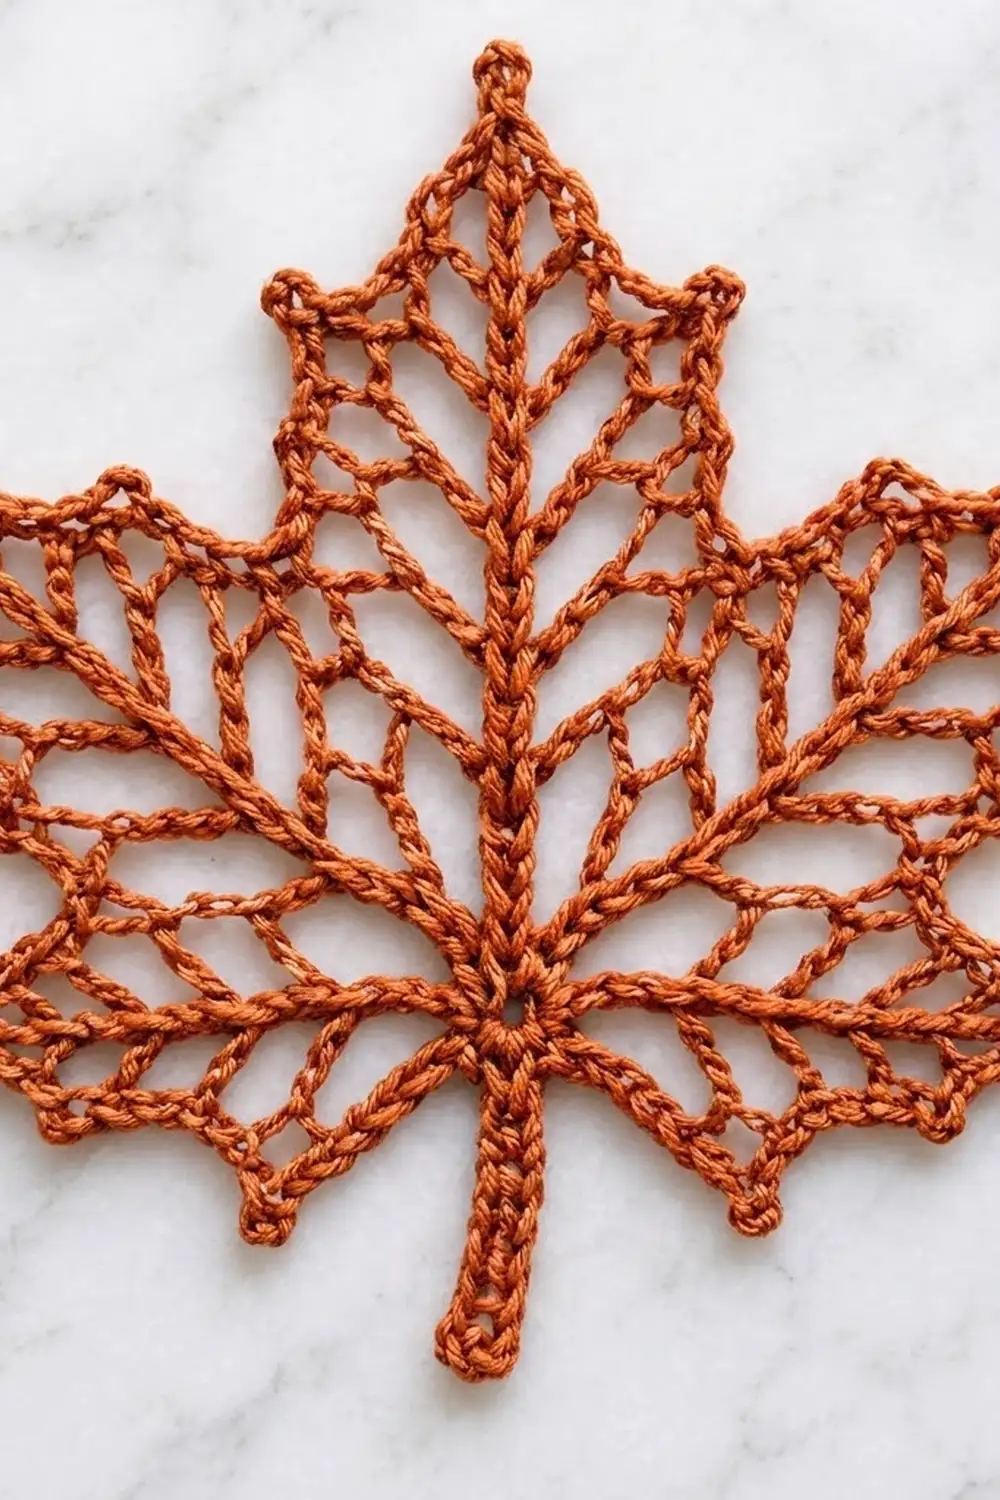
Leaf Block (Make 35)
Leaf
Rnd 1: Ch 5, sl st to form a ring. Ch 1, work 12 sc in the ring, sl st to the first sc. (12 sc)
Number these sc 1–12. Sc 12 sits at the bottom of the ring, and the round travels counterclockwise.
Rnd 2 (veins and stem): In this round, count each vein’s sc from the ring outward.
- Sl st in sc 2.
- Lower-right vein: Ch 13, sl st in the 4th ch from the hook (this makes the tip loop), sc in the next 9 ch, sl st in the same ring sc.
- Sl st in the next 2 sc.
- Upper-right vein: Ch 17, sl st in the 4th ch from the hook, sc in the next 13 ch, sl st in the same ring sc.
- Sl st in the next 2 sc.
- Center vein: Ch 21, sl st in the 4th ch from the hook, sc in the next 17 ch, sl st in the same ring sc.
- Sl st in the next 2 sc.
- Upper-left vein: Work as the upper-right vein.
- Sl st in the next 2 sc.
- Lower-left vein: Work as the lower-right vein.
- Sl st in the next 2 sc (you are now at sc 12).
- Stem: Ch 13, sc in the 2nd ch from the hook and in the next 11 ch, sl st in the same ring sc.
Totals: 5 veins (9, 13, 17, 13 and 9 sc, each with a ch-3 tip) and a 12-sc stem.
Rnd 3 (inner lace):
1. Sl st in the first 4 sc of the stem.
2. Ch 6, sc in the 5th sc of the lower-right vein.
3. Ch 7, sc in the 7th sc of the upper-right vein.
4. Ch 7, sc in the 9th sc of the center vein.
5. Ch 7, sc in the 7th sc of the upper-left vein.
6. Ch 7, sc in the 5th sc of the lower-left vein.
7. Ch 6, sl st in the stem st where you started.
Totals: 6 loops (two ch-6 loops and four ch-7 loops) and 5 sc anchors. These loops form the open pockets between the veins.
Rnd 4 (serrated outline):
1. Sl st in the first ch-6 loop. Ch 1, sc in the same loop.
2. Lower-right lobe: Ch 4, picot, ch 4, (sc, ch 3, sc) in the tip loop, ch 4, picot, ch 4, sc in the next ch-7 loop.
3. Upper-right lobe: Ch 5, picot, ch 5, (sc, ch 3, sc) in the tip loop, ch 5, picot, ch 5, sc in the next ch-7 loop.
4. Center lobe: Work as the upper-right lobe, ending with sc in the next ch-7 loop.
5. Upper-left lobe: Work as the upper-right lobe, ending with sc in the next ch-7 loop.
6. Lower-left lobe: Work as the lower-right lobe, ending with sc in the last ch-6 loop.
7. Ch 3, sc in the 7th stem sc from the ring, ch 3, sl st to the first sc.
Totals: 5 pointed tips, 10 side picots, and 7 anchor sc. The rest of the stem hangs free below the outline. Check the leaf size against the checkpoint above.
Frame
Rnd 5 (spokes):
1. Join with sc in the first picot of the lower-right lobe.
2. Work ch 6, sc in the next point in this order: lower-right tip, lower-right second picot, upper-right first picot, upper-right tip, upper-right second picot, center first picot.
3. In the center tip ch-3 work (sc, ch 6, sc).
4. Continue ch 6, sc in the next point: center second picot, upper-left first picot, upper-left tip, upper-left second picot, lower-left first picot, lower-left tip, lower-left second picot.
5. Ch 4, sl st in the end st of the stem, ch 4, sl st to the first sc.
Totals: 16 sc and 16 loops. The bottom loop is tacked at the stem.
Rnd 6 (picot mesh):
1. Sl st in the next 3 ch, sc in the same loop.
2. Ch 4, picot, ch 4, sc in the next loop 14 times.
3. Ch 4, picot, ch 4, sc in the stem sl st (this is the bottom loop).
4. Ch 4, picot, ch 4, sl st to the first sc.
Totals: 16 sc and 16 picot loops. Mark sc #2, #6, #10 and #14 as the corners.
Rnd 7 (square up):
1. Sl st along the picot loop to the marked sc #2.
2. Ch 5 (counts as dtr), ch 9, tr in the next sc, ch 9, 2 dc in the next sc, ch 9, tr in the next sc, ch 9.
3. (Dtr, ch 3, dtr) in the next marked sc, ch 9, tr in the next sc, ch 9, 2 dc in the next sc, ch 9, tr in the next sc, ch 9 3 times.
4. Dtr in the first sc, ch 3, sl st to the top of the ch-5.
Per side: dtr + 9 ch + tr + 9 ch + 2 dc + 9 ch + tr + 9 ch + dtr = 42.
Rnd 8 (conversion):
1. Ch 1. Work sc in each st and 9 sc in each ch-9 sp.
2. Work (sc, ch 2, sc) in each corner ch-3 sp.
3. Sl st to the first sc and fasten off.
Per side: 42 sts worked 1 for 1, plus 2 corner sc added, = 44 sc, counting the corner sc at each end. Round total: 176 sc and 4 ch-2 corner sps.
The top edge is the side with the center tip loop.
Make All Pieces
- Rust (A): 21 blocks and 6 tabs
- Butter yellow (B): 14 blocks and 4 tabs
Layout (strips left to right, 7 blocks each):
Strip:  1  2  3  4  5
        A  B  A  B  A
        A  B  A  B  A
        A  B  A  B  A
        A  B  A  B  A
        A  B  A  B  A
        A  B  A  B  A
        A  B  A  B  A
Each strip uses one color only. The strips are never joined to each other.
Joining
Join the 7 blocks of each strip into a vertical column, top edge to bottom edge.
- Hold two blocks with RS together, matching the top edge of the lower block to the bottom edge of the upper block.
- Sl st through both corner ch-2 sps.
- Sl st through both loops of all 44 pairs of sc. The corner sc pair up one-to-one, so no stitches are added at the seam.
- Sl st through the far corner ch-2 sps and fasten off.
Tension: Keep the sl st loose enough that the seam stays at 8 in (20.3 cm), the same as the block edge. A tight seam will pucker the column. If needed, go up one hook size for joining only.
Size checkpoint: Two joined blocks should measure 8 × 16 in (20.3 × 40.6 cm). A finished column of 7 blocks measures 8 × 56 in (20.3 × 142.2 cm).
Border
Border gauge: The same 22 sc = 4 in (10.2 cm). Each long side has 7 × 44 = 308 sc, which is exactly 56 in (142.2 cm).
Rnd 1 (sc):
1. With RS facing, join in any sc.
2. Work sc in each sc around. At each seam, work into both corner sc and skip the joined ch-2 sps.
3. Work (sc, ch 2, sc) in each of the 4 outer corner sps.
4. Sl st to the first sc.
Long sides: 308 sc worked 1 for 1, plus 2 corner sc added, = 310 sc.
Short sides: 44 + 2 = 46 sc.
Total: 712 sc and 4 ch-2 sps.
Top Fan Edging
Work across the 46 top sc only.
Row 1 (RS): Join with sc in the first top sc. Ch 5, sk 4 sc, sc in the next sc 9 times.
(9 arches, 10 sc. This uses 1 + 9 × 5 = 46 sc.)
Row 2 (WS):
1. Ch 1, turn. Sc in the first sc.
2. 8 dc in the next arch, sc in the next sc, (sc, ch 3, sc) in the next arch, sc in the next sc 4 times.
3. 8 dc in the last arch, sc in the last sc.
(5 fans of 8 dc, 18 sc, 4 ch-3 sps)
Row 3 (RS):
1. Ch 1, turn. Sl st in the first sc.
2. [Sc in the next 2 dc, picot] 4 times, sk 2 sc, (sc, picot, sc) in the ch-3 sp, sk 2 sc 4 times.
3. [Sc in the next 2 dc, picot] 4 times, sl st in the last sc.
4. Fasten off.
(48 sc, 24 picots) Rows 1–3 plus Rnd 1 make the top border 1.5 in (3.8 cm) deep.
Side and Bottom Trim
- With RS facing, join with sc in the top-left corner sp.
- Left side: [Sc in the next 5 sc, picot] 62 times. (310 sc)
- Bottom-left corner: (Sc, picot, sc) in the corner sp.
- Bottom: [Sc in the next 5 sc, picot] 9 times, sc in the next sc. (46 sc)
- Bottom-right corner: (Sc, picot, sc) in the corner sp.
- Right side: [Sc in the next 5 sc, picot] 62 times.
- Sc in the top-right corner sp and fasten off.
Why the math works:
– 310 = 62 × 5 and 46 = 9 × 5 + 1, so the picots repeat evenly with no fudging.
– Across the top, 46 = 1 + 9 × 5, so the arches fit exactly.
– Rnd 1 and the trim add 0.25 in (0.6 cm) to each side, which takes the width from 8 to 8.5 in (20.3 to 21.6 cm).
– The length goes from 56 in to 56 + 1.5 + 0.25 = 57.75 in (146.7 cm).
Tabs (2 per strip)
- Ch 9.
- Row 1: Sc in the 2nd ch from the hook and in each ch across. (8 sc)
- Rows 2–20: Ch 1, turn, sc in each sc. Fasten off.
Each tab measures 1.5 × 3 in (3.8 × 7.6 cm). Fold each tab in half and sew both ends to the WS of border Rnd 1, behind arches 2 and 8.
Final Blocking
- Weave in all ends along the veins or seams.
- Soak each strip in cool water, then roll it in a towel to press out the excess.
- Pin the strip flat to 8.5 × 57.75 in (21.6 × 146.7 cm).
- Pin each leaf tip and side picot outward to sharpen the lobes.
- Pin the side rails straight and the corners square.
- Open each fan and pin every top picot.
- Mist again and let it dry completely before unpinning.
Final Quality-Control Checklist
- Every block measures 8 in (20.3 cm) per side and has 44 sc per side.
- Each leaf has 5 sharp tips, 10 picots, and a free stem.
- Every seam lies flat with no puckering.
- Long sides have 310 sc and 62 picots; the bottom has 46 sc.
- The top has 5 even fans.
- Both tabs are sewn level and are the same height.
- All five strips are the same length within 0.25 in (0.6 cm).
Troubleshooting
- Lobes curl inward: The Rnd 4 chains are too tight. Add 1 ch to each segment, or block harder.
- Block is wavy: Rnd 7 is too loose. Shorten the ch-9 spaces to ch-8, but still work 9 sc into each in Rnd 8.
- Block cups: Check that Rnd 7 has 2 dc in each mid-side sc, not 1.
- Strip twists when hung: Re-block it and pin the side rails perfectly straight.
- Strips hang at different lengths: Measure the unblocked blocks and replace any outlier before joining.
Care
Hand wash in cool water with mild soap and dry flat to the blocked measurements. A light spray starch keeps the leaves crisp in a sunny window.
Final Notes
The whole curtain follows one measurement chain:
- A leaf of 5 × 6 in (12.7 × 15.2 cm) becomes an 8 in (20.3 cm) block with 44 sc per side.
- Seven blocks make an 8 × 56 in (20.3 × 142.2 cm) column with 308 sc per long side.
- The border brings each strip to 8.5 × 57.75 in (21.6 × 146.7 cm).
If you check gauge on your first block, every later count will fall into place. Happy crocheting!