

This delicate thread ornament is a slim candle, made entirely of lace. It has a teardrop flame with a tiny open heart, a ribbed band at the top of the candle, open sides draped with chain garlands, and two pointed lace leaves at the base. Hung on a tree in front of the lights, it reads clearly as a candle while staying light and airy.
The ornament is worked in one color: a soft cream or ivory cotton thread. The look is classic heirloom lace, the kind you would starch and keep in an ornament box for years. All instructions use US crochet terms.
The finished ornament measures 6 in (15.2 cm) tall and 4 in (10.2 cm) wide, plus a hanging loop of about 2 in (5.1 cm).
Construction is simple and done in sections. You crochet the flame in the round, work a three-row band, and make two leaves that join at their inner tips. Next you add the corded rails and swags between the band and the leaves. The last step is a picot edging round around each leaf, which acts as the border.
Finished Size and Construction
- Finished size: 6 in (15.2 cm) tall × 4 in (10.2 cm) wide, without the hanging loop
- Skill level: Intermediate (thread lace, working into chain spaces)
- Terminology: US crochet terms
- Yarn weight: Size 3 cotton crochet thread (Lace / 0)
- Hook: 2.0 mm steel crochet hook
- Number of pieces: 1 finished ornament, made in 4 connected sections
- Layout: Single standalone ornament (no grid or assembly)
- Section sizes: flame 1 in × 1.25 in (2.5 × 3.2 cm); band 1.5 in × 0.5 in (3.8 × 1.3 cm); rails 3 in (7.6 cm); each leaf 2 in × 1.25 in (5.1 × 3.2 cm)
- Size before border: each leaf is 1.75 in × 1 in (4.4 × 2.5 cm), and the ornament is 3.75 in (9.5 cm) wide
- Border depth: 0.125 in (0.3 cm) on each leaf edge
Materials
Thread: Choose a mercerized size 3 cotton crochet thread. It holds a crisp shape, takes starch well, and shows the chain texture clearly. Avoid fuzzy or very soft cotton, because the swags and mesh will lose their definition.
- Cream / ivory: approx. 10 g, about 18 m (19.7 yd)
Tools:
– 2.0 mm steel crochet hook
– Fine tapestry needle with a small eye
– Scissors
– Fabric stiffener or spray starch
– Foam blocking board, rustproof pins, and plastic wrap
The thread quantity includes about a 30% margin for gauge swatching, tails, and the hanging loop.
Abbreviations (US Terms)
- ch – chain
- sl st – slip stitch
- sc – single crochet
- hdc – half double crochet
- dc – double crochet
- tr – treble crochet
- sk – skip
- sp(s) – space(s)
- st(s) – stitch(es)
- [ ] – repeat the steps inside the brackets as many times as stated
Special stitch – ch-3 picot: Ch 3, then sl st into the stitch you just made.
Gauge and Checkpoints
Gauge: 11 sc = 1.5 in (3.8 cm) with size 3 thread and a 2.0 mm hook. You can also check it on the rails, where 22 sc = 3 in (7.6 cm).
Make the flame first and use it as your test piece. It is quick, and it tells you right away whether your tension matches.
Checkpoints:
– Flame after Rnd 1: 0.6 in (1.5 cm) across
– Flame after Rnd 3: 1 in (2.5 cm) wide × 1.25 in (3.2 cm) tall, without the hanging loop
– Band after Row 3: 1.5 in (3.8 cm) wide × 0.5 in (1.3 cm) tall
– Leaf after Rnd 2: 1.75 in (4.4 cm) × 1 in (2.5 cm)
– Each rail: 3 in (7.6 cm) long
– Flame + band + rails: 4.75 in (12.1 cm)
– Finished ornament: 6 in (15.2 cm) × 4 in (10.2 cm)
If your flame is too big, change to a 1.75 mm hook. If it is too small, change to a 2.25 mm hook. Keep the thread and change only the hook. The chain swags depend on the rail spacing, so matching the band width matters most.
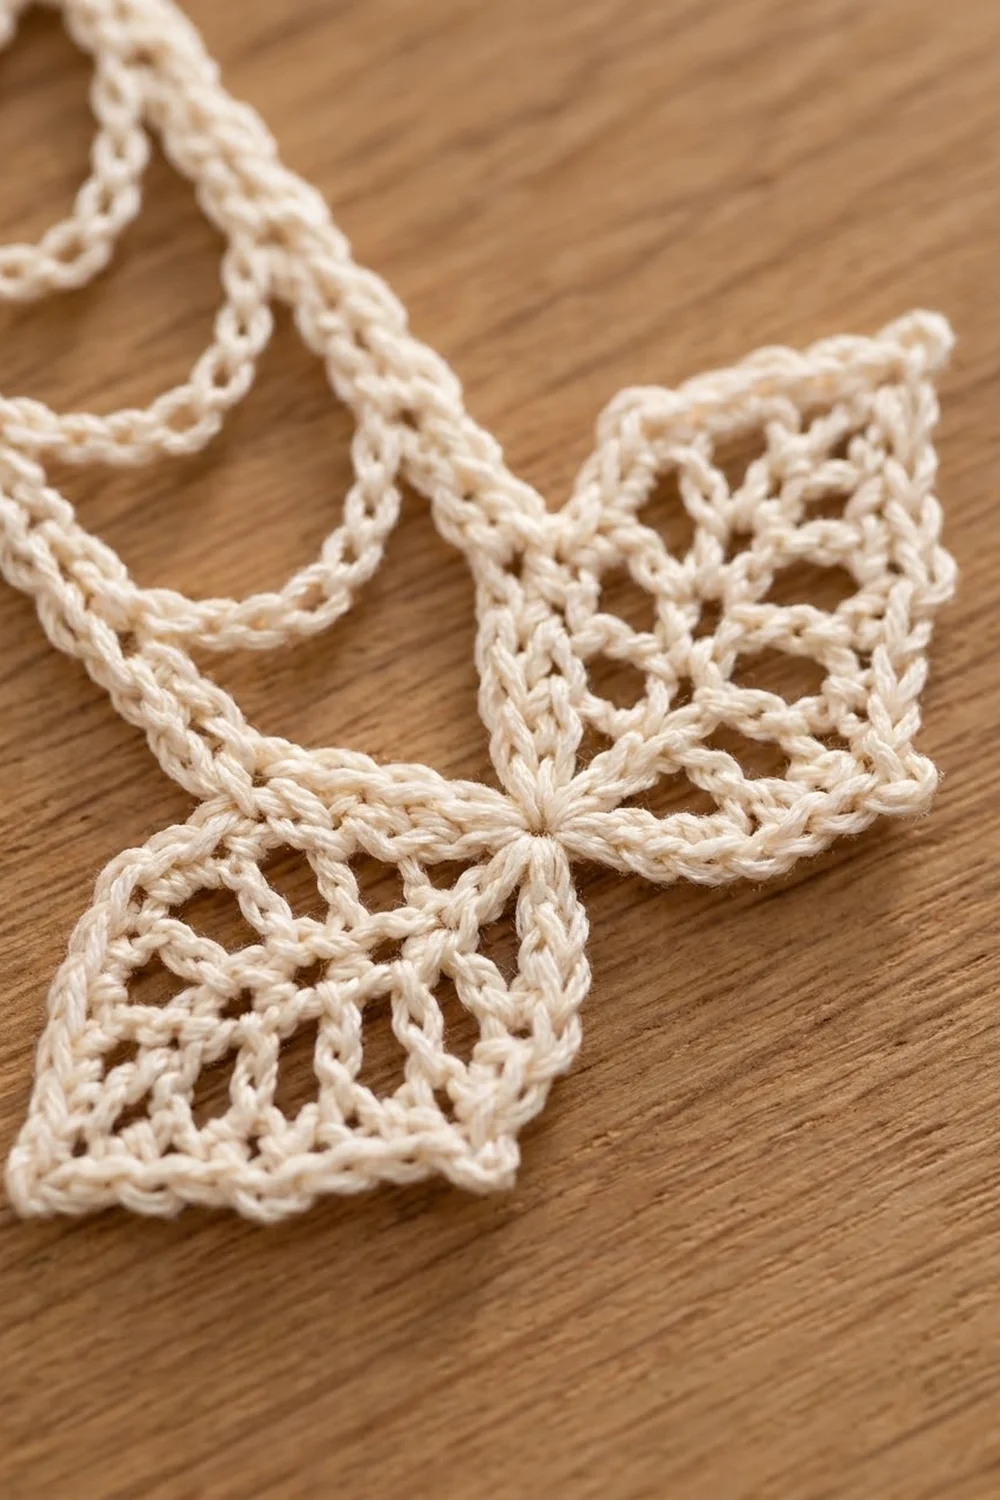
Section 1: Flame
Work in rounds with the right side facing you. Do not turn.
Rnd 1: Ch 6 and sl st to the first ch to form a ring. Ch 3 (counts as dc), then work 11 dc into the ring. Sl st to the top of the beginning ch-3. (12 dc)
This ring becomes the small open center of the flame. In Rnd 2, stitch 1 is the beginning ch-3, which marks the bottom of the flame.
Rnd 2: Ch 1. Work 2 sc in each of the next 3 sts, 2 hdc in the next st, 2 dc in the next st, and (dc, tr) in the next st. Ch 2 for the flame tip. Work (tr, dc) in the next st, 2 dc in the next st, 2 hdc in the next st, and 2 sc in each of the last 3 sts. Sl st to the first sc. (24 sts + 1 ch-2 tip sp)
Count check: 6 sc + 2 hdc + 2 dc + 2 + 2 + 2 dc + 2 hdc + 6 sc = 24. The stitch heights rise from sc to tr and back down, which pulls the circle into a teardrop.
Rnd 3: Ch 1. Sc in each st up to the tip. Work (2 sc, ch 2, 2 sc) in the ch-2 tip sp, then sc in each remaining st. Sl st to the first sc. (28 sc + 1 ch-2 tip sp)
This is a trim round: 24 sc worked 1 per existing stitch, plus 4 sc added at the tip.
Hanging loop: Do not fasten off. Sl st along the sts to the tip, then sl st into the ch-2 tip sp. Ch 30 and sl st into the same tip sp. Fasten off and leave a 6 in (15.2 cm) tail.
Section 2: Candle Band
Work in rows.
Row 1: Ch 12. Sc in the 2nd ch from the hook and in each ch across. (11 sc)
Row 2: Ch 4 (counts as tr) and turn. Tr in each st across. (11 tr)
These tall stitches make the upright ribbed look.
Row 3: Ch 1 and turn. Sc in the first st and make a ch-3 picot. Sc in each of the next 9 sts. Sc in the last st and make a ch-3 picot. (11 sc + 2 corner picots)
Fasten off and leave a 12 in (30.5 cm) tail.
Attach the flame: Use the band tail to sew the 3 bottom-center sc of Flame Rnd 3 to the center 3 sc of Band Row 3 (sts 5, 6 and 7). The ring should sit straight above the middle of the band.
Section 3: Leaves (Rounds 1–2)
Make 2 leaves. Each leaf is worked around both sides of a foundation chain.
Rnd 1: Ch 14. Starting in the 2nd ch from the hook, work sc, hdc in the next ch, and dc in the next ch. Work [ch 2, sk next ch, tr in next ch] 3 times. Ch 2, sk the next ch, then dc in the next ch and hdc in the next ch. Work (sc, ch 3, sc) in the last ch for the outer tip.
Now work along the opposite side of the foundation chain. Hdc in the next ch and dc in the next ch. Work [ch 2, sk next ch, tr in next ch] 3 times. Ch 2, sk the next ch, then dc in the next ch and hdc in the next ch. Work (sc, ch 3) in the same ch as the first sc for the inner tip, and sl st to the first sc.
(18 sts, 8 ch-2 sps, 2 ch-3 tip sps)
Count check: each long side has hdc, dc, 3 tr, dc and hdc (8 sts), and the 2 tip sc bring the total to 18. Each side has 4 ch-2 sps.
Rnd 2 (Leaf 1): Ch 1 and sc in the same st as the join.
- Side A: Ch 3, sc in the first ch-2 sp, [ch 4, sc in the next ch-2 sp] 3 times, ch 3.
- Outer tip: (sc, ch 4, sc) in the ch-3 tip sp.
- Side B: Ch 3, sc in the next ch-2 sp, [ch 4, sc in the next ch-2 sp] 3 times, ch 3.
- Inner tip: Sc in the inner ch-3 tip sp, ch 3, sl st to the first sc.
(12 sc, 12 ch-sps)
The sc count is 1 + 4 + 2 + 4 + 1 = 12.
Fasten off.
Rnd 2 (Leaf 2, joining): Work exactly like Leaf 1 until the last ch 3. Replace that ch 3 with: ch 1, sl st into Leaf 1’s inner-tip ch-3 sp, ch 1. Then sl st to the first sc. Fasten off.
The two leaves now meet at one point, as in the finished piece. Checkpoint: each leaf measures 1.75 in × 1 in (4.4 × 2.5 cm).
Section 4: Candle Body (Rails and Swags)
Lay the band above the leaves with the joined inner tips centered under it. The leaves are symmetrical, so turn each one so that a long edge faces up. Each rail attaches to the 2nd sc from the inner tip on the top edge of its leaf.
In this section, rail stitches are numbered from the top. St 1 is next to the band and st 22 is at the leaf.
Right rail: Join the thread with a sl st in the bottom-right corner of the band, in the last ch of the Row 1 foundation. Ch 22, then sl st in the anchor sc of the right leaf. Turn and work 1 sc in each ch back up. (22 sc) Sl st in the band corner and fasten off.
Left rail: Work the same way from the bottom-left corner of the band to the left leaf. End with a sl st in the band corner, but do not fasten off.
Swags: Make each swag by chaining 13 across and joining with a sl st in the matching rail stitch. Each ch-13 hangs about 0.5 in (1.3 cm).
- Swag 1: From the top of the left rail, ch 13 and sl st in right rail st 1.
- Sl st down the right rail into sts 2–7 (6 sl sts). Swag 2: Ch 13 and sl st in left rail st 7.
- Sl st down the left rail into sts 8–13. Swag 3: Ch 13 and sl st in right rail st 13.
- Sl st down the right rail into sts 14–19. Swag 4: Ch 13 and sl st in left rail st 19.
- Sl st down the left rail into sts 20–22 and fasten off.
The sl sts along the rails make them thicker, which gives the corded look. Checkpoint: the band and rails measure 3.5 in (8.9 cm) from the band top to the leaves, and the rails stay 1.5 in (3.8 cm) apart.
Border: Leaf Picot Edging
Border gauge: 1 sc per chain worked over, so 7.33 sc per inch (2.54 cm), the same as the main gauge.
Work this round on each leaf, keeping the right side facing you. Work into the chain spaces only, so the Rnd 2 sc are not worked into.
Rnd 3: Join the thread with a sl st in the first ch-3 sp of Side A and ch 1.
- Side A: 3 sc in the ch-3 sp, [(2 sc, ch 2, 2 sc) in the next ch-4 sp] 3 times, 3 sc in the next ch-3 sp. (18 sc + 3 ch-2 picots)
- Outer tip: (2 sc, ch 3, 2 sc) in the ch-4 tip sp. (4 sc + ch-3 point)
- Side B: Repeat Side A. (18 sc + 3 ch-2 picots)
- Inner tip: (sc, ch 2, sc) in the inner ch-3 sp. On Leaf 1, this sp also holds the Leaf 2 join, so work over it. (2 sc + ch-2)
- Sl st to the first sc and fasten off.
Round total: 36 + 4 + 2 = 42 sc, 6 side picots, 1 outer point, and 1 inner ch-2.
Why the math works: Along each long side, Rnd 2 has 18 chains: 3 + (3 × 4) + 3. Rnd 3 places 18 sc into those 18 chains, exactly 1 sc per chain, so the edge stays flat with no ruffling or cupping. The ch-2 picots add points without adding width. At the outer tip, 4 sc over the 4 tip chains keeps the tip sharp. This border adds 0.125 in (0.3 cm) on each edge, taking each leaf from 1.75 × 1 in (4.4 × 2.5 cm) to 2 × 1.25 in (5.1 × 3.2 cm). The ornament grows from 3.75 in (9.5 cm) to 4 in (10.2 cm) wide.
Final Blocking
- Weave in all ends along the rails or through the solid stitches. Leave the ends uncut for now.
- Soak the ornament in fabric stiffener, or in a mix of 1 part white glue to 1 part water. Squeeze it gently in a towel.
- Cover a foam board with plastic wrap and lay the ornament face up.
- Pin the flame tip, both band corners, and the leaf tips. Check that the ornament is 6 in (15.2 cm) tall and 4 in (10.2 cm) wide.
- Pin each rail straight. Keep them parallel and 1.5 in (3.8 cm) apart.
- Pull each swag into an even curve with about 0.5 in (1.3 cm) of drop, and pin the low point.
- Pin out every leaf picot and the open mesh loops.
- Let it dry completely, at least overnight. Unpin it, then trim the ends close.
Final Quality-Control Checklist
- Flame Rnd 3 has 28 sc and a clear ch-2 tip
- The flame is centered on the band over sts 5–7
- The band has 11 sts per row and 2 corner picots
- Each rail has 22 sc and is 3 in (7.6 cm) long
- All 4 swags are ch-13 and hang evenly
- Each leaf has 42 sc and 6 side picots in Rnd 3
- The leaves meet at one point under the candle center
- The ornament is 6 in × 4 in (15.2 × 10.2 cm) and lies flat
- The hanging loop is secure and the ornament hangs straight
Troubleshooting
The flame looks round, not teardrop-shaped: Check the tall stitches in Rnd 2. The tr must sit on each side of the ch-2 tip.
The swags sag unevenly: Count the sl sts between swags (6 each) and the chains in each swag (13 each).
The rails bow outward: Your chain was looser than your sc. Redo the rail with a tighter ch 22.
The leaf edge ruffles: You put more than 1 sc per chain in Rnd 3. Count 18 sc per side.
The leaf cups: Rnd 3 is too tight. Go up 0.25 mm in hook size for the border only.
The ornament leans: Re-center the rail anchors on the 2nd sc from each inner tip.
Care
Dust gently, or rinse by hand in cool water, then re-starch and pin flat to dry. Store it flat in tissue so the swags and picots keep their shape.

Final Notes
Each measurement leads to the next. The 1 in × 1.25 in (2.5 × 3.2 cm) flame sits on a 1.5 in × 0.5 in (3.8 × 1.3 cm) band. The band holds two 3 in (7.6 cm) rails with four swags. The rails anchor on two leaves that grow from 1.75 × 1 in (4.4 × 2.5 cm) to 2 × 1.25 in (5.1 × 3.2 cm) with the picot border. Together they make one 6 in × 4 in (15.2 × 10.2 cm) lace candle, ready for the tree.
Happy crocheting!