

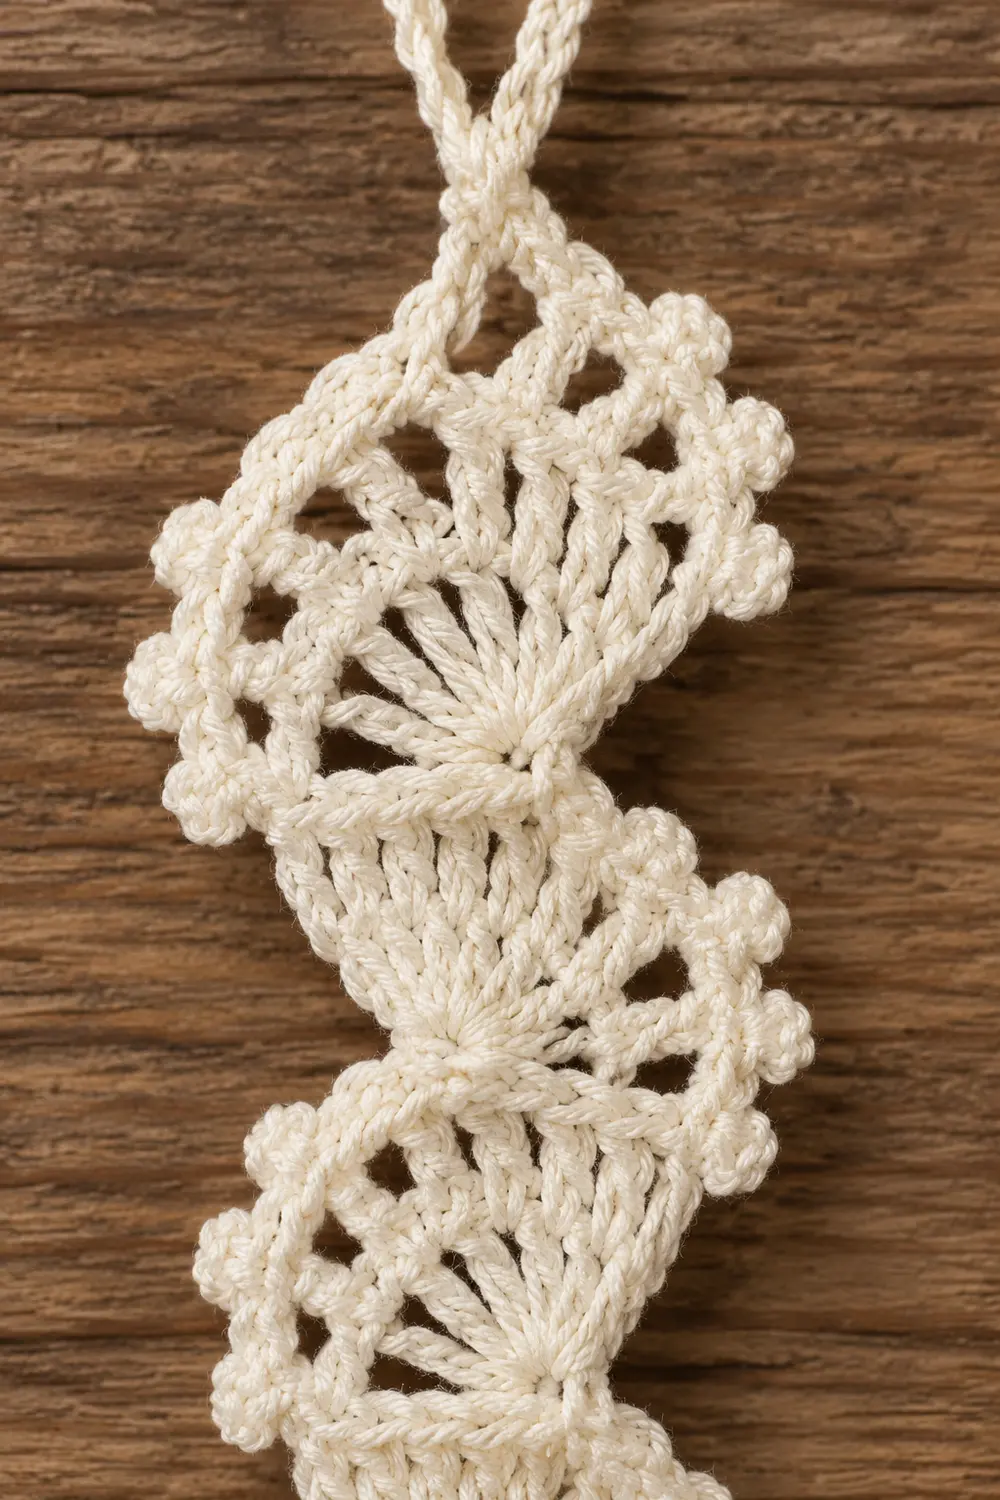
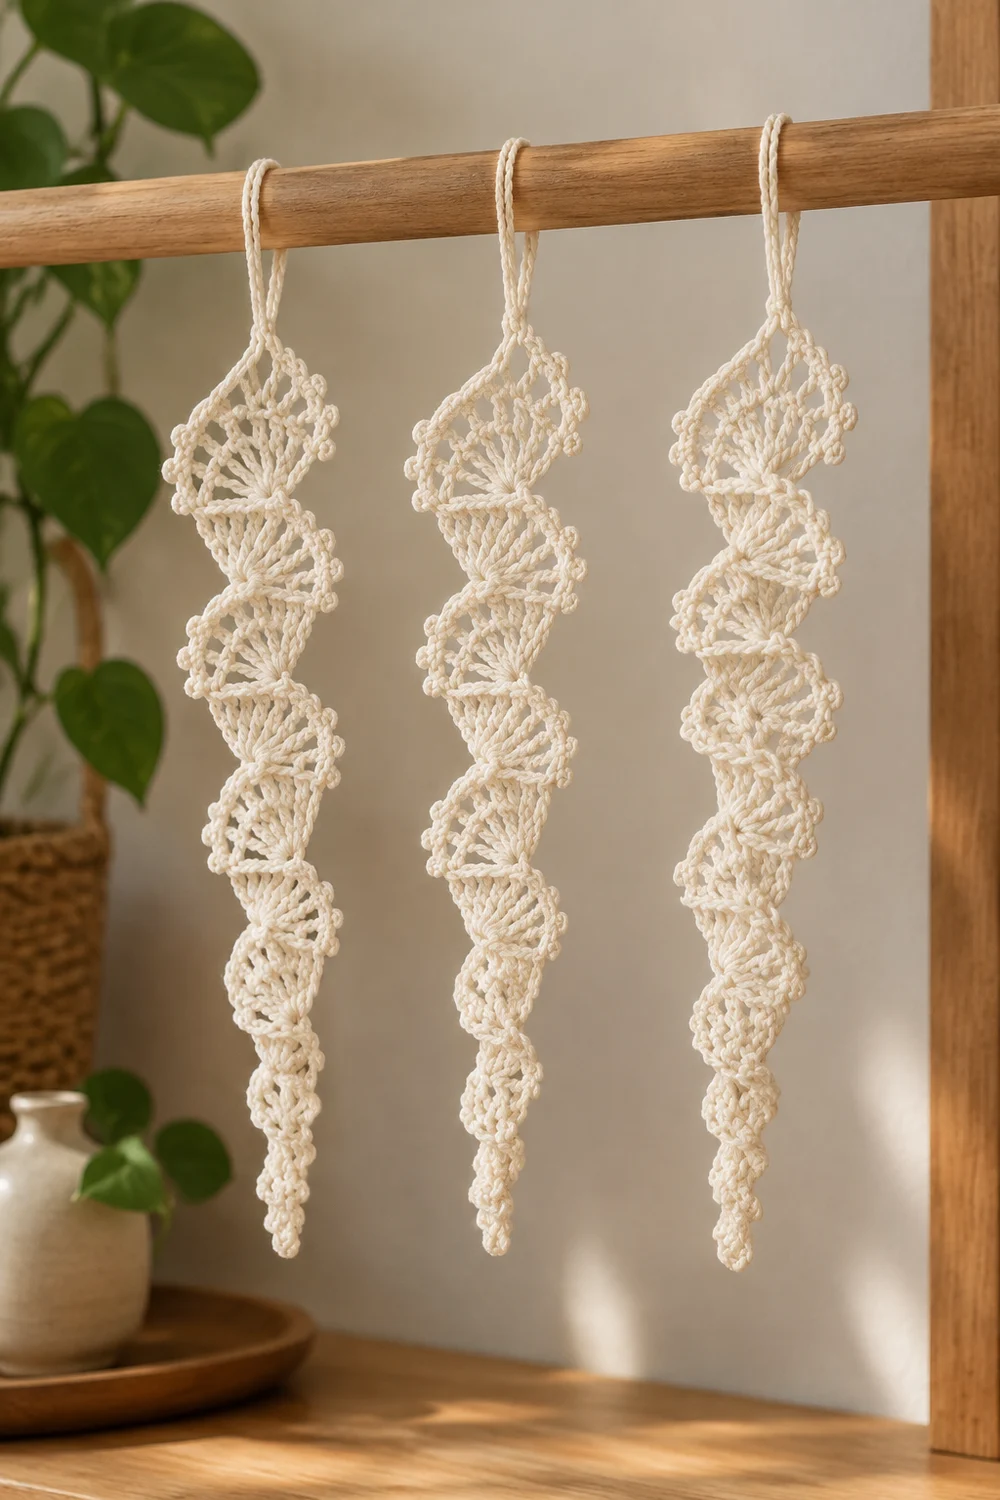
These little ornaments are made of open, lacy fans stacked one below the next in a chain-like column. Each fan radiates from a single point like a small semicircle. The fans get gradually narrower toward the bottom, so each ornament reads as a slim vertical strip with a soft, scalloped outline.
The set shown is three identical ornaments in cream cotton, displayed hanging from a wooden rod. A single neutral shade shows off the openwork texture of each fan. It also looks right in rustic, Scandinavian, or minimalist decor.
The pattern uses US crochet terms. Each finished ornament measures 4.75 in (12.1 cm) long and 1.5 in (3.8 cm) wide at the top fan. The hanging loop adds 1.25 in (3.2 cm), for a total hanging length of 6 in (15.2 cm).
Each ornament is worked top-down in one continuous piece. You start with a small base ring and work the first fan into it. Each new fan is worked into the center space of the fan above. A picot border then runs down one side, around the tip, and up the other side. A chain loop finishes the top.
Finished Size and Construction
- Finished size (one ornament): 4.75 in (12.1 cm) long × 1.5 in (3.8 cm) wide at the widest fan
- With hanging loop: 6 in (15.2 cm) total
- Skill level: Easy to Intermediate
- Terminology: US crochet terms
- Yarn weight: Fingering weight (Category 1) mercerized cotton
- Hook: 2.25 mm (US B-1)
- Number of pieces: 3 identical ornaments, each worked as one continuous strip
- Layout: displayed side by side, hanging from a wooden rod
- Piece size: 4.75 in (12.1 cm) × 1.5 in (3.8 cm)
- Size before border: 4.5 in (11.4 cm) × 1 in (2.5 cm)
- Border depth: 0.25 in (0.6 cm) at the sides and tip
Materials
Yarn: Use a smooth, mercerized fingering-weight cotton. It gives crisp stitch definition and holds the fans open after blocking. Avoid fuzzy or very soft yarns, because they blur the lacy spaces.
- Cream: about 2.5 g / 8.5 m per ornament. That comes to 7.5 g / 25.5 m for three ornaments. Have 10 g / 34 m on hand.
The quantities above include a margin of roughly one third for gauge swatching, a practice ornament, and weaving in ends.
Tools:
- 2.25 mm (US B-1) crochet hook, plus 2.0 mm and 2.5 mm hooks for gauge adjustment
- Tapestry needle (small eye)
- Scissors
- Blocking mat or foam board
- Rust-proof pins
- Spray bottle
- Optional: fabric stiffener or spray starch
- Ruler or tape measure
Abbreviations (US Terms)
- ch – chain
- sl st – slip stitch
- sc – single crochet
- dc – double crochet
- sp(s) – space(s)
- st(s) – stitch(es)
- RS – right side
Special stitches:
- Picot: Ch 3, sl st in 3rd ch from hook.
- Large Fan (LF): All worked into one indicated sp: ch 3 (counts as dc), [ch 1, dc] 3 times, ch 3, dc, [ch 1, dc] 3 times. Result: 8 dc, 6 ch-1 sps, and 1 center ch-3 sp.
- Medium Fan (MF): All worked into one indicated sp: ch 3 (counts as dc), [ch 1, dc] 2 times, ch 3, dc, [ch 1, dc] 2 times. Result: 6 dc, 4 ch-1 sps, and 1 center ch-3 sp.
- Small Fan (SF): All worked into one indicated sp: ch 3 (counts as dc), ch 1, dc, ch 3, dc, ch 1, dc. Result: 4 dc, 2 ch-1 sps, and 1 center ch-3 sp.
Gauge and Checkpoints
Gauge:
- 1 dc = 0.5 in (1.3 cm) tall
- 10 ch = 1 in (2.5 cm)
- One completed Large Fan = 1 in (2.5 cm) across its straight top edge
Test one piece first. Make one full ornament before starting the set, then check these measurements:
- After Fan 1: 1 in (2.5 cm) wide × 0.5 in (1.3 cm) deep
- After Fan 3: 1.5 in (3.8 cm) long
- After Fan 6: 3 in (7.6 cm) long
- After Fan 9 (tip): 4.5 in (11.4 cm) long
- After the border: 4.75 in (12.1 cm) × 1.5 in (3.8 cm)
If your fans are too big, go down to a 2.0 mm hook. If they are too small, go up to a 2.5 mm hook.
Fan depth matters more than fan width. Every fan adds one dc height of length, so a dc that is too tall multiplies across nine fans. Being off by 0.1 in (0.3 cm) per dc changes the length by nearly 1 in (2.5 cm).
Pattern: One Ornament
Leave a 4 in (10.2 cm) tail at the start for weaving in.
Base ring: Ch 4, sl st in first ch to form a ring.
Fan 1: Work an LF into the ring. Do not join. You now have 8 dc, 6 ch-1 sps, and 1 center ch-3 sp. The fan opens downward from the ring.
Reposition (after an LF): Turn. Then work:
- sl st in next ch-1 sp
- [sl st in next dc, sl st in next ch-1 sp] 2 times
- sl st in next dc
- sl st in center ch-3 sp
That is 7 sl sts. Your hook now sits in the center ch-3 sp at the bottom of the fan.
Fan 2: Work an LF into the same center ch-3 sp. That gives 8 dc and 7 sps.
Fan 3: Reposition as after an LF (7 sl sts), then work an LF into the center ch-3 sp. That gives 8 dc and 7 sps.
Reposition (after an LF, leading into an MF): Turn and work the same 7 sl sts as before.
Fan 4: Work an MF into the center ch-3 sp of Fan 3. That gives 6 dc, 4 ch-1 sps, and 1 ch-3 sp.
Reposition (after an MF): Turn. Then work:
- sl st in next ch-1 sp
- sl st in next dc
- sl st in next ch-1 sp
- sl st in next dc
- sl st in center ch-3 sp
That is 5 sl sts.
Fans 5 and 6: Work an MF into the center ch-3 sp. Then reposition with 5 sl sts and work another MF. Each fan has 6 dc.
Reposition: Turn and work 5 sl sts as after an MF.
Fan 7: Work an SF into the center ch-3 sp of Fan 6. That gives 4 dc, 2 ch-1 sps, and 1 ch-3 sp.
Reposition (after an SF): Turn. Then work:
- sl st in next ch-1 sp
- sl st in next dc
- sl st in center ch-3 sp
That is 3 sl sts.
Fan 8: Work an SF into the center ch-3 sp. That gives 4 dc.
Reposition: Turn and work 3 sl sts.
Fan 9 (tip): In the center ch-3 sp, work ch 3 (counts as dc) and 2 dc. That gives 3 dc. Fasten off.
Checkpoint: The strip should be 4.5 in (11.4 cm) long. Fans 1–3 should be 1 in (2.5 cm) wide, Fans 4–6 about 0.8 in (2.0 cm), and Fans 7–8 about 0.6 in (1.5 cm). The narrower fans come from the lower stitch count, which spreads each fan over a smaller angle.
The repositioning sl sts sit along alternating halves of each fan rim. They roll slightly to the back and disappear under the border.
Make All Pieces
Make 3 ornaments in Cream, following the pattern above for each one. Finish each ornament completely, including its border and loop, before starting the next. This keeps your tension consistent across the set.
Lay the three ornaments out for display in a single row:
ROW 1: CREAM CREAM CREAM
Space the loops about 1.75 in (4.4 cm) apart on the wooden rod, so the widest fans sit close but do not overlap.
Joining
The three ornaments are never joined to each other. The joining in this design happens inside each strip, as you go.
Method: Each fan is worked directly into the center ch-3 sp of the fan above. That shared space is the only connection between two fans, which creates the chain-like, link-to-link look.
Stitch-to-stitch logic: All dc of a new fan go into one ch-3 sp, never into individual stitches. The ch-3 sp sits at the bottom center of the rim of the fan above. That places each new fan’s pivot point exactly on the strip’s vertical centerline.
Tension advice:
- Keep the repositioning sl sts loose. If they are tight, they pucker the rim and pull the fan off-center.
- Keep the center ch-3 sps relaxed so they can hold 8 dc without straining.
Size checkpoint: After the joining-as-you-go is complete (Fan 9), the strip is 4.5 in (11.4 cm) long and 1 in (2.5 cm) wide at Fan 1.
Border
Border gauge: One picot about every 0.25 in (0.6 cm) along each fan rim. The border adds 0.25 in (0.6 cm) at each side and at the tip.
Border round (RS facing): Join Cream with a sl st in the base ring. You will work down the right side, around the tip, and up the left side.
Right side, per fan, Fans 1 through 8:
- Work 2 sc around the post of the fan’s right-hand end stitch.
- Work (sc, picot, sc) in each right-half ch-1 sp, moving toward the center.
Large Fans have 3 right-half ch-1 sps, Medium Fans have 2, and Small Fans have 1. Work into the sps even where repositioning sl sts sit inside them.
- Right side count: 8 fans × 2 post sc = 16 sc. The ch-1 sps total 17 (3 + 3 + 3 + 2 + 2 + 2 + 1 + 1). At 2 sc each, that is 34 sc and 17 picots. Side total: 50 sc and 17 picots.
Tip: Sc in top of each of the 3 dc of Fan 9, working a picot after the 2nd sc. Tip total: 3 sc and 1 picot.
Left side, Fans 8 back up to 1: Mirror the right side.
- Work (sc, picot, sc) in each left-half ch-1 sp, moving outward.
-
Work 2 sc around the post of the left-hand end stitch.
-
Left side count: 50 sc and 17 picots.
Finish: Sl st in the base ring.
Round total: 50 + 3 + 50 = 103 sc and 17 + 1 + 17 = 35 picots.
Hanging loop: Without fastening off, ch 25 and sl st in the base ring. Fasten off. The 25 ch measure 2.5 in (6.4 cm), which folds into a 1.25 in (3.2 cm) loop.
Why the math works:
- Each ch-1 sp spans about 0.25 in (0.6 cm) of rim. One picot per space spaces the picots evenly on every fan size.
- A Large Fan’s half-rim is about 0.8 in (2.0 cm) long and holds 3 picots.
- The post sc fill the straight edges where the fans meet, so the outline stays smooth between scallops.
- The two sides use identical counts, so the strip hangs straight.
Final Blocking
- Weave in all ends along the back of the border sc. Leave them unclipped for now.
- Soak the ornament in cool water for 5 minutes. Press out the water in a towel; do not wring.
- Pin the base ring and the tip so the strip is 4.75 in (12.1 cm) long.
- Open each fan so its dc radiate evenly. Pin each picot outward.
- Check the widths: Fans 1–3 should be 1.5 in (3.8 cm) with the border, and the lower fans should taper evenly.
- Optional: mist with spray starch or fabric stiffener.
- Let the ornament dry completely, about 6–8 hours.
- Unpin it and trim the woven ends close.
Final Quality-Control Checklist
- [ ] Nine fans: 3 LF, 3 MF, 2 SF, and the 3-dc tip
- [ ] Each fan’s pivot sits on the centerline
- [ ] 50 sc and 17 picots per side, plus 3 sc and 1 picot at the tip
- [ ] The ornament measures 4.75 in (12.1 cm) × 1.5 in (3.8 cm)
- [ ] The loop is 1.25 in (3.2 cm) and firmly anchored in the base ring
- [ ] All three ornaments match within 0.25 in (0.6 cm)
- [ ] Ends are secure and invisible from the front
Troubleshooting
Fans curl into cups. Too many dc are crowded into a tight ch-3 sp. Work the center ch-3 a little looser, or go up a hook size.
Strip zigzags instead of hanging straight. A reposition was miscounted. Recount: 7 sl sts after an LF, 5 after an MF, and 3 after an SF.
Ornament is too long. Your dc are too tall. Switch to a 2.0 mm hook and re-measure after Fan 3.
Border ruffles. Your picot chains are too loose. Keep each picot at exactly 3 ch with snug tension.
Loop stretches. Work a second pass of sl sts along the chain, then fasten off.
The three ornaments differ in size. Make all three in one sitting with the same hook, and block them together.
Care
Hand wash in cool water with mild soap and lay flat to dry. Re-block and re-starch as needed before hanging again.
Final Notes
The measurement chain is simple:
- 1 dc = 0.5 in (1.3 cm), so nine fans = 4.5 in (11.4 cm).
- The border adds 0.25 in (0.6 cm), for a finished strip of 4.75 in (12.1 cm) × 1.5 in (3.8 cm).
- The 25-ch loop adds 1.25 in (3.2 cm), for 6 in (15.2 cm) of hanging length.
Check the first ornament against these numbers, and the other two will match it.
Optional: for a longer piece, add one more Medium Fan to each ornament for an extra 0.5 in (1.3 cm).
Happy crocheting!