

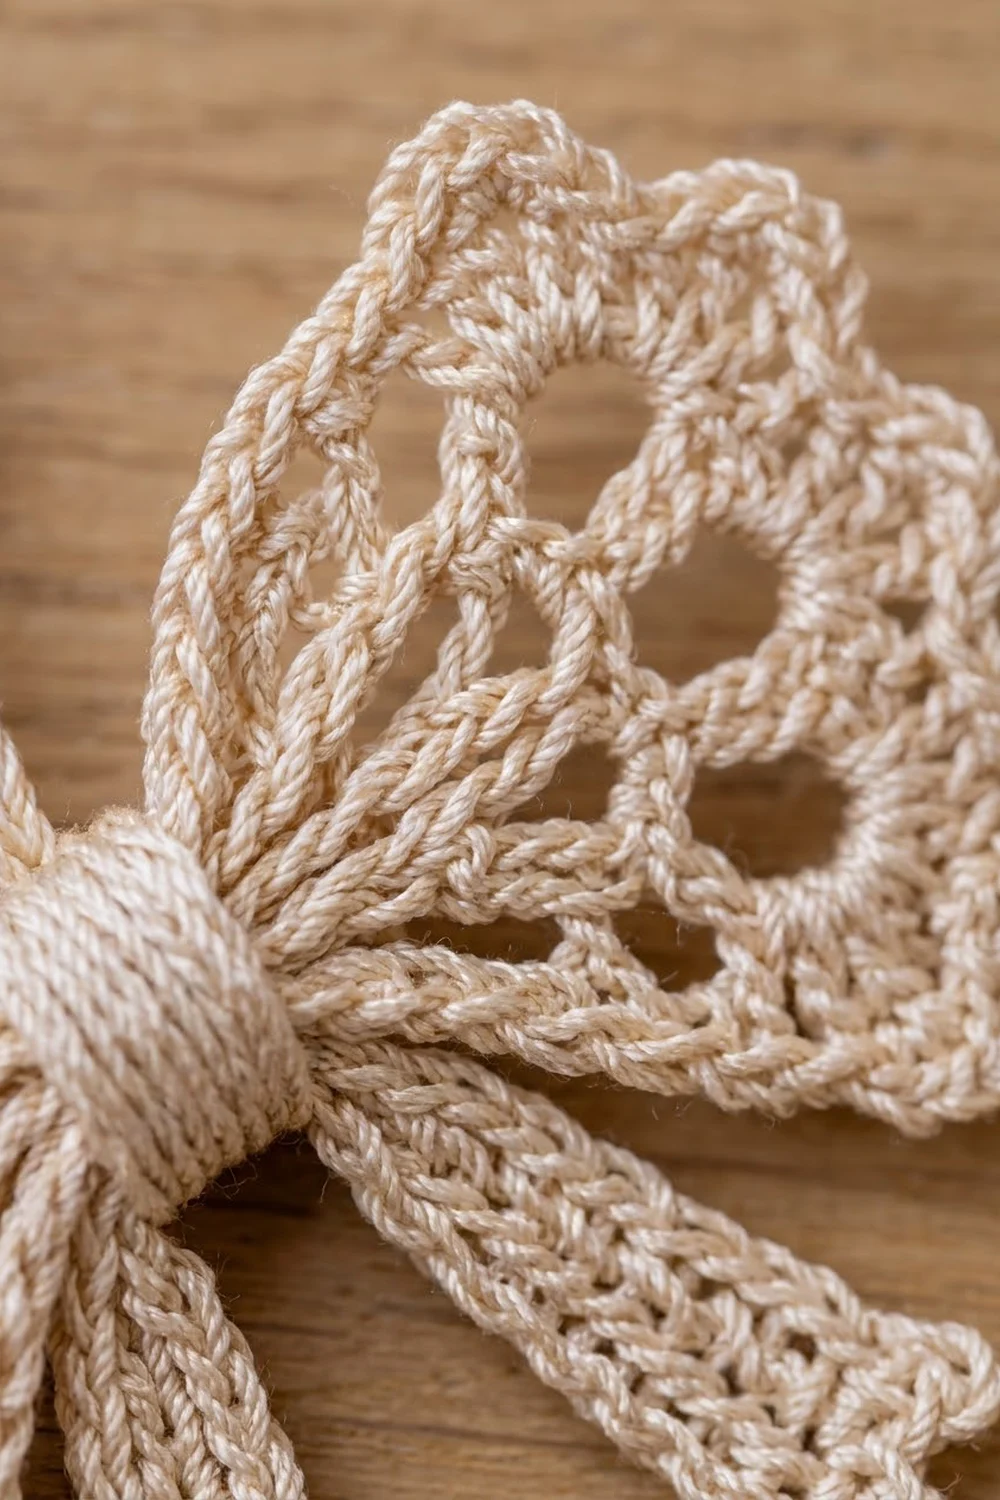
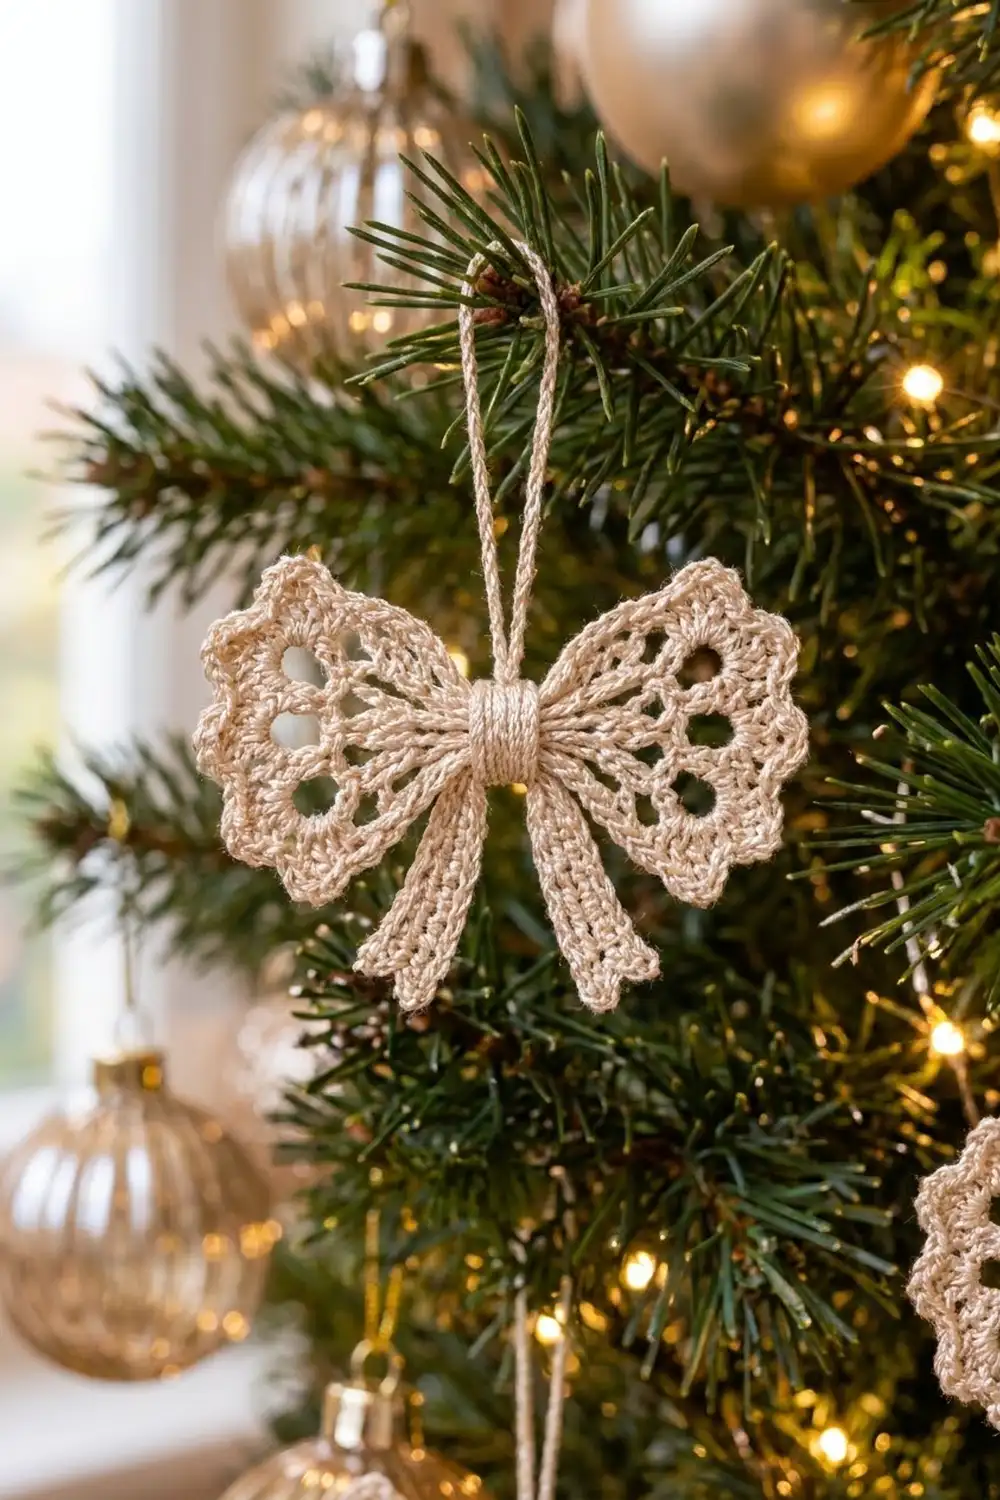
This little lace bow is made for the Christmas tree. Two fan-shaped wings with teardrop openings and picot scallops sit on each side of a neat ribbed center band. Two notched tails hang below, and a fine chain loop lets it hang from a branch.
The sample is worked in one color, a light cream/champagne mercerized cotton thread. The thread’s sheen catches tree lights and pairs well with gold, glass, and glitter baubles. The look is vintage and delicate, like a small piece of heirloom lace.
All instructions use US crochet terms. The finished bow measures about 3.25 in (8.3 cm) wide and 3 in (7.6 cm) tall. The hanging loop adds about 2.5 in (6.4 cm) above the bow.
You make six small pieces: two wings worked in rows from a magic ring, one band, two tails, and one loop cord. You then join the wings along their straight edges, gather the center, add the tails and loop, and wrap the band around the middle.
Finished Size and Construction
- Finished size: 3.25 in (8.3 cm) wide × 3 in (7.6 cm) tall, plus a 2.5 in (6.4 cm) loop
- Skill level: Intermediate (thread work, small pieces, sewing)
- Terminology: US
- Thread weight: Size 3 crochet thread (Lace, category 0)
- Hook: 2.25 mm (US B-1)
- Number of pieces: 6 (2 wings, 1 band, 2 tails, 1 loop)
- Layout: wings side by side, band at the center, tails below, loop above
- Wing size (flat, finished): 3 in (7.6 cm) along the straight edge × 1.5 in (3.8 cm) deep
- Wing size before border: 2 in (5.1 cm) along the straight edge × 1 in (2.5 cm) deep
- Border depth: 0.5 in (1.3 cm) picot scallop edge
Materials
Use a smooth, mercerized cotton thread in size 3. Mercerized cotton holds its shape, shows the lace clearly, and has the soft shine you see on the sample. Avoid fuzzy or very soft thread, because the teardrop openings will blur.
- Cream/champagne, size 3 cotton thread: 5 g, about 25 m (27 yd) per ornament
- For a set of 6 ornaments: 30 g, about 150 m (164 yd)
Tools:
– 2.25 mm (US B-1) crochet hook
– Small sharp-eyed sewing or tapestry needle
– Scissors
– Rust-proof pins and a foam blocking board
– Optional: fabric stiffener or spray starch
– Ruler or tape measure
These quantities include a margin of about 30% for your gauge swatch, sewing tails, and small differences in tension.
Abbreviations (US Terms)
- ch – chain
- sl st – slip stitch
- sc – single crochet
- hdc – half double crochet
- dc – double crochet
- MR – magic ring
- blo – back loop only
- sp – space
- st(s) – stitch(es)
- rep – repeat
Special stitches
- Picot: ch 3, sl st in 3rd ch from hook.
- Picot shell: (2 dc, picot, 2 dc) in the same stitch.
Gauge and Checkpoints
Gauge: 8 dc = 1 in (2.5 cm) and 4 dc rows = 1 in (2.5 cm). For single crochet, 8 sc = 1 in (2.5 cm) and 9 sc rows = 1 in (2.5 cm).
Make one complete wing before you start the other pieces. That wing is your gauge swatch. Measure it flat and lightly pressed.
Wing checkpoints (straight edge × depth):
– After Row 1: 0.6 in (1.5 cm) × 0.3 in (0.8 cm)
– After Row 3: 1.5 in (3.8 cm) × 0.75 in (1.9 cm)
– After Row 4: 2 in (5.1 cm) × 1 in (2.5 cm)
– After Row 5 (border): 3 in (7.6 cm) × 1.5 in (3.8 cm)
If your wing is too big: go down to a 2.0 mm hook, or tighten the long chain spaces in Rows 2 and 3.
If your wing is too small: go up to a 2.5 mm hook.
If Row 4 ruffles: your chains are too loose compared with your dc. Tighten the chains slightly.
Wing (Make 2)
You work each wing flat, in rows, from a magic ring. The rows form a half-circle fan. The two straight row-end edges, one on each side of the ring, together make the straight edge that is later gathered at the center.
Row 1 (RS): Make a MR. Ch 3 (counts as dc), 6 dc in the ring. Pull the ring closed, but keep the work flat as a half circle. Turn. (7 dc)
Row 2: Ch 5 (counts as dc + ch 2). [Dc in next dc, ch 2] 5 times. Dc in top of the turning ch-3. Turn. (7 dc, 6 ch-2 sps)
Row 3: Ch 6 (counts as dc + ch 3). [Dc in next dc, ch 3] 5 times. Dc in 3rd ch of the turning ch-5. Turn. (7 dc, 6 ch-3 sps)
The dc in Rows 2 and 3 stack directly on top of each other. This makes 7 spokes with 6 long teardrop openings between them, which is the radiating lace you see in each wing.
Row 4: Ch 3 (counts as dc). [3 dc in next ch-3 sp, dc in next dc] 6 times, working the last dc in the 3rd ch of the turning ch-6. Turn. (25 dc)
Check the count: 1 starting dc + 6 × (3 + 1) = 25 dc. This solid row closes the tops of the teardrops and forms the smooth band below the scallops.
Do not fasten off. The border (Row 5) follows in the Border section.
Center Band (Make 1)
Foundation: Ch 6.
Row 1: Sc in 2nd ch from hook and in each ch across. Turn. (5 sc)
Rows 2–10: Ch 1, sc blo in each st across. Turn. (5 sc)
Working through the back loop only makes the horizontal ribs you see on the knot. The band measures 0.6 in (1.5 cm) wide × 1.1 in (2.8 cm) long. Fasten off and leave an 8 in (20.3 cm) tail for sewing.
Tail (Make 2)
Each tail is worked lengthwise. The stitches get taller toward the bottom, so the tail flares naturally.
Foundation: Ch 15.
Row 1: Sc in 2nd ch from hook and in next 3 ch. Hdc in next 4 ch. Dc in last 6 ch. Turn. (14 sts: 4 sc, 4 hdc, 6 dc)
Row 2: Ch 3 (counts as dc). Dc in next 5 dc, hdc in next 4 hdc, sc in last 4 sc. Turn. (14 sts)
Row 2 ends at the narrow top end. The tail’s trim (the notched tip) is in the Border section.
Hanging Loop (Make 1)
Foundation: Ch 41.
Row 1: Sl st in the back bump of the 2nd ch from hook and in each ch across. (40 sl st)
The cord measures about 5 in (12.7 cm). Fasten off and leave a 6 in (15.2 cm) tail. Slip-stitching into the back bumps gives the cord a firm, slightly twisted look.
Make All Pieces
Everything is in one color.
- Cream/champagne: 2 wings, 1 center band, 2 tails, 1 hanging loop (6 pieces in total)
Layout (front view):
            [ LOOP ]
               ||
[ WING A ]==[BAND]==[ WING B ]
             /    \
        [TAIL]    [TAIL]
Wing A and Wing B face each other with their straight edges touching. The band covers the seam. The tails come out from under the band in a V, and the loop ends hide behind the band.
Joining
Method: whipstitch with the thread tails, then a running stitch to gather.
1. Join the wings. Place both wings RS up with their straight edges touching. Each straight edge has 5 row-ends on each side of the ring: Rows 1–5, with Row 5 belonging to the border. That makes 10 row-ends per wing.
Match row-end to row-end, so that Row 1 meets Row 1, Row 2 meets Row 2, and so on, outward in both directions from the ring. Whipstitch through the outer strand of each pair. You make 10 matched stitch pairs in total. The seam is 3 in (7.6 cm) long.
2. Gather the center. Using the same thread, run a running stitch along the seam and pull it until the seam measures 0.75 in (1.9 cm). Wrap the thread twice around the gathered center and knot it at the back.
3. Add the tails. Place the narrow top end of each tail behind the gathered center. Angle the tails outward into a V, with about 1.4 in (3.6 cm) of each tail showing below the center. Tack them in place with 3 or 4 stitches each.
4. Add the loop. Fold the cord in half. Tack both ends behind the center, just above the tails.
5. Wrap the band. Wrap the band around the front of the center, covering the gathers, the tail tops, and the loop ends. Sew the short ends of the band together at the back. Catch a few stitches of the wings, tails, and loop as you sew so nothing shifts.
Tension advice: sew snugly, but don’t pull so hard that the scallops cup. The wings should puff gently forward like real ribbon loops.
Size checkpoint: the joined bow measures 3.25 in (8.3 cm) wide × 3 in (7.6 cm) tall.
Border
Border gauge: each picot shell spans 4 stitches of Row 4, which is about 0.5 in (1.3 cm) of the Row 4 edge. The border adds 0.5 in (1.3 cm) of depth to each wing.
Wing Border: Picot Scallop Edge
Continue on each wing straight after Row 4.
Row 5: Ch 1, sc in first dc. [Skip 1 dc, picot shell in next dc, skip 1 dc, sc in next dc] 6 times. (6 picot shells, 7 sc)
Fasten off. Leave a 10 in (25.4 cm) tail on one wing for joining.
Why the math works: Row 4 has 25 dc. This edge uses 1 stitch for the first sc, then 4 stitches per repeat (skip, shell, skip, sc). 1 + 6 × 4 = 25, so the last sc lands exactly on the turning chain, with no leftover stitches at either end.
The Row 4 arc is about 3.1 in (7.9 cm) long, which is 25 dc at 8 dc per inch. That gives each scallop about 0.5 in (1.3 cm) of edge, so the scallops lie flat instead of ruffling.
Tail Trim: Notched Tip
Work this on each tail straight after Row 2.
Trim:
1. Ch 1. Working back down Row 2 from top to bottom, sc in each of the 14 sts.
2. At the bottom corner, make a picot. This is the first point.
3. Sl st in the gap between Row 1 and Row 2 at the bottom end. This is the notch.
4. Make a picot. This is the second point.
5. Working along the free loops of the foundation chain from bottom to top, sc in each of the 14 free loops.
Fasten off. (28 sc, 2 picots, 1 sl st)
Per side: each long side has 14 sc, which is the same as the 14 stitches in Rows 1 and 2, so the trim stays flat. The bottom end has 2 picot points with 1 sl st between them, which pulls the center in to make the notch.
The finished tail measures 1.75 in (4.4 cm) long, 0.4 in (1.0 cm) wide at the top, and 0.7 in (1.8 cm) wide at the bottom.
Final Blocking
- Weave in all remaining ends along stitches of the same color. Keep them out of the open spaces.
- Mist the bow lightly with water, or dip it in diluted fabric stiffener and squeeze out the excess.
- Pin it RS up on the blocking board.
- Pin each picot point, opening the scallops evenly.
- Pin the inside of each teardrop opening so the spokes run straight from the center.
- Shape the wings so they puff slightly. A small rolled tissue under each wing helps.
- Pin the tails into a V and pin both points of each notched tip.
- Check the size: 3.25 in (8.3 cm) wide × 3 in (7.6 cm) tall.
- Let it dry completely, at least 12 hours, before you unpin.
Final Quality-Control Checklist
- Each wing has 7 spokes, 6 teardrop openings, and 6 picot scallops.
- Both wings are the same size: 3 in (7.6 cm) × 1.5 in (3.8 cm) flat.
- The wing seam is gathered to 0.75 in (1.9 cm).
- The band shows clear horizontal ribs and hides all the gathers.
- The tails are even, form a V, and each ends in 2 points.
- The loop is centered and 2.5 in (6.4 cm) tall.
- No ends show from the front.
- The ornament hangs straight without tipping.
Troubleshooting
- Wing cups or curls: the chains in Rows 2 and 3 are too tight. Loosen them slightly, or block firmly.
- Row 4 ruffles: the chains are too loose, or you put more than 3 dc in a space. Recount: 25 dc.
- Scallops don’t fit: you didn’t end Row 4 with 25 dc. Recount before you start Row 5.
- Teardrops look uneven: check that each dc in Row 3 sits on top of a dc from Row 2.
- Band too short to wrap: add 1–2 rows. Each row adds about 0.1 in (0.3 cm).
- Tails twist: block them flat with the stiffener.
- Bow tips forward when hanging: move the loop slightly higher behind the band.
Care
Spot clean or hand wash gently in cool water, then reshape and pin flat to dry. If you stiffened the bow, store it flat in tissue between seasons and re-stiffen if needed.
Final Notes
Here is the measurement chain for the whole bow:
- Wing, before border: 25 dc in Row 4, 2 in (5.1 cm) × 1 in (2.5 cm).
- Wing, after border: 6 picot scallops, 3 in (7.6 cm) × 1.5 in (3.8 cm).
- Wing seam: two wings joined along 10 matched row-ends to make a 3 in (7.6 cm) seam, gathered to 0.75 in (1.9 cm).
- Band: a 5-stitch ribbed band, 1.1 in (2.8 cm) long, wrapped over the center.
- Tails: two 14-stitch tails, 1.75 in (4.4 cm) long.
- Loop: a 40-stitch cord, folded to 2.5 in (6.4 cm).
- Finished bow: 3.25 in (8.3 cm) × 3 in (7.6 cm).
Check your first wing against these numbers, and the rest of the bow will fall into place.
Happy crocheting!