

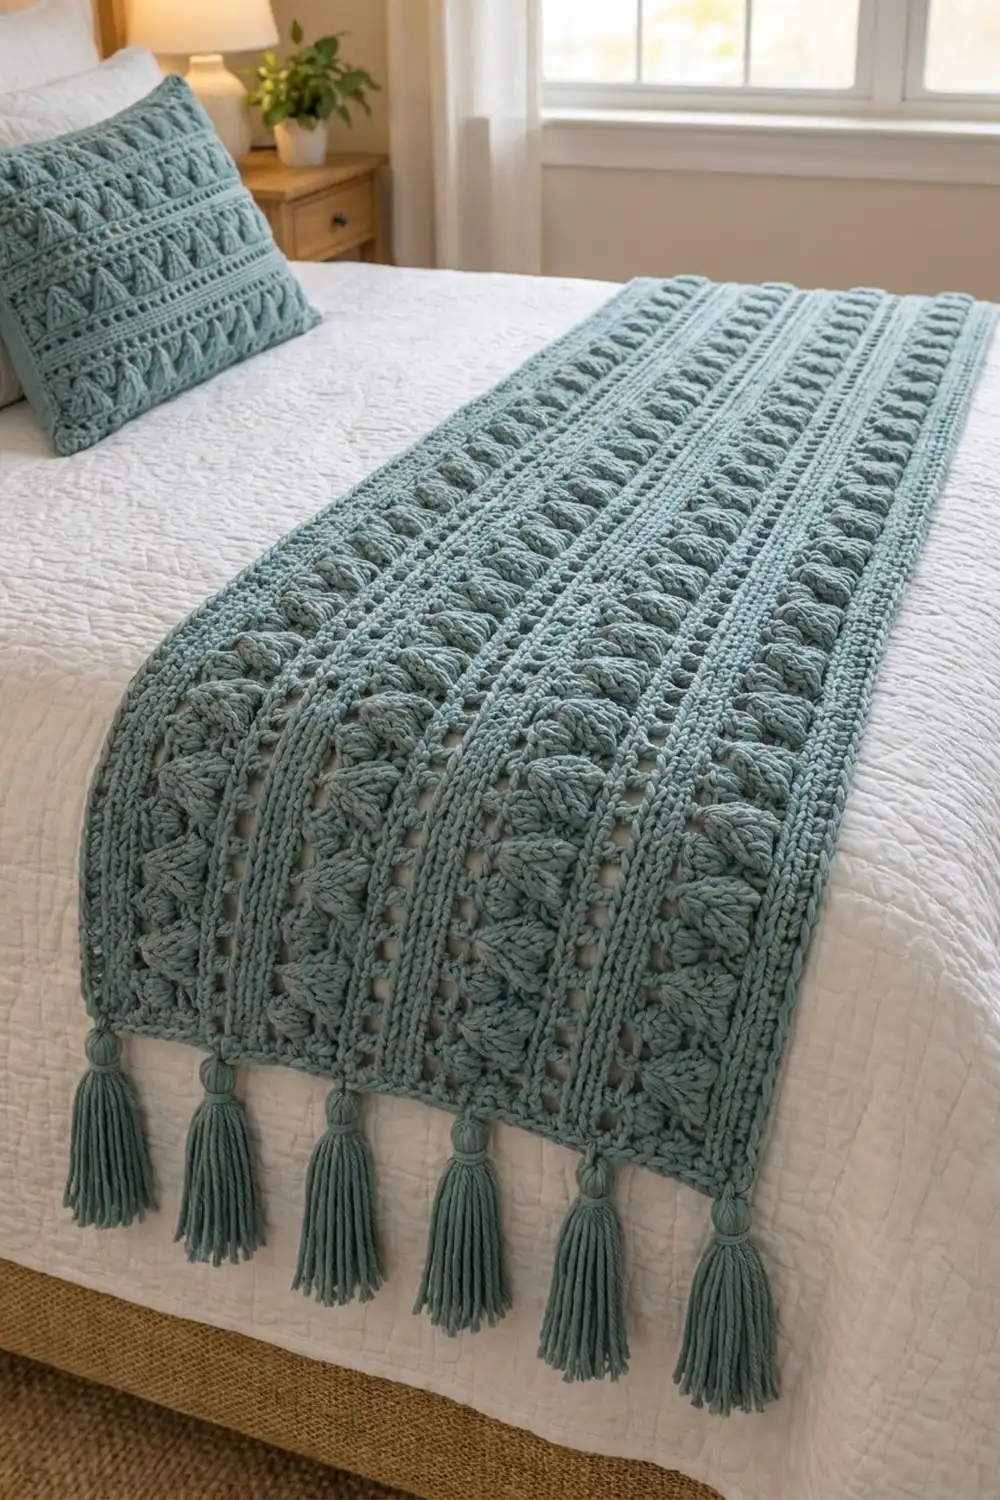
The Seaglass Peaks Bed Runner is a chunky, textured runner that sits across the foot of a bed. Rows of raised triangles stand out from the fabric like small peaks. Between them are flat single crochet ridges and a row of open eyelets. A line of soft tassels hangs from the lower edge.
It is made in one color, a calm dusty teal. The single color lets the texture show clearly, and it suits coastal, Scandinavian and neutral bedrooms. This pattern uses US crochet terms throughout.
The finished runner measures about 18 in (45.7 cm) wide and 61 in (154.9 cm) long, not counting the tassels. The tassels add about 5 in (12.7 cm) along one long edge.
You work the runner flat in one piece. You start with a long foundation chain and work rows along the full length, so every band of triangles runs from end to end. Then you add a two-round single crochet border, block the piece, and tie on eight tassels.
Finished Size and Construction
- Finished size: 18 x 61 in (45.7 x 154.9 cm), plus 5 in (12.7 cm) tassels
- Skill level: Intermediate
- Terminology: US crochet terms
- Yarn weight: Bulky (#5)
- Hook: 6.5 mm (US K-10.5)
- Number of pieces: 1 runner body plus 8 tassels
- Layout: One rectangle, worked lengthwise in rows
- Piece size before border: about 17 x 60 in (43.2 x 152.4 cm)
- Border depth: ½ in (1.3 cm) on every side
Materials
Yarn: Choose a smooth bulky yarn with good stitch definition. Wool blends and soft acrylics both work well. Avoid fuzzy or very loosely plied yarns, which blur the triangle legs and split when you pull up long loops. The quantities below assume about 125 m per 100 g.
- Dusty Teal (body and border): 650 g / 813 m
- Dusty Teal (tassels): 75 g / 94 m
- Total: 725 g / 907 m
These quantities include a margin of about 20%, so you have enough for a gauge swatch and small differences in tension.
Tools:
– 6.5 mm (US K-10.5) crochet hook
– Tapestry needle
– Scissors
– Stitch markers (at least 10)
– Measuring tape
– Stiff card, 5 in (12.7 cm) tall, for the tassels
– Blocking mats and rust-proof pins
Abbreviations (US Terms)
- ch – chain
- sc – single crochet
- dc – double crochet
- sk – skip
- st(s) – stitch(es)
- sp – space
- yo – yarn over
- RS / WS – right side / wrong side
- TC – Triangle Cluster (special stitch)
Triangle Cluster (TC): You work this in a RS row. It uses 5 sts of the row 3 rows below, which is always an sc row. Find the st directly below the next st of the current row. Work [yo, insert hook in the st 2 sts to the right of that st, pull up a loop to the height of the current row, yo and draw through 2 loops] once. Repeat the bracket in the st 1 to the right, the st directly below, the st 1 to the left, and the st 2 to the left. You now have 6 loops on your hook. Yo and draw through all 6 loops. Skip the st of the current row behind the TC. Each TC counts as 1 st.
The five long legs fan out across a base 5 sts wide and meet at one point at the top, which makes the upward triangle.
Gauge and Checkpoints
Gauge: 12 sc = 4 in (10.2 cm). One 6-row pattern repeat is 2 in (5.1 cm) tall.
Test swatch first: Before you start the runner, make one small sample of the full stitch pattern.
- Ch 26. Work the Foundation Row: 25 sc.
- Work Rows 1–6 twice, using the swatch count. Each triangle row is: sc in first 3 sts, [TC, sc in next 5 sts] 3 times, TC, sc in last 3 sts = 25 sts. The mesh rows have 13 dc and 12 ch-1 sps.
- Check that the swatch is 8⅓ in (21.2 cm) wide and that Rows 1–12 measure 4 in (10.2 cm) tall.
If the swatch is too big: Try a 6 mm (US J-10) hook. If it is too small: Try a 7 mm hook. Change hooks until the width is right before you look at height. If the width is right but the triangles look squashed, pull the TC loops up a little taller.
Checkpoints on the runner:
– Foundation Row: 60 in (152.4 cm) long, laid flat without stretching
– After Row 12: 4¼ in (10.8 cm) tall
– After Row 24: 8¼ in (21.0 cm) tall
– After Row 48: 16¼ in (41.3 cm) tall
– After Row 50: 17 in (43.2 cm) tall
– After the border: 18 x 61 in (45.7 x 154.9 cm)

Runner Body
The stitch count is a multiple of 6 + 1, and it stays at 181 sts in every row. The ch 1 at the start of an sc row does not count as a stitch.
Foundation Row (WS): Ch 182. Sc in the 2nd ch from the hook and in each ch across. Turn. (181 sc)
At 3 sts per inch, 181 sts measure 60⅓ in (153.2 cm). That fits the 60 in (152.4 cm) target within normal blocking tolerance.
Pattern Repeat (Rows 1–6)
Row 1 (RS, mesh row): Ch 4 (counts as first dc and ch-1 sp). Sk next st, dc in next st. Ch 1, sk next st, dc in next st; repeat from * 89 times. Turn. (91 dc + 90 ch-1 sps = 181 sts)
This row makes the small square eyelets.
Row 2 (WS): Ch 1. Sc in each dc and each ch-1 sp across, ending with sc in the 3rd ch of the turning ch-4. Turn. (181 sc)
Row 3 (RS): Ch 1, sc in each st across. Turn. (181 sc)
Row 4 (WS): Ch 1, sc in each st across. Turn. (181 sc)
Row 5 (RS, triangle row): Ch 1, sc in first 3 sts. TC (worked into Row 2), sc in next 5 sts; repeat from * 29 times. TC, sc in last 3 sts. Turn. (30 TC + 151 sc = 181 sts)
Check the count: 3 + 30 TC + (29 x 5) + 3 = 181. The first TC is centered over the 4th st, so its legs land in sts 2–6 of Row 2. The last TC is centered over st 178 and lands in sts 176–180. That leaves a clean edge at each end.
Row 6 (WS): Ch 1, sc in each st across, including the top of each TC. Turn. (181 sc)
Tip: The top of each TC can hide. Place a marker in the first and last TC of Row 5 so you don’t skip them.
Continue
Rows 7–48: Repeat Rows 1–6 seven more times, for 8 repeats in total. Every TC is worked into the sc row 3 rows below it. Every TC sits directly above the TC in the band below, so the peaks stack in neat columns.
Measure now: about 16¼ in (41.3 cm) tall.
Row 49 (RS): Repeat Row 1. (181 sts)
Row 50 (WS): Repeat Row 2. (181 sc)
The body has 51 rows including the Foundation Row: 9 mesh rows and 42 sc-height rows. Do not fasten off. Continue straight into the border.
Border
Border gauge: The border uses the body gauge, 3 sts per inch. Each sc round adds about ¼ in (0.6 cm) on every side.
Round 1 (RS): Ch 1 and turn so the RS faces you. You will work the border around all four sides.
- Top long edge: 3 sc in the first st (corner), sc in each of the next 179 sts, 3 sc in the last st (corner).
- First short edge: Sc in each of the 49 row ends between the corner rows. Work 1 sc in each sc row end, and 1 sc around the post of each dc or turning ch at the end of a mesh row.
- Bottom long edge: Work into the free loops of the foundation chain: 3 sc in the first st (corner), sc in each of the next 179 sts, 3 sc in the last st (corner).
- Second short edge: Sc in each of the 49 row ends.
- Sl st to the first sc to join.
Count: 179 sc along each long side, 49 sc along each short side, and 3 sc at each corner. Shown as stitches worked one per existing stitch or row end, plus extras: (181 + 181 + 49 + 49 = 460) + (2 extra at each of 4 corners = 8) = 468 sts.
Round 2: Ch 1. Sc in each st around, working 3 sc in the center sc of each corner group. Sl st to the first sc to join.
Count: 181 sc along each long side, 51 sc along each short side, and 3 sc at each corner. As a trim round: (468 worked one per stitch) + (2 extra at each of 4 corners = 8) = 476 sts. Fasten off and weave in the ends.
Why the math works: The long sides use exactly one sc per body stitch, so they cannot ruffle or pull in. The short sides have 51 row ends that are 17 in (43.2 cm) tall. Single crochet at 3 sts per inch over 17 in needs about 51 sts, and that is what one sc per row end gives you. Working only one sc into each taller mesh row end keeps the short sides from flaring.
Tassels
Make 8.
- Wrap yarn 25 times around the 5 in (12.7 cm) card. Cut the yarn.
- Thread a 10 in (25.4 cm) strand under the wraps at the top of the card and tie it tightly. Leave both tails long, because you will use them to attach the tassel.
- Cut through the wraps at the bottom edge of the card.
- Wrap an 18 in (45.7 cm) strand tightly around the bundle ¾ in (1.9 cm) below the top tie to form the neck. Knot it, then use a tapestry needle to bury the ends down into the tassel.
- Trim the bottom evenly to 5 in (12.7 cm).
Placement: Work along the bottom long edge (the foundation edge). Put markers in the center st of the two bottom corners. Counted from one corner center to the other, the edge is 182 st positions long: 181 sides sts plus the 1-st step into the far corner. Divide that into 7 equal spaces of 26 sts each. Starting at one corner center, place a marker in every 26th st. You will have 8 markers, and the last one lands on the opposite corner center. Tassels sit about 8⅔ in (22.0 cm) apart.
Attach: At each marker, pull the two top-tie tails through the border st from front to back. Tie them firmly on the WS, then weave the tails into the border.
Block the runner before you attach the tassels, so the spacing stays even.
Final Blocking
- Soak the runner (without tassels) in cool water with a little wool wash for 15 minutes.
- Press out the water gently. Roll the runner in a towel to remove more moisture, without wringing or twisting.
- Lay it flat on blocking mats, RS up.
- Pin the long edges to 61 in (154.9 cm) and the short edges to 18 in (45.7 cm). Check that the corners are square.
- Pin the long edges straight every 4 in (10.2 cm). Don’t stretch the triangle bands taller than they want to sit.
- Gently lift each triangle with your fingertips so the peaks stand up.
- Let it dry completely, then unpin it and attach the tassels.
For acrylic yarn, pin the runner dry and hover a steam iron over it without touching the fabric. Let it cool before you unpin it.
Final Quality-Control Checklist
- Every row has 181 sts, and every triangle row has 30 TC.
- Each band of triangles lines up vertically with the band below.
- The TC legs fan out evenly and meet in a single point.
- There are 9 eyelet rows, each with 90 open spaces.
- Border Round 2 totals 476 sts, with 3 sc at each corner.
- The runner measures 18 x 61 in (45.7 x 154.9 cm) after blocking.
- There are 8 tassels spaced 26 sts apart, each 5 in (12.7 cm) long.
- All ends are woven in securely on the WS.
Troubleshooting
Triangles lean to one side: You probably counted the base sts from the wrong st. Center each TC on the st directly below the skipped st, with 2 legs on each side.
Triangles look flat or puckered: The loops are too short. Pull each leg up to the full height of the current row before you yo.
Stitch count drifts: You missed a TC top in Row 6 or the turning chain in Row 2. Mark both and recount every 6 rows.
Short ends flare: You worked 2 sc into the mesh row ends. Go back to 1 sc per row end.
Short ends pull in: You skipped some row ends. You need 49 sc between the corners in Round 1.
Long edges wave: The foundation chain was too tight or too loose. Next time, chain with a hook one size larger.
Tassels look uneven: Trim them all at once, laid flat side by side against a ruler.
Care
Hand wash in cool water, or use a gentle wool cycle in a mesh bag, and dry flat. Smooth the tassels with your fingers while they are damp.
Final Notes
The measurement chain is simple. The gauge of 3 sts per inch gives a 181-st foundation of about 60 in (152.4 cm). Eight 2 in (5.1 cm) repeats, plus the opening and closing rows, give a 17 in (43.2 cm) body. Two border rounds add ½ in (1.3 cm) on every side, for a finished size of 18 x 61 in (45.7 x 154.9 cm). Eight tassels spaced 26 sts apart complete the edge. If your swatch matches, every later checkpoint should match too.
Happy crocheting!