

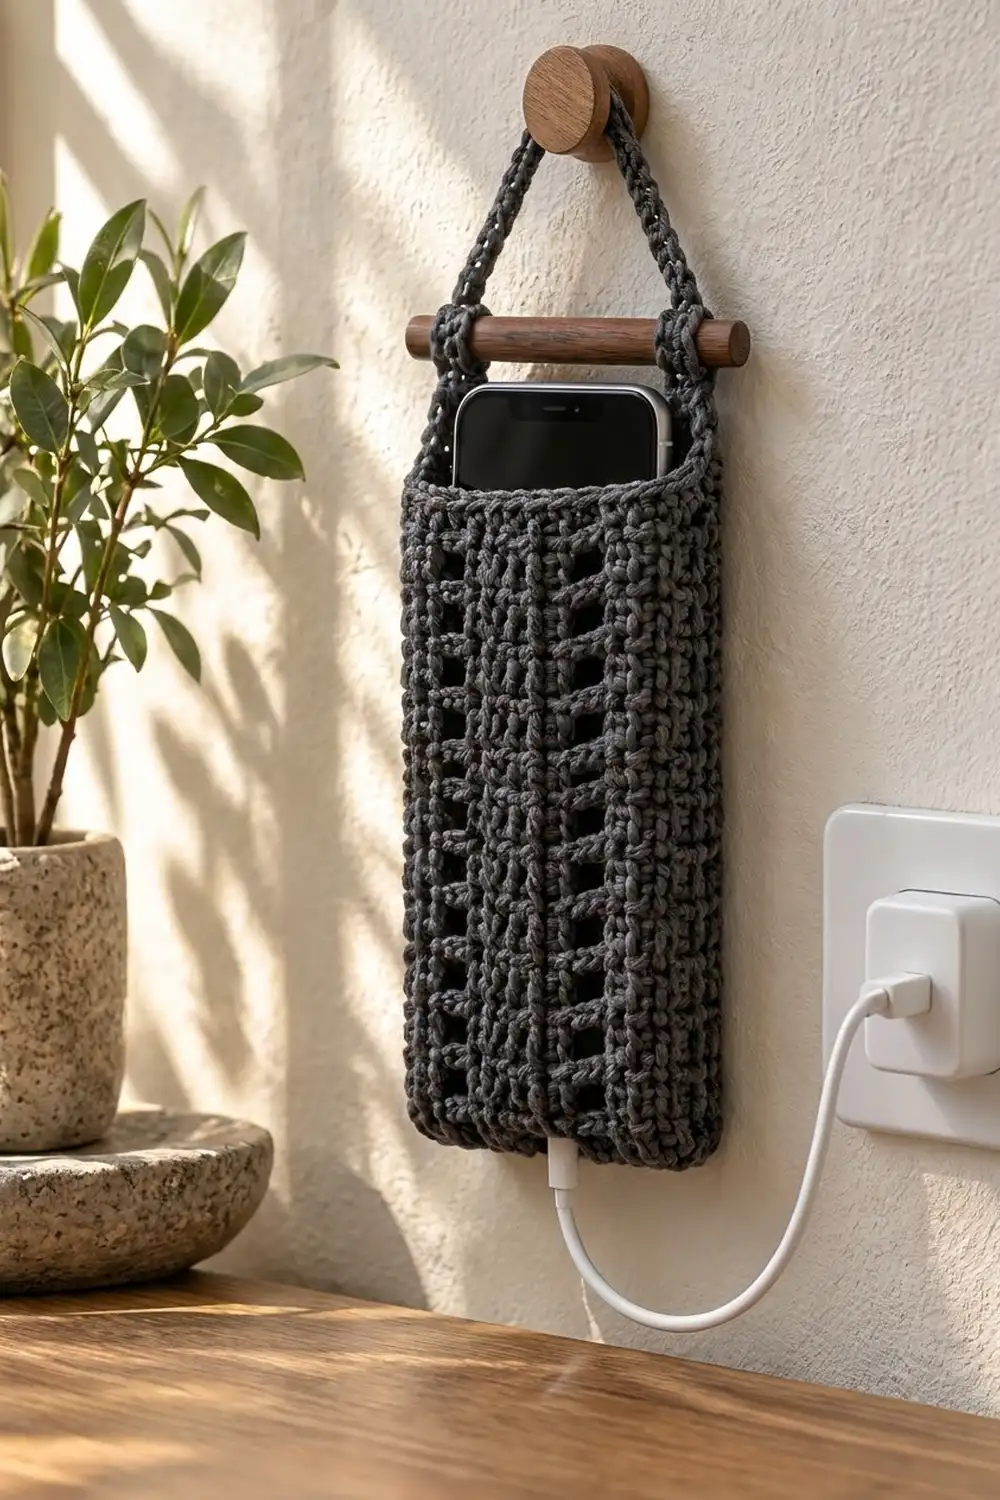
This hanging phone pocket keeps your phone off the counter while it charges. It is worked in a single charcoal gray worsted cotton. It hangs from a wooden dowel and a crocheted cord looped over a wall knob. The phone drops in from the top, and the charging cable comes out through a small gap in the bottom seam.
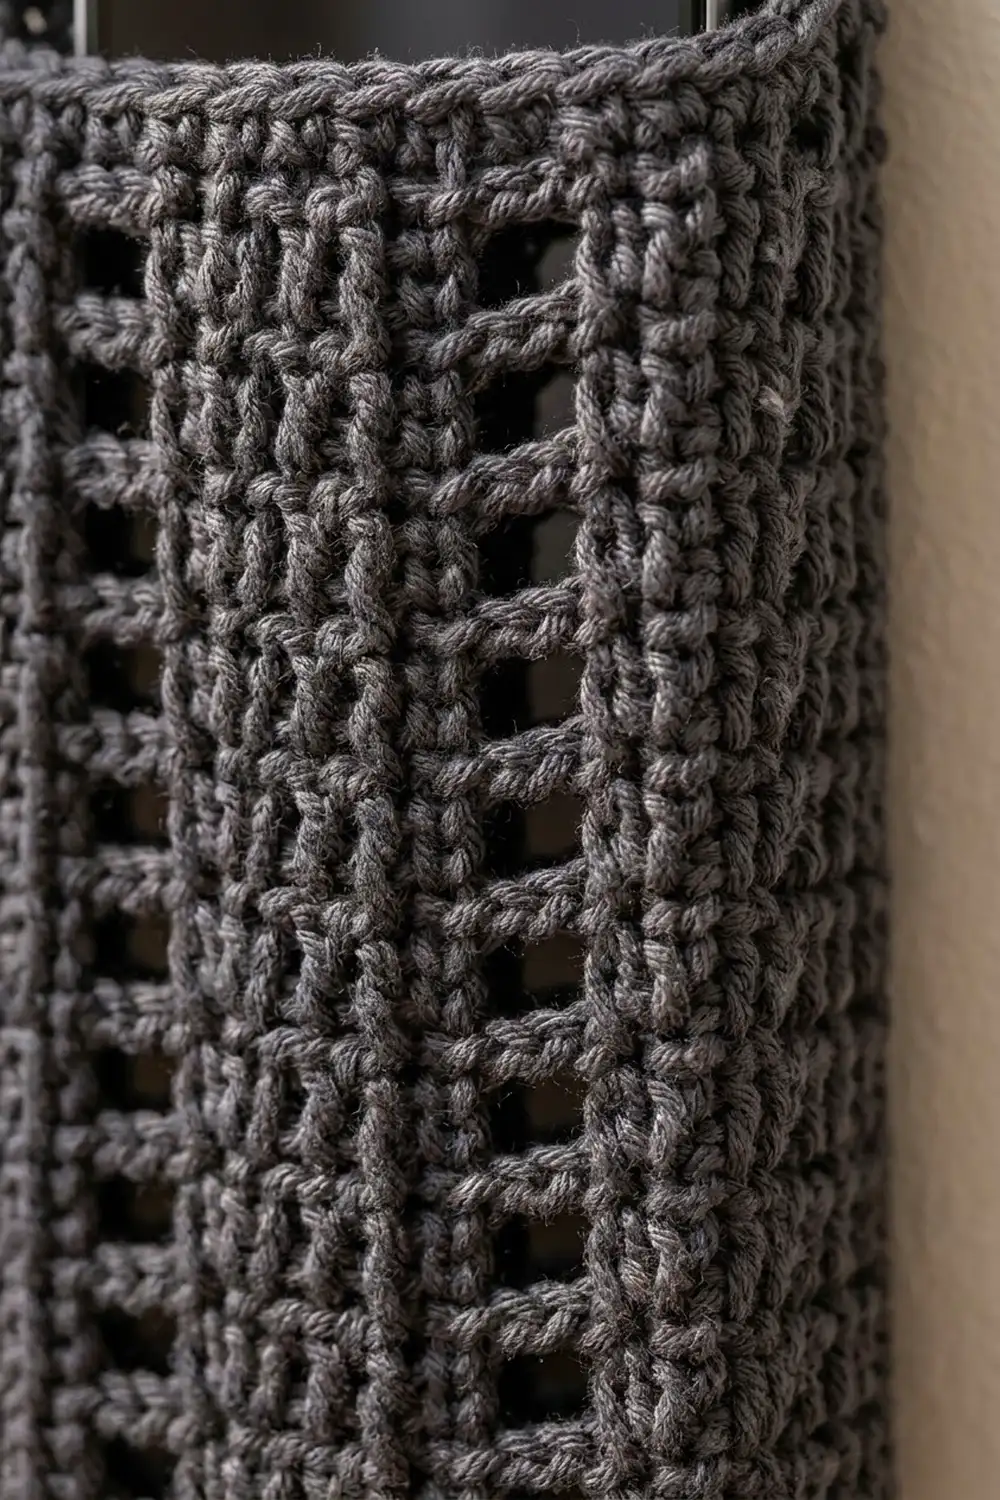
The texture comes from columns of stacked rectangular eyelets set between solid columns. Each eyelet row is followed by a single crochet row, so the holes line up in neat ladders with firm bars between them. Each face shows three eyelet columns, each eight holes tall.
The pattern uses US crochet terms. The finished pocket measures 4 in (10.2 cm) wide when flat and 6.75 in (17.1 cm) tall, not counting the dowel and cord.
Construction is simple. You crochet one flat rectangular panel in rows. Then you fold it in half so the fold forms one side edge, and you slip stitch the other side and the bottom closed, leaving a gap for the cable. Two rounds of single crochet finish the opening. Last, you make one slip stitch cord, wrap it around the dowel, and sew its ends inside the top edges.
Finished Size and Construction
- Finished size: 4 in (10.2 cm) wide x 6.75 in (17.1 cm) tall, flat
- Skill level: Easy
- Terminology: US crochet terms
- Yarn weight: Worsted (#4), cotton
- Hook: 5.0 mm (US H-8)
- Number of pieces: 1 pocket body plus 1 hanging cord (a single item, not joined motifs)
- Layout: One panel, 32 stitches wide, folded into a 16-stitch front and a 16-stitch back
- Panel size before folding: 8 in (20.3 cm) wide x 6.25 in (15.9 cm) tall
- Size before border (folded and seamed): 4 in (10.2 cm) x 6.25 in (15.9 cm)
- Border depth: 0.5 in (1.3 cm), 2 rounds of sc around the opening
- Cable gap: 1 in (2.5 cm) at bottom center
Materials
Choose a smooth worsted weight yarn in 100% cotton or a cotton blend. Cotton holds the eyelet shape well and does not sag under the weight of a phone. Avoid fuzzy or stretchy yarns. They blur the ladder texture and let the pocket stretch longer over time.
Yarn:
– Charcoal gray: 50 g, about 90 m (98 yd)
The pocket uses about 35 g and the cord about 5 g. The amount above includes a margin for a gauge swatch and seaming.
Tools:
– 5.0 mm (US H-8) crochet hook
– 1 stitch marker
– Tapestry needle
– Scissors
– Measuring tape
– Wooden dowel, 6 in (15.2 cm) long, 3/8 in (1.0 cm) across
– Wooden wall knob or hook for hanging
– Rust-proof pins, a spray bottle, and a piece of stiff card for blocking
Abbreviations (US Terms)
- ch – chain
- sc – single crochet
- dc – double crochet
- sl st – slip stitch
- sk – skip
- sp – space
- st(s) – stitch(es)
- rnd – round
- RS / WS – right side / wrong side
- [ ] – repeat the steps inside the brackets as directed
Special stitch – Back-bump slip stitch cord: Make a chain. Insert the hook into the back bump (the small ridge on the back) of the 2nd chain from the hook. Yarn over and pull through both the chain and the loop on the hook. Repeat in each back bump. This makes a firm, rounded cord that stretches very little.
Gauge and Checkpoints
Gauge: 16 sc = 4 in (10.2 cm). One pattern repeat (1 dc row + 1 sc row) = 0.75 in (1.9 cm). Four repeats = 3 in (7.6 cm).
Since this is a single piece, the panel itself is your test piece. Work Rows 1–5, then measure before you go on. If you prefer, make a separate 16-stitch swatch of Rows 1–9 first.
Checkpoints:
– After Row 1: 32 sc = 8 in (20.3 cm) wide.
– After Row 9: 3.25 in (8.3 cm) tall.
– After Row 17: 6.25 in (15.9 cm) tall.
– After seaming, flat: 4 in (10.2 cm) wide.
– After the border: 6.75 in (17.1 cm) tall.
If your work is too big: go down one hook size to 4.5 mm (US 7). If the panel is even 0.25 in (0.6 cm) too wide, the phone will tip forward in the pocket.
If your work is too small: go up one hook size to 5.5 mm (US I-9). The folded pocket must lie flat at 4 in (10.2 cm) wide so that a standard phone, up to about 3 in (7.6 cm) wide, slides in easily.
If your gauge is off, change the hook size and keep the stitch counts as written. That way the eyelet columns stay centered on each face.
Pocket Panel
You work the panel flat in rows from the bottom edge up. Stitches 1–16 become one face and stitches 17–32 become the other. Each face is laid out like this:
2 solid | eyelet (2) | 3 solid | eyelet (2) | 3 solid | eyelet (2) | 2 solid = 16 sts
At the fold, the 2-stitch edge columns of the two faces sit side by side, so the fold runs down the middle of a 4-stitch solid column.
Foundation: Ch 33.
Row 1 (WS): Sc in 2nd ch from hook and in each ch across, turn. (32 sc)
Place a stitch marker in the 16th sc to mark the fold line.
Row 2 (RS, eyelet row): Ch 3 (counts as first dc), dc in next st, [ch 2, sk 2, dc in next 3 sts] twice, ch 2, sk 2, dc in next 4 sts, [ch 2, sk 2, dc in next 3 sts] twice, ch 2, sk 2, dc in last 2 sts, turn. (20 dc + 6 ch-2 sps = 32 sts)
Check: 2 + 3 + 3 + 4 + 3 + 3 + 2 = 20 dc. Then 6 spaces x 2 ch = 12 ch. That makes 32.
Row 3 (WS, bar row): Ch 1, sc in first 2 dc, [2 sc in ch-2 sp, sc in next 3 dc] twice, 2 sc in ch-2 sp, sc in next 4 dc, [2 sc in ch-2 sp, sc in next 3 dc] twice, 2 sc in ch-2 sp, sc in last dc and in top of turning ch-3, turn. (20 sc worked 1-per-dc + 12 sc worked in the spaces = 32 sc)
This row closes the top of each eyelet with a solid bar and brings the row back to 32 stitches. The next eyelet row skips the same stitch positions, so the holes stack straight on top of each other.
Rows 4–17: Repeat Rows 2–3 seven more times. (8 eyelet rows total; Row 17 ends with 32 sc)
Fasten off and weave in the ends.
Checkpoint: The panel measures 8 in (20.3 cm) wide and 6.25 in (15.9 cm) tall. Each face has 3 eyelet columns, each 8 holes tall.
Fold and Seam
Fold: Fold the panel in half with RS together at the marked 16th stitch, so the 16 front stitches sit exactly on top of the 16 back stitches. The fold becomes one side edge of the pocket. The two row-end edges now lie together on the other side, and the two foundation edges lie together at the bottom.
Side seam: Join yarn through both layers at the top corner of the open side. Working through both layers, sl st along the row ends: 1 sl st in the end of each sc row and 2 sl sts in the end of each dc row. (9 sc rows x 1 + 8 dc rows x 2 = 25 sl sts)
Bottom seam with cable gap: At the bottom corner, turn to work along the foundation edge. Match the 16 foundation stitches of the front with the 16 of the back. Working through both layers, sl st in the next 6 pairs of sts, ch 4, sk the next 4 pairs, sl st in the last 6 pairs. (6 + 4 skipped + 6 = 16 pairs) Fasten off.
The 4 skipped pairs leave a 1 in (2.5 cm) gap at the bottom center for the cable. That fits a USB-C or Lightning plug but is far too narrow for a phone to slip through.
Turn the pocket RS out. The seam ridges are now on the inside, so the outer edges look clean.
Checkpoint: The pocket lies flat at 4 in (10.2 cm) wide and 6.25 in (15.9 cm) tall.
Border (Top Rim)
Border gauge: 4 sc per 1 in (2.5 cm), the same as the body. 2 rnds of sc = 0.5 in (1.3 cm).
With RS facing, join yarn at the top of the side seam.
Rnd 1: Ch 1, sc in each st around the opening, working 16 sc across the front and 16 sc across the back, sl st to first sc. (32 sc: 16 per side)
Rnd 2: Ch 1, sc in each st around, sl st to first sc. (32 sc: 16 per side) Fasten off.
Why the math works: The top of Row 17 has exactly 32 sc, 16 on each face. The rim works 1 sc into each existing stitch, so no stitches are added or lost. At 4 sts per inch, 16 sts = 4 in (10.2 cm), which matches the body width. That means the rim will not flare or pull in.
The opening is a tube, so it has no corners. The first and last stitches of each 16-stitch side, at the fold and at the seam, are already counted in that 16. Do not add extra stitches at the fold or seam, or the opening will ruffle.
Hanging Cord
Foundation: Ch 65.
Row 1: Work the back-bump slip stitch cord: sl st in the back bump of 2nd ch from hook and in each ch across. (64 sl sts) Fasten off, leaving a 10 in (25.4 cm) tail. Thread the starting tail onto the needle as well. You will sew with both tails.
Checkpoint: The cord measures about 16 in (40.6 cm). If it is more than 1 in (2.5 cm) too short or too long, make it again, adding or removing 4 chains for each 1 in (2.5 cm).
Attaching the Cord and Dowel
- Lay the pocket flat with the front facing you, fold edge on one side and seam on the other.
- Tuck one end of the cord inside the pocket at the fold side. Using its tail, sew it to the inside of the rim and the top 0.5 in (1.3 cm) of the side with small whipstitches through the inner loops only. Do the same with the other end at the seam side.
- Hold the dowel level, 1 in (2.5 cm) above the rim. On each side, wrap the cord once around the dowel, about 0.5 in (1.3 cm) from the end. Stitch each wrap in place so it cannot slide.
- The rest of the cord forms a triangle above the dowel, with each leg about 5 in (12.7 cm) long. Hang the point of the triangle over the knob.
Final Blocking
- Check that the side seam lies right along the side edge, directly opposite the fold.
- Mist the pocket lightly until it is damp but not soaked.
- Cut a card 3.75 in (9.5 cm) wide x 6.75 in (17.1 cm) tall and slide it inside. It holds the outside at 4 in (10.2 cm) wide.
- Pin the outer edges straight on a blocking mat so the pocket measures 6.75 in (17.1 cm) tall.
- Use a fingertip to square up each eyelet into an even rectangle in a straight column.
- Let it dry completely, then remove the card.
- Mist the cord and smooth it straight. It does not need pinning.
Final Quality-Control Checklist
- Each face has 3 eyelet columns, 8 holes tall, centered on the face.
- A 4-stitch solid column runs down the fold edge.
- The pocket measures 4 in (10.2 cm) x 6.75 in (17.1 cm).
- Both rim rounds have 32 sc, 16 per side.
- The side seam has 25 sl sts and lies flat.
- The 1 in (2.5 cm) cable gap is centered on the bottom.
- The cord ends are sewn firmly inside and do not show from the front.
- The dowel wraps are stitched in place.
- All ends are woven in and trimmed.
Troubleshooting
The eyelets drift out of line. Each eyelet row must skip the 2 sc that were worked into the space below. Count the dc groups: 2, 3, 3, 4, 3, 3, 2.
The panel gets narrower. You probably missed the last sc in the top of the turning ch-3. Count 32 sts at the end of every sc row.
The holes look like slits. Your chains are too tight. Work the ch-2 more loosely.
The pocket is the wrong height. Add or remove whole pattern repeats. Each repeat is 0.75 in (1.9 cm). Always end on a sc row.
The rim flares. You added stitches at the seam or fold. Pull out the rim and work exactly 16 sc per side.
The cable plug does not fit. Undo the bottom seam. Work 5 pairs, ch 6, sk 6 pairs, then work the last 5 pairs, so the total stays at 16 pairs.
Care
Remove the dowel, then hand wash the pocket in cool water with mild soap. Roll it in a towel to press out the water, and dry it flat over the blocking card to keep its shape.
Final Notes
All the sizes in this pattern come from the gauge. At 16 sc = 4 in (10.2 cm), the 32-stitch panel measures 8 in (20.3 cm) wide and folds into a 4 in (10.2 cm) pocket. Each pattern repeat adds 0.75 in (1.9 cm). Row 1 plus 8 repeats brings the body to 6.25 in (15.9 cm). The 2-round rim adds 0.5 in (1.3 cm), for a finished height of 6.75 in (17.1 cm), and its 16 stitches per side match the body width.
If you check these numbers at each stage, the pocket will come out square and sturdy, ready to hold your phone by the outlet.
Happy crocheting!