

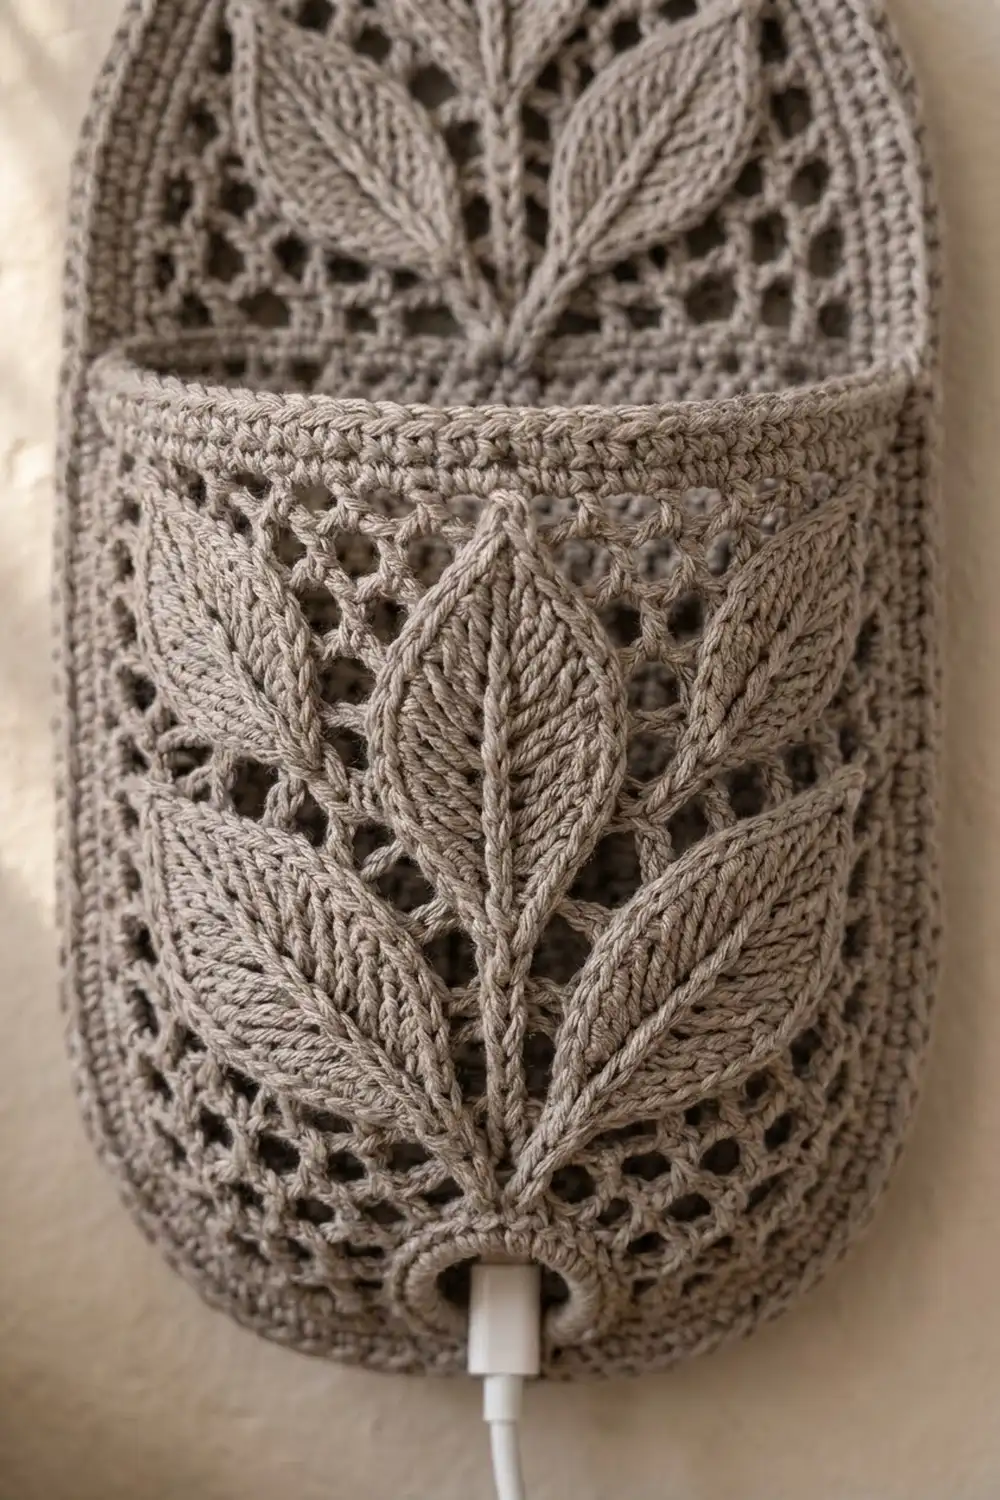
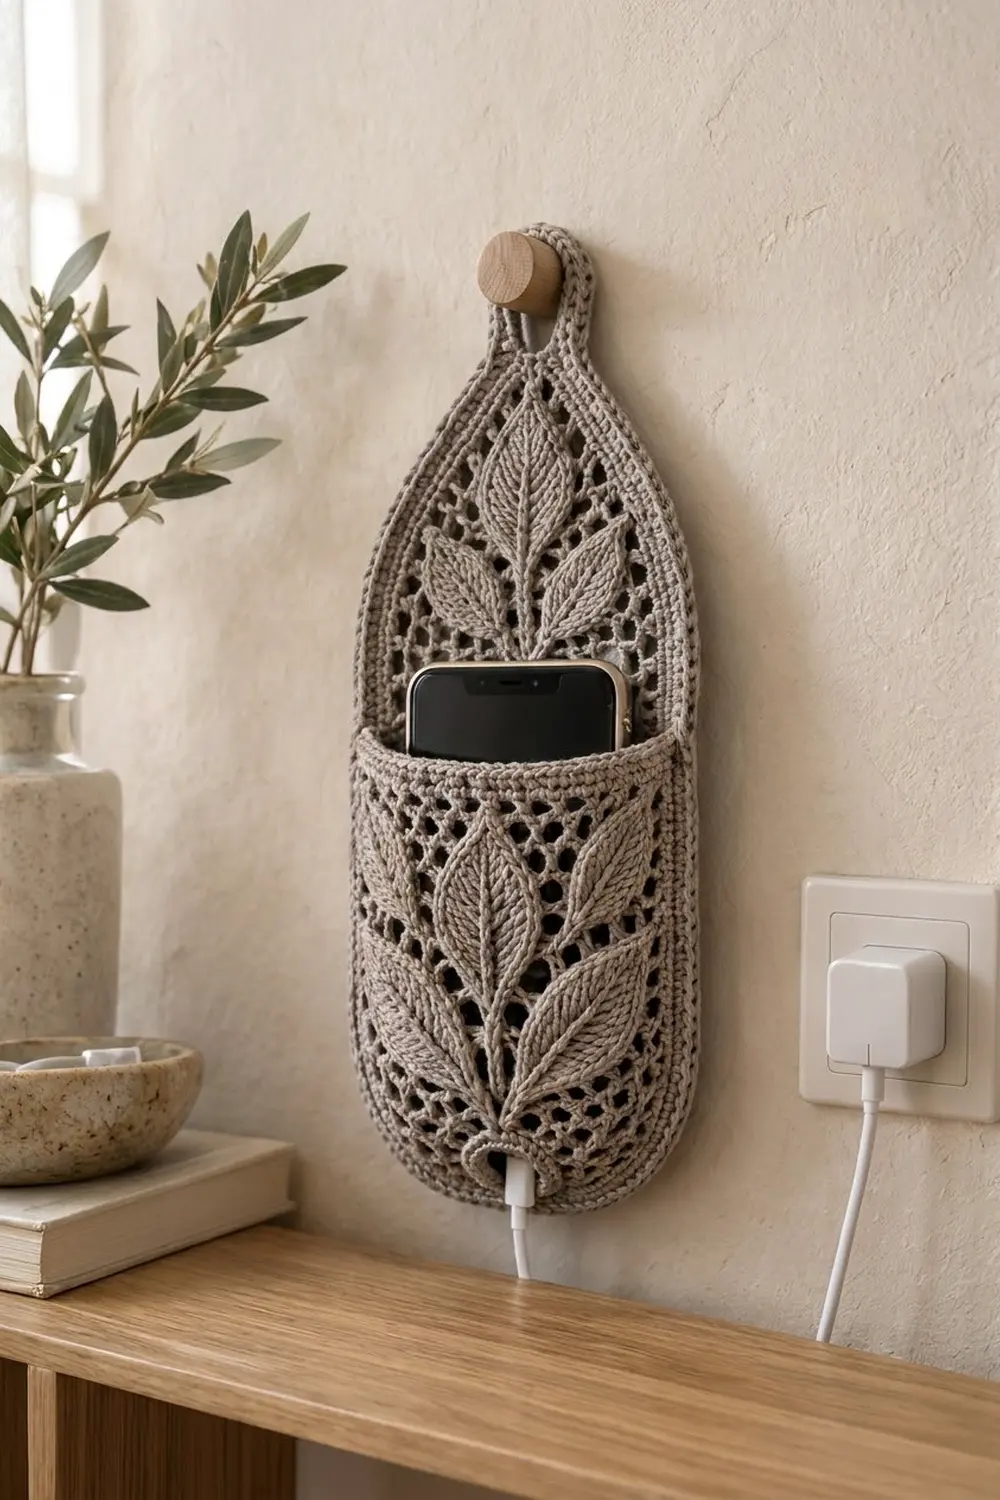
The Olive Sprig Wall Phone Holder is a hanging charging pocket for your phone. It has an airy filet-mesh back, a deep front pocket and raised leaves that climb up the center of each layer. A teardrop loop at the top hangs it on a peg or hook, and a slot at the bottom center lets the charging cable come out neatly.
The sample uses one color, a warm taupe-grey cotton, so the texture does the work. Leaves sit on the open grid like pressed botanicals. Everything has a firm single-crochet rim, so the edge stays crisp against the wall.
This pattern uses US crochet terms. The finished holder is 6.0 in (15.2 cm) wide and 14.0 in (35.6 cm) tall including the loop. The pocket opening is 6.6 in (16.8 cm) above the bottom edge.
Construction overview: work the back panel and the pocket flat, bottom-up, in filet mesh. Both start with the same rounded bottom. Make 12 leaves, 2 stem cords and 1 ring separately and sew them onto the panels. Each panel gets one round of edging. A second border round then joins the pocket to the back and finishes the outline in one pass.
Finished Size and Construction
- Finished size: 6.0 in (15.2 cm) wide × 14.0 in (35.6 cm) tall
- Skill level: Intermediate
- Terminology: US crochet terms
- Yarn weight: DK (#3) cotton
- Hook: 3.5 mm (US E-4)
- Number of pieces: 2 main panels (back and pocket), 12 leaves (7 large, 5 small), 2 stem cords, 1 ring
- Layout: pocket stacked on the lower front of the back panel, bottom edges aligned
- Back panel size before border: 5.2 in (13.2 cm) wide × 13.2 in (33.5 cm) tall
- Pocket size before edging: 5.2 in (13.2 cm) wide × 6.0 in (15.2 cm) tall
- Border depth: 2 rounds of sc, 0.4 in (1.0 cm) total
Materials
Use a smooth, tightly plied DK cotton or cotton blend. Mercerized or matte cotton both work. Avoid very fuzzy or loosely spun yarn: the mesh needs clean holes and the leaves need crisp ribs.
- Taupe-grey (one color): 70 g, about 155 m (170 yd)
Approximate split: back panel 22 g, pocket 12 g, leaves 16 g, stems and ring 2 g, edging and border 8 g. That adds up to 60 g, and the quantity above includes about a 15% margin for your swatch and tension differences.
Tools:
- 3.5 mm (US E-4) crochet hook
- Tapestry needle
- 6 locking stitch markers
- Rust-proof pins and a blocking mat
- Measuring tape
- Spray bottle
Abbreviations (US Terms)
- ch – chain
- sl st – slip stitch
- sc – single crochet
- hdc – half double crochet
- dc – double crochet
- tr – treble crochet
- sk – skip
- sp – space
- st(s) – stitch(es)
- BLO – back loop only
- rep – repeat
Special stitches
- Mesh: one dc post plus the ch-1 sp beside it. A row with n meshes has 2n + 1 sts.
- Beginning increase (beg-inc): ch 4 (counts as dc and ch 1), then dc in the first dc, at the base of the turning chain. This adds 1 mesh at the start of the row.
- End increase (end-inc): (dc, ch 1, dc) in the top of the turning chain. This completes the last mesh and adds 1 more.
Gauge and Checkpoints
- Filet mesh: 10 meshes and 10 rows = 4 in (10.2 cm), so each mesh is 0.4 in (1.0 cm) square.
- Single crochet: 20 sc = 4 in (10.2 cm), or 5 sc per 1 in (2.5 cm).
Make the pocket first and use it as your test piece. It is the smaller panel and has the same bottom curve as the back.
Checkpoints:
- After Row 4, the piece is 13 meshes wide and measures 5.2 in (13.2 cm).
- After Row 14 of the pocket, the mesh measures 5.6 in (14.2 cm) tall.
- After Row 16 of the pocket, it measures 6.0 in (15.2 cm) tall.
- After Row 30 of the back, the mesh measures 12.0 in (30.5 cm) tall.
If your piece is too big, go down 0.25 mm in hook size. If it’s too small, go up 0.25 mm. If the width is right but the rows are too short, pull each dc up slightly taller and don’t change hooks.
Back Panel
Foundation: Ch 18.
Row 1: Dc in the 6th ch from hook (the skipped chs count as dc, ch 1 and a skipped base ch). *Ch 1, sk 1 ch, dc in next ch; rep from * across. Turn. (7 meshes, 15 sts)
Row 2: Beg-inc. *Ch 1, dc in next dc; rep from * to the turning chain. Ch 1, end-inc in the top of the turning chain. Turn. (9 meshes, 19 sts)
Row 3: Rep Row 2. (11 meshes, 23 sts)
Row 4: Rep Row 2. (13 meshes, 27 sts)
These three increase rows make the rounded bottom: each edge steps out on a diagonal.
Rows 5–20: Ch 4 (counts as dc and ch 1), sk the ch-1 sp, dc in next dc. *Ch 1, dc in next dc; rep from * across, working the last dc in the 3rd ch of the turning ch-4. Turn. (13 meshes, 27 sts in each row)
Now work the dome-shaped top. Odd rows decrease and even rows hold the count.
Row 21 (decrease): Sl st in the first ch-1 sp and in the next dc. Ch 4 (counts as dc and ch 1), dc in next dc. *Ch 1, dc in next dc; rep from * until you have worked into the second-to-last dc. Turn, leaving the last mesh unworked. (11 meshes, 23 sts)
Row 22: Work as Rows 5–20. (11 meshes, 23 sts)
Rows 23–30: Rep Rows 21–22 four more times. The counts are:
- Row 23: 9 meshes, 19 sts
- Row 24: 9 meshes, 19 sts
- Row 25: 7 meshes, 15 sts
- Row 26: 7 meshes, 15 sts
- Row 27: 5 meshes, 11 sts
- Row 28: 5 meshes, 11 sts
- Row 29: 3 meshes, 7 sts
- Row 30: 3 meshes, 7 sts
Checkpoint: the mesh measures 12.0 in (30.5 cm) tall.
Row 31 (neck): Ch 1, sc in each dc and each ch-1 sp across, ending with sc in the top of the turning chain. Turn. (7 sc)
Rows 32–33: Ch 1, sc in each sc across. Turn. (7 sc in each row)
The neck is 0.6 in (1.5 cm) tall.
Row 34 (loop): Ch 1, sc in the first 2 sc, ch 10, sk 3 sc, sc in the last 2 sc. Fasten off. (4 sc and a ch-10 loop)
The ch-10 arches over the 3 skipped sts and makes the teardrop opening.
Foundation and Rows 1–4: Work exactly as the Back Panel. (13 meshes, 27 sts)
Matching the curve is what lets the two panels line up for joining.
Rows 5–14: Work as the Back Panel’s Rows 5–20. (13 meshes, 27 sts in each row)
Checkpoint: 5.6 in (14.2 cm) tall.
Row 15: Ch 1, sc in each dc and each ch-1 sp across, ending with sc in the top of the turning chain. Turn. (27 sc)
Row 16: Ch 1, sc in each sc across. Do not fasten off. (27 sc)
These two rows make the solid rim at the pocket opening. The pocket now measures 6.0 in (15.2 cm), the same height as Back Panel Rows 1–15.
Leaves, Stems and Ring
Large leaf (make 7): Ch 11.
- Rnd 1: Sc in the 2nd ch from hook, hdc in next ch, dc in next 2 chs, tr in next 2 chs, dc in next 2 chs, hdc in next ch. In the last ch, work (sc, ch 2, sc) for the tip. Working along the other side of the foundation chain: hdc in next ch, dc in next 2 chs, tr in next 2 chs, dc in next 2 chs, hdc in next ch, sc in the last ch. Sl st to the first sc. (20 sts and a ch-2 tip)
- Rnd 2: Working in BLO, loosely sl st in each st around, working (sl st, ch 2, sl st) in the tip sp. Fasten off and leave a 12 in (30.5 cm) tail.
The front loops left behind by the BLO round make the raised outline, and the tr-to-sc slope makes the slanted ribs. The finished leaf is about 2.2 in (5.6 cm) long and 1.1 in (2.8 cm) wide.
Small leaf (make 5): Ch 8.
- Rnd 1: Sc in the 2nd ch from hook, hdc in next ch, dc in next 3 chs, hdc in next ch. In the last ch, work (sc, ch 2, sc). Working along the other side of the foundation chain: hdc in next ch, dc in next 3 chs, hdc in next ch, sc in the last ch. Sl st to the first sc. (14 sts and a ch-2 tip)
- Rnd 2: Work as the large leaf’s Rnd 2.
The finished leaf is about 1.6 in (4.1 cm) long and 0.8 in (2.0 cm) wide.
Vein (all leaves): Using the tail, work surface sl sts up the center of the leaf, from the base to the tip.
Stem cords: For the back, ch 24. For the pocket, ch 22. Sl st in the back bump of each ch. The back stem is 4.8 in (12.2 cm) long and the pocket stem is 4.4 in (11.2 cm).
Ring (make 1): Ch 10 and sl st to the first ch to form a ring.
- Rnd 1: Work 18 sc into the ring and sl st to the first sc. The ring is about 0.9 in (2.3 cm) across.
Make All Pieces and Layout
Piece count, all in taupe-grey:
- 1 back panel
- 1 pocket
- 7 large leaves
- 5 small leaves
- 2 stem cords
- 1 ring
Sew all appliqués on before you start joining. Use the tails and small stitches through the backs of the leaves, so the stitches stay hidden in the mesh. Leaves angle outward at about 45° in mirrored pairs. The rows below are counted from the bottom of each panel.
BACK PANEL                      POCKET
Row 29   S tip (top)            Row 14   L tip (top)
Row 25   [ stem top / S tip ]   Row 12   [ stem top / L tip ]
Rows 21-22   S   |   S          Rows 10-11   L   |   L
Rows 17-18   L   |   L          Rows 7-8     L   |   L
Rows 13-25   stem (center)      Rows 4-5     S   |   S
                                Rows 1-12    stem from ring
                                Rows 1-2     ring (center)
The lower part of the back stem (Rows 13–15) will be hidden behind the pocket, so the sprig looks continuous.
Edging and Joining
Edging gauge: 2 sc per mesh-row end on straight edges and 3 sc per diagonal row end. This keeps 5 sc = 1 in (2.5 cm) on straight edges. The diagonal ends need the extra st because they are about 0.57 in (1.4 cm) long.
Back Panel Rnd 1: Join yarn at the bottom right corner. Each part below gives its exact count.
- Bottom: Work along the 15 base sts of Row 1: 3 sc in the first, sc in the next 13, 3 sc in the last. (19 sc)
- Left side, going up: Row 1 end: 2 sc. Rows 2–4 ends: 3 sc each (9). Rows 5–20 ends: 2 sc each (32). Rows 21–30: 3 sc at each decrease-row end and 2 sc at each even-row end (25). Rows 31–34 ends: 1 sc each (4). (72 sc)
- Top: Sc in the 2 sc, 16 sc over the ch-10 loop, sc in the 2 sc. (20 sc)
- Right side, going down: Mirror the left side. (72 sc)
Sl st to the first sc. Total: 183 sc (19 + 72 + 20 + 72).
Pocket Rnd 1: Continue from Row 16, without turning.
- Side, going down: Rows 16 and 15 ends: 1 sc each (2). Rows 14–5 ends: 2 sc each (20). Rows 4–2 ends: 3 sc each (9). Row 1 end: 2 sc. (33 sc)
- Bottom: Same as the back. (19 sc)
- Other side, going up: Mirror the first side. (33 sc)
- Top: Sc in each of the 27 sts. (27 sc)
Sl st to join. Total: 112 sc. Fasten off.
Why the panels match: the back’s sides have 11 + 22 = 33 sc for Rows 1–15. The pocket also has 33 sc per side, and its 6.0 in (15.2 cm) height equals Back Rows 1–15. So the lower U-shaped edge has 33 + 19 + 33 = 85 sts on each panel, and they pair 1-to-1.
Joining method: Place the pocket on the front of the back panel, wrong sides together, with bottoms and side edges aligned. Clip the two layers together every 1 in (2.5 cm) with stitch markers. Through both layers, the stitch-to-stitch rule is 1 pocket sc paired with 1 back sc. Work at your normal tension. Joining too tightly pulls the curve into points, and joining too loosely makes the seam flare.
Border
Border Rnd 2 (joining round): Join yarn at the back panel’s right side, where it meets the pocket’s top corner. Each part below gives its exact count.
- Joined zone: Work down the side, around the bottom and up the other side. Most sts go through both layers.
- Sides: 33 sc on each side.
- Corners: work 2 sc in the center st of each 3-sc corner group.
- Cord slot: at the bottom center, work the middle 5 sts (bottom sts 8–12) through the back panel only. This leaves a 1.0 in (2.5 cm) cord slot under the ring.
- Count: 85 + 2 = 87 sc. That is 82 through both layers and 5 through the back only.
- Upper back, back panel only:
- Left side: 39 sc.
- Top: sc in 2 sts, *sc in 3, 2 sc in next; rep from * 4 times over the loop (20), sc in 2 sts. (24 sc)
- Right side: 39 sc.
- Count: 39 + 24 + 39 = 102 sc.
Sl st to join. Total: 189 sc.
Why the math works:
- 183 Rnd 1 sts = 85 joined-zone sts + 98 upper sts (39 + 20 + 39).
- Rnd 2 keeps every st 1-to-1 and adds only the 2 corner increases and the 4 loop increases. 183 + 6 = 189.
- The two rounds add 0.4 in (1.0 cm) per edge. The width grows from 5.2 in (13.2 cm) to 6.0 in (15.2 cm), and the height grows from 13.2 in (33.5 cm) to 14.0 in (35.6 cm).
Fasten off and weave in all ends along the border.
Final Blocking
- Lay the holder flat with the front facing up on a blocking mat.
- Spray it until it is evenly damp but not dripping.
- Pin the sides straight, so the width is 6.0 in (15.2 cm) at both the pocket level and above it.
- Pin the bottom into a smooth half-circle and the top into a smooth dome. Check that the total height is 14.0 in (35.6 cm).
- Square the mesh holes using your fingertip, working row by row.
- Pinch each leaf so the ribs and outline stand up, and let it dry without pressing it flat.
- Slip a folded piece of card into the pocket so the layers dry apart.
- Let it dry fully, then unpin it.
Final Quality-Control Checklist
- Back Rnd 1 has 183 sc, Pocket Rnd 1 has 112 sc, and Border Rnd 2 has 189 sc
- Width is 6.0 in (15.2 cm) and height is 14.0 in (35.6 cm)
- Pocket opening is 6.6 in (16.8 cm) above the bottom edge
- Leaf pairs are mirrored and angled at about 45°
- Both stems are centered and vertical
- The cord slot is open and sits directly below the ring
- The loop is firm, open and centered over the neck
- All ends are hidden on the wrong side
Troubleshooting
- Mesh slants to one side: check that every row starts with the full ch 4 and ends in the 3rd ch of the turning chain.
- Bottom curve looks stepped: you probably worked 2 sc on the increase-row ends. Use 3 sc on each diagonal end.
- Pocket edge ends short of the back: count the 33 sc on each pocket side before joining, and redo any side that is off.
- Leaves curl: block them separately before sewing, or loosen the BLO round.
- Loop stretches: add a sl st round inside the opening.
- Phone sits too low: fold a felt pad into the pocket bottom.
Care
Hand wash in cool water with mild soap, press out the water in a towel and dry flat. Re-pin the shape if the mesh relaxes.
Final Notes
The measurement chain runs like this:
- Each mesh is 0.4 in (1.0 cm).
- 13 meshes make a 5.2 in (13.2 cm) panel.
- 15 rows make a 6.0 in (15.2 cm) pocket, and 30 rows plus the neck and loop make a 13.2 in (33.5 cm) back.
- 2 rounds of sc border bring the holder to 6.0 in × 14.0 in (15.2 cm × 35.6 cm).
If each checkpoint is right, the pocket matches the back stitch for stitch, and the leaves have room to spread.
Happy crocheting!