

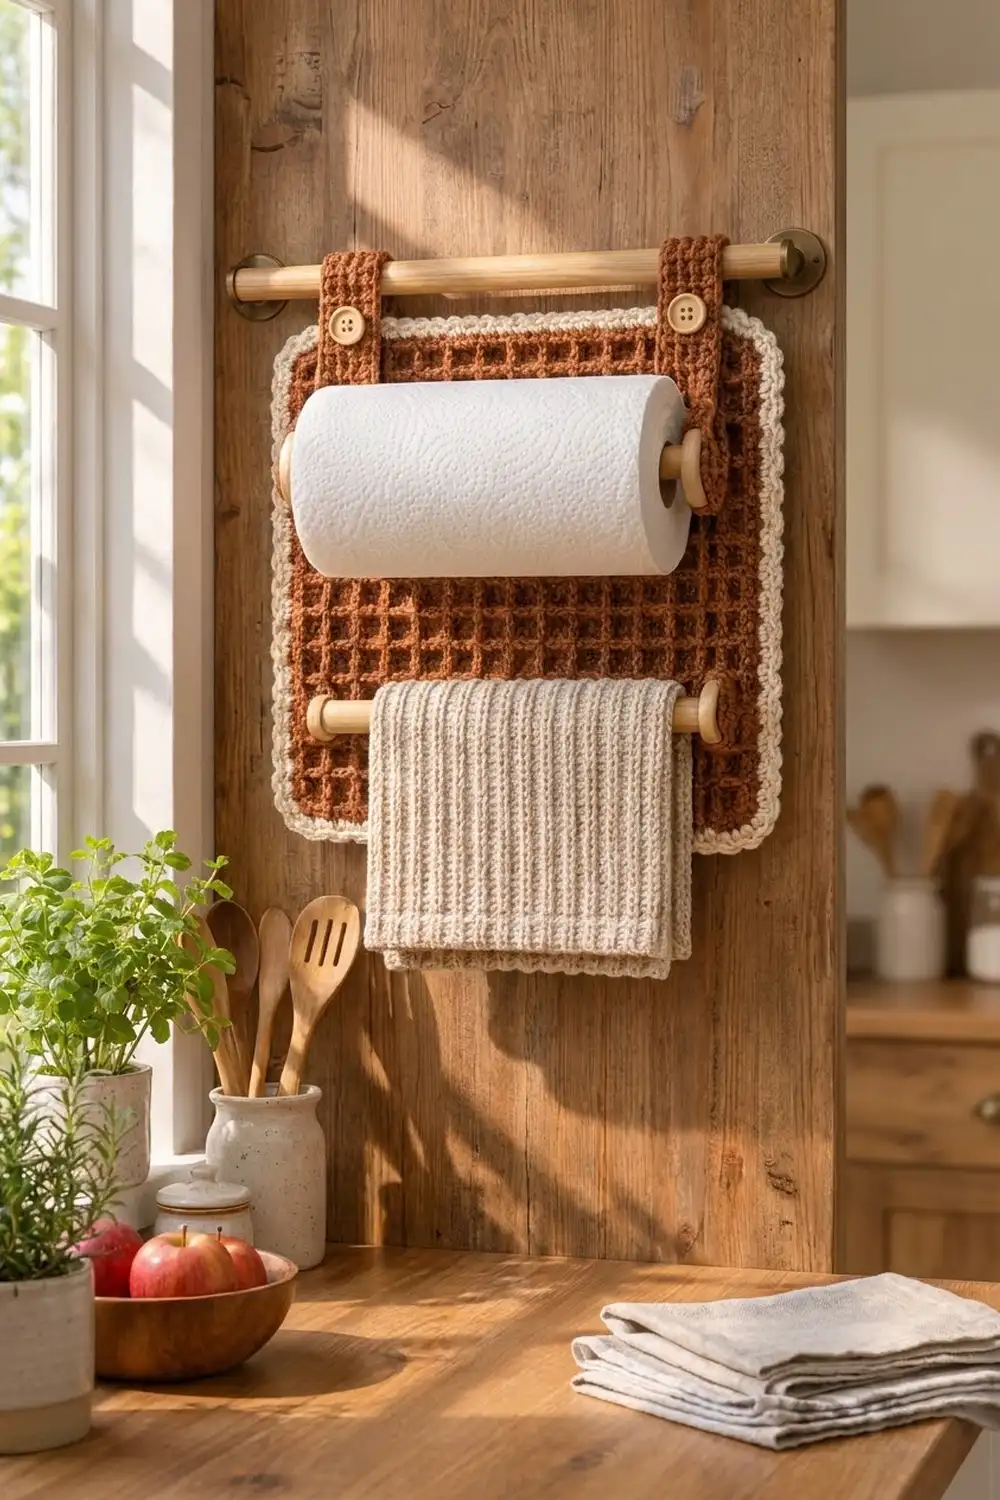
This cozy kitchen piece turns a plain paper towel rod into something warm and handmade. A deep cinnamon-rust waffle-stitch panel hangs from a wooden dowel. A twisted cream border frames it, and two buttoned straps carry the paper towel roll. A second rod near the bottom holds a dish towel.
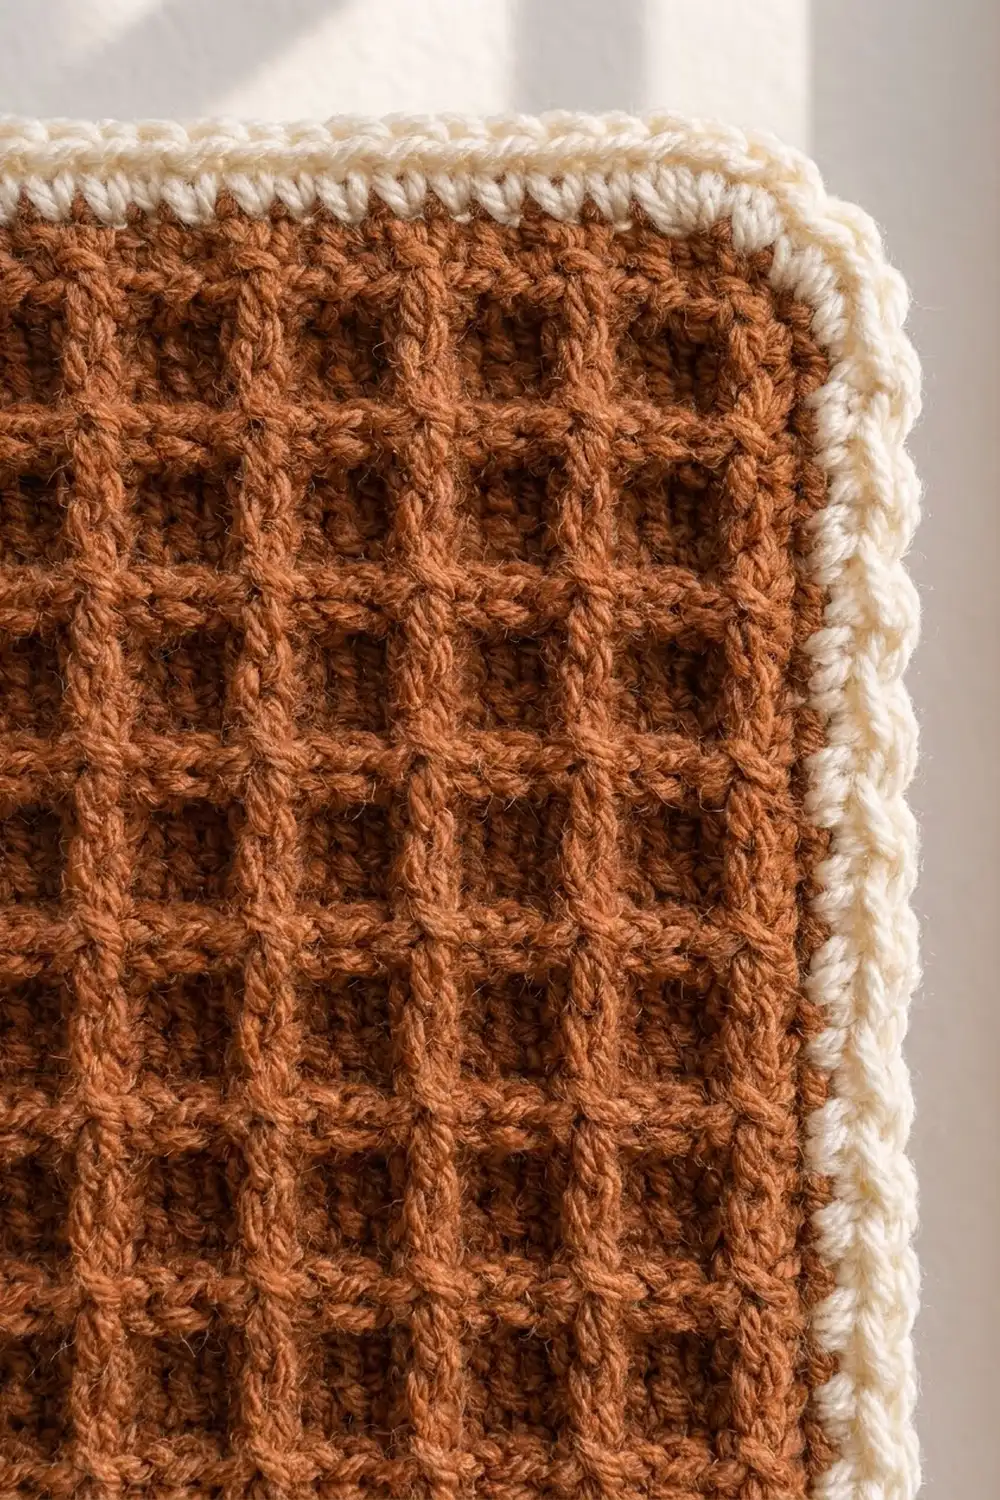
The waffle texture is the star. It’s a grid of raised front-post ridges that look like a breakfast waffle. Against the soft cream reverse single crochet edge, it gives a rustic, farmhouse look that suits wood, plants, and sunny windows.
This pattern uses US crochet terms. The finished panel measures 15.9 in wide x 12.7 in tall (40.4 x 32.3 cm), border included.
Construction is simple. You work the panel flat in rows of waffle stitch, then add a three-round cream border. Next you crochet two single crochet straps with buttonholes. Last, you sew the straps on, add two small surface loops for the towel rod, and hang the holder.
Finished Size and Construction
- Finished size: 15.9 in x 12.7 in (40.4 x 32.3 cm)
- Skill level: Easy-intermediate (front post stitches)
- Terminology: US
- Yarn weight: Worsted (#4)
- Hook: 5.0 mm (H-8)
- Number of pieces: 3 (1 panel, 2 straps)
- Layout: One panel, with a strap sewn near each top corner
- Panel size before border: 14.4 in x 11.2 in (36.6 x 28.4 cm)
- Border depth: 0.75 in (1.9 cm) on every side
- Strap size: 1.6 in x 10 in (4.1 x 25.4 cm)
Materials
Choose a smooth worsted cotton or cotton blend. Cotton holds the waffle texture crisply and doesn’t stretch much under the weight of a paper towel roll. Avoid very fuzzy yarns, because they blur the grid.
- Cinnamon rust (Color A): 220 g, about 400 m
- Cream (Color B): 40 g, about 75 m
Quantities include a safety margin of roughly 15%. Waffle stitch uses more yarn than plain double crochet, so don’t cut it close.
Tools and supplies:
- 5.0 mm (H-8) crochet hook
- Tapestry needle
- Stitch markers (4)
- Scissors and measuring tape
- 2 wooden four-hole buttons, 1 in (2.5 cm)
- Hanging dowel, 3/4 in (1.9 cm) diameter x 18 in (45.7 cm), with two wall brackets
- Paper towel rod, 3/4 in (1.9 cm) x 16 in (40.6 cm), with wooden end knobs or large beads
- Towel rod, 3/4 in (1.9 cm) x 16 in (40.6 cm), with end knobs
- Sewing thread or a split strand of Color A for the buttons
Abbreviations (US Terms)
- ch: chain
- sl st: slip stitch
- sc: single crochet
- dc: double crochet
- FPdc: front post double crochet
- rev sc: reverse single crochet (crab stitch)
- st(s): stitch(es)
- sp: space
- rep: repeat
FPdc: Yarn over and insert the hook from front to back to front around the post of the stitch. Yarn over and pull up a loop, then (yarn over, pull through 2 loops) twice.
Rev sc: Working left to right (right-handers), insert the hook into the next stitch to the right. Pull up a loop, yarn over, and pull through both loops. This makes the twisted, rope-like edge.
Note: The turning ch 2 never counts as a stitch.
Gauge and Checkpoints
Waffle gauge: 15 sts and 10 rows = 4 in (10.2 cm)
Sc gauge (border and straps): 15 sts and 16 rows = 4 in (10.2 cm)
Work a test swatch first. Ch 20 and work Row 1 below to get 18 dc, then work the waffle rows until you have 10 rows in total. The swatch should measure 4.8 in (12.2 cm) wide and 4 in (10.2 cm) tall.
Checkpoints:
- After Row 10: panel is 4 in (10.2 cm) tall and 14.4 in (36.6 cm) wide.
- After Row 20: 8 in (20.3 cm) tall.
- After Row 28: 11.2 in (28.4 cm) tall.
- After the border: 15.9 in x 12.7 in (40.4 x 32.3 cm).
If your swatch is too big, go down half a hook size. If it’s too small, go up half a size. Don’t change the stitch counts, because every border count depends on 54 sts and 28 rows.
Panel
With Color A, ch 56.
Row 1: Dc in 3rd ch from hook and in each ch across, turn. (54 dc)
Row 2: Ch 2, dc in first st, FPdc around next st, dc in next 2 sts; rep from * 17 times, FPdc around next st, dc in last st, turn. (54 sts: 18 FPdc, 36 dc)
Row 3: Ch 2, dc in first st, dc in next st (the FPdc), FPdc around each of next 2 sts; rep from * 17 times, dc in next st, dc in last st, turn. (54 sts: 34 FPdc, 20 dc)
Row 3’s FPdc stitches wrap the dc pairs from Row 2. Its dc stitches go into Row 2’s FPdc stitches. That alternation builds the raised ridges around recessed squares.
Row 4: Ch 2, dc in first st, FPdc around next st, dc in next 2 sts; rep from * 17 times, FPdc around next st, dc in last st, turn. (54 sts)
Each FPdc in this row wraps a dc from Row 3, and each dc pair goes into Row 3’s FPdc pair.
Rows 5–28: Rep Rows 3 and 4 alternately, so odd rows match Row 3 and even rows match Row 4. (54 sts in every row)
At the end of Row 28, fasten off. The panel measures 14.4 in x 11.2 in (36.6 x 28.4 cm).
Straps (Make 2)
With Color A, ch 7.
Row 1: Sc in 2nd ch from hook and in each ch across, turn. (6 sc)
Rows 2–36: Ch 1, sc in each st across, turn. (6 sc)
Checkpoint: At Row 20 the strap measures 5 in (12.7 cm).
Row 37 (buttonhole): Ch 1, sc in next 2 sts, ch 2, skip 2 sts, sc in last 2 sts, turn. (4 sc, 1 ch-2 sp)
Row 38: Ch 1, sc in next 2 sts, 2 sc in ch-2 sp, sc in last 2 sts, turn. (6 sc)
The count is 4 sts worked one per existing stitch plus 2 sts worked into the space.
Rows 39–40: Ch 1, sc in each st across, turn. (6 sc)
Fasten off, leaving a 20 in (50.8 cm) tail for sewing. Each strap measures 1.6 in x 10 in (4.1 x 25.4 cm).
Make All Pieces
- Color A: 1 panel and 2 straps
- Color B: border only, worked directly on the panel
Layout (front view):
   [Strap]                      [Strap]
 +-----------------------------------+
 | S                               S |
 | S   paper towel rod in loops    S |
 |                                   |
 |        waffle panel               |
 |   (o)  towel rod loops   (o)      |
 +-----------------------------------+
The S marks show where the straps are sewn. The (o) marks show the surface loops for the towel rod.
Border
Border gauge: 15 sc = 4 in (10.2 cm). That matches the waffle stitch gauge, so the sc stitches sit flat along both the stitch edges and the row edges.
With the right side facing, join Color B in the first stitch of Row 28 (top right corner).
Round 1: Ch 1. Work 3 sc in the corner st, sc in next 52 sts, 3 sc in last st (corner).
Down the side, work 3 sc over every 2 row-ends, for 42 sc across 28 rows.
Along the bottom, work into the free loops of the foundation chain: 3 sc in first loop, sc in next 52 loops, 3 sc in last loop.
Up the second side, work 42 sc as before. Sl st to the first sc. (196 sc)
Mark the center sc of each 3-sc corner.
Counts for Round 1:
- Top and bottom: 54 sts between corner stitches, or 56 sts including both corner stitches.
- Each side: 42 sts between corner stitches, or 44 sts including both corner stitches.
- Total: 4 corners + (2 x 54) + (2 x 42) = 196.
Round 2: Ch 1. Sc in each st around, working 3 sc in each marked corner st. Move the markers up to the new corner centers. Sl st to first sc. (204 sc)
Counts for Round 2:
- Top and bottom: 56 sts between corner stitches, or 58 sts including both corner stitches.
- Each side: 44 sts between corner stitches, or 46 sts including both corner stitches.
- Total: 4 + 112 + 88 = 204.
Round 3: Ch 1. Rev sc in each st around, with no extra stitches at the corners. Sl st to first st and fasten off. (204 rev sc: 204 worked one per existing stitch + 0 added)
Why the math works: The top edge has 54 sc at 3.75 sc per inch, which is 14.4 in (36.6 cm). That matches the panel’s width exactly.
Each side has 42 sc, which is 11.2 in (28.4 cm). That matches 28 rows of waffle stitch. Working 3 sc over every 2 rows is what makes 42.
The three rounds add 0.75 in (1.9 cm) per side. So 14.4 + 1.5 = 15.9 in (40.4 cm) wide, and 11.2 + 1.5 = 12.7 in (32.3 cm) tall.
Joining
The straps are sewn on with whipstitch, using the strap tails.
1. Form the rod loop. Fold the bottom of each strap back so that Row 1 lies against the back of Row 16. Whipstitch the 6 sts of Row 1 to the back of Row 16, stitch to stitch. Rows 1–16 now make a loop about 2 in (5.1 cm) deep.
2. Place the straps. Lay the panel right side up. Place one strap at each top corner, with its outer edge 0.25 in (0.6 cm) inside the panel’s side edge.
Line up the top of Row 22 with the panel’s top edge. Rows 17–22 lie on the front of the panel, and the loop hangs below them.
3. Sew down. Whipstitch both long edges of Rows 17–22 to the panel. Then sew across Row 16, catching the panel underneath. Keep the stitches snug, but don’t let them pucker the waffle.
4. Add the buttons. Sew one button to the center of Row 21 on each strap, stitching through the strap and the panel.
5. Hang the holder. Take each free strap end (Rows 23–40) up behind the hanging dowel, over the top, and down the front. Push the button through the buttonhole.
If you need more or less length, add or remove rows in pairs before Row 37.
6. Add the towel rod loops. Count up from the bottom of the panel. With Color A, join with a sl st around the post of the 4th stitch from the right edge on Row 9.
Ch 10, then sl st around the post of the same column on Row 6. Turn, work 10 sc into the chain, and sl st to the starting point. Fasten off.
Repeat at the 4th stitch from the left edge. These loops sit behind the towel.
Size checkpoint: The gap between the inner edges of the two straps is about 12.2 in (31 cm). That’s enough room for a standard 11 in (27.9 cm) roll.
Final Blocking
- Before sewing on the straps, pin the bordered panel to a blocking mat at 15.9 in x 12.7 in (40.4 x 32.3 cm).
- Check that all four corners are square and that the edges are straight.
- Mist it well with water, or hover a steam iron above it. Don’t press, because pressing flattens the waffle texture.
- Pin each strap to 1.6 in x 10 in (4.1 x 25.4 cm) and mist them too.
- Let everything dry completely, about 12–24 hours.
- Unpin the pieces and do the joining steps.
Final Quality-Control Checklist
- Every panel row has 54 stitches.
- The panel measures 14.4 in x 11.2 in (36.6 x 28.4 cm) before the border.
- The border rounds have 196, 204, and 204 stitches.
- The corners are rounded but flat, with no cupping.
- The finished panel measures 15.9 in x 12.7 in (40.4 x 32.3 cm).
- The straps have 6 stitches per row and 40 rows.
- The buttonholes fit the buttons snugly.
- The rod loops are firmly sewn and level with each other.
- All yarn ends are woven in securely.
Troubleshooting
The panel slants or narrows. You probably missed the edge dc in the first or last stitch. Count every row.
The waffle looks flat. Your FPdc stitches are too loose. Pull up shorter loops, or go down a hook size just for the post stitches.
The border ruffles. Your gauge has drifted. Change the side spacing to fewer sc per 2 rows only if your sides measure under 11.2 in (28.4 cm).
The border cups. Make sure Round 2 has 3 sc in every corner. Loosen up on the rev sc round.
The roll sits crooked. One strap is placed lower than the other. Re-sew the straps so that both Row 22s line up with the panel top.
The button slips out. Use a 1 in (2.5 cm) button, or make the ch-2 space a ch-1 space.
Care
Spot clean, or hand wash in cool water and lay flat to dry, reshaping it to 15.9 in x 12.7 in (40.4 x 32.3 cm). Take out the dowels before washing.
Final Notes
Everything starts with the gauge. With 15 sts to 4 in (10.2 cm), 54 sts gives a width of 14.4 in (36.6 cm), and 28 rows gives a height of 11.2 in (28.4 cm).
The border places 54 sc along the top and bottom and 42 sc along each side, which matches the panel exactly. Its three rounds add 0.75 in (1.9 cm) per side, so the finished panel is 15.9 in x 12.7 in (40.4 x 32.3 cm).
The 10 in (25.4 cm) straps fold into rod loops and buttoned hangers. Check each measurement as you go, and your holder will hang straight and square.
Happy crocheting!